커스텀뷰
안드로이드는 View, ViewGroup 클래스를 상속받아서 내가 원하는 UI를 만들 수 있다.
기존에 존재하는 뷰들로는 원하는 UI를 구현할 수 없을 때 커스텀을 하게 된다.
처음 커스텀뷰를 만드는 상황에 공식문서의 예제를 보면 뭐라는거야... 라는 소리가 절로 나오기 때문에 작성해보는 글
뷰의 생명주기
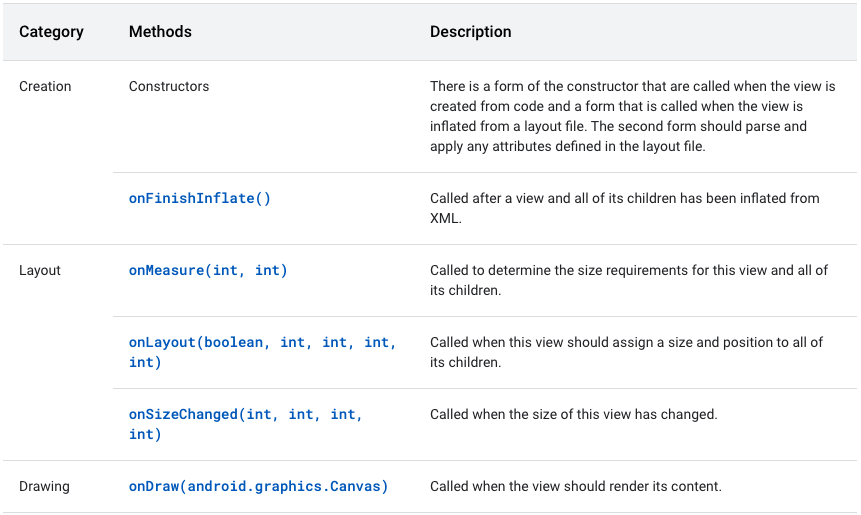
- xml을 inflate하는 creation -> size를 정하는 onMeasure -> size와 position을 정하는 onLayout -> 뷰를 화면에 rendering하는 onDraw순으로 진행된다.
커스텀뷰 만들기
공식문서
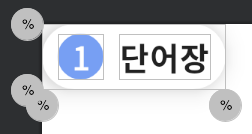
이렇게 생긴 커스텀 뷰를 만들어볼 것이다. 해당 숫자와 텍스트만 바꿔서 여러군데 사용할 수 있다.
디자인
- ConstraintLayout 안에 텍스트뷰 두개가 있도록 구성하였다. 배경은 따로 drawable 파일로 만들었다.
클래스 만들기
- 상위 클래스가 ConstraintLayout이기 때문에 ConstraintLayout을 상속해서 만들었다.
class MainTitleView(context: Context, attrs: AttributeSet) : ConstraintLayout(context, attrs) {속성 설정하기
- 상속받은 뷰에 존재하는 속성만 사용할거라면 굳이 만들지 않아도 된다.
- 하지만, 나는 텍스트뷰가 두 개이기 때문에 numberText, titleText로 커스텀 attribute를 만들었다.
- values 폴더에 attrs라는 파일을 만들어서 거기에다 정의해주면 된다.
<?xml version="1.0" encoding="utf-8"?>
<resources>
    <declare-styleable name="MainTitleView">
        <attr name="numberText" format="string" />
        <attr name="titleText" format="string" />
    </declare-styleable>
</resources>
이 속성은
<com.vocaengplus.vocaengplus.view.MainTitleView
        android:id="@+id/wordTitleView"
        android:layout_width="wrap_content"
        android:layout_height="wrap_content"
        app:layout_constraintStart_toStartOf="parent"
        app:layout_constraintTop_toTopOf="parent"
        app:numberText="1"
        app:titleText="단어장" />
요렇게 xml에서 사용할 수 있다.
속성 스타일 적용하기
- constructor에서 attrs를 전달할 때 속성값들을 읽는데 이 때 스타일과 참조값 (@string resource같은) 은 적용되지 않는다. 그리고 커스텀 속성값도 설정해줘야한다.
- 그래서 init 단계에서 obtainStyledAttributes()를 통해서 스타일을 입혀줘야 한다.
context.theme.obtainStyledAttributes(
    attrs,
    R.styleable.MainTitleView,
    0, 0
).apply {

    try {
        numberText = getString(R.styleable.MainTitleView_numberText).toString()
        titleText = getString(R.styleable.MainTitleView_titleText).toString()

        binding?.run {
            titleNumberTextView.text = numberText
            titleTextView.text = titleText
        }
    } finally {
        recycle()
    }
}
그리고 만약 UI 업데이트로 속성값을 변경해야 하거나 값이 필요하다면 해당 값에 접근할 수 있는 메소드도 정의해야 한다.
나는 타이틀로서 UI를 만든거라 UI가 변경될 일이 없어서 만들지 않았다.
사이즈 정하기
- 사이즈는 커스텀뷰가 어떤 방식이냐에 따라 다르다.
- 자기자신의 기본 사이즈를 가지고 있는 커스텀뷰
내가 만들고 있는 뷰가 이에 해당한다. 텍스트뷰 자체의 크기가 있고 서로의 마진을 통해서 이미 wrap_content로 사이즈가 정해져있다. - 내가 직접 사이즈를 정해줘야하는 커스텀뷰
내가 100dp를 할 건지 150dp를 할 것인지를 정해줘야 하는 경우
1번인 경우는 굳이 onMeasure를 오버라이드하지 않아도 되지만 2번은 오버라이드해서 사이즈를 내가 정해줘야한다.
2번의 경우
- resolveSizeAndState() 메소드를 통해서 내가 원하는 값으로 최종 dp로 변경된 px값을 얻을 수 있다.
override fun onMeasure(widthMeasureSpec: Int, heightMeasureSpec: Int) {
        val width = resolveSizeAndState(data.size.width.px, widthMeasureSpec, MEASURED_SIZE_MASK)
        val height = resolveSizeAndState(data.size.height.px, heightMeasureSpec, MEASURED_SIZE_MASK)
        setMeasuredDimension(width, height)
}- resolveSizeAndState()로 설정해준 사이즈를 setMeasuredDimension을 통해서 시스템에 전달해준다 (참고로 setMeasuredDimension 호출안해주면 오류난다.)
위치 정하기
- 부모 클래스로부터 상대적으로 어느 위치에 뷰를 배치할 것인지 정한다.
- 뷰는 사각형으로 배정이 되는데 왼쪽 위 꼭짓점이 0,0이다.
- 뷰가 가지고 있는 x,y 속성에 원하는 위치를 설정해주면 된다.
 override fun onLayout(changed: Boolean, left: Int, top: Int, right: Int, bottom: Int) {
        super.onLayout(changed, left, top, right, bottom)
        x = data.point.x.toFloat()
        y = data.point.y.toFloat()
}
그리기
- 사각형으로 배정받은 뷰 위에 원하는 그림을 그릴 수 있다.
- 단순히 배경색만 바꿀 거라면 backgroundColor 속성을 사용해도 되지만 drawRect으로 표현할 수도 있다.
- drawXXX로 다양한 메소드가 존재하고 onDraw는 상대적으로 자주 호출이 되기 때문에 drawXXX메소드에 있는 Paint 인자값은 onDraw 바깥에 변수로 선언해주는 것이 좋다.
적용해보기
- 위 사진처럼 커스텀뷰에 elevation으로 그림자가 들어간 버전으로 만들고 싶었는데 xml에 적용해보니 clipToPadding을 false로 주어도 그림자가 짤리는 현상이 발생했다.
- 이미 커스텀뷰 자체에서 짤렸기 때문에 적용한 xml에서는 아무리 해도 짤리는 거였다.
- 결론적으로, init 코드 내에서 elevation을 적용해주었더니 해결이 되었다.
 init {
    val inflater = context.getSystemService(Context.LAYOUT_INFLATER_SERVICE) as LayoutInflater
    binding = MainTitleBinding.inflate(inflater, this, true)

    context.theme.obtainStyledAttributes(
        attrs,
        R.styleable.MainTitleView,
        0, 0
    ).apply {

        try {
            numberText = getString(R.styleable.MainTitleView_numberText).toString()
            titleText = getString(R.styleable.MainTitleView_titleText).toString()

            elevation = 10f
            clipToPadding = false
            setBackgroundResource(R.drawable.main_title_background)

            binding?.run {
                titleNumberTextView.text = numberText
                titleTextView.text = titleText
            }
        } finally {
            recycle()
        }
    }
}
최종결과물

Frontend Developer