
처음 플러터 프로젝트 생성시 widget_test.dart에 있는 테스트 코드들도
main.dart 의 예시 코드를 기준으로 만들어진 내용이라 전부 삭제해준다.
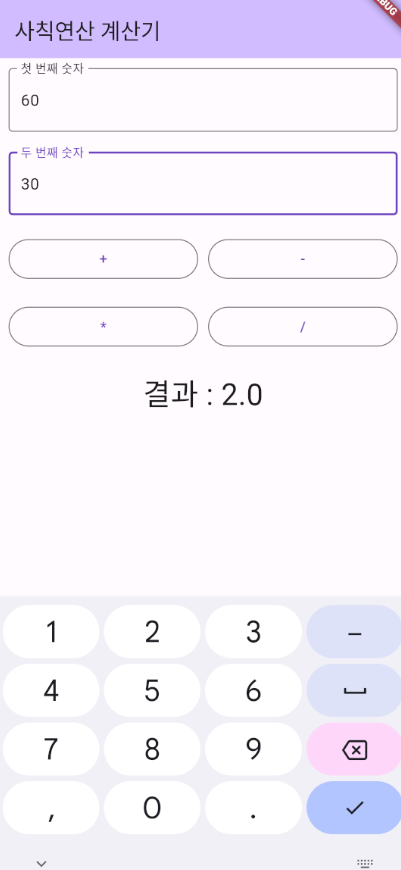
플러터로 계산기 만들기
1. 코드 삭제
- lib/main.dart, test/widget_test.dart 내부의 코드를 모두 삭제한다.
2. StatefulWidget으로 구조를 잡아준다.
import 'package:flutter/material.dart';
class CalApp extends StatefulWidget {
const CalApp({super.key});
State<CalApp> createState() => _CalAppState();
}
class _CalAppState extends State<CalApp> {
Widget build(BuildContext context) {
return const Placeholder();
}
}3. main 함수를 작성해준다.
void main(){
  runApp(CalApp());
}
4. MaterialApp을 설정한다.
    return MaterialApp(
      title : "4칙 연산 계산기",
      theme: ThemeData(
        colorScheme: ColorScheme.fromSeed(seedColor: Colors.deepPurple),
        useMaterial3: true,
      ),
      home: Scaffold(

      ),
    );
5. Adapter를 설정한다.
        appBar: AppBar(
          backgroundColor: Theme.of(context).colorScheme.inversePrimary,
          title: Text("사칙연산 계산기"),
        ),
6. body를 작성한다.
        body: Container(

        ),
7. 내부 여백을 설정해준다
- margin : 외부 여백
- padding : 내부 여백
- EdgeInsets의 메서드를 통해 여백을 설정한다.
- EdgeInsets.zero : 모든 여백을 0으로 결정한다.
- EdgeInsets.symmetric() : 좌우 여백을 하나의 값으로, 상하 여백을 하나의 값으로 설정한다.
- EdgeInsets.all() : 상, 하, 좌, 우 여백을 하나의 값으로 설정한다.
- EdgeInsets.fromLTRB() : 좌, 상, 우, 하의 여백을 각각 설정한다.
- EdgeInsets.only() : 상하좌우 중 원하는 것만 여백을 설정한다.(설정하지 않는 것들은 0으로 설정됨)
        body: Container(
          padding: EdgeInsets.all(10),
        ),
8. 컬럼 요소를 배치한다.
        body: Container(
          padding: EdgeInsets.all(10),
          // 위에서 아래로 배치하는 레이아웃 요소를 설정한다.
          child: Column(
            children: [

            ],
          ),
        ),
9. 첫 번째 입력 요소를 설정한다.
              // 첫 번째 입력 요소를 배치한다.
              TextField(
                // 입력 요소의 모양을 설정한다.
                decoration: InputDecoration(
                    // 외곽선 모양
                    border: OutlineInputBorder(),
                    // hint
                    labelText: "첫 번째 숫자"
                ),
                // 입력가능한 데이터 양식
                inputFormatters: [
                  // 숫자만 입력 가능하게
                  FilteringTextInputFormatter.digitsOnly
                ],
                // 나타나는 키보드 타입 설정, 숫자 키보드로
                keyboardType: TextInputType.number,
              ),
10. 두 번째 입력 요소를 배치한다.
              // 위젯의 여백을 설정할 수 있는 Padding 요소를 사용한다.
              Padding(
                padding: EdgeInsets.only(top: 20),
                child: TextField(
                  decoration: InputDecoration(
                      border: OutlineInputBorder(),
                      labelText: "두 번째 숫자"
                  ),
                  inputFormatters: [
                    FilteringTextInputFormatter.digitsOnly
                  ],
                  keyboardType: TextInputType.number,
                ),
              ),
11. 버튼 배치를 위한 Row를 배치한다.
              // 버튼을 배치하기 위한 Row를 배치한다.
              Padding(
                padding: EdgeInsets.only(top: 20),
                child: Row(
                  children: [

                  ],
                ),
              )
12. 더하기와 빼기 버튼을 배치한다.
            // 버튼을 배치하기 위한 Row를 배치한다.
            Padding(
                padding: EdgeInsets.only(top: 20),
                child: Row(
                    children: [
                        Expanded(
                            child: OutlinedButton(
                                onPressed: () {},
                                child: Text("+")
                            ),
                        ),
                        SizedBox(width: 10),
                        Expanded(
                            child: OutlinedButton(
                                onPressed: () {},
                                child: Text("-")
                            ),
                        ),
                    ],
                    mainAxisSize: MainAxisSize.max,
                ),
            ),
13. 곱하기 나누기 버튼을 배치한다.
              Padding(
                padding: EdgeInsets.only(top: 20),
                child: Row(
                    children: [
                        Expanded(
                            child: OutlinedButton(
                                onPressed: () {},
                                child: Text("*")
                            ),
                        ),
                        SizedBox(width: 10),
                        Expanded(
                            child: OutlinedButton(
                                onPressed: () {},
                                child: Text("/")
                            ),
                        ),
                    ],
                    mainAxisSize: MainAxisSize.max,
                ),
              ),
14. 출력 결과가 표시될 문자열 요소를 배치한다.
              // 출력 결과를 출력할 텍스트 요소
              Padding(
                padding: EdgeInsets.only(top: 20),
                child: Text(
                  "결과 : 100",
                  style: TextStyle(
                    fontSize: 30
                  ),
                ),
              ),
15. 연산 결과를 담을 변수를 선언한다.
class _CalAppState extends State<CalApp> {

  // 제일 하단에 결과가 나오는 Text 요소의 문자열을 가지고 있는 변수
  var result_text = "결과 : 0";
16. 하단 연산 결과를 보여줄 Text 요소의 문자열을 변수로 바꾼다.
              // 출력 결과를 출력할 텍스트 요소
              Padding(
                padding: EdgeInsets.only(top: 20),
                child: Text(
                  result_text,
                  style: TextStyle(
                    fontSize: 30
                  ),
                ),
              ),
17. 입력 요소에 연결할 컨트롤러를 생성해준다.
class _CalAppState extends State<CalApp> {

  // 제일 하단에 결과가 나오는 Text 요소의 문자열을 가지고 있는 변수
  var result_text = "결과 : 0";

  // 첫 번째 숫자 입력 요소의 컨트롤러
  var number1_controller = TextEditingController();
  // 두 번째 숫자 입력 요소의 컨트롤러
  var number2_controller = TextEditingController();
18. 첫 번째 입력 요소에 컨트롤러를 연결해준다.
              TextField(
                // 입력 요소의 모양을 설정한다.
                decoration: InputDecoration(
                    // 외곽선 모양
                    border: OutlineInputBorder(),
                    // hint
                    labelText: "첫 번째 숫자"
                ),
                // 입력가능한 데이터 양식
                inputFormatters: [
                  // 숫자만 입력 가능하게
                  FilteringTextInputFormatter.digitsOnly
                ],
                // 나타나는 키보드 타입 설정, 숫자 키보드로
                keyboardType: TextInputType.number,
                // 포커스를 준다.
                autofocus: true,
                // 컨트롤러를 연결해준다.
                controller: number1_controller,
              ),
19. 두 번째 입력 요소에 컨트롤러를 연결해준다.
              Padding(
                padding: EdgeInsets.only(top: 20),
                child: TextField(
                  decoration: InputDecoration(
                      border: OutlineInputBorder(),
                      labelText: "두 번째 숫자"
                  ),
                  inputFormatters: [
                    FilteringTextInputFormatter.digitsOnly
                  ],
                  keyboardType: TextInputType.number,
                  // 컨트롤러를 연결해준다.
                  controller: number2_controller,
                ),
              ),
20. 연산 결과를 출력하는 함수를 만들어준다.
  // 연산후 출력하는 함수
  void setResult(String op){
    setState(() {
      // 입력한 값을 가져온다.
      int number1 = int.parse(number1_controller.text);
      int number2 = int.parse(number2_controller.text);

      // 연산자에 따라 연산 결과를 출력해준다.
      switch(op){
        case '+':
          result_text = "결과 : ${number1 + number2}";
        case '-':
          result_text = "결과 : ${number1 - number2}";
        case '*':
          result_text = "결과 : ${number1 * number2}";
        case '/':
          result_text = "결과 : ${number1 / number2}";
      }
    });
  }
21. 각 버튼의 onPressed 속성에서 함수를 호출하도록
                        child: OutlinedButton(
                            onPressed: () => setResult("+"),
                            child: Text("+")
                        ),
전체 코드
import 'package:flutter/material.dart';
import 'package:flutter/services.dart';
void main(){
runApp(CalApp());
}
class CalApp extends StatefulWidget {
const CalApp({super.key});
State<CalApp> createState() => _CalAppState();
}
class _CalAppState extends State<CalApp> {
// 제일 하단에 결과가 나오는 Text 요소의 문자열을 가지고 있는 변수
var result_text = "결과 : 0";
// 첫 번째 숫자 입력 요소의 컨트롤러
var number1_controller = TextEditingController();
// 두 번째 숫자 입력 요소의 컨트롤러
var number2_controller = TextEditingController();
Widget build(BuildContext context) {
return MaterialApp(
title : "4칙 연산 계산기",
theme: ThemeData(
colorScheme: ColorScheme.fromSeed(seedColor: Colors.deepPurple),
useMaterial3: true,
),
home: Scaffold(
appBar: AppBar(
backgroundColor: Theme.of(context).colorScheme.inversePrimary,
title: Text("사칙연산 계산기"),
),
body: Container(
// 내부의 여백을 설정한다.
padding: EdgeInsets.all(10),
// 위에서 아래로 배치하는 레이아웃 요소를 설정한다.
child: Column(
children: [
// 첫 번째 입력 요소를 배치한다.
TextField(
// 입력 요소의 모양을 설정한다.
decoration: InputDecoration(
// 외곽선 모양
border: OutlineInputBorder(),
// hint
labelText: "첫 번째 숫자"
),
// 입력가능한 데이터 양식
inputFormatters: [
// 숫자만 입력 가능하게
FilteringTextInputFormatter.digitsOnly
],
// 나타나는 키보드 타입 설정, 숫자 키보드로
keyboardType: TextInputType.number,
// 포커스를 준다.
autofocus: true,
// 컨트롤러를 연결해준다.
controller: number1_controller,
),
// 위젯의 여백을 설정할 수 있는 Padding 요소를 사용한다.
Padding(
padding: EdgeInsets.only(top: 20),
child: TextField(
decoration: InputDecoration(
border: OutlineInputBorder(),
labelText: "두 번째 숫자"
),
inputFormatters: [
FilteringTextInputFormatter.digitsOnly
],
keyboardType: TextInputType.number,
// 컨트롤러를 연결해준다.
controller: number2_controller,
),
),
// 버튼을 배치하기 위한 Row를 배치한다.
Padding(
padding: EdgeInsets.only(top: 20),
child: Row(
children: [
Expanded(
child: OutlinedButton(
onPressed: () => setResult("+"),
child: Text("+")
),
),
SizedBox(width: 10),
Expanded(
child: OutlinedButton(
onPressed: () => setResult("-"),
child: Text("-")
),
),
],
mainAxisSize: MainAxisSize.max,
),
),
// *, / 버튼
Padding(
padding: EdgeInsets.only(top: 20),
child: Row(
children: [
Expanded(
child: OutlinedButton(
onPressed: () => setResult("*"),
child: Text("*")
),
),
SizedBox(width: 10),
Expanded(
child: OutlinedButton(
onPressed: () => setResult("/"),
child: Text("/")
),
),
],
mainAxisSize: MainAxisSize.max,
),
),
// 출력 결과를 출력할 텍스트 요소
Padding(
padding: EdgeInsets.only(top: 20),
child: Text(
result_text,
style: TextStyle(
fontSize: 30
),
),
),
],
),
) ,
),
);
}
// 연산후 출력하는 함수
void setResult(String op){
setState(() {
// 입력한 값을 가져온다.
int number1 = int.parse(number1_controller.text);
int number2 = int.parse(number2_controller.text);
// 연산자에 따라 연산 결과를 출력해준다.
switch(op){
case '+':
result_text = "결과 : ${number1 + number2}";
case '-':
result_text = "결과 : ${number1 - number2}";
case '*':
result_text = "결과 : ${number1 * number2}";
case '/':
result_text = "결과 : ${number1 / number2}";
}
});
}
}

안드로이드공부