제어 흐름 개요 Control flow
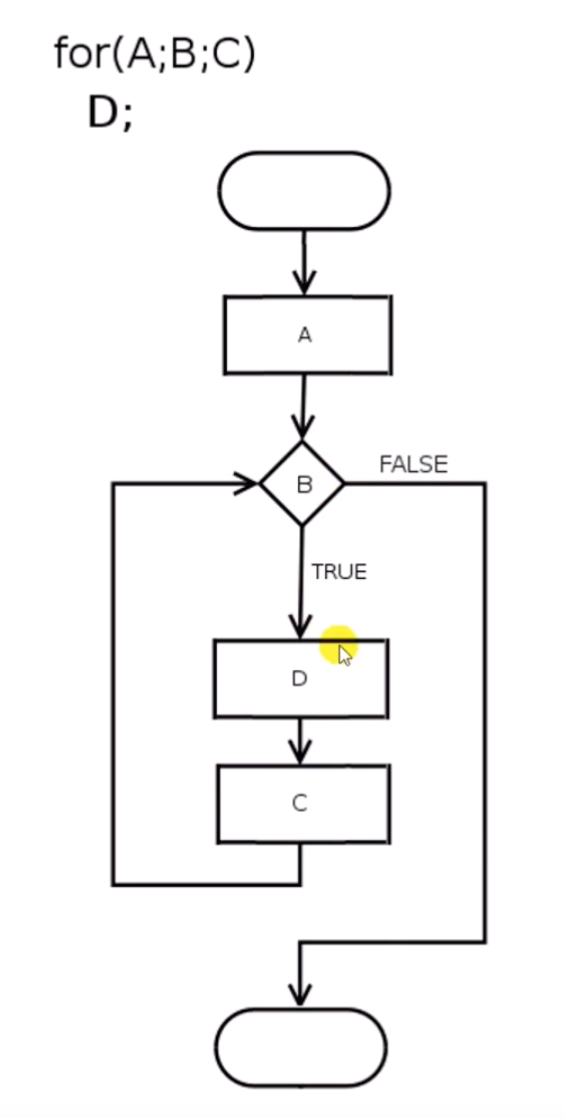
순서도 (Flow Chart)
 {:width="20%" height="20%"}
- 중단(Halt)
- 점프(Jump) : goto, break, continue
- 조건 분기(Conditional branches) : if, switch
- 반복(Loops) : while, do while, for
- 예외 처리(Exceptions) : try, catch, throw
조건문
if
- 설명
if문 문법 예제
#include <iostream>

int main() {
    using namespace std;

    int x, y;
    cin >> x >> y;

    if (x > 0 && y > 0)
        cout << "both numbers are positive" << endl;
    else if (x > 0 || y > 0)
        cout << "one of the numbers is positive" << endl;
    else
        cout << "Neither number is positive" << endl;

    return 0;
}
}
3
-2
one of the numbers is positive
switch
- 설명
switch 문 문법 예제
#include <iostream>

using namespace std;

enum class Colors
{
    BLACK,
    WHITE,
    RED,
    GREEN,
    BLUE,
};

void printColorName(Colors color)
{
    switch (static_cast<int>(color))
    {
        case 0 :
            cout << "Black";
            break;
        case 1 :
            cout << "White";
            break;
        case 2 :
            cout << "Red";
            break;
        case 3 :
            cout << "Green";
            break;
        case 4 :
            cout << "Blue";
            break;
        default :
            cout << "Undefined input ";
    }
    cout << endl;
}

int main() {
    printColorName(Colors::BLACK);

    return 0;
}
반복문
while (조건)
조건이 참이면 다음에 나오는 { } 안에 문장 실행
문법 사용 예제
#include <iostream>

int main() {
    using namespace std;

    cout << "While-loop test" << endl;

    int outer_count = 1;

    while(outer_count <= 5)
    {
        int inner_count = 1;
        while (inner_count <= outer_count)
        {
            cout << inner_count++ << " ";
        }
        cout << endl;
        ++outer_count;
    }

    return 0;
}
While-loop test
1
1 2
1 2 3
1 2 3 4
1 2 3 4 5
do while
- 반복하기전에 반드시 한번은 실행해야 할 때 사용
do뒤에 { } 안에 문장 반복,while(조건)
문법 사용 예제
#include <iostream>

int main()
{
    using namespace std;

    int selection; // must be declared outsied do/while loop

    do
    {
        cout << "1. add" << endl;
        cout << "2. sub" << endl;
        cout << "3. mult" << endl;
        cout << "4. div" << endl;
        cin >> selection;
    } while (selection <= 0 || selection >= 5);

    cout << "You Selected " << selection << endl;

    return 0;
}
for
- 뒤에 숫자가 와서 깔끔하게 정리 되는 경우에 많이 사용된다.
- while 문과 비교해보면 while은 반복횟수가 많을 때, for문은 반복횟수가 정해져있을때 사용하면 좋다
- 상호 변환이 가능하다
for(count로 샤용할 변수; 반복할 조건; 변수 증감이나 연산)
for문 문법 사용 예제
#include <iostream>

int pow(int base, int exponent)
{
    int result = 1;

    for (int count = 0; count < exponent; ++count)
    {
        result *= base;
    }

    return result;
}
int main()
{
    std::cout << pow(2, 4) << std::endl;

    // 구구단
    for(int j = 1; j < 10; ++j)
    {
        std::cout << j <<"단 " << std::endl;
        for(int i = 1; i < 10; ++i)
        {
            std::cout << j << " * " <<  i << " = " << (i*j) << "\t";
        }
        std::cout << std::endl;
    }

    return 0;
}
점프
- 반복문을 제어하는 기법
break
- 실행중인 반복문 블럭에서 빠져나간다.
- 조건에 따라서 반복문을 더이상 진행시키지 않을 때 사용
break vs return 예제
#include <iostream>

void breakOrReturn()
{
    while (true)
    {
        char ch;
        std::cin >> ch;

        if(ch == 'b')
            break;

        if(ch == 'r')
            return;
    }
    std::cout << "Hello" << std::endl;
}

int main()
{
    breakOrReturn();
    return 0;
}
b를 누르면 Hello가 출력된다.
r을 누르면 Hello가 출력되지 않고 프로그램이 종료된다.
break 예제
#include <iostream>

int main()
{
    using namespace std;
    int count(0);
    char ch;

    while (true)
    {
        cout << "input x to escape" << endl;
        cin >> ch;

        cout << ch << " " << count << endl;

        if (ch == 'x')
            break;
    }
    return 0;
}
bool escape_flag변수를 만들어서if문 에서while의 조건을 변경 하는 방법도 있지만,break를 사용하면 더 간단하다.
continue
- 반복문 중 continue가 있으면 아래 구문을 실행하지 않고 다시 반복문 처음으로 돌아감
예제
#include <iostream>

int main()
{
    for( int i = 0; i < 10; ++i)
    {
        if(i % 2 == 0) continue;
        std::cout << i << std::endl;

//  같은문법
//        if(i % 2 == 1)
//            std::cout << i << std::endl;

    }
    return 0;
}
위 아래 둘다 10 이전 홀수만 출력한다.
goto
- 잘 안씀, 옛날 문법
- label 이름을 정하기
goto 라벨명하면 라벨 위치로 돌아감
goto 문법 예제
#include <iostream>
#include <cmath> // sqrt()

int main() {
    using namespace std;

    double x;
    tryAgain : // label

    cout << "Enter a non-negative number" << endl;
    cin >> x;

    if (x < 0.0)
        goto tryAgain;

    cout << sqrt(x) << endl;

    return 0;
}
난수 생성
- 컴퓨터는 난수를 만들 능력이 없다.
난수 만드는(계산해내는) 코드 예제
#include <iostream>

using namespace std;

unsigned int PRNG() // Pseudo Random Number Generator
{
    static unsigned int seed = 5523; // seed number

    seed = 8253729 * seed + 2396403; // over flow occur

    return seed % 32768;
}

int main() {
    for (int count = 1; count <= 100; ++count)
    {
        cout << PRNG() << "\t";

        if(count % 5 == 0) cout << endl;
    }

    return 0;
}
static변수와 overflow를 이용한 코드
1. 최초에 아무 숫자로나 초기화
2. 큰 수를 넣어서 overflow 발생 -> 이상한 숫자가 남음 (unsigned int type이라 음수는 안생김)
3. 이상하게 나온수의 나머지를 난수로 사용
4. 이상하게 나온수는 다시 seed로 사용
std::rand와std::srand를 이용하여 난수를 만들 수 있다.std::srand(숫자)는 seed number를 설정해준다.- seed number 가 일정하면 항상 같은 수를 내보낸다.
- 시간은 계속 변하기 때문에 시간을 seed number로 하는 난수를 생성하면 된다.
구현 예제
#include <iostream>
#include <cstdlib> // std::rand(), std::srand()
#include <ctime>   // std::time()

using namespace std;

int main()
{
    std::srand(static_cast<unsigned int>(std::time(0)));
    for (int count = 1; count <= 100; ++count)
    {
        cout << std::rand() << "\t";

        if(count % 5 == 0) cout << endl;
    }

    return 0;
}
Random 라이브러리 활용
- 난수생성은 라이브러리를 활용하는게 가장 좋다.
사용 예제
#include <iostream>
#include <random>

int main()
{
    std::random_device rd;

    //create a mesenne twister,
    std::mt19937_64 mersenne(rd()); // 64bit 짜리 난수
    std::uniform_int_distribution<> dice(1, 6); // 1부터 6까지 동일한 확률로 나올수 있게 해준다.

    for(int count = 1; count <= 20; ++count)
    {
        std::cout << dice(mersenne) << std::endl;
    }

    return 0;
}
std::cin 더 잘 쓰기
- 사용자가 한 번에 여러개를 입력할 때 (한 개만 입력 받으려 했는데)
-cin은 여러개가 들어오면 하나만 받고 나머지는 buffer에 저장
-std::cin.ignore(적당한수, '\n')로 buffer 초기화 - 사용자가 의도하지 않은 이상한 문자를 입력할 때
-std::cin.fail()은 잘못된 문자 타입을 넣거나 저장공간을 초과하는 입력을 받았을 때true를 반환한다.
- 이를 이용하여 조건문으로 처리한다. std::clear()는 buffer에 남아있는 모든 데이터를 없앤다.
예제
#include <iostream>

using namespace std;

int getInt()
{
    while(true){
        cout << "Enter an integer number : ";
        int x;
        cin >> x;

        if(std::cin.fail())
        {
            std::cin.clear();
            std::cin.ignore(32767, '\n');
            cout << "Invalid number, please try again" << endl;
        }
        else{
            std::cin.ignore(32767, '\n');
            return x;
        }
    }
}

char getOperator()
{
    while (true){
        cout << "Enter an operator (+, -) : "; // TODO: more operators *, / etc.
        char op;
        cin >> op;
        std::cin.ignore(32767, '\n');

        if(op == '+' || op == '-' )
            return op;
        else
            cout << "Invalid operator, please try again" << endl;
    }
}

void printResult(int x, char op, int y)
{
    if (op == '+') cout << x + y << endl;
    else if (op == '-') cout << x - y << endl;
    else
    {
        cout << "Invalid operator" << endl;
    }
}
int main()
{
    int     x  = getInt();
    char    op = getOperator();
    int     y  = getInt();

    printResult(x, op, y);

    return 0;
}

https://github.com/velmash