Parallax mapping?
Parallax 는 시차라는 뜻임
관찰자의 위치나 시점에 따라 어떤 물체의 상대적인 위치나 방향이 달라져 보이는 시각적 현상을 뜻함
그럼 parallax mapping은 뭐냐?
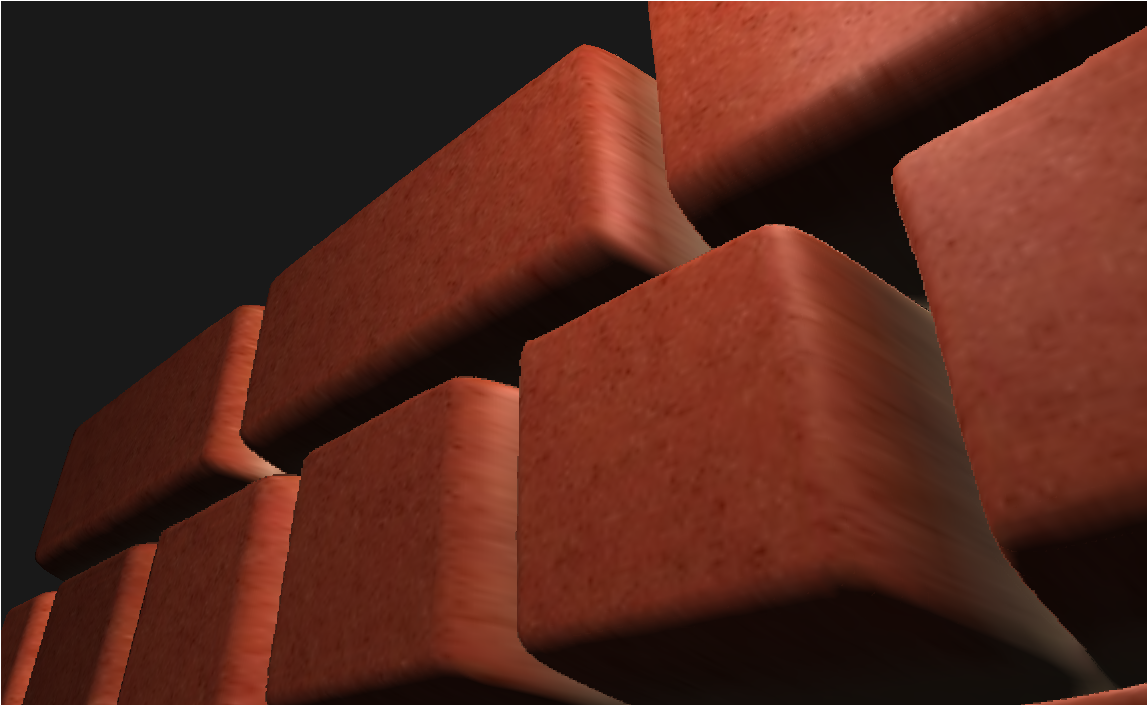
사용자의 시점에 맞춰 텍스쳐에 깊이를 더하는것과 같은 효과를 주는 매핑임
어? 그거 normal mapping아님??
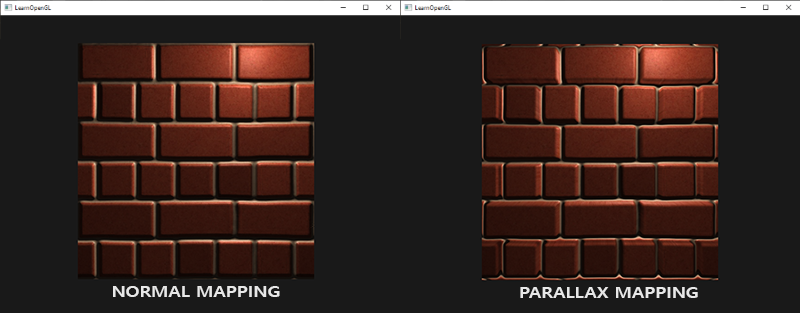
normal mapping은 문제점이 뚜렷함
분명히 텍스쳐의 정면과 비슷한 각도에서 바라보면 높낮이가 보임
하지만 비스듬한 각도로 이동하면 결국 평면의 이미지이므로, 평면처럼 보이는 문제가 있음
하지만 parallax mapping은 다름
실제로 어느각도에서 보든 오브젝트의 깊이감이 생기게 됨
parallax mapping은 지정된 정점들의 높이를 height map이란걸 이용해
정점들을 이동시키는 등의 행위로 실제 높낮이를 부여하는 매핑임
이렇게 정점을 이동시키는 mapping을 displacement mapping이라고 함
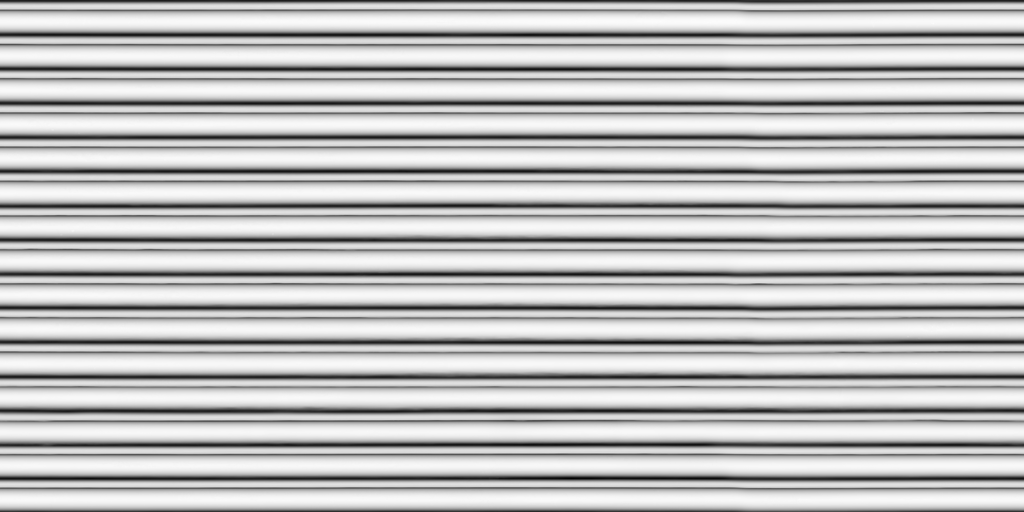 displacement/height map displacement/height map | 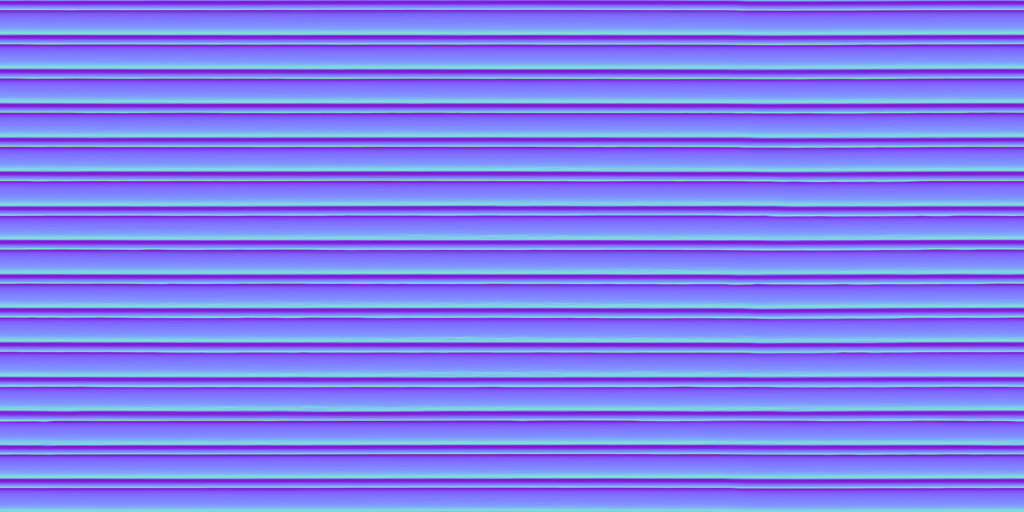 normal map normal map |
|---|
여기서 문제점이 나옴
깊이감을 주기위해서 정점들을 매핑할 수 있는 텍스쳐를 사용해야한다면
어마어마한 수의 삼각형을 이용해서 이를 매핑해야할거임
하지만 실제로는 1개의 텍스쳐, 즉 2개의 삼각형만으로 매핑이 가능하다는거임
Parallax mapping 작동방식
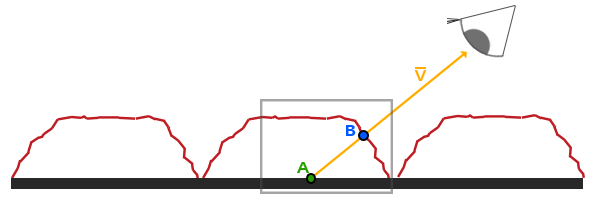
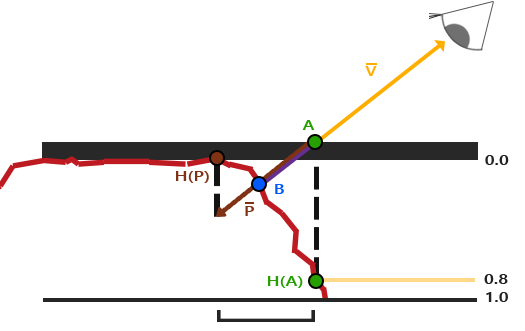
이렇게 fragment에서 시점까지의 경로를 라고 함
이때 height map과 의 실제 교점을 라고 함
parallax mapping의 핵심은 아래임
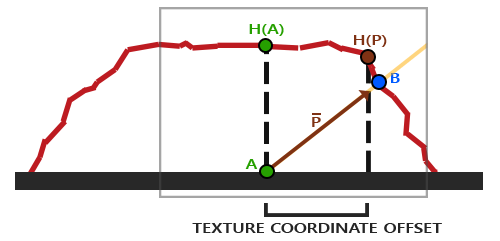
점에서 표면에 수직으로 선을이어 height map과 생긴 교점을 H(A)라고 함
그리고 이를 이은 벡터를 라고 함
가 됨
점의 좌표가 바로 실제 교점 와 근사한 좌표인거임
하지만 문제가 있음
parallax mapping문제
- 높이 차이가 급격하면 근사치가 근사치가 아니게 됨
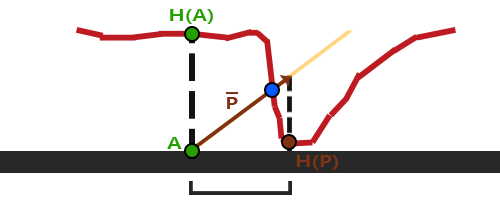
실제교점 B와 점좌표를 보자
실제 교점 B는 점좌표와 비슷하지만
height map기준에서보면 점좌표는 height map과의 차이가 큼
따라서 실제로 비현실적으로 보이게 될 가능성이 큼
- 회전, 크기, 이동등 변환행렬
normal mapping에서 얘기한것처럼
Advanced OpenGL(14) - Normal mapping, normal mapping문제점
변환행렬이 수행되었을때 정확한 텍스쳐의 좌표를 얻을 수 없다는거임
따라서 이를 해결하기위해 마찬가지로 탄젠트 공간에서 parallax mapping을 수행하게 됨
Parallax mapping 구현
가장 중요한게 하나 있음
이걸 잘 보면 흰부분은 높이, 어두운 부분은 깊이라는걸 알 수 있음
이걸 반전시킬거임
반전된 height map
왜냐면 어짜피 parallax mapping은 깊이를 표현하는 테크닉이고,
높이를 바꾸는것보다 대부분의 경우에서 깊이를 바꾸는게 더 직관적임
따라서 점에서 를 빼면 가 나옴
연산은 단순하게
로 바꾸면 됨
여기서 하나 개념을 짚어야함
는 높이임
height map에서 texture메서드로 얻은 높이값ㅇㅇ
여기서 를 구하는 순서는 아래와 가틍ㅁ
- 의 원근값 :
- 텍스쳐 좌표는 2차원임
하지만 viewsms 3차원임
따라서 원근값 z를 통해 실제 x,y를 조절해서 2차원에서의 xy를 비율적으로 3차원과 비슷하게 조절하는거임
- 텍스쳐 좌표는 2차원임
- 는 height map에서의 높이임
- 를 통해 실제 를 알아냄
- 여기에 displacement strength를 곱해 실제 적용되는 displacement강도를 조절함
- 4번까지의 과정을 통해 실제 사용될 를 구하고 depth map으로 우린 사용하므로, 텍스쳐 좌표에서 뺄셈을 하면 됨
구현
Advanced OpenGL(14) - Normal mapping#TBN행렬 구현
여기서 vertex shader를 찾아서 그대로 사용하면 됨
왜냐면.... 동일한 개념의 탄젠트 공간에서 사용하는거걸랑ㅇㅇ
fragment shader만 수정해주면 됨
#version 330 core
out vec4 FragColor;

in VS_OUT {
    vec3 FragPos;
    vec2 TexCoords;
    vec3 TangentLightPos;
    vec3 TangentViewPos;
    vec3 TangentFragPos;
} fs_in;

uniform sampler2D diffuseMap;
uniform sampler2D normalMap;
uniform sampler2D depthMap;

uniform float heightScale;

vec2 ParallaxMapping(vec2 texCoords, vec3 viewDir)
{
    float height =  1 - texture(depthMap, texCoords).r;
    return texCoords - (viewDir.xy) * (height * heightScale);
}

void main()
{
    // offset texture coordinates with Parallax Mapping
    vec3 viewDir = normalize(fs_in.TangentViewPos - fs_in.TangentFragPos);
    vec2 texCoords = fs_in.TexCoords;

    texCoords = ParallaxMapping(fs_in.TexCoords,  viewDir);
    if(texCoords.x > 1.0 || texCoords.y > 1.0 || texCoords.x < 0.0 || texCoords.y < 0.0) discard;

    // obtain normal from normal map
    vec3 normal = texture(normalMap, texCoords).rgb;
    normal = normalize(normal * 2.0 - 1.0);

    // get diffuse color
    vec3 color = texture(diffuseMap, texCoords).rgb;
    // ambient
    vec3 ambient = 0.1 * color;
    // diffuse
    vec3 lightDir = normalize(fs_in.TangentLightPos - fs_in.TangentFragPos);
    float diff = max(dot(lightDir, normal), 0.0);
    vec3 diffuse = diff * color;
    // specular
    vec3 reflectDir = reflect(-lightDir, normal);
    vec3 halfwayDir = normalize(lightDir + viewDir);
    float spec = pow(max(dot(normal, halfwayDir), 0.0), 32.0);

    vec3 specular = vec3(0.2) * spec;
    FragColor = vec4(ambient + diffuse + specular, 1.0);
}
parallax mapping부분은 위에서 설명한 그대로임ㅇㅇ
중요한 부분은 if(texCoords.x > 1.0 || texCoords.y > 1.0 || texCoords.x < 0.0 || texCoords.y < 0.0) discard;임
viewDir은 정규화되어있음
따라서 viewDir.z는 0~1사이의 값임
만약 정~말 비스듬하게 본다면 z값이 0과 가까워지므로 텍스쳐좌표의 최대인 1보다 훨씬 커질 수 있음
따라서 그 값들을 discard해줘야함
그냥 위 코드처럼 viewDir.z로 나누는걸 없애도 되고... 많이 사용하기도 함
또, 텍스쳐좌표를 벗어나는 크기의 텍셀은 없애주는게 나으므로
if(texCoords.x > 1.0 || texCoords.y > 1.0 || texCoords.x < 0.0 || texCoords.y < 0.0) discard;이게 꼭 필요함
전체코드가 궁금하면
LearnOpenGL - Parallax Mapping.cpp 이걸 보도록!
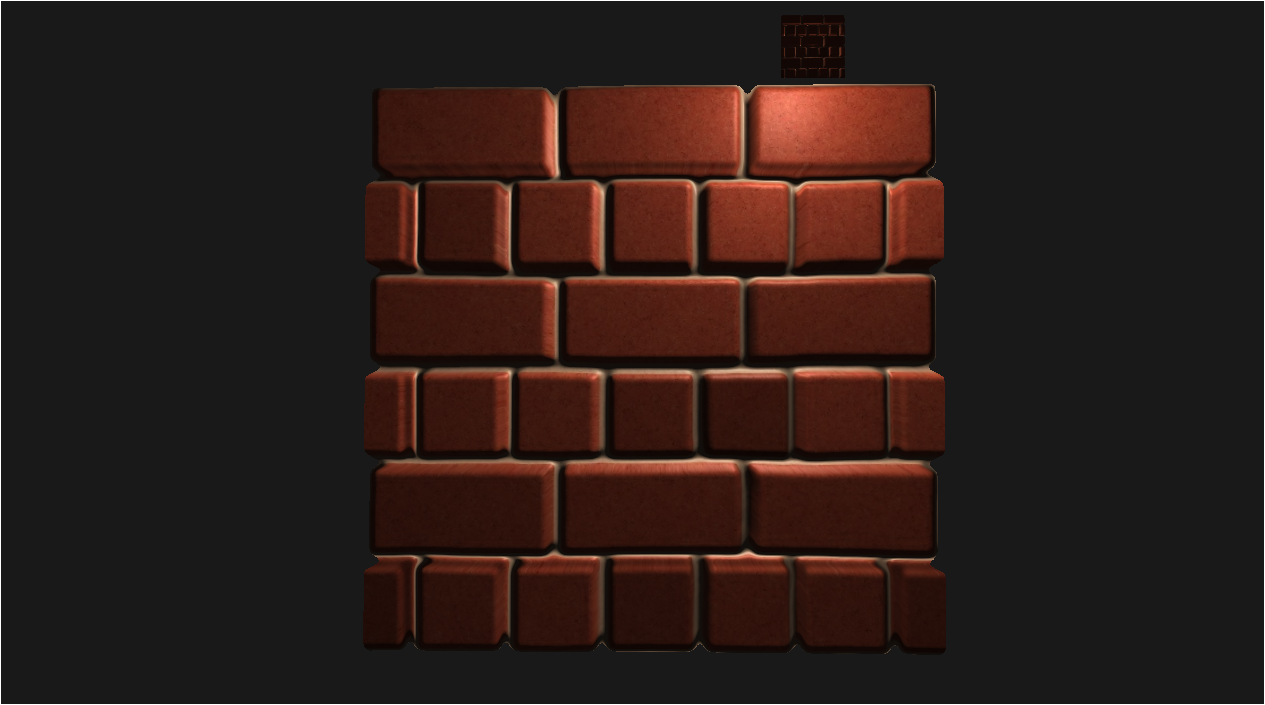
이쁘게 나온걸 볼 수 있음
하지만 문제가 있음
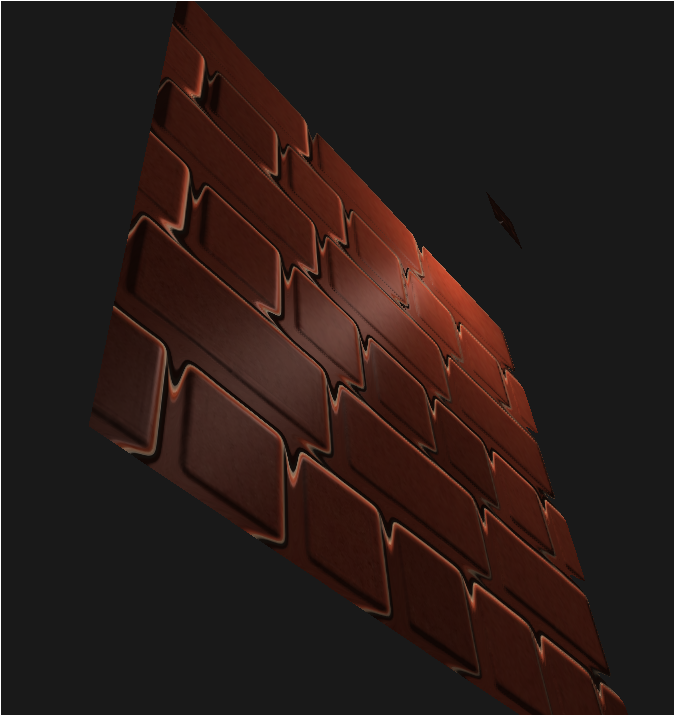 viewDir.xy | 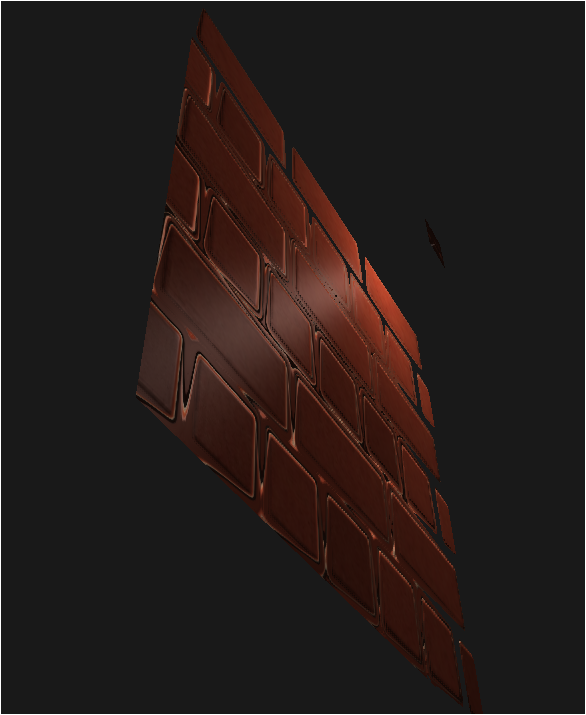 viewDir.xy/viewDir.z |
|---|
비스듬한 각도에서 바라보면 둘 다 깊이가 휘어지고
깊이표현도 제대로 되지 않는단걸 볼 수 있음
이건 어떻게 해결해야할까?
실제 교점 B와 근사한 좌표를 더 정확하게 찾을 수 있다면 어떨까?
steep parallax mapping
height/depth map의 전체 깊이는 0~1사이의 텍스쳐 범위임
이 깊이의 특정 구간을 나누는 steep을 나누고,
의 경로에서 각 steep에서의 교차점을 확인후
height와 계산해서 height map안쪽에 교차점이 있으면 사용하는거임
이게 뭔소리냐면...
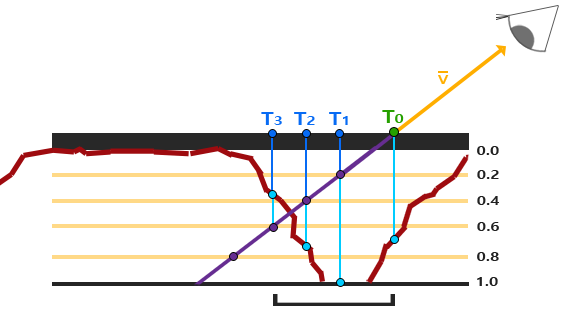
이걸 보면, 알 수 있음
- 보라색 벡터 =
- 보라색 점 = steep과의 교차점
- 각 steep과의 교차점과 해당 지점에서의 height와의 비교
- steep의 교차점이 height보다 값이 작은 지점이 최근사좌표
easyeasy~
steep parallax mapping구현
fragment shader의 parallax map메서드만 바꾸면 됨
vec2 ParallaxMapping(vec2 texCoords, vec3 viewDir)
{
    //steep수 결정
    const float numLayers = 10;
    // 각 steep 차이
    float layerDepth = 1.0 / numLayers;
    // 현재 벡터의 깊이
    float currentLayerDepth = 0.0;
    // 시점 ~ 점A까지 벡터P
    vec2 P = viewDir.xy * displacementScale;
    // 벡터P를 steep단위로 나눈 차이 벡터
    vec2 deltaTexCoords = P / numLayers;

    // 초기 값
    vec2  currentTexCoords     = texCoords;
    float currentDepthMapValue = texture(depthMap, currentTexCoords).r;

    while(currentLayerDepth < currentDepthMapValue)
    {
        // depth map이므로 현재 texture좌표에서 벡터P를 steep단위로 나눈 차이 벡터를 뺌
        currentTexCoords -= deltaTexCoords;
        //해당 steep의 depth 값 할당
        currentDepthMapValue = texture(depthMap, currentTexCoords).r;
        // 다음 steep의 텍스쳐로 이동
        currentLayerDepth += layerDepth;
    }

    return currentTexCoords;
}
어려운 코드는 없음
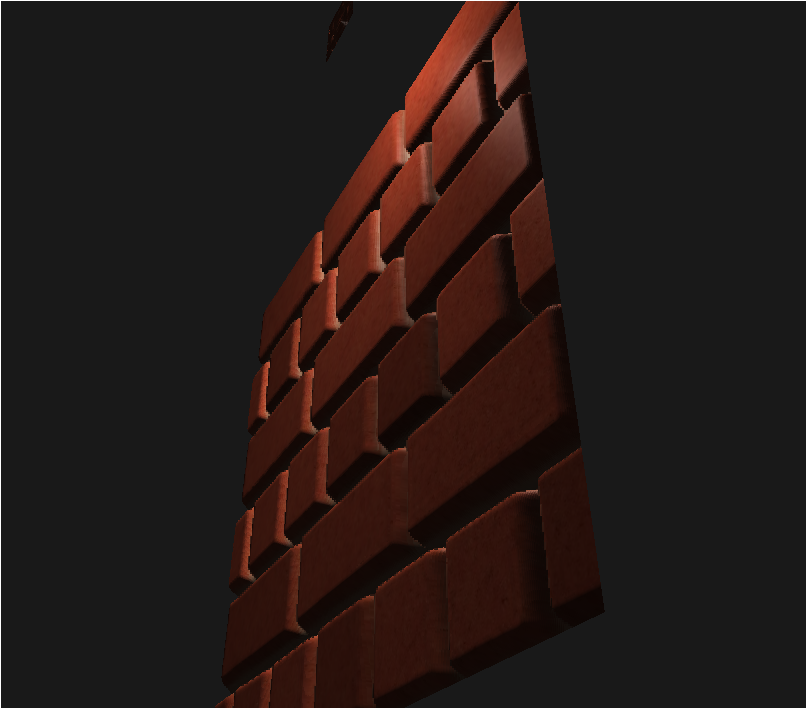
비스듬한 각에서도 잘 보이는걸 알수 있음
개선
이 코드를 약간 개선할 수 있음
일명 동적 레이어를 이용하는거임
아이디어는 간단함
- 정면에서 바라볼때는 displacement가 많이 필요하지 않음
- 비스듬히 바라볼때는 displacement가 많이 필요함
따라서 이걸 동적으로 바뀌도록 하면 되는데...
이걸 어떻게 하지?
내적이용하면됨ㅇㅇ
결국 비스듬히 바라볼때는 z와 viewDir이 비슷하다는거임
두 벡터가 비슷할수록 내적은 1이됨
//steep수 결정
const float minLayer = 4;
const float maxLayer = 48;
const float similar = abs(dot(viewDir, vec3(0.0, 0.0, 1.0)));
const float numLayer = mix(maxLayer, minLayer, similar);
내적을 절대값 사용하는 이유는 두 벡터가 완전히 다른방향일때 -1을 반환하는데,
이렇게 두 벡터가 같으면 1이 바환되므로 minLayer가 반환되고,
두 벡터가 완전히 다르면 0이 반환되므로 maxLayer가 반환되고,
그 사이는 보간처리되어서 적절한 값을 가지도록 함
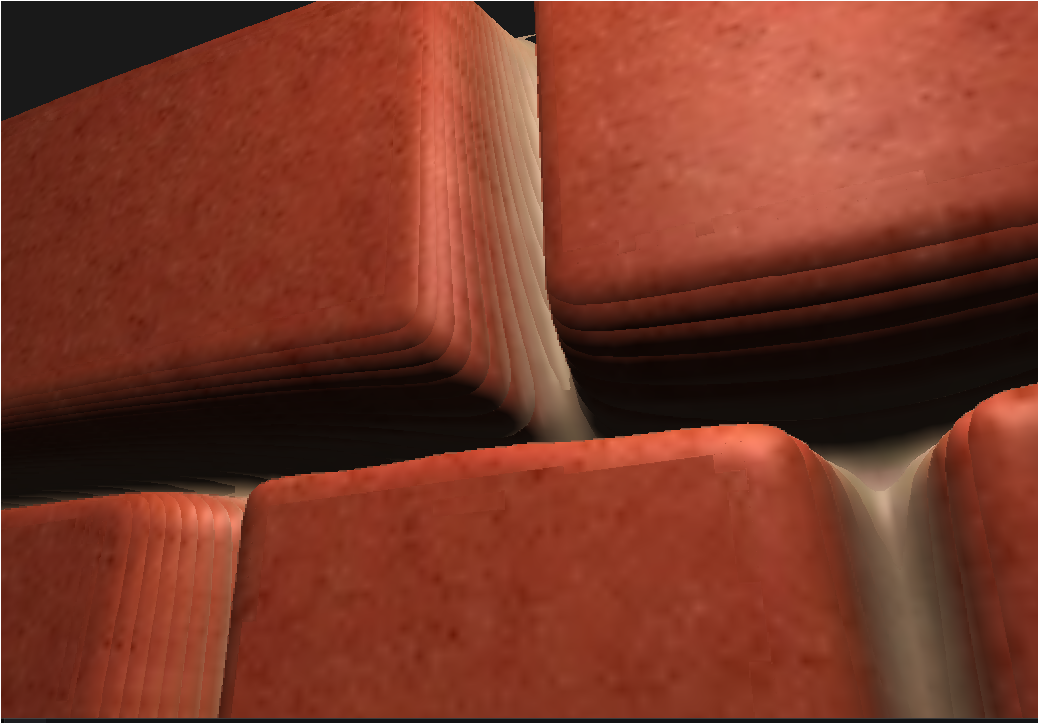
이걸 보자 ㅇㅇ
가까이서 보면 역시나 문제가 생김
역시 layer수가 한정적이라서 그런데,
layer수를 무한정 늘리면 성능에 부담이 심하지ㅇㅇ
해결하려면??
relief parallax map이나 parallax occlusion map을 사용하면 됨
relief방식은 이진탐색을 이용해서 정확한 실제교점 B를 구함
대신 연산이 비쌈ㅇㅇ... 그래서 RT에서는 잘 사용못함
그래서 보통 사용하는게 parallax occlusion map임
parallax occlusion mapping
POM이라고 부름
이사진에서 점 가 만큼 이동한 후의 좌표를 라고 해보자
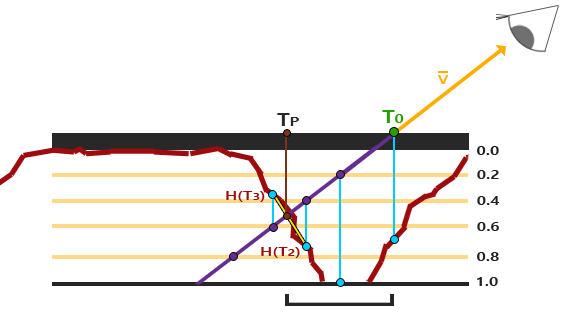
여기서 볼 수 있듯이 POM은
steep parallax occlusion가 비슷하지만
를 기준으로 전후로 지나가는 steep과의 교차점 , 를 이용함
- steep parallax mapping을 함
- 의 경로에서 를 지나기 직전, 직후의 steep의 교차점을 찾음
- 해당 교차점들을 각각 관통하는 ray를 표면에 수직방향으로 쏴서, height map과 만나는 두 지점 , 를찾음
- , 를 선형보간으로 이어줌
vec2 ParallaxMapping(vec2 texCoords, vec3 viewDir)
{
    //steep수 결정
    const float minLayer = 4;
    const float maxLayer = 48;
    float similar = abs(dot(viewDir, vec3(0.0, 0.0, 1.0)));
    float numLayers = mix(maxLayer, minLayer, similar);

    // 각 steep 차이
    float layerDepth = 1.0 / numLayers;
    // 현재 벡터의 깊이
    float currentLayerDepth = 0.0;
    // 시점 ~ 점A까지 벡터P
    vec2 P = viewDir.xy * displacementScale;
    // 벡터P를 steep단위로 나눈 차이 벡터
    vec2 deltaTexCoords = P / numLayers;

    // 초기 값
    vec2  currentTexCoords     = texCoords;
    float currentDepthMapValue = texture(depthMap, currentTexCoords).r;

    while(currentLayerDepth < currentDepthMapValue)
    {
        // depth map이므로 현재 texture좌표에서 벡터P를 steep단위로 나눈 차이 벡터를 뺌
        currentTexCoords -= deltaTexCoords;
        //해당 steep의 depth 값 할당
        currentDepthMapValue = texture(depthMap, currentTexCoords).r;
        // 다음 steep의 텍스쳐로 이동
        currentLayerDepth += layerDepth;
    }

    // depth map이라는 개념을 이용하므로 delta를 더해주면 previous 텍스쳐 좌표가 나옴
    vec2 prevTexCoords = currentTexCoords + deltaTexCoords;

    // 이후, 이전 layer에서 height까지의 거리
    float afterDepth  = currentDepthMapValue - currentLayerDepth;
    float beforeDepth = texture(depthMap, prevTexCoords).r - currentLayerDepth + layerDepth;

    // afterDepth, beforeDepth를 이용해 가중치, 이후 depth와 이전 depth의 비율이 가중치가 됨
    float weight = afterDepth / (afterDepth - beforeDepth);
    //선형보간
    vec2 finalTexCoords = prevTexCoords * weight + currentTexCoords * (1.0 - weight);

    return finalTexCoords;
}
아래 몇줄만 추가해주면 됨
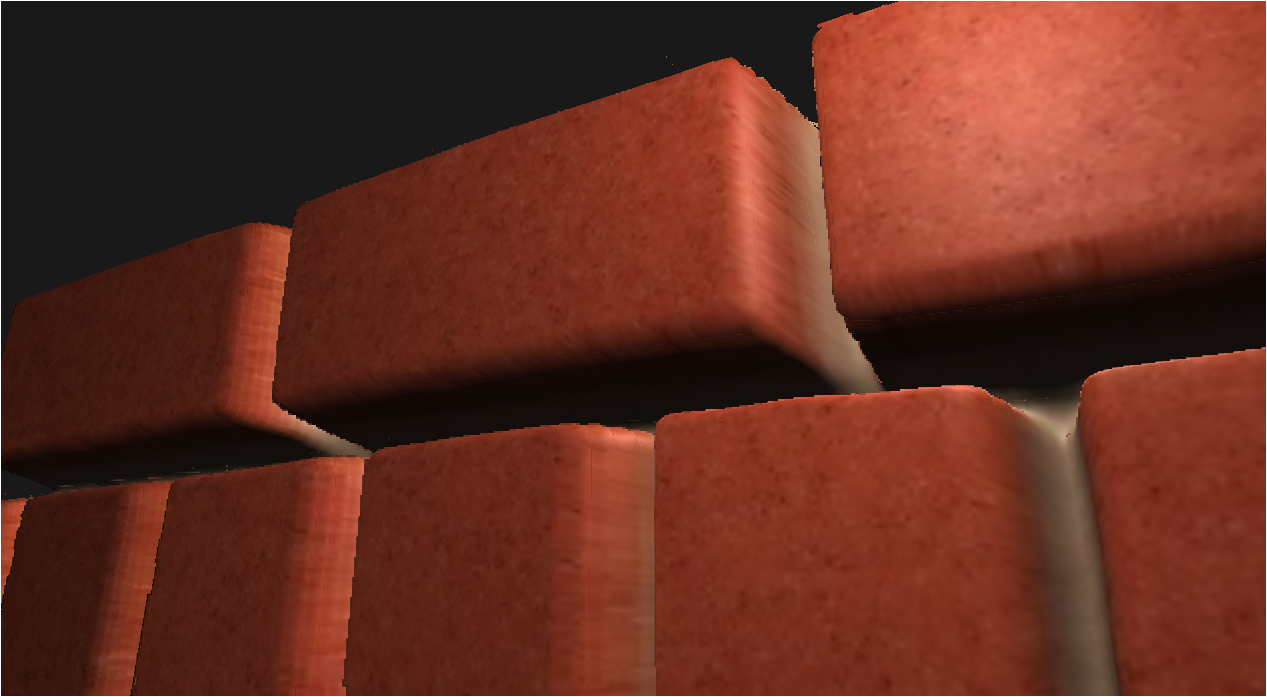
AA와 여전히 조금이 layer마다 나뉘는 문제가 있긴하지만,
이정도면 ㅅㅌ치임!!!!
보통 pm이나 pom은 벽이나 바닥에 사용을 함