영상에서 이상행동을 검출하는 분야를 테스트해보았다.
이번엔 모델 학습이나 미리 학습된 모델을 어떻게 사용하는지 정도만 살펴봤고, 이론적으로 어떤 계산식이나 어떤 아이디어가 들어갔는지는 좀 더 공부해 봐야겠다.
이미지가 아니라 영상이라 그런지 처음에 개념 잡기가 엄청 까다로웠는데, 엄청 헷갈렸던 이상행동검출의 종류를 mmaction2에서 사용할 수 있는 모델의 결과를 기준으로 구분해 봤다.
Action Recognition은 영상자체가 어떤 영상인지 분류한다. 마치 image classification처럼 입력된 영상에 label를 정하는 모델이다.
Action Detection은 영상에서 사람을 찾고 그 사람의 현재 행동을 찾는다.
환경설정
먼저 환경설정인데, mmaction2를 사용하려면 친절한 설명서가 있고, 이걸 따라만 하면 된다.
cuda는 12.1, python은 3.8이고 버전에 맞는 pytorch, torchvision를 설치해주었다.
pip install -U openmim
mim install mmengine
mim install mmcv
mim install mmdet
mim install mmpose
git clone https://github.com/open-mmlab/mmaction2.git
cd mmaction2
pip install -v -e .
그 다음 mmengine, mmcv 등을 다운받아주면 완료!
mmaction2 git도 clone 해준다.
데이터 형식
공식문서를 보면 사용하려는 모델에 따라 형식이 정해져 있다.
Video Dataset
가장 간단하고 Action Recognition를 할때 사용하며, 이렇게 동영상의 path와 label값으로만 구성된 txt파일이다.
some/path/000.mp4 1
some/path/001.mp4 1
some/path/002.mp4 2
some/path/003.mp4 2
some/path/004.mp4 3
some/path/005.mp4 3
학습할땐 train, val, test에 따라 나눠서 txt파일을 만들고 config파일에 txt 파일 경로를 기입하면 된다.
custom_test_list.txt
custom_train_list.txt
custom_val_list.txt
그리고 학습에 사용된 label 이름이 적힌 label_map_custom.txt파일을 생성한다.
custom data로 모델을 학습해보기 위해 내 이상행동 dataset을 만들었는데, 비정상 데이터는 ai-hub에서 '이상행동 CCTV 영상' data를 다운받아 event 부분만 clip하여 위 형식으로 수정하였고, 정상 데이터는 UCF Crimes dataset에서 이벤트가 없는 일반 비디오 파트(normal video)를 다운받았다.
Pose Dataset
Skeleton-based Action Recognition을 할때 사용하고 split과 annotations으로 구성된 pickle파일이다.
split는 train, test으로 나눠진 비디오 이름 목록이 들어있다.
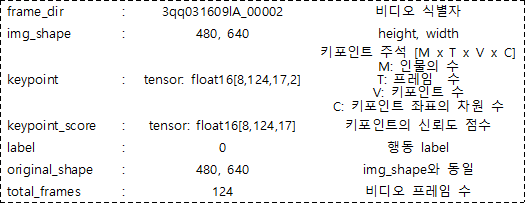
annotations은 영상에 대한 label과 frame 수 만큼의 사람 pose값이 들어있다.
{
    "split":
        {
            'xsub_train':
                ['S001C001P001R001A001', ...],
            'xsub_val':
                ['S001C001P003R001A001', ...],
            ...
        }

    "annotations:
        [
            {
                {
                    'frame_dir': 'S001C001P001R001A001',
                    'label': 0,
                    'img_shape': (1080, 1920),
                    'original_shape': (1080, 1920),
                    'total_frames': 103,
                    'keypoint': array([[[[1032. ,  334.8], ...]]])
                    'keypoint_score': array([[[0.934 , 0.9766, ...]]])
                },
                {
                    'frame_dir': 'S001C001P003R001A001',
                    ...
                },
                ...

            }
        ]
}
annotations을 자세히 해석해 보자면 아래와 같이 구성되어있다.
mmaction2에서 skeleton 학습을 위해 dataset을 준비하는 코드와 함께 많이 사용하는 dataset마다 사전 처리된 주석 파일을 제공한다.
또 skeleton중에 PoseC3D모델을 사용하기 위한 custom dataset를 만들 수 있는 코드도 제공한다.
Detection Dataset
Spatio-Temporal Action Detection를 할때 사용하고 1fps로 frame마다 사람을 전부 찾고, 그 사람의 행동이 전부 기입된 csv파일이다.
video_identifier time_stamp lt_x lt_y rb_x rb_y label entity_id 이렇게 구성되어있는데 x, y는 사람의 box위치(왼쪽 상단, 오른쪽 하단 point)로 이미지 사이즈로 정규화 되어있다.
난 ava dataset이라고 고전 영화를 15분부터 30분까지 15분짜리 영상으로 clip한 data를 다운받아 사용했고 mmaction2에서 data 준비하는 설명 및 코드도 제공한다.
1j20qq1JyX4 0902 0.002 0.118 0.714 0.977 12 0
1j20qq1JyX4 0902 0.002 0.118 0.714 0.977 79 0
1j20qq1JyX4 0903 0.02  0.069 0.985 0.985 12 0
1j20qq1JyX4 0903 0.02  0.069 0.985 0.985 17 0
1j20qq1JyX4 0903 0.02  0.069 0.985 0.985 79 0
1j20qq1JyX4 0904 0.015 0.052 1     0.979 12 0
1j20qq1JyX4 0904 0.015 0.052 1     0.979 17 0
자세히 보면 한 프레임에 그 사람의 행동이 전부 나눠서 적혀있다.
902 프레임에서 사람 0번의 label은 12(stand), 79(talk to)로 0번 사람은 서있고 말하고 있는 상태이다.
MMAction2 사용하기
Action Recognition
Action Recognition은 C3D와 I3D 모델을 사용해 내 custom data로 학습도하고 test도 해봤다.
하나만 사용해보면 나머지 하나는 비슷하니 C3D 사용법만 적어보겠다.
C3D의 input은 문제행동 영상 clip과 VideoDataset 형식의 txt 주석 파일이다.
output은 입력한 영상에 대학 모든 label 확률이 나온다.
학습준비하기
내가 만든 custom dataset으로 config파일을 작성한다.
난 C3D의 config 파일중 하나를 복사하여 dataset settings 부분을 아래와 같이 내 주석파일 path로 수정하였다.
# dataset settings
dataset_type = 'VideoDataset'
data_root = 'data/abnormal-behavior'
data_root_val = 'data/abnormal-behavior'
data_root_test = 'data/abnormal-behavior'
ann_file_train = 'data/abnormal-behavior/custom_train_list.txt'
ann_file_val = 'data/abnormal-behavior/custom_val_list.txt'
ann_file_test = 'data/abnormal-behavior/custom_test_list.txt'
지금 내 mmaction2 프로젝트 폴더는 아래와 같은 형식이다.
mmaction2
├── mmaction
├── tools
├── configs
├── data
│   ├── abnormal-behavior
│   │   ├── custom_test_list.txt
│   │   ├── custom_train_list.txt
│   │   ├── custom_val_list.txt
│   │   ├── normal
│   │   │   ├── normal_001.mp4
│   │   │   ├── normal_002.mp4
│   │   │   ├── ...
│   │   ├── assault
│   │   │   ├── assault_001.mp4
│   │   │   ├── assault_002.mp4
│   │   │   ├── ...
│   │   ├── ...
train과 test 하기
config파일을 만들었으면 학습 시작한다.
C3D 페이지에도 기본 명령어 예시가 적혀있지만, train_test 설명서가 따로 있으니 자세한 args는 여기서 확인하고 원하는대로 수정하면 된다.
난 멀티 gpu를 가지고 있어서 dist_train.sh를 사용해 학습했다.
bash tools/dist_train.sh ${CONFIG} ${GPUS} [PY_ARGS]
bash tools/dist_train.sh configs/recognition/c3d/c3d_sports1m-pretrained_8xb30-16x1x1-45e_custom-rgb.py 4
학습된 체크포인트와 log파일이 work_dirs 폴더에 저장된다.
학습된 마지막 체크포인트로 test파일도 돌려본다.
python tools/test.py ${CONFIG_FILE} ${CHECKPOINT_FILE} [ARGS]
python tools/test.py configs/recognition/c3d/c3d_sports1m-pretrained_8xb30-16x1x1-45e_custom-rgb.py work_dirs/c3d_sports1m-pretrained_8xb30-16x1x1-45e_custom-rgb/best_acc_top1_epoch_15.pth --dump work_test_c3d/result.pkl —work-dir work_test_c3d
결과가 work_test_c3d 폴더에 저장되었다.
학습한 model 사용하기
mmaction2의 api를 사용해서 모델을 load하고 사용해 보았다.
from operator import itemgetter
from mmaction.apis import init_recognizer, inference_recognizer

#c3d
config_file = 'configs/recognition/c3d/c3d_sports1m-pretrained_8xb30-16x1x1-45e_custom-rgb.py'
checkpoint_file = 'work_dirs/c3d_sports1m-pretrained_8xb30-16x1x1-45e_custom-rgb/best_acc_top1_epoch_15.pth'
video_file = 'data/abnormal-behavior/assault/assault_001.mp4'
label_file = 'data/abnormal-behavior/label_map_custom.txt'

model = init_recognizer(config_file, checkpoint_file, device='cuda:0')
pred_result = inference_recognizer(model, video_file)

pred_scores = pred_result.pred_score.tolist()
score_tuples = tuple(zip(range(len(pred_scores)), pred_scores))
score_sorted = sorted(score_tuples, key=itemgetter(1), reverse=True)
top2_label = score_sorted[:2]

labels = open(label_file).readlines()
labels = [x.strip() for x in labels]
results = [(labels[k[0]], k[1]) for k in top2_label]

print('The top-2 labels with corresponding scores are:')
for result in results:
    print(f'{result[0]}: ', result[1])
이렇게 입력한 영상의 모든 label에 대한 확률을 알려준다.
The top-2 labels with corresponding scores are:
assault:  0.9976192712783813
vandalism:  0.0023689167574048042
Skeleton-based Action Recognition
Skeleton-based Action Recognition은 PoseC3D 모델을 사용해봤다.
내가 가진 data엔 pose 정보가 없는데 따로 생성하기가 까다로워서 mmaction2에서 제공하는 미리 학습된 모델 체크포인트를 다운받아 사용해보기만 하였다.
PoseC3D의 input은 문제행동 영상 clip과 Pose Dataset 형식의 pickle 주석 파일이다.
output은 입력한 영상에 대학 모든 label 확률이 나온다.
학습한 model 사용하기
mmaction2의 demo 파일을 사용해 load하고 사용해 보았다.
Skeleton-based Action Recognition 모델을 사용할땐 HUMAN_DETECTION 모델과 HUMAN_POSE_ESTIMATION 모델이 따로 필요하다.
config_file = 'configs/skeleton/posec3d/slowonly_r50_8xb16-u48-240e_ntu60-xsub-keypoint.py'
checkpoint_file = 'configs/skeleton/posec3d/slowonly_r50_8xb16-u48-240e_ntu60-xsub-keypoint_20220815-38db104b.pth'
video_file = 'data/abnormal-behavior/assault/assault_001.mp4’

python demo/demo_skeleton.py {video_file} 'posec3d_test.mp4' --config {config_file} --checkpoint {checkpoint_file}
이렇게 입력한 영상에서 가장 높은 확률의 label을 알려준다.
사람의 pose 정보는 계속 업데이트되지만 label은 영상 전체에 대해 예측한 label로 바뀌지 않는다.
만약 실시간으로 바꾸려면, 영상을 쪼개어 모델에 넣고 짧은 영상에서 예측한 값으로 계속 업데이트되도록 수정해야한다.

Spatio-Temporal Action Detection
Spatio-Temporal Action Detection은 SlowFast+Fast R-CNN와 VideoMAE 모델을 사용해봤다.
내가 가진 data엔 detaction 정보가 없는데 따로 생성하기가 까다로워서 mmaction2에서 제공하는 미리 학습된 모델 체크포인트를 다운받아 사용해보기만 하였다.
하나만 사용해보면 나머지 하나는 비슷하니 SlowFast 사용법만 적어보겠다.
SlowFast+Fast R-CNN의 input은 영상 전체와 detection Dataset 형식의 csv 주석 파일이다.
output은 실시간으로 지금 영상에서 사람을 찾고 그 사람의 행동 label을 전부 알려준다.
학습한 model 사용하기
mmaction2의 demo 파일을 사용해 load하고 사용해 보았다.
Spatio-Temporal Action Detection 모델을 사용할땐 HUMAN_DETECTION 모델이 따로 필요하다.
config_file = 'configs/detection/slowfast/slowfast_r50-k400-pre-temporal-max-focal-alpha3-gamma1_8xb6-8x8x1-cosine-10e_ava22-rgb.py'
checkpoint_file = 'configs/detection/slowfast/slowfast_r50-k400-pre-temporal-max-focal-alpha3-gamma1_8xb6-8x8x1-cosine-10e_ava22-rgb_20220906-dd59e26f.pth'
video_file = 'data/abnormal-behavior/assault/assault_001.mp4'
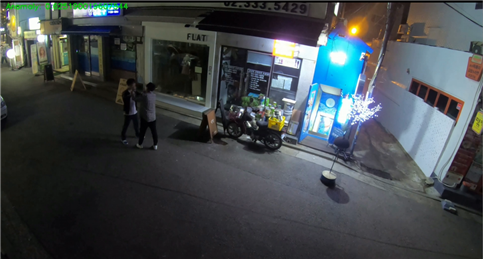
python demo/demo_spatiotemporal_det.py {video_file} 'slowfast_test.mp4' --config {config_file} --checkpoint {checkpoint_file}이렇게 실시간으로 사람을 찾고 그 사람의 행동 label을 모두 알려준다.
설정한 step에 따라 사람의 위치 box와 행동 label이 계속 업데이트 된다.
AnomalyDetectionCVPR2018
Real-world Anomaly Detection in Surveillance Videos 논문 구현으로 저자의 git이 있으나 오래된 버전이기 때문에 비교적 최신 버전인 pytorch 버전을 사용했다.
input은 문제행동 영상 clip과 영상에서 뽑아낸 feature txt 파일이다.
output은 실시간으로 지금 영상이 비정상일 확률이 나온다.
학습준비하기
feature_extractor 파일로 각 영상마다 특징을 뽑아내 feature 폴더에 저장한다.
c3d.pickle 파일은 따로 다운받아서 프로젝트 폴더에 넣어줬다.
python feature_extractor.py --dataset_path "data/abnormal-behavior" --save_dir "data/abnormal-behavior/features" --model_type "c3d" --pretrained_3d "c3d.pickle" --num_workers 0
train하기
기본적으로 AnomalyDetectionCVPR2018은 여러 label를 각각 학습하는게 아니라 normal와 나머지로 학습한다.
그러니까 폴더명에 normal이 있으면 정상 행동, 아니면 비정상 행동으로만 구분된다.
python TrainingAnomalyDetector_public.py
--features_path '추출한 특징 폴더'
--annotation_path '학습할 주석 txt파일'
--exps_dir '저장할 폴더 이름'
--log_file '저장할 log파일 이름'
--epochs 학습할 epoch 수
python TrainingAnomalyDetector_public.py --features_path 'data/abnormal-behavior/features' --annotation_path 'data/abnormal-behavior/custom_train_list.txt' --exps_dir 'custom_train' --log_file 'custom_train_log.log' --epochs 100
custom_train 폴더에 학습 결과가 저장된다.
학습한 model 사용하기
gui가 있는 상황이라면 아래 AD_live_prediction파일을 사용해 자신의 webcam을 input으로 넣어 현재 상황이 정상인지 비정상인지 실시간으로 볼 수 있다.
python AD_live_prediction.py --feature_extractor "c3d.pickle" --feature_method "c3d" --ad_model "custom_train/models/epoch_100.pt"
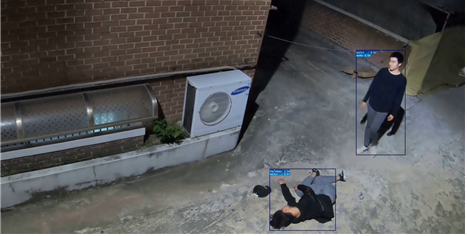
gui가 없다면 모델에 영상을 집어넣고 모델의 결과를 다시 영상으로 만들어 저장해야한다. custom_model_prediction파일은 내가 AD_live_prediction파일에서 모델을 load하고 사용하는 부분만 가져와 영상이 input되고 결과를 저장할 수 있도록 수정한 파일이다.
python custom_model_prediction.py --feature_extractor "c3d.pickle" --feature_method "c3d" --ad_model "custom_train/models/epoch_100.pt" --video_path "data/abnormal-behavior/assult/outsidedoor_06/25-5/25-5_cam01_assault01_place02_night_spring.mp4" --output_path "./custom_test"
- 정확히 따지면 모델에 영상을 집어넣는게 아니라 영상을 frame으로 쪼개서 frame의 feature를 추출해 모델에 집어넣는다.
- Action Recognition에선 전체 영상에 대한 결과를 내기 때문에 event가 있는 부분만 clip하여 model에 집어넣었지만, AnomalyDetectionCVPR2018에선 영상을 계속 보며 비정상인지 알려주기 때문에 event가 발생되기 전 부분이 합쳐진 최초영상을 model에 집어넣었다.
이렇게 왼쪽 위의 비정상 수치가 설정한 step마다 변하며 지금 비정상인 확률을 계속 업데이트하여 알려준다.
LSTM
또 다른 방법으론 사람의 Pose point를 찾아 시퀀스 데이터로 만들어 LSTM모델에 학습하는 방법도 있고...
이 블로그와 이 블로그를 참고하면 될듯. 설명을 너무 잘해주셨다.
이건 아직 테스트를 못해봤다.
pose를 찾는 모델을 사용해 pose값을 모아서 시퀀스 데이터로 만들어 학습한다.
모델을 사용할땐 특정 step으로 끊어가며 frame에서 찾아낸 pose값을 리스트로 만들어 모델에 집어넣고 어떤 행동인지 본다.
이런 방식으로 진행하면 실시간으로 업데이트 해서 사용할 수 있을것 같다.
정리
처음엔 검색할때 Recognition로 봐야할지 Detection으로 봐야할지도 모르겠고 개념잡기에 시간을 많이 보낸것 같다.
검출하고 싶은게 어떤 행동이냐에 따라 모델이 달라질듯 하다.
서있기, 걷기 같은 간단한 행동이랑 싸움 같은 복합적(?) 행동은 다르니까... 싸움이란 행동을 어떻게 정의할지도 정해야하고...
확실히 이미지에서 영상으로 넘어가니 어려워졌다. 주석 만들기도 까다롭고...
crowd counting이랑 change detection도 테스트 다 했는데 블로그에 글 적어야하는데...