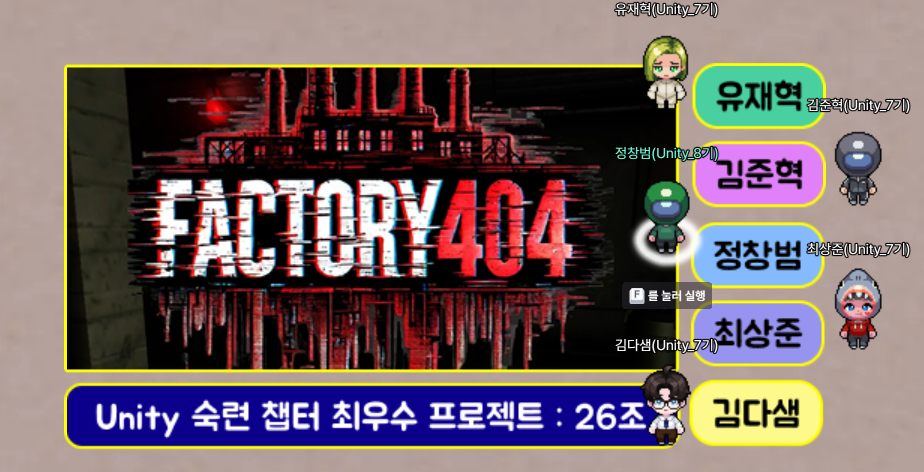
TIL과 별개인 이야기인데, 이전 챕터에서 진행했던 프로젝트가 최우수 프로젝트로 선정되었다!
Unity심화 강의는 2D와 3D로 나뉘어 있는데 오늘은 2D부분을 정리해보려고 한다.
[1. Cinemachine]
<Cinemachine이란?>
Unity에서 제공하는 카메라 제어 시스템으로, 코딩 없이 카메라 이동, 전환, 흔들림, 추적이 가능하다. (2D뿐만아니라 3D에서도 쓰인다.)
<주요기능>
- Virtual Camera
- 여러 개의 가상 카메라 설정 가능
- Priority 값으로 자동 전환
- Follow & Look At
- 특정 대상(플레이어 등) 자동 추적 및 바라보기 설정
- Cinemachine Confiner 2D
- 카메라가 지정된 영역을 벗어나지 않도록 제한
- Impulse (카메라 흔들림 효과)
- 폭발, 피격 시 카메라 진동 효과 적용 가능
- 트랜지션(카메라 전환)
- Priority 값을 조절하여 자연스러운 카메라 변경
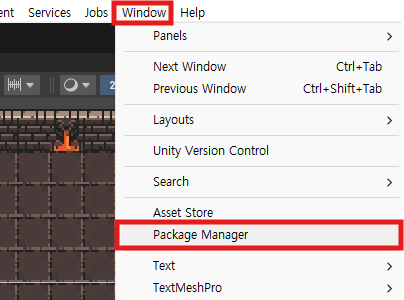
<Cinemachine 설치>
Unity 상단 메뉴에서 Window -> PackageManager -> Unity Registry로 들어가서 Cinemachine을 검색해서 Install하면 된다.
| 패키지 설치 |
|---|
 |
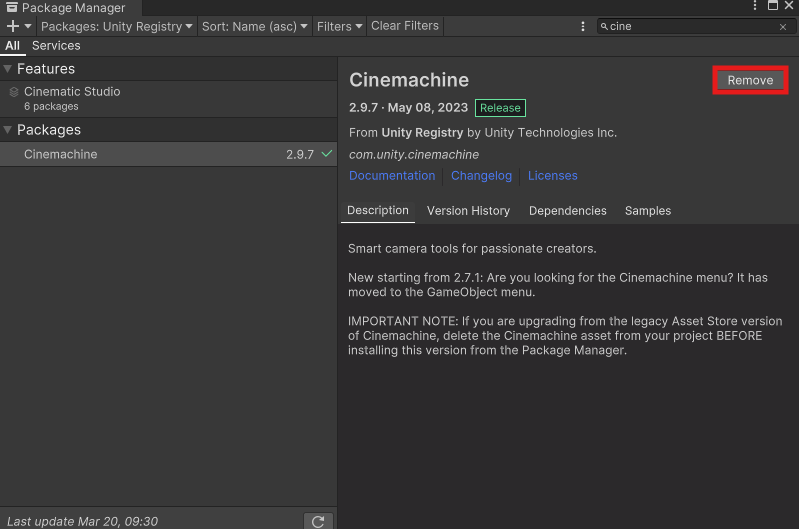 |
| *나는 이미 설치되어 있어서 Remove가 뜨지만 설치되어 있지 않으면 Install이 뜬다. |
<Follow Camera 적용>
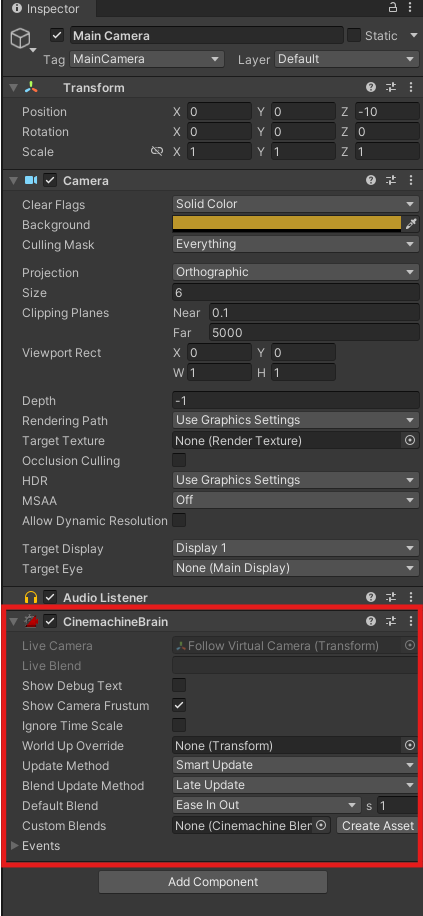
1. Main Camera에 CinemachineBrain 컴포넌트를 추가한다.
| CinemachineBrain 추가 |
|---|
 |
2. 따라갈 대상을 정할 Virtual Camera 생성한다.
카메라 루트 오브젝트 생성 -> 빈 게임 오브젝트를 생성하고 이름을 "Cameras" 로 변경
이후 Cameras 하위 오브젝트로 빈 게임 오브젝트를 생성하고 이름을 "Follow Virtual Camera" 로 변경한 다음 CinemachineVirtualCamera 컴포넌트를 추가한다.
그리고 아래와 같이 설정해준다.
| Follow Virtual Camera 생성 |
|---|
 |
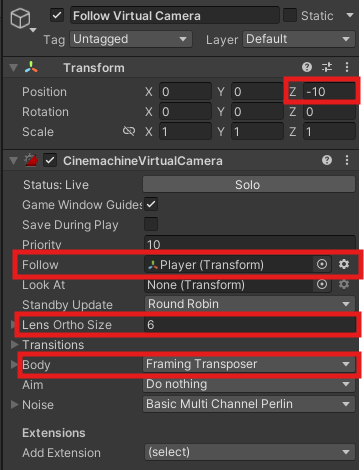 |
이렇게 하면 이제 카메라가 자동으로 Player를 따라다닌다.
<카메라 이동 제한 적용>
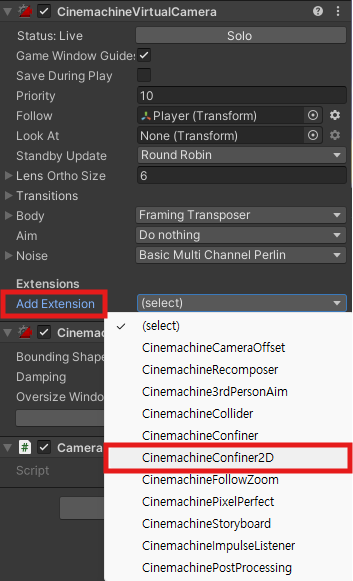
- Follow Virtual Camera의 CinemachineVirtualCamera 컴포넌트에서 Add Extension를 눌러
CinemachineConfiner2D컴포넌트를 추가해준다.
| CinemachineConfiner2D 추가 |
|---|
 |
- Cameras 하위 오브젝트로 빈 오브젝트를 만들고 이름을 "Virtual Camera Collider"로 변경한다. 이후 Polygon Collider 2D 컴포넌트를 추가해주고 카메라 영역보다 크게 설정해준다.
| 카메라 이동 범위를 제한할 Collider 생성 |
|---|
 |
- 마지막으로 Follow Virtual Camera의 Cinemachine Confiner 2D 컴포넌트의 Bounding Shape 2D 부분에 방금 만든 Virtual Camera Collider를 넣어준다.
| 카메라 범위로 사용할 Collider 지정 |
|---|
 |
이렇게 하면 이제 카메라가 지정한 범위 밖을 촬영하지 않는다.
<Camera Shake 구현>
Follow Virtual Camera의 Cinemachine Virtual Camera 컴포넌트의 Noise부분을 아래와 같이 설정한다.
| Follow Virtual Camera 설정 |
|---|
 |
| *Basic Multi Channel Perlin : 카메라의 상태에 Perlin 노이즈를 추가하여 카메라 흔들림 효과를 생성한다 |
| *6D Shake : 카메라의 6차원 움직임을 통해 흔들림 효과를 생성 |
| *Amplitude Gain : 흔들리는 세기 |
| *Frequency Gain : 흔들리는 속도 |
using Cinemachine;
using UnityEngine;

public class CameraShake : MonoBehaviour
{
    private CinemachineVirtualCamera virtualCamera;
    private CinemachineBasicMultiChannelPerlin perlin;
    private float shakeTimeRemaining;

    bool isInit = false;

    private void Awake()
    {
        if(isInit == false)
        {
            Init();
        }
    }

    void Init()
    {
        virtualCamera = GetComponent<CinemachineVirtualCamera\>();
        perlin = virtualCamera.GetCinemachineComponent<CinemachineBasicMultiChannelPerlin\>();
        isInit = true;
    }

    public void ShakeCamera(float duration, float amplitude, float frequency)
    {
        if (isInit == false)
        {
            Init();
        }

        if(shakeTimeRemaining > duration)
        {
            return;
        }

        shakeTimeRemaining = duration;

        perlin.m_AmplitudeGain = amplitude;
        perlin.m_FrequencyGain = frequency;
    }

    private void Update()
    {
        if (shakeTimeRemaining > 0)
        {
            shakeTimeRemaining -= Time.deltaTime;
            if(shakeTimeRemaining <= 0f)
            {
                StopShake();
            }
        }
    }

    public void StopShake()
    {
        shakeTimeRemaining = 0;
        perlin.m_FrequencyGain = 0;
        perlin.m_AmplitudeGain = 0;
    }
}
이렇게 스크립트를 만들고 Follow Virtual Camera에 컴포넌트로 추가해주면 ShakeCamera() 함수를 호출해서 카메라 흔들림을 연출할 수 있다.
<카메라 전환 구현>
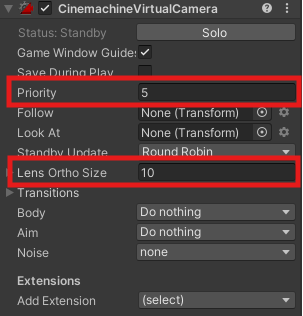
Cameras 자식 객체로 빈 게임 오브젝트를 만들고 Fixed Virtual Camera로 이름을 변경해준다. 이후 Cinemachine Virtual Camera 컴포넌트를 추가해주고 아래와 같이 설정한다.
| Fixed Virtual Camera 설정 |
|---|
 |
그리고 BoxCollider2D 컴포넌트를 추가해주고 isTrigger를 체크해준 뒤 적당한 크기로 설정한다.
using Cinemachine;
using UnityEngine;

public class VirtualCameraController : MonoBehaviour
{
    CinemachineVirtualCamera vcam;

    public int currentPriority = 5;
    public int activepriority = 20;

    private void Awake()
    {
        vcam = GetComponent<CinemachineVirtualCamera\>();
    }

    private void OnTriggerEnter2D(Collider2D collision)
    {
        if (collision.gameObject.GetComponent<PlayerController\>())
        {
            vcam.Priority = activepriority;
        }
    }

    private void OnTriggerExit2D(Collider2D collision)
    {
        if (collision.gameObject.GetComponent<PlayerController\>())
        {
            vcam.Priority = currentPriority;
        }
    }
}
마지막으로 MainCamera의 CinemachineBrain 컴포넌트에서 Default Blend를 Ease IN Out : 1 로 설정해준다. (카메라가 자연스럽게 바뀌는 데 걸리는 시간 1초)
위에 만든 스크립트를 Fixed Virtual Camera에 추가해주고 Fixed Virtual Camera의 Box Collider에 플레이어가 닿으면, 카메라의 우선순위가 바뀌면서 Fixed Virtual Camera를 비추는 연출이 가능하다.
[2. 스테이지 데이터 구성]
StageData라는 스테이지의 정보를 저장하는 클래스를 만들어서 스테이지의 데이터를 관리하는 형식이다. StageData에는 스테이지를 구성하는 모든 정보가 담겨있다고 생각하면 된다.
[System.Serializable]
public class StageInfo
{
    public int stageKey;
    public WaveData[] waves;

    public StageInfo(int stageKey, WaveData[] waves)
    {
        this.stageKey = stageKey;
        this.waves = waves;
    }
}

[System.Serializable]
public class WaveData
{
    public MonsterSpawnData[] monsters;
    public bool hasBoss;
    public string bossType;

    public WaveData(MonsterSpawnData[] monsters, bool hasBoss, string bossType)
    {
        this.monsters = monsters;
        this.hasBoss = hasBoss;
        this.bossType = bossType;
    }
}

[System.Serializable]
public class MonsterSpawnData
{
    public string monsterType;
    public int spawnCount;

    public MonsterSpawnData(string monsterType, int spawnCount)
    {
        this.monsterType = monsterType;
        this.spawnCount = spawnCount;
    }
}

public static class StageData
{
    public static readonly StageInfo[] Stages = new StageInfo[]
    {
        new StageInfo(0,new WaveData[] {
            new WaveData(new MonsterSpawnData[]
            {
                new MonsterSpawnData("Goblin",1),
            }
            ,false,""),
            new WaveData(new MonsterSpawnData[]
            {
                new MonsterSpawnData("Goblin",3),
            }
            ,false,""),
            new WaveData(new MonsterSpawnData[]
            {
                new MonsterSpawnData("Goblin",2),
                new MonsterSpawnData("Goblin",2),
                new MonsterSpawnData("Goblin",2),
            }
            ,true,"Orc_Shaman"),
        }
        ),

        new StageInfo(1,new WaveData[] {
            new WaveData(new MonsterSpawnData[]
            {
                new MonsterSpawnData("Goblin",4),
            }
            ,false,""),
            new WaveData(new MonsterSpawnData[]
            {
                new MonsterSpawnData("Goblin",10),
            }
            ,false,""),
            new WaveData(new MonsterSpawnData[]
            {
                new MonsterSpawnData("Goblin",10),
                new MonsterSpawnData("Goblin",10),
                new MonsterSpawnData("Goblin",10),
            }
            ,true,"Orc_Shaman"),
        }
        ),
    };
}
이런식으로 스크립트를 구조를 짜게 되면 해당 스테이지의 웨이브 정보, 스폰될 몬스터, 보스 유무 등 모든 정보를 저장할 수 있으며, static class이므로 인스턴스 생성없이 편하게 접근해서 사용할 수 있다.
[3. 게임 데이터 저장과 로드 구현]
스테이지의 진행도를 저장해서 저장과 불러오기를 구현하기 위해 PlayerPrefs를 이용하는 방법이다.
아래는 세이브 로드를 진행할 StageSaveManager 스크립트이다.
using UnityEngine;

[System.Serializable]
public class StageInstance
{
    public int stageKey;
    public int currentWave;
    public StageInfo currentStageInfo;

    public StageInstance(int stageKey, int currentWave)
    {
        this.stageKey = stageKey;
        this.currentWave = currentWave;
    }

    public void SetStageInfo(StageInfo stageInfo)
    {
        currentStageInfo = stageInfo;
    }

    public bool CheckEndOfWave()
    {
        if(currentStageInfo == null)
        {
            return false;
        }

        if(currentWave >= currentStageInfo.waves.Length - 1)
        {
            return false;
        }

        return true;
    }
}

public class StageSaveManager
{
    private const string SaveKey = "StageInstance";

    public static void SaveStageInstance(StageInstance instance)
    {
        string json = JsonUtility.ToJson(instance);
        PlayerPrefs.SetString(SaveKey, json);
        PlayerPrefs.Save();
    }

    public static StageInstance LoadStageInstance()
    {
        if (PlayerPrefs.HasKey(SaveKey))
        {
            string json = PlayerPrefs.GetString(SaveKey);
            return JsonUtility.FromJson<StageInstance\>(json);
        }
        return null;
    }

    public static void ClearSavedStage()
    {
        PlayerPrefs.DeleteKey(SaveKey);
        PlayerPrefs.Save();
    }
}
간단하게 설명하면 현재 스테이지 정보를 담을 인스턴스를 생성해서 저장할 땐 해당 인스턴스의 정보를 JsonUility를 활용해서 클래스 전체를 PlayerPrefs에 저장하고, 불러올 땐 PlayerPref에 저장되어 있는 데이터를 인스턴스화 시킨다고 생각하면된다.
주의할 점은 StageInstance를 직렬화 하려면 Serializable을 선언해야하고, 모든 멤버 변수를 public으로 선언해야한다.
[5. 오브젝트 풀링]
오브젝트 풀링이란 자주 생성 및 파괴되는 객체를 미리 생성하여 재사용하는 방식이다. 이는 GC의 부담을 줄이고, 성능을 최적화하는데 효과적이다.
먼저 IPoolable이라는 인터페이스를 만들어서 ObjectPooling을 사용할 클래스에 상속시켜준다.
using System;
using UnityEngine;

public interface IPoolable
{
    void intialize(Action<GameObject\> returnAction);
    void OnSpawn();
    void OnDespawn();
}
그리고 ObjectPoolManager를 만들어서 오브젝트를 관리해준다.
using System.Collections.Generic;
using UnityEngine;

public class ObjectPoolManager : MonoBehaviour
{
    public GameObject[] prefabs;
    private Dictionary<int, Queue<GameObject\>> pools = new Dictionary<int, Queue<GameObject\>>();

    public static ObjectPoolManager Instance { get; private set; }

    private void Awake()
    {
        Instance = this;

        for (int i = 0; i < prefabs.Length; i++)
        {
            pools[i] = new Queue<GameObject\>();
        }
    }

    public GameObject GetObject(int prefabIndex, Vector3 position, Quaternion rotation)
    {
        if (!pools.ContainsKey(prefabIndex))
        {
            Debug.Log($"프리팹 인덱스 {prefabIndex}에 대한 풀이 존재하지 않습니다.");
            return null;
        }

        GameObject obj;
        if (pools[prefabIndex].Count > 0)
        {
            obj = pools[prefabIndex].Dequeue();
        }
        else
        {
            obj = Instantiate(prefabs[prefabIndex]);
            obj.GetComponent<IPoolable\>()?.intialize(o => ReturnObject(prefabIndex, o));
        }

        obj.transform.SetPositionAndRotation(position, rotation);
        obj.SetActive(true);
        obj.GetComponent<IPoolable\>().OnSpawn();
        return obj;
    }

    public void ReturnObject(int prefabIndex, GameObject obj)
    {
        if (!pools.ContainsKey(prefabIndex))
        {
            Destroy(obj);
            return;
        }
        obj.SetActive(false);
        pools[prefabIndex].Enqueue(obj);
    }
}
위 코드를 사용하면 GetObject를 통해 오브젝트 풀에서 오브젝트를 가져올 수 있고, ReturnObject를 통해 오브젝트를 풀에 넣을 수도 있다. 이것을 활용해서 instantiate와 destroy를 최소화하자.
[6. 확장 가능한 스탯 시스템 설계]
ScriptableObject는 에디터에서 데이터를 수정하고 런타임에서는 읽기 전용으로 사용하는 정적 데이터 관리 방식에 적합하다. 그래서 캐릭터의 스탯을 관리할 때 유용하게 사용할 수 있다.
using System.Collections.Generic;
using UnityEngine;

public enum StatType
{
    Health,
    Speed,
    ProjectileCount,
}

[CreateAssetMenu(fileName = "New StatData", menuName ="Stat/Character Stats")]
public class StatData : ScriptableObject
{
    public string characterName;
    public List<StatEntry\> stats;
}

[System.Serializable]
public class StatEntry
{
    public StatType statType;
    public float baseValue;
}
이런식으로 ScriptableObject를 사용하면 Inspector창에서 데이터를 수정해서 사용할 수 있어서 매우 편리하다.
여기서 추가적으로 StatHandler를 만들어서 위에서 만든 ScriptableObject를 캐싱해서 스텟을 관리해주면 된다.
public class StatHandler : MonoBehaviour
{
    public StatData statData;
    private Dictionary<StatType, float> currentStats = new Dictionary<StatType, float>();

    private void Awake()
    {
        InitializeStats();
    }

    private void InitializeStats()
    {
        foreach (StatEntry entry in statData.stats)
        {
            currentStats[entry.statType] = entry.baseValue;
        }
    }

    public float GetStat(StatType statType)
    {
        return currentStats.ContainsKey(statType) ? currentStats[statType] : 0;
    }

    public void ModifyStat(StatType statType, float amount, bool isPermanent = true, float duration = 0)
    {
        if (!currentStats.ContainsKey(statType)) return;

        currentStats[statType] += amount;

        if (!isPermanent)
        {
            StartCoroutine(RemoveStatAfterDuration(statType, amount, duration));
        }
    }

    private IEnumerator RemoveStatAfterDuration(StatType statType, float amount, float duration)
    {
        yield return new WaitForSeconds(duration);
        currentStats[statType] -= amount;
    }
}
Scriptable을 활용해서 캐릭터 스탯뿐만아니라 아이템 정보, 레벨 디자인 데이터 같은 정적 데이터를 관리해보자.