Circuit이란?
Circuit은 Kotlin 애플리케이션을 구축하기 위한 간단하고 가벼우며, 확장 가능한 프레임워크로, Compose 기반으로 만들어졌다. UDP(단방향 데이터 흐름)과 Presenters 아키텍처와 같이 핵심 원칙을 기반으로 한다.
circuit 소개 내용 참고
이번에는 실제 circuit 공식 문서와 다른 블로그들의 정보를 토대로 간단한 메인화면(+ 바텀 내비게이션)을 구현해보려고 한다.
특히 해당 블로그는 circuit에 대한 딥다이브 공부 느낌으로 분석해주신 분이 있어서 참고가 많이 되었습니다.
프로젝트 적용
1. 라이브러리 설정
먼저 해당 프로젝트는 circuit + hilt 라이브러리를 이용해 구성을 할 예정이다.
실제로 공식 문서 Code Generation 보면 hilt를 통해 종속성 주입 도구로 팩토리 생성과 관련 보일러 플레이트를 줄일 수 있는 방법을 설명해준다.
[versions]
circuit = "0.30.0"
ksp = "2.0.21-1.0.27"
hilt = "2.57.1"

[libraries]
#circuit 라이브러리
slack-circuit = { module = "com.slack.circuit:circuit-foundation", version.ref = "circuit"}
slack-circuit-android = { module = "com.slack.circuit:circuitx-android", version.ref = "circuit"}
slack-circuit-runtime = { module = "com.slack.circuit:circuit-runtime", version.ref = "circuit"}
slack-circuit-codegen-annotations = { module = "com.slack.circuit:circuit-codegen-annotations", version.ref = "circuit"}
slack-circuit-codegen = { module = "com.slack.circuit:circuit-codegen", version.ref = "circuit"}

#hilt
dagger-hilt-android = { module = "com.google.dagger:hilt-android", version.ref = "hilt"}
dagger-hilt-compiler = { module = "com.google.dagger:hilt-android-compiler", version.ref = "hilt"}

[plugins]
ksp = { id = "com.google.devtools.ksp", version.ref="ksp"}
hilt-plugin = {id = "com.google.dagger.hilt.android", version.ref = "hilt"}


[bundles]
circuit = [
    "slack-circuit",
    "slack-circuit-android",
    "slack-circuit-runtime"
]
해당 라이브러리들을 추가해 gradle 파일에 적용해준다.
//root gradle.kts
plugins {
    //...
    alias(libs.plugins.ksp) apply false
    alias(libs.plugins.hilt.plugin) apply false
}


//app gradle.kts
plugins {
    //...
    alias(libs.plugins.ksp)
    alias(libs.plugins.hilt.plugin)
    //참고로 Circuit을 Parcelize를 이용해 Screen 적용하기 때문에 추가 적용
    id("kotlin-parcelize")
}

android {
    //...

    //이 정보를 넣어야 code Generation 동작!
    ksp {
        arg("circuit.codegen.mode", "hilt")
    }
}

dependencies {
	//...
    //hilt
    implementation(libs.dagger.hilt.android)
    ksp(libs.dagger.hilt.compiler)

    //circuit
    implementation(libs.bundles.circuit)
    api(libs.slack.circuit.codegen.annotations)
    ksp(libs.slack.circuit.codegen)
}
2. Screen 설정하기
먼저 바텀 내비게이션을 적용할 정보를 만든다. 2개의 내비게이션을 적용(MainScreen, SecondScreen)
//parcelize 어노테이션 설정하기
@Parcelize
data object MainScreen : Screen

@Parcelize
data object SecondScreen : Screen
여기서 Screen을 상속받는데 해당 Screen은 circuit에서 제공하는 인터페이스다.
내부를 보면 StaticScreen도 Screen을 상속 받는데, 이는 아직 잘 몰라서 적용은 안하고, Screen을 사용했다. 보시는 바와 같이 Parcelable을 상속받고 있다. 이거 때문에 어노테이션을 적용안하면 아래와 같이 오류가 발생
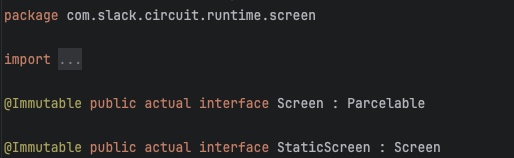
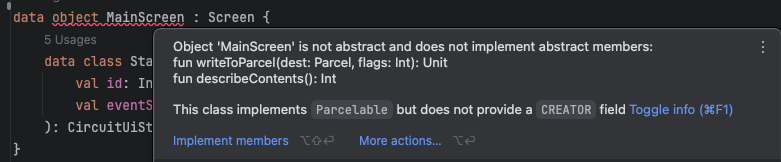
이는 Parcelable 구현체를 작성하라는 것이고, 이를 간단하게 구현적용하도록 도와주는 것이 @Parcelize 어노테이션이다.
3. State, Event 설정하기
다른 circuit 라이브러리들을 보면 다양하게 적용하는데 공식 문서를 이용한 방식으로 일단 채택했다.
@Parcelize
data object MainScreen : Screen {
    data class State(
        val id: Int,
        val eventSink: (MainEvent) -> Unit
    ): CircuitUiState
}

sealed interface MainEvent {
    data object Increase: MainEvent
    data object Decrease: MainEvent
}

//------

@Parcelize
data object SecondScreen : Screen {
    data class State(
        val id: Int,
        val eventSink: (SecondEvent) -> Unit
    ): CircuitUiState
}

sealed interface SecondEvent {
    data object Increase: SecondEvent
    data object Decrease: SecondEvent
}
eventSink의 고차함수를 이용해 State 안에 적용하는 것을 볼 수 있다. 이는 이제 ViewModel에서 onEvent같은 함수 역할을 하는 것 같다.
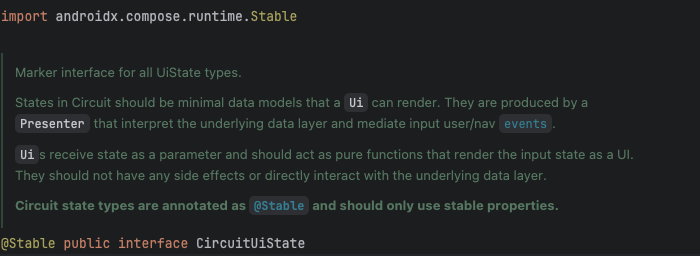
Event는 현재 Screen 밖에 있긴 한데 내부에 작성해도 무방(공식 문서에는 State가 Screen 내부에 구현되어 있으나, 이를 밖에 빼도 무방하다. CircuitUiState만 상속하면 되는 것 같다.
이 CircuitUiState도 circuit 라이브러리에 적용되어 있는 인터페이스다.
4. UI 구현하기
UI를 구현하는 방법이 2가지가 있는 것 같다. 첫 방법은 일반 함수를 이용해서 화면을 구성하는 방식이다. 아래는 공식 문서 코드 내용이다.
//파라미터에 State를 넣어서 사용하는 것 같음
@Composable
fun Inbox(state: InboxScreen.State, modifier: Modifier = Modifier) {
  Scaffold(modifier = modifier, topBar = { TopAppBar(title = { Text("Inbox") }) }) { innerPadding ->
    LazyColumn(modifier = Modifier.padding(innerPadding)) {
      items(state.emails) { email ->
        EmailItem(email)
      }
    }
  }
}

// Write one or use EmailItem from ui.kt
@Composable
private fun EmailItem(email: Email, modifier: Modifier = Modifier) {
  // ...
}
또 다른 방법으로는 class를 만들어 Ui<STATE>를 상속 받는 것이다. 설명이 적혀있긴 한데, 종속성이 있는 복잡한 UI의 경우 사용한다고 적혀 있다. 근데 이 경우는 거의 필요하지 않아서 보통은 위와 방식을 사용한다고 적혀 있다.
하지만 나는 class를 사용하는 방식을 이용해보았다.
//이 Inject 어노테이션을 꼭 명시하자.
@CircuitInject(MainScreen::class, SingletonComponent::class)
class MainUi: Ui<MainScreen.State> {
@Composable
override fun Content(
state: MainScreen.State,
modifier: Modifier
) {
Box(
modifier = modifier
.fillMaxSize()
.background(color = Color.Yellow)
.clickable {
state.eventSink(MainEvent.Increase)
},
contentAlignment = Alignment.Center
) {
Text(
text = "${state.id}"
)
}
}
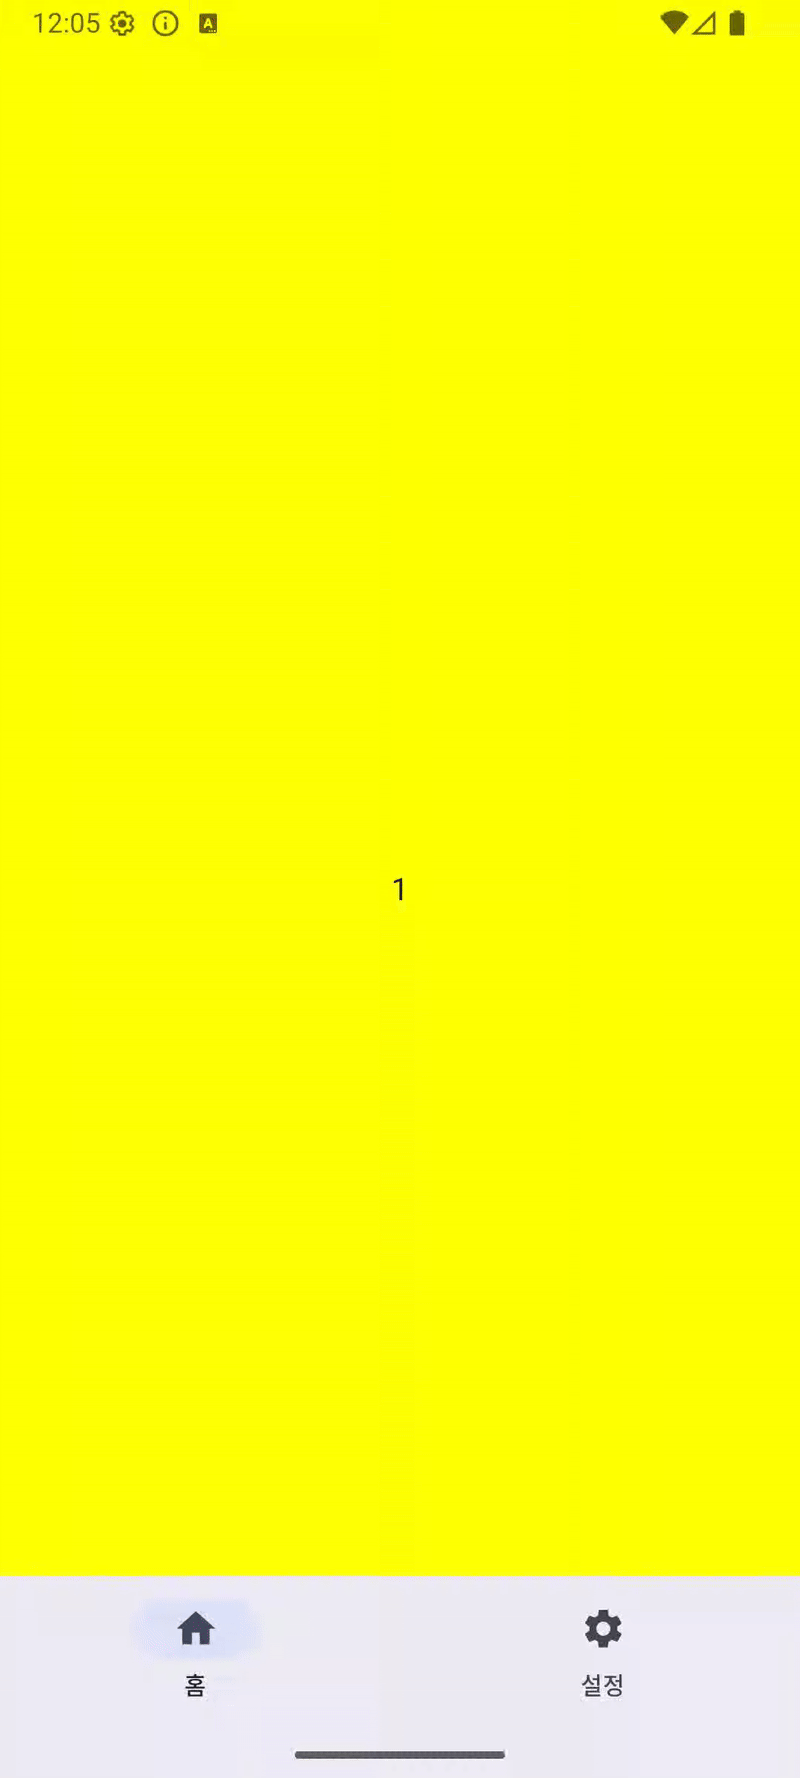
}일단 기본적으로 박스 화면을 클릭했을 때 id값이 증가하는 기본적인 UI이다.(SecondScreen 역시 배경 색상만 다르고 똑같이 구현했다.
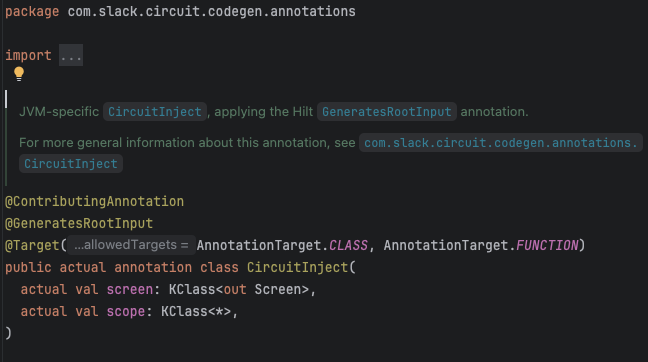
여기서 중요한 것은 @CircuitInject 어노테이션이다. codgen 라이브러리 어노테이션으로 아까 gradle에서 설정한 것을 토대로 의존성 주입을 해주는 것 같다. 실제 공식 문서에서도 적용되어 있다.
5. Presenter 구현
Circuit에서 ViewModel 대신 사용하는 Presenter다. 예전 방식과 다른 방법이지만, 다른 블로그에서 설명을 잘해 줘서 참고하면서 적용했다.
Circuit Presenter
- UI 비즈니스 로직과 데이터 레이어 사이의 변환 계층 제공
- Presenter 로직은 Compose UI를 생성하면 안되고 비즈니스 로직만을 위한 것이다
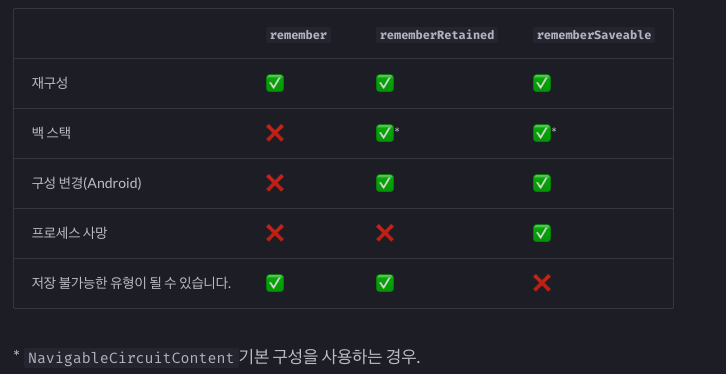
- remember, rememberRetained, rememberSaveable을 이용해 상태 관리를 한다. 아래 이미지는 공식 문서에서 사용적용 범위를 알려준다. (ViewModel은 LiveData 또는 StateFlow 사용)
- Circuit Presenter는 Compose Lifecycle에 연결되어 있어서 Lifecycle에 대해 고려할 필요가 없다.) (ViewModel은 repeatOnLifecycle또는 collectAsStateWithLifecycle 같은 함수 사용)
이제 실제 Presenter를 구현해 버튼을 눌렀을 때 카운터가 증가, 감소되는 기능을 구현했다.
@CircuitInject(MainScreen::class, SingletonComponent::class)
class MainPresenter: Presenter<MainScreen.State> {
@Composable
override fun present(): MainScreen.State {
var counter by rememberRetained {
mutableStateOf(1)
}
return MainScreen.State(id = counter) { event ->
when(event) {
MainEvent.Decrease -> counter++
MainEvent.Increase -> counter--
}
}
}
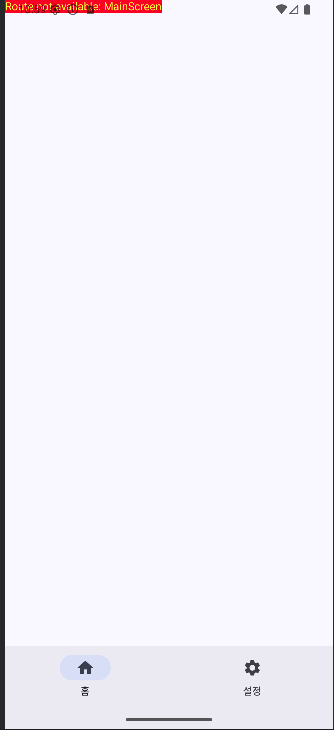
}나는 @CircuitInject를 적용해야 화면이 보였다. 어노테이션을 주석 처리하면 아래와 같이 오류가 발생(Route not available: MainScree)
아무튼 State에 eventSink에서 event에 따른 counter 증감을 적용한 코드다.
6. DI 적용
단순 code Generation을 이용한다고 자동으로 DI가 적용되는 것은 아니다. circuit을 적용하려면 MainActivity에 Circuit 객체를 가져와야하는데 이 객체를 DI를 만들어야 한다. 다른 circuit 예제 깃허브를 보고, 블로그도 여러 개를 봤는데 기본적으로 DI는 이 코드가 거의 공통적으로 사용하는 것 같다.(심지어 gpt도 같은 결과를 알려줌)
@Module
@InstallIn(SingletonComponent::class)
abstract class CircuitModule {

    @Multibinds
    abstract fun presenterFactories(): Set<Presenter.Factory>

    @Multibinds
    abstract fun uiFactories(): Set<Ui.Factory>

    companion object {
        @OptIn(ExperimentalCircuitApi::class)
        @Provides
        fun provideCircuit(
            presenterFactories: @JvmSuppressWildcards Set<Presenter.Factory>,
            uiFactories: @JvmSuppressWildcards Set<Ui.Factory>,
        ): Circuit = Circuit.Builder()
            .addPresenterFactories(presenterFactories)
            .addUiFactories(uiFactories)
            .build()
    }
}
만약 해당 DI를 적용하지 않으면 컴파일에서 오류가 발생한다.
MainActivity에 Circuit객체를 @Inject했는데 해당 객체를 찾을 수 없는 오류

7. MainActivity에 적용하기
이제 Circuit을 적용해보자. 바텀 내비게이션 까지 구현한 방법이다.
@AndroidEntryPoint
class MainActivity : ComponentActivity() {

    @Inject
    lateinit var circuit: Circuit

    @SuppressLint("UnusedMaterial3ScaffoldPaddingParameter")
    override fun onCreate(savedInstanceState: Bundle?) {
        super.onCreate(savedInstanceState)
        enableEdgeToEdge()
        setContent {
            Media3ExTheme {
                val backStack = rememberSaveableBackStack(root = MainScreen)
                val navigator = rememberCircuitNavigator(backStack)

                var currentBottomScreen by remember {
                    mutableStateOf<Screen>(MainScreen)
                }
                val bottoms = listOf(
                    MainScreen,
                    SecondScreen
                )

                CircuitCompositionLocals(circuit = circuit) {
                    val circuitLocal = LocalCircuit.current
                    Scaffold(
                        modifier = Modifier.fillMaxSize(),
                        bottomBar = {
                            NavigationBar(
                                contentColor = Color.Black
                            ) {
                                bottoms.forEach { screen ->
                                    NavigationBarItem(
                                        selected = screen == currentBottomScreen,
                                        onClick = {
                                            if(currentBottomScreen != screen) {
                                                currentBottomScreen = screen
                                                navigator.resetRoot(
                                                    screen,
                                                    saveState = true,
                                                    restoreState = true
                                                )
                                            }
                                        },
                                        icon = {
                                            when (screen) {
                                                MainScreen -> {
                                                    Icon(
                                                        imageVector = Icons.Default.Home,
                                                        contentDescription = null
                                                    )
                                                }
                                                SecondScreen -> {
                                                    Icon(
                                                        imageVector = Icons.Default.Settings,
                                                        contentDescription = null
                                                    )
                                                }
                                            }
                                        },
                                        label = {
                                            when (screen) {
                                                MainScreen -> {
                                                    Text(text = "홈")
                                                }
                                                SecondScreen -> {
                                                    Text(text = "설정")
                                                }
                                            }
                                        }
                                    )
                                }
                            }
                        }
                    ) {
                        NavigableCircuitContent(
                            navigator = navigator,
                            backStack = backStack,
                        )
                    }
                }
            }
        }
    }
}
중요한건 CircuitCompositionLocals(circuit = circuit)을 지정하는 것과
val backStack = rememberSaveableBackStack(root = MainScreen)
val navigator = rememberCircuitNavigator(backStack)
을 이용해 내비게이션 스택을 적용할 수 있다는 것이다.
CircuitCompositionLocals을 적용하지 않으면 앱 실행 중에 오류가 발생한다.

required value was null이라는 NavigableCircuitContent오류인데
CircuitCompositionLocals를 사용하면 Localcircuit.current를 사용할 수 있는데 아마 이부분을 사용하는 곳에서 null이 나와 생긴 오류 같다.(아마도?)
앱을 실행하면 아래와 같다.
실행한 것을 보면 Main쪽은 변화된 것이 유지가 되고, Second 쪽은 화면 이동하면 숫자가 초기화 된 것을 볼 수 있다.
이는 MainScreen에서는 rememberRetained을, SecondScreen에서는 remember를 사용했기 때문에 remember는 백스택 시에 정보가 저장이 되지 않는다.
또한 바텀 내비게이션을 누를 때 navigator.resetRoot 함수를 호출해 초기 root로 이동하는데 해당 함수 파라미터에 saveState와 restoreState를 true를 지정했기 때문에 MainScreen 상태가 유지가 되는것이다. 만약 없으면 Main쪽도 초기화가 된다.
그래서 탭을 눌렀을 때 화면을 유지하고 싶다면 saveState와 restoreState를 true로 주는 것도 방법이다. 만약 설정 안하면 아래와 같이 MainScreen도 초기화 된다.

6. 화면 전환 애니메이션 적용
뭔가 화면 전환시 기본적으로 애니메이션이 적용되어 있는 것 같다. 이번에는 이 애니메이션을 없애는 방법이나 다른 애니메이션 적용 방법을 알아보자.
사실 이 애니메이션 관련된 내용이 공식 문서에 잘 안보인다..(내가 못찾는건가?)
그래서 검색으로 찾아봤는데 change Log에 하나를 발견했다. 라이브러리 버전 0.27.0에 나온 Change Log로 화면 전환 시에 적용하는 방법을 마지막 줄 PR을 통해 확인 할 수 있다고 한다.(아직 실험 버전)
번역 내용
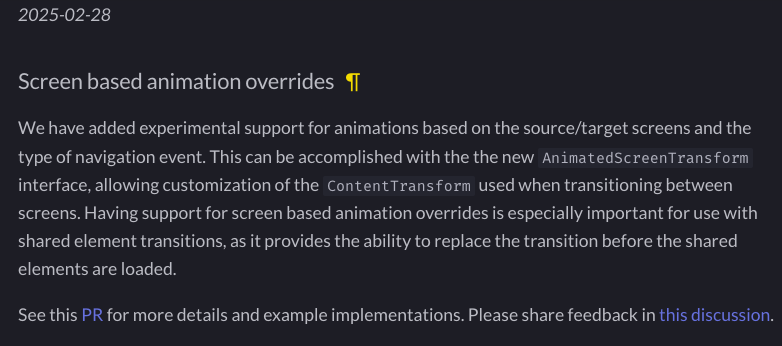
화면 기반 애니메이션 재정의
소스/타겟 화면과 탐색 이벤트 유형에 따라 애니메이션을 실험적으로 지원합니다. 새로운 인터페이스를 통해 화면 간 전환 시 사용되는 AnimatedScreenTransform애니메이션을 사용자 지정할 수 있습니다 ContentTransform. 특히 공유 요소 전환 시 화면 기반 애니메이션 오버라이드 지원은 공유 요소가 로드되기 전에 전환을 대체할 수 있으므로 매우 중요합니다.
자세한 내용과 구현 예시는 이 PR을 참조하세요. 이 토론 에 대한 피드백을 공유해 주세요 .
그래도 여러모로 찾아봤지만 제대로 구현 방법을 잘 못찾아서 직접 Discussions를 이용해 추천 화면 전환 애니메이션 질문했는데 친절하게 알려줘서 감사했다. 아래 링크를 보면 쉽게 적용할 수 있을 것이다.
https://github.com/slackhq/circuit/discussions/2361
그래서 일단 두 가지 버전을 구현해보자.
1. 애니메이션 없애기
2. 화면 이동시 slideHorizon 적용해보기
애니메이션 없애기
//1번 방식
@ExperimentalCircuitApi
object CustomScreenNoneAnimatedTransform : AnimatedScreenTransform {

    val bottomNavigation = listOf(
        MainScreen,
        SecondScreen
    )

    override fun AnimatedContentTransitionScope<AnimatedNavState>.enterTransition(
        animatedNavEvent: AnimatedNavEvent
    ): EnterTransition? {
        // Coming from `HomeScreen` we override the transition to slide in horizontally.
        Log.e("vsvx13", "animatedNavEvent $animatedNavEvent ${initialState.top.screen} ${targetState.top.screen} ${initialState.root.screen} ${targetState.root.screen}")
        return if (initialState.top.screen in bottomNavigation) EnterTransition.None else null
    }

    override fun AnimatedContentTransitionScope<AnimatedNavState>.exitTransition(
        animatedNavEvent: AnimatedNavEvent
    ): ExitTransition? {
        Log.e("vsvx13", "Exit animatedNavEvent $animatedNavEvent ${initialState.top.screen} ${targetState.top.screen} ${initialState.root.screen} ${targetState.root.screen}")
        // Going to `HomeScreen` we override the transition fade out.
        return if(targetState.top.screen in bottomNavigation) ExitTransition.None else null
    }
}


//2번 방식
@ExperimentalCircuitApi
object CustomScreenSlideHorizonAnimatedTransform : AnimatedScreenTransform {

    val bottomNavigation = listOf(
        MainScreen,
        SecondScreen
    )

    override fun AnimatedContentTransitionScope<AnimatedNavState>.enterTransition(
        animatedNavEvent: AnimatedNavEvent
    ): EnterTransition? {
        // Coming from `HomeScreen` we override the transition to slide in horizontally.
        Log.e("vsvx13", "animatedNavEvent $animatedNavEvent ${initialState.top.screen} ${targetState.top.screen} ${initialState.root.screen} ${targetState.root.screen}")
        return if (initialState.top.screen in bottomNavigation) slideInHorizontally() else null
    }

    override fun AnimatedContentTransitionScope<AnimatedNavState>.exitTransition(
        animatedNavEvent: AnimatedNavEvent
    ): ExitTransition? {
        Log.e("vsvx13", "Exit animatedNavEvent $animatedNavEvent ${initialState.top.screen} ${targetState.top.screen} ${initialState.root.screen} ${targetState.root.screen}")
        // Going to `HomeScreen` we override the transition fade out.
        return if(targetState.top.screen in bottomNavigation) slideOutHorizontally { it } else null
    }
}
AnimatedScreenTransform을 상속 받아서 들어올 때와 나갈 때 정보에 따라 애니메이션을 적용할 수 있다. 알려주신 코드를 참조했을 때 targetState.top과 initialState.top이 무엇인지 궁금해서 로그를 남겨보았다.
로그 결과는 아래와 같다.
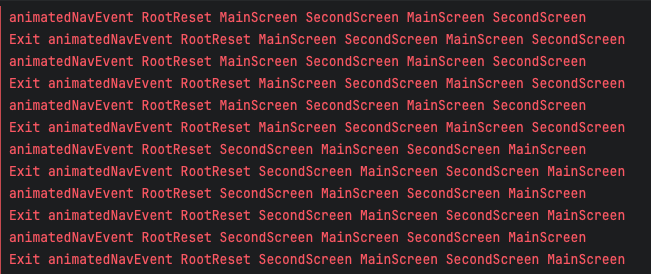
로그를 조금 이상하게 남기긴 했는데 정리하면
MainScreen -> SecondScreen 이동시 initialState.top.screen은 MainScreen, targetState.top.screen은 SecondScreen
SecondScreen -> MainScreen 이동 시 initialState.top.screen은 SecondScreen, targetState.top.screen은 MainScreen 으로 찍히는 것 같다.
즉 initialState...은 현재 스크린, targetState...은 이동된 스크린 같다.
애니메이션이 없을 때는 확인하기 힘드니 Horizon일 때 적용을 하자면 DI에서 Circuit 객체 주입하는 부분에서 아래 코드를 추가하자
@Module
@InstallIn(SingletonComponent::class)
abstract class CircuitModule {

    //...

    companion object {
        @OptIn(ExperimentalCircuitApi::class)
        @Provides
        fun provideCircuit(
            presenterFactories: @JvmSuppressWildcards Set<Presenter.Factory>,
            uiFactories: @JvmSuppressWildcards Set<Ui.Factory>,
        ): Circuit = Circuit.Builder()
            .addPresenterFactories(presenterFactories)
            .addUiFactories(uiFactories)
            //이부분 추가하기, 각 화면에 맞는 애니메이션 적용 가능
            .addAnimatedScreenTransforms(
                MainScreen::class to CustomScreenNoneAnimatedTransform,
                SecondScreen::class to CustomScreenNoneAnimatedTransform
            )
            .build()
    }
}
굳... 각 Screen마다 addAnimatedScreenTransform에 맞는 애니메이션 설정을 하면 각 화면마다 애니메이션을 적용할 수 있다