[SpartaCodingClub] 힙한취미코딩 개발일지 (1)
🎈힙한취미코딩 이벤트 URL
https://spartacodingclub.kr/hip?utm_source=kakao_plusfriend&utm_medium=crm&utm_campaign=%EC%98%A8%EB%9D%BC%EC%9D%B8&utm_content=%EC%B9%B4%EC%B9%B4%EC%98%A4%ED%94%8C%EC%B9%9C%EC%A0%84%EC%88%98&utm_term=%EA%B2%BD%ED%92%88%EA%B0%95%EC%A1%B0_210913
[힙한취미코딩 1일차 MISSION]
🎯간단한 로그인 페이지 만들어보기!🎯
1. HTML?? CSS??
로그인 페이지를 만들기 전에 HTML과 CSS가 각각 무엇이고 어떤 역할을 하는지 배웠다.
📚 HTML = 뼈대, CSS = 꾸미기!!
HTML은 '구역과 텍스트를 나타내는 코드'이고,
CSS는 '잡은 구역을 꾸며주는 것'이다.
💡 HTML 코드 내에 CSS 파일을 불러와서 적용한다!!
1-1) HTML 기초
HTML은 크게 head와 body로 구성되어 있다.
- head 안에는 '페이지의 속성 정보'를,
- body 안에는 '페이지의 내용'을 담는다.
💡 head 안에 들어가는 대표적인 요소로 meta, title, link, style, script 등이 있다!!
Visual Studio Code에서 HTML 파일을 만들어 거기에
html:5을 쓰고 enter를 누르면 아래와 같이 나온다.<!DOCTYPE html> <html lang="en"> <head> <meta charset="UTF-8"> <meta http-equiv="X-UA-Compatible" content="IE=edge"> <meta name="viewport" content="width=device-width, initial-scale=1.0"> <title>Document</title> </head> <body> ... </body> </html>
1-2) CSS 기초
📚 CSS 사용방법
<head> ~ </head>안에<style> ~ </style>로 공간을 만들어 작성하기!!!- class를 가리킬 때는 꼭!! 반드시!!
.아무거나이름 {...}형태로 써주기!!!- EX) mytitle이라는 class를 가리킬 때,
.mytitle {...}형태로!!!
📚 오늘 배운 CSS
✅ 배경관련
① background-color
② background-image
③ background-size*** 위 3개는 항상 붙어 다닌다.
✅ 사이즈
① width
② height
✅ 폰트
① font-size
② font-weight
③ font-famliy
④ color
✅ 간격
① margin
② padding💡 margin은 바깥쪽 여백을, padding은 내 안쪽 여백을 조정해준다.
✅ 추가로 자주 쓰이는 CSS
① border-radius
2. 간단한 로그인 페이지 만들기
이제 본격적으로 '로그인 페이지'를 만들어보도록 하겠다.🚩

📍 1st. Visual Studio Code에서 HTML 파일 만들기
login.html 이라는 파일을 하나 만든다.
💡 파일명에 꼭!!
.html이 포함하기!!!
📍 2nd. "html:5"로 HTML 기본 뼈대 가져오기
<!DOCTYPE html>
<html lang="en">
<head>
    <meta charset="UTF-8">
    <meta http-equiv="X-UA-Compatible" content="IE=edge">
    <meta name="viewport" content="width=device-width, initial-scale=1.0">
    <title>Document</title>
</head>
<body>
    ...
</body>
</html>
📍 3rd. <head> ~ </head> 안의 <title> ~ </title> 사이에 있는 'Document' 지우고, '로그인페이지'라고 쓰기
<!DOCTYPE html>
<html lang="en">
<head>
    <meta charset="UTF-8">
    <meta http-equiv="X-UA-Compatible" content="IE=edge">
    <meta name="viewport" content="width=device-width, initial-scale=1.0">
    <title>로그인페이지</title>
</head>
<body>
    ...
</body>
</html>
📍 4th. CSS를 활용하여 로그인 페이지 '제목' 브라우저에 띄우기
_%EB%A1%9C%EA%B7%B8%EC%9D%B8%ED%8E%98%EC%9D%B4%EC%A7%80_%EC%A0%9C%EB%AA%A9.png)
<h1>태그는 제목을 나타내는 태그이다.<h5>태그도 비중은 작지만 역할이 있다.<body> <h1>로그인 페이지</h1> <h5>아이디, 비밀번호를 입력해주세요</h5> </body>
📍 5th. ID와 PASSWORD 입력할 칸 만들기
_%EB%A1%9C%EA%B7%B8%EC%9D%B8%ED%8E%98%EC%9D%B4%EC%A7%80_ID,PW.png)
<input type="text" />코드를 사용하면 text를 입력할 칸을 만들 수 있다.<body> <h1>로그인 페이지</h1> <h5>아이디, 비밀번호를 입력해주세요</h5> <p>ID: <input type="text" /></p> <p>PW: <input type="text" /></p> </body>
📍 6th. 로그인하기 버튼 만들기
_%EB%A1%9C%EA%B7%B8%EC%9D%B8%ED%8E%98%EC%9D%B4%EC%A7%80_%EB%B2%84%ED%8A%BC.png)
- 버튼을 만들고 싶다면,
<button>태그를 활용하면 된다.<body> <h1>로그인 페이지</h1> <h5>아이디, 비밀번호를 입력해주세요</h5> <p>ID: <input type="text" /></p> <p>PW: <input type="text" /></p> <button>로그인하기</button> </body>
📍 7th. Background 이미지 삽입하기
_%EB%A1%9C%EA%B7%B8%EC%9D%B8%20%ED%8E%98%EC%9D%B4%EC%A7%80_%EC%9D%B4%EB%AF%B8%EC%A7%80%EC%82%BD%EC%9E%85.png)
<body>태그 사이에<div>태그를 만든다.<div>에 "mytitle"라는 class를 입력한다.<body> <div class="mytitle"> <h1>로그인 페이지</h1> <h5>아이디, 비밀번호를 입력해주세요</h5> </div> <p>ID: <input type="text" /></p> <p>PW: <input type="text" /></p> <button>로그인하기</button> </body>
<head>태그 사이에<style>태그를 만든다.- "mytitle"이라는 class를 가리키기 위해
<style>태그 안에.title {...}코드를 입력한다.- 이미지 코드 삽입 전, 이 class 부분이 자리를 얼마나 차지하고 있는지를 확인해야 하는데, 이때
background-color: green;코드를 사용하면 확인이 가능하다.background-color: green;코드를 통해 확인한 크기를 줄이기 위해width와height를 사용했다.- text를 가운데로 옮기기 위해
text-align을 이용하여 위치를 center로 옮겼고,padding-top을 이용하여 box 위부분으로 부터 안쪽으로 20px 떨어진 곳에 위치하도록 조정했다.background-image와background-size,background-position이 3개는 항상 붙어다닌다.<head> <style> .mytitle { width: 300px; height: 200px; color: white; text-align: center; background-image: url('https://www.ancient-origins.net/sites/default/files/field/image/Agesilaus-II-cover.jpg'); background-size: cover; background-position: center; border-radius: 10px; padding-top: 20px; } </style> </head>
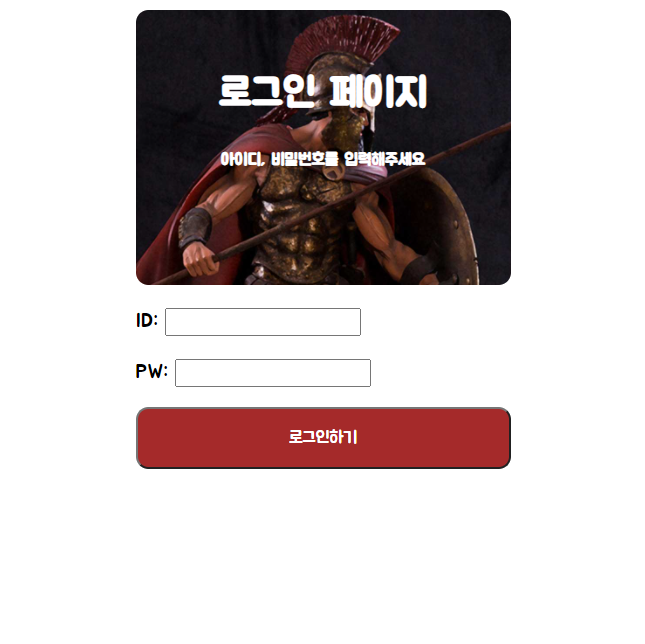
📍 8th. 정중앙으로 옮기기
_%EB%A1%9C%EA%B7%B8%EC%9D%B8%ED%8E%98%EC%9D%B4%EC%A7%80_%EC%A0%95%EC%A4%91%EC%95%99.png)
<body>태그 사이에<div>태그를 만든다.<div>에 "wrap"라는 class를 입력한다.- 각 코드를 하나씩 중앙으로 옮기는 것보다 하나의 묶음으로 만들어서 옮기는 것이 더 효율적. 그래서
<div class="wrap">코드를 만든 것임.<body> <div class="wrap"> <div class="mytitle"> <h1>로그인 페이지</h1> <h5>아이디, 비밀번호를 입력해주세요</h5> </div> <p>ID: <input type="text" /></p> <p>PW: <input type="text" /></p> <button>로그인하기</button> </div> </body>
- "wrap" class가 자리를 얼마나 차지하고 있는지를 확인하기 위해
background-color: green;코드를 사용한다.background-color: green;코드를 통해 확인한 크기를 줄이기 위해width를 사용했다.
-margin: auto;에서 auto는 좌우의 바깥 여백을 똑같이 배분하는 역할을 한다. 그래서 이 코드를 사용하면 브라우저 화면 중앙에 위치하게 된다.<head> <style> .wrap { width: 300px; margin: auto; } </style> </head>
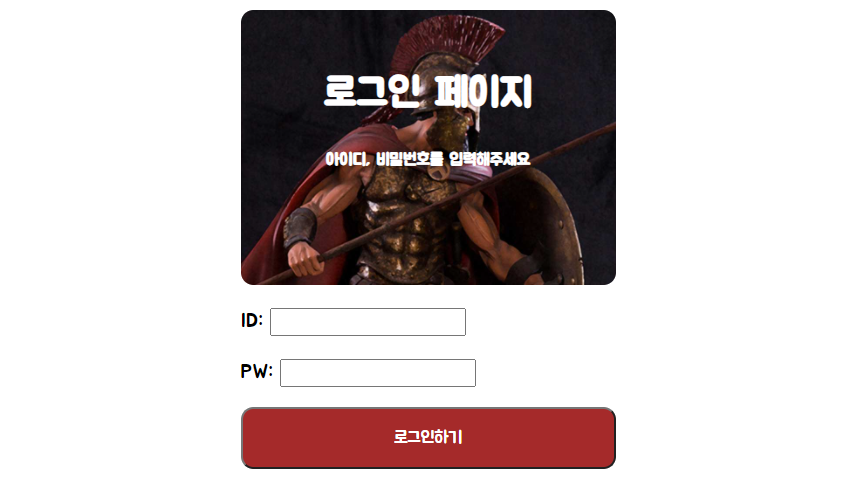
📍 9th. '로그인하기' button 크기, 색 바꾸기
_%EB%A1%9C%EA%B7%B8%EC%9D%B8%ED%8E%98%EC%9D%B4%EC%A7%80_%EB%B2%84%ED%8A%BC%ED%81%AC%EA%B8%B0%EC%83%89.png)
<button>태그에 "mybtn"이라는 class를 입력한다.<body> <div class="wrap"> <div class="mytitle"> <h1>로그인 페이지</h1> <h5>아이디, 비밀번호를 입력해주세요</h5> </div> <p>ID: <input type="text" /></p> <p>PW: <input type="text" /></p> <button class="mybtn">로그인하기</button> </div> </body>
width와height를 이용해 버튼의 가로, 세로 길이를 조절했다.border-radius를 이용해 button 모서리를 덜각지게 만들었다.<head> <style> .mybtn { width: 300px; height: 50px; border-radius: 10px; background-color: brown; color: white; } </style> </head>
📍 10th. 폰트 입히기

- 먼저 구글웹에서 마음에 드는 폰트를 click한다.
- [ + Select this style ]을 click한다.
- link를 복사해서
<head> ~ </head>사이<title>태그 아래에 넣는다.- CSS를 복사해서
<style> ~ </style>사이에 넣는다. 이때 주의할 점은,*의 의미는 모든 태그에 폰트스타일을 다 먹이겠다는 뜻이다.<head> <meta charset="UTF-8"> <title>로그인페이지</title> <link rel="preconnect" href="https://fonts.googleapis.com"> <link href="https://fonts.googleapis.com/css2?family=Jua&display=swap" rel="stylesheet"> <style> * { font-family: 'Jua', sans-serif; } </style> </head>
3. 로그인 페이지 완성 🏆
<완성 코드>
<!DOCTYPE html>
<html lang="en">
<head>
    <meta charset="UTF-8">
    <title>로그인페이지</title>

    <link rel="preconnect" href="https://fonts.googleapis.com">
    <link href="https://fonts.googleapis.com/css2?family=Jua&display=swap" rel="stylesheet">

    <style>
        * {
            font-family: 'Jua', sans-serif;
        }

        .mytitle {
            width: 300px;
            height: 200px;

            color: white;
            text-align: center;

            background-image: url('https://www.ancient-origins.net/sites/default/files/field/image/Agesilaus-II-cover.jpg');
            background-size: cover;
            background-position: center;

            border-radius: 10px;

            padding-top: 20px;
        }

        .wrap {
            width: 300px;
            margin: auto;
        }

        .mybtn {
            width: 300px;
            height: 50px;

            border-radius: 10px;

            background-color: brown;
            color: white;
        }
    </style>
</head>
<body>
    <div class="wrap">
        <div class="mytitle">
            <h1>로그인 페이지</h1>
            <h5>아이디, 비밀번호를 입력해주세요</h5>
        </div>
        <p>ID: <input type="text"/></p>
        <p>PW: <input type="text"/></p>
        <button class="mybtn">로그인하기</button>
    </div>
</body>
</html>
웹개발 종합반에서 배웠던 내용을 힙한취미코딩 이벤트를 통해 다시 한번 더 복습하는 시간을 가질 수 있어서 너무 좋았다. 배웠던 것을 반복해서 한번 더 되새기니 더 꼼꼼하게 머리에 새길수 있어서 매우 유익한 시간이었다.( •̀ .̫ •́ )✧