[SpartaCodingClub] 힙한취미코딩 개발일지 (2)
_%EB%88%88%EC%98%A4%EB%8A%94%ED%9A%A8%EA%B3%BC%EB%B6%99%EC%9D%B4%EA%B8%B0.png)
🎈힙한취미코딩 이벤트 URL
https://spartacodingclub.kr/hip?utm_source=kakao_plusfriend&utm_medium=crm&utm_campaign=%EC%98%A8%EB%9D%BC%EC%9D%B8&utm_content=%EC%B9%B4%EC%B9%B4%EC%98%A4%ED%94%8C%EC%B9%9C%EC%A0%84%EC%88%98&utm_term=%EA%B2%BD%ED%92%88%EA%B0%95%EC%A1%B0_210913
🎈 미션 완성 작품 URL
https://xmas.spartacodingclub.kr/CkpnCWKzT1Fb/xmas.html
[힙한취미코딩 2일차 MISSION]
🎯나만의 Invitation Card 만들어보기!🎯
📍 1. 카드 봉투 HTML 만들기
_%EC%B9%B4%EB%93%9C%EB%B4%89%ED%88%AChtml%EB%A7%8C%EB%93%A4%EA%B8%B0.png)
1-1) 새로운 HTML 파일 만들기
이름은
xmas.html
💡 html:5 입력후 tab을 누르면 템플릿이 자동 완성 된다!!
1-2) 배경색 바꾸기
회색빛이 섞인 진청록색:
#264C59
💡 배경색은 자신이 원하는 color 'pick'하면 된다!!
1-3) 카드 봉투 이미지 가운데에 놓기
✅ 카드 봉투 이미지 URL
https://media.istockphoto.com/vectors/mail-customer-service-icon-vector-id1152903919?k=20&m=1152903919&s=612x612&w=0&h=fSfMK-4dtkcHuujrDXk2mMZrQnl9QC6CHpeaL9jsRIk=✅ <head> 태그 안의 <style> 태그 사이에
.envelope {
    width: 300px;
    height: 300px;

    background-image: url('https://media.istockphoto.com/vectors/mail-customer-service-icon-vector-id1152903919?k=20&m=1152903919&s=612x612&w=0&h=fSfMK-4dtkcHuujrDXk2mMZrQnl9QC6CHpeaL9jsRIk=');
    background-size: cover;
    background-position: center;

    margin: 100px auto 0px auto;
}
✅ <body> 태그 사이에
<div class="envelope"></div>1-4) 카드 봉투 밑에 글씨 놓기
✅ <head> 태그 안의 <style> 태그 사이에
.envelope-title {
    color: white;
    text-align: center;
}

.envelope-msg {
    color: white;
    text-align: center;
}
✅ <body> 태그 사이에
<h2 class="envelope-title">2021 MS's Online Piano Recital Invitation Card</h2>
<h5 class="envelope-msg">LET'S OPEN IT!</h5>
1-5) 마지막으로, 셋을 div로 묶어주기 + class 붙여주기
✅ <body> 태그 사이에
<div class="letter-close">
    <div class="envelope" onclick="open_letter()"></div>
    <h2 class="envelope-title">2021 MS's Online Piano Recital Invitation Card</h2>
    <h5 class="envelope-msg">LET'S OPEN IT!</h5>
</div>
WHY? 이 셋은 같이 나타나고, 없어져야 하는 존재!!
💡 즉, 함께 행동해야 하는 존재이기 때문에, div로 묶어준다.
📍 2. 웹폰트 적용하기
_%EC%9B%B9%ED%8F%B0%ED%8A%B8%20%EC%A0%81%EC%9A%A9%ED%95%98%EA%B8%B0.png)
2-1) 구글 웹폰트 접속하기
2-2) 원하는 글꼴 찾기
Josefin Sans체
https://fonts.google.com/specimen/Josefin+Sans#standard-styles
2-3) Select this style 클릭하기
2-4) link 아래 태그들 복사하기
✅ <head> 태그 안에 위치한 <title> 태그 아래에 붙여넣기
<link rel="preconnect" href="https://fonts.googleapis.com">
<link rel="preconnect" href="https://fonts.gstatic.com" crossorigin>
<link href="https://fonts.googleapis.com/css2?family=Josefin+Sans:wght@500&display=swap" rel="stylesheet">
2-5) css 입히기
✅ <head> 태그 안의 <style> 태그 사이에
* {
    font-family: 'Josefin Sans', sans-serif;
}
📍 3. 편지 HTML 만들기 - 르탄이
_%EB%A5%B4%ED%83%84%EC%9D%B4.png)
3-1) 카드 봉투 HTML 안 보이게 해두기
display 값을 none으로주면 안 보이게 할 수 있다!!
✅ <body> 태그 사이에
<div class="letter-close">
    <div class="envelope"></div>
    <h2 class="envelope-title">2021 MS's Online Piano Recital Invitation Card</h2>
    <h5 class="envelope-msg">LET'S OPEN IT!</h5>
</div>
✅ <head> 태그 안의 <style> 태그 사이에
.letter-close {
    display: none;
}
3-2) 르탄이 만들기
✅ 르탄이 코드스니펫
https://s3.ap-northeast-2.amazonaws.com/materials.spartacodingclub.kr/xmas/Webp.net-gifmaker.gif<르탄이 이미지 띄우기>
✅ <head> 태그 안의 <style> 태그 사이에
.rtan {
    background-color: white;

    width: 200px;
    height: 200px;

    background-image: url('https://s3.ap-northeast-2.amazonaws.com/materials.spartacodingclub.kr/xmas/Webp.net-gifmaker.gif');
    background-size: cover;
    background-position: center;
}
✅ <body> 태그 사이에
<div class="rtan"></div>3-3) 르탄이를 동그랗게 + 흰 테두디로 + 가운데로
✅ <head> 태그 안의 <style> 태그 사이에
.rtan {
    background-color: white;

    width: 200px;
    height: 200px;

    background-image: url('https://s3.ap-northeast-2.amazonaws.com/materials.spartacodingclub.kr/xmas/Webp.net-gifmaker.gif');
    background-size: cover;
    background-position: center;

    margin: auto;

    border-radius: 100px;

    border: 5px solid white;
}
border속성은 태그의 테두리를 설정하는 속성이다.5px solid white는 순서대로 각각 '테두리의 두께', '테두리의 스타일', '테두리의 색상'을 의미하고 각 코드 명령에 따라 테두리를 변경한다.
3-4) 르탄이 띄우기
✅ <head> 태그 안의 <style> 태그 사이에
.rtan {
    background-color: white;

    width: 200px;
    height: 200px;

    background-image: url('https://s3.ap-northeast-2.amazonaws.com/materials.spartacodingclub.kr/xmas/Webp.net-gifmaker.gif');
    background-size: cover;
    background-position: center;

    margin: 30px auto 0px auto;

    border-radius: 100px;

    border: 5px solid white;
}
3-5) 그림자 효과 넣어주기
✅ <head> 태그 안의 <style> 태그 사이에
.rtan {
    background-color: white;

    width: 200px;
    height: 200px;

    background-image: url('https://s3.ap-northeast-2.amazonaws.com/materials.spartacodingclub.kr/xmas/Webp.net-gifmaker.gif');
    background-size: cover;
    background-position: center;

    margin: 30px auto 0px auto;

    border-radius: 100px;

    border: 5px solid white;
    box-shadow: 0px 0px 10px 0px white;
}
- box-shadow 속성은 요소의 테두리를 감싼 그림자 효과를 추가한다.
📍 4. 편지 HTML 만들기 - 메시지
4-1) 메시지 제목 넣기
<하얀색 글씨 + 가운데에 놓기 >
✅ <head> 태그 안의 <style> 태그 사이에
.hone {
    color: white;
    text-align: center;
}

.htwo {
    color: white;
    text-align: center;
}
✅ <body> 태그 사이에
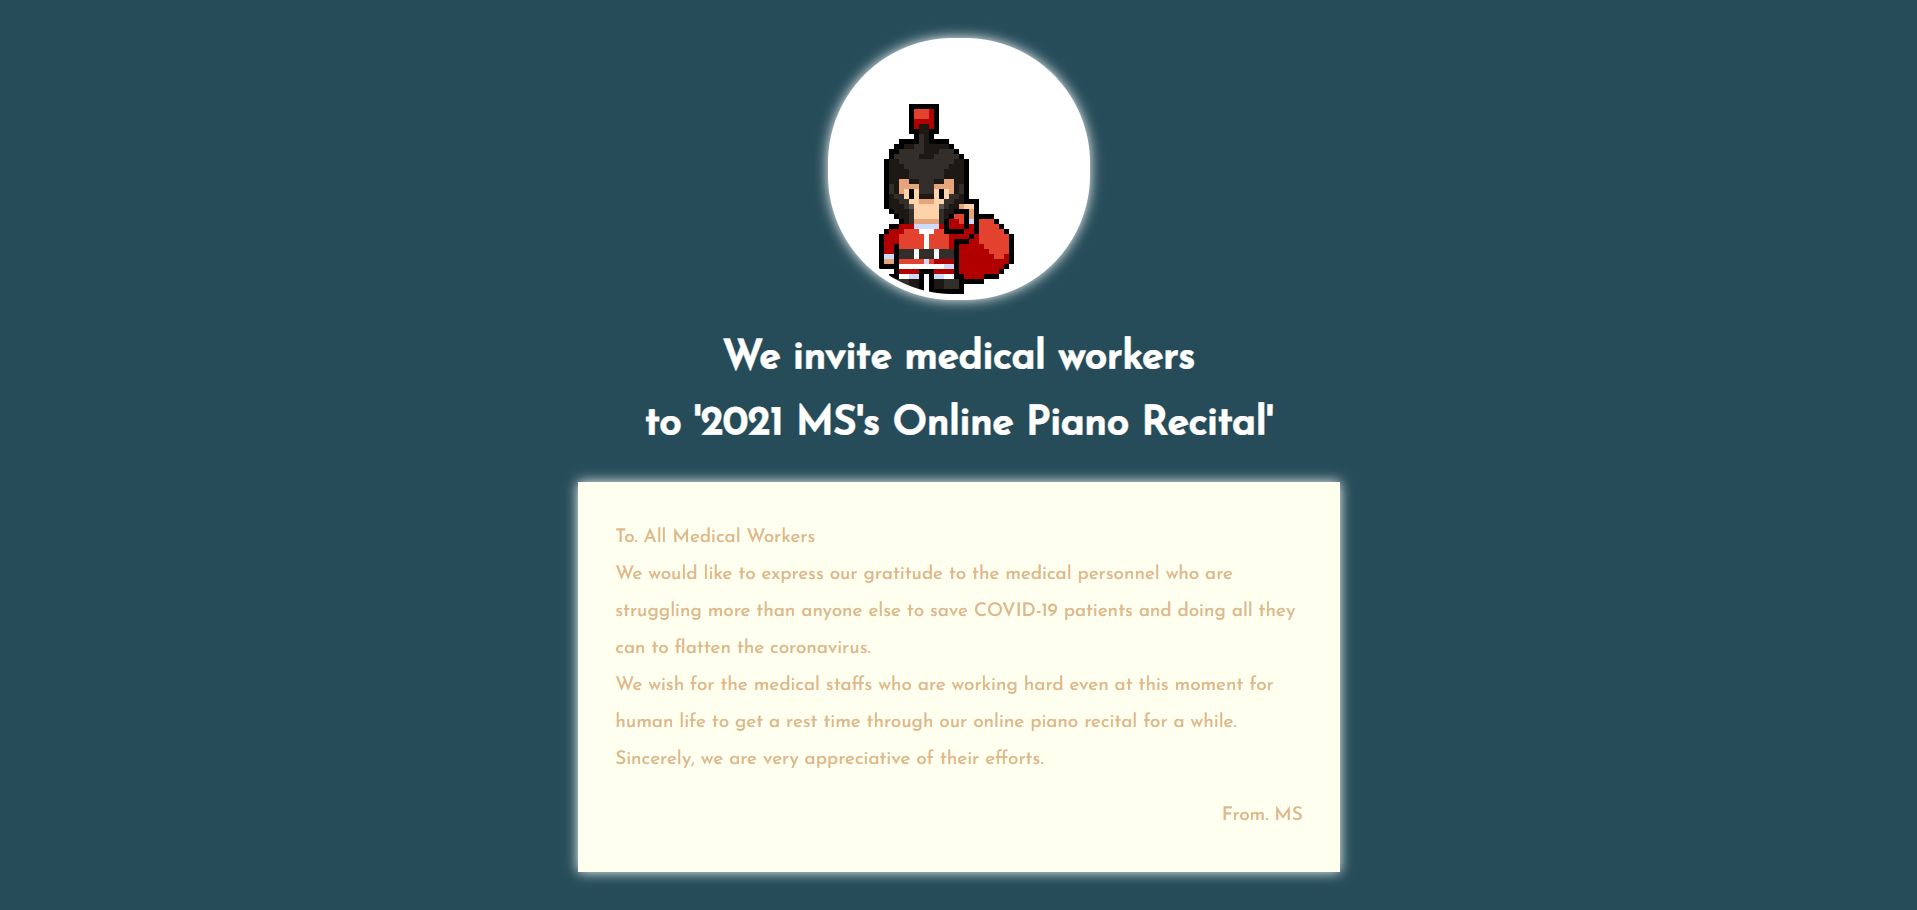
<h1 class="hone">We invite medical workers</h1>
<h1 class="htwo">to '2021 MS's Online Piano Recital'</h1>
4-2) 메시지 넣기
<메시지 쓰기>
✅ <body> 태그 사이에
<div class="messagebox">
    To. All Medical Workers <br />
    We would like to express our gratitude to the medical personnel who are struggling more than anyone else to save COVID-19 patients and doing all they can to flatten the coronavirus. <br />
    We wish for the medical staffs who are working hard even at this moment for human life to get a rest time through our online piano recital for a while. <br />
    Sincerely, we are very appreciative of their efforts.
</div>
<br />는 '줄바꿈'을 의미!!
<메시지를 가운데로 오게 하기 + 메시지 박스에 색 넣기 + 그림자 효과 넣기>
✅ <head> 태그 안의 <style> 태그 사이에
.messagebox {
    background-color: ivory;

    width: 550px;
    margin: auto;

    color: burlywood;

    padding: 30px;

    font-size: 15px;
    line-height: 30px;

    box-shadow: 0px 0px 10px 0px white;
}
line-height줄간격(줄의 높이)은 폰트 사이즈보다 큰게 보기에 좋다.
<from - 넣기>
✅ <head> 태그 안의 <style> 태그 사이에
.from {
    text-align: right;
    margin-bottom: 0px;
}
✅ <body> 태그 사이에
<div class="messagebox">
    To. All Medical Workers <br />
    We would like to express our gratitude to the medical personnel who are struggling more than anyone else to save COVID-19 patients and doing all they can to flatten the coronavirus. <br />
    We wish for the medical staffs who are working hard even at this moment for human life to get a rest time through our online piano recital for a while. <br />
    Sincerely, we are very appreciative of their efforts.
    <p class="from">From. MS</p>
</div>
4-3) 메시지 제목 바깥쪽 여백(글자 간격) 조정하기
✅ <head> 태그 안의 <style> 태그 사이에
.hone {
    color: white;
    text-align: center;

    margin-top: 30px;
}

.htwo {
    color: white;
    text-align: center;

    margin-bottom: 30px;
}
4-4) 마지막으로, div로 묶어주기 + class 붙여주기
✅ <body> 태그 사이에
<div class="letter-open">
    <div class="rtan"></div>
    <h1 class="hone">We invite medical workers</h1>
    <h1 class="htwo">to '2021 MS's Online Piano Recital'</h1>
    <div class="messagebox">
        To. All Medical Workers <br />
        We would like to express our gratitude to the medical personnel who are struggling more than anyone else to save COVID-19 patients and doing all they can to flatten the coronavirus. <br />
        We wish for the medical staffs who are working hard even at this moment for human life to get a rest time through our online piano recital for a while. <br />
        Sincerely, we are very appreciative of their efforts.
        <p class="from">From. MS</p>
    </div>
</div>
WHY? 편지 HTML 태그들은 같이 나타나고, 없어져야 하는 존재!!
💡 즉, 함께 행동해야 하는 존재이기 때문에, div로 묶어준다.
📍 5. 모바일 버전 처리
5-1) 크롬 개발자 도구 이용하기
- 마우스 오른쪽 키 누르고 →
검사click → 모바일 보기 click- Responsive로 맞추고, 가로길이를 356px로 맞추기
5-2) 편지 HTML 모바일 버전 처리하기
✅ <head> 태그 안의 <style> 태그 사이에
@media screen and (max-width: 760px) {

}
↓ '편지지 사이즈', '르탄이 사이즈', '편지 제목 폰트 사이즈' 고쳐주기
@media screen and (max-width: 760px) {
    .messagebox {
        width: 300px;
        padding: 20px;
    }
    .rtan {
        margin: 50px auto 0px auto;
    }
    .hone {
        font-size: 22px;
    }
    .htwo {
        font-size: 22px;
    }
    .messagebox {
        margin-bottom: 50px;
    }
}
5-3) 카드 봉투 HTML 모바일 버전 처리하기
- 잠시 편지를 숨기고, 카드 봉투를 보여주기!!
.letter-close {
    display: block;
}

.letter-open {
    display: none;
}
↓ '카드 봉투 위치' 고쳐주기
@media screen and (max-width: 760px) {
    .messagebox {
        width: 300px;
        padding: 20px;
    }
    .rtan {
        margin: 50px auto 0px auto;
    }
    .hone {
        font-size: 22px;
    }
    .htwo {
        font-size: 22px;
    }
    .messagebox {
        margin-bottom: 50px;
    }
    .envelope {
        margin: 50px auto 0px auto;
    }
}
📍 6. 카드 봉투에 클릭 함수 붙이기 - Javascript
6-1) 함수 만들기
<열고 닫는 Javascript 코드>
✅ <head> 태그 안의 <script> 태그 사이에
function open_letter() {
    document.getElementsByClassName("letter-close")[0].style.display = 'none'
    document.getElementsByClassName("letter-open")[0].style.display = 'block'
}
✅ <body> 태그 사이에
<div class="envelope" onclick="open_letter()"></div>6-2) 카드 봉투 마우스 모양 바꾸기
✅ <head> 태그 안의 <style> 태그 사이에
.envelope {
    width: 300px;
    height: 300px;

    background-image: url('https://media.istockphoto.com/vectors/mail-customer-service-icon-vector-id1152903919?k=20&m=1152903919&s=612x612&w=0&h=fSfMK-4dtkcHuujrDXk2mMZrQnl9QC6CHpeaL9jsRIk=');
    background-size: cover;
    background-position: center;

    margin: 100px auto 0px auto;

    cursor: pointer;
}
cursor속성을 이용하면 해당 태그 위에 위치하는 마우스 cursor의 모양을 바꿀 수 있다.pointer는 손가락 모양의 클릭 가능한 버튼!!
📍 7. 눈오는 효과 붙이기
_%EB%88%88%EC%98%A4%EB%8A%94%ED%9A%A8%EA%B3%BC%EB%B6%99%EC%9D%B4%EA%B8%B0.png)
7-1) 라이브러리 찾아보기
✅ 눈오는 효과 코드스니펫
<script src="https://s3.ap-northeast-2.amazonaws.com/materials.spartacodingclub.kr/xmas/snow.js"></script>✅ 위 코드스니펫을 <head> 태그 안에 위치한 <title> 태그 아래에 붙여넣기
📍 8. 히든메시지 넣어보기
8-1) 르탄이에 함수 붙이기
✅ <head> 태그 안의 <script> 태그 사이에
function go_rtan() {
    alert('앗, 어떻게 찾았지!');
    window.location.href='https://www.youtube.com/watch?v=E4zTPrVx4Lc&list=OLAK5uy_m8Zrr2fonba63dH1AgQm9ywOGb5vt_ofk&index=3';
}
- alert 메시지 띄우기:
alert('앗, 어떻게 찾았지!');- 링크로 이동하게 하기:
window.location.href='...';
✅ <body> 태그 사이에
<div class="rtan" onclick="go_rtan()"></div>📍 9. 공유를 위한 기초작업
<카카오톡, 페이스북에 공유하기>
9-1) og 태그 넣기
_og%ED%83%9C%EA%B7%B8%EB%84%A3%EA%B8%B0.jpg)
✅ 아래 코드스니펫을 <head> 태그 안에 위치한 <title> 태그 아래에 붙여넣기
<meta property="og:image" content="https://media.istockphoto.com/photos/grand-piano-picture-id540856596?k=20&m=540856596&s=612x612&w=0&h=13JroUZzU-23Dd4afIbs_4-34KzuC7RW766VBDdzWdc=">
<meta property="og:title" content="2021 MS's Online Piano Recital">
<meta property="og:description" content="For The Medical Workers">
9-2) favicon 넣기
_favicon%EB%84%A3%EA%B8%B0.png)
✅ 아래 코드스니펫을 <head> 태그 안에 위치한 <title> 태그 아래에 붙여넣기
<link rel="shortcut icon" href="https://icons-for-free.com/iconfiles/png/512/Piano-1320568874543813841.png">📍 10. 배포해보기
10-1) 배포하고, URL 받기
💡 받은 링크를 카카오톡에 보내서 og:image가 잘 뜨는지 확인해보기!!
✅ 배포페이지 URL
✅ 미션 완성 작품 URL
🏆나만의 Invitation Card 완성🏆
_%EB%88%88%EC%98%A4%EB%8A%94%ED%9A%A8%EA%B3%BC%EB%B6%99%EC%9D%B4%EA%B8%B0.png)
<완성 코드>
<!DOCTYPE html>
<html lang="en">

<head>
    <meta charset="UTF-8">
    <meta http-equiv="X-UA-Compatible" content="IE=edge">
    <meta name="viewport" content="width=device-width, initial-scale=1.0">
    <title>2021 MS's Online Piano Recital</title>

    <link rel="shortcut icon" href="https://icons-for-free.com/iconfiles/png/512/Piano-1320568874543813841.png">

    <meta property="og:image" content="https://media.istockphoto.com/photos/grand-piano-picture-id540856596?k=20&m=540856596&s=612x612&w=0&h=13JroUZzU-23Dd4afIbs_4-34KzuC7RW766VBDdzWdc=">
    <meta property="og:title" content="2021 MS's Online Piano Recital">
    <meta property="og:description" content="For The Medical Workers">

    <script src="https://s3.ap-northeast-2.amazonaws.com/materials.spartacodingclub.kr/xmas/snow.js"></script>

    <link rel="preconnect" href="https://fonts.googleapis.com">
    <link rel="preconnect" href="https://fonts.gstatic.com" crossorigin>
    <link href="https://fonts.googleapis.com/css2?family=Josefin+Sans:wght@500&display=swap" rel="stylesheet">

    <style>
        * {
            font-family: 'Josefin Sans', sans-serif;
        }

        body {
            background-color: #264C59;
        }

        .envelope {
            width: 300px;
            height: 300px;

            background-image: url('https://media.istockphoto.com/vectors/mail-customer-service-icon-vector-id1152903919?k=20&m=1152903919&s=612x612&w=0&h=fSfMK-4dtkcHuujrDXk2mMZrQnl9QC6CHpeaL9jsRIk=');
            background-size: cover;
            background-position: center;

            margin: 100px auto 0px auto;

            cursor: pointer;
        }

        .envelope-title {
            color: white;
            text-align: center;
        }

        .envelope-msg {
            color: white;
            text-align: center;
        }

        .letter-close {
            display: block;
        }

        .letter-open {
            display: none;
        }

        .rtan {
            background-color: white;

            width: 200px;
            height: 200px;

            background-image: url('https://s3.ap-northeast-2.amazonaws.com/materials.spartacodingclub.kr/xmas/Webp.net-gifmaker.gif');
            background-size: cover;
            background-position: center;

            margin: 30px auto 0px auto;

            border-radius: 100px;

            border: 5px solid white;
            box-shadow: 0px 0px 10px 0px white;
        }

        .hone {
            color: white;
            text-align: center;

            margin-top: 30px;
        }

        .htwo {
            color: white;
            text-align: center;

            margin-bottom: 30px;
        }

        .messagebox {
            background-color: ivory;

            width: 550px;
            margin: auto;

            color: burlywood;

            padding: 30px;

            font-size: 15px;
            line-height: 30px;

            box-shadow: 0px 0px 10px 0px white;
        }

        .from {
            text-align: right;
            margin-bottom: 0px;
        }

        @media screen and (max-width: 760px) {
            .messagebox {
                width: 300px;
                padding: 20px;
            }
            .rtan {
                margin: 50px auto 0px auto;
            }
            .hone {
                font-size: 22px;
            }
            .htwo {
                font-size: 22px;
            }
            .messagebox {
                margin-bottom: 50px;
            }
            .envelope {
                margin: 50px auto 0px auto;
            }
        }
    </style>

    <script>
        function open_letter() {
            document.getElementsByClassName("letter-close")[0].style.display = 'none'
            document.getElementsByClassName("letter-open")[0].style.display = 'block'
        }

        function go_rtan() {
            alert('앗, 어떻게 찾았지!');
            window.location.href='https://www.youtube.com/watch?v=E4zTPrVx4Lc&list=OLAK5uy_m8Zrr2fonba63dH1AgQm9ywOGb5vt_ofk&index=3';
        }
    </script>
</head>

<body>
    <div class="letter-close">
        <div class="envelope" onclick="open_letter()"></div>
        <h2 class="envelope-title">2021 MS's Online Piano Recital Invitation Card</h2>
        <h5 class="envelope-msg">LET'S OPEN IT!</h5>
    </div>

    <div class="letter-open">
        <div class="rtan" onclick="go_rtan()"></div>
        <h1 class="hone">We invite medical workers</h1>
        <h1 class="htwo">to '2021 MS's Online Piano Recital'</h1>
        <div class="messagebox">
            To. All Medical Workers <br />
            We would like to express our gratitude to the medical personnel who are struggling more than anyone else to save COVID-19 patients and doing all they can to flatten the coronavirus. <br />
            We wish for the medical staffs who are working hard even at this moment for human life to get a rest time through our online piano recital for a while. <br />
            Sincerely, we are very appreciative of their efforts.
            <p class="from">From. MS</p>
        </div>
    </div>
</body>

</html>
나에게 힙한취미코딩 이벤트는 웹개발종합반에서 아직 다루지 않은 것들을 미리 쉽게 접해볼 수 있는 기회였다. 직접 웹페이지를 만들고 배포까지 해보니 너무 뿌뜻했다. 특히 모바일 버전 코드를 다시 짜보는 프로그래밍 과정이 되게 재밌었다. @media screen and (max-width: 760px) 코드를 사용해서 모바일 버전 코드를 따로 변경했는데, 어떻게 모바일 버전으로 웹페이지가 만들어지고 수정되는지 배울 수 있었다. 그리고 공유 기초 작업을 위해 og 태그와 favicon 넣는 것까지 해봤는데 이 부분이 너무 신기했다. 이렇게 코드를 하나하나씩 쌓아가니까 완성도 있는 웹페이지를 완성할 수 있었다. 이번 경험이 앞으로 웹페이지를 개발할 때 정말 큰 도움이 될 것 같다.