지난글
- IcosahedronGeometry (20면체)
- LatheGeometry (선 회전 도형)
- OctahedronGeometry (8면체)
- ParametricGeometry (벡터 도형)
- PlaneGeometry (2D 직사각형)
- PolyhedronGeometry (다면체)
이어서
지난 포스트에서도 6가지의 기본 도형들을 알아봤는데 이번에도 6가지의 도형을 끝으로 재미없는 기본 도형들을 끝내보도록 하겠습니다. 예제 코드는 이번에도 똑같습니다.
index.html
<!DOCTYPE html>
<html lang="en">
  <head>
    <meta charset="UTF-8" />
    <meta name="viewport" content="width=device-width, initial-scale=1.0" />
    <title>Document</title>
  </head>
  <body>
    <canvas id="c"></canvas>
    <script type="module" src="./index.js"></script>
  </body>
</html>index.js
import * as THREE from './node_modules/three/build/three.module.js';
const canvas = document.querySelector('#c');
const renderer = new THREE.WebGLRenderer({ antialias: true, canvas });
renderer.setSize(window.innerWidth, window.innerHeight);
const fov = 70;
const aspect = window.innerWidth / window.innerHeight;
const near = 0.1;
const far = 100;
const camera = new THREE.PerspectiveCamera(fov, aspect, near, far);
camera.position.z = 20;
const scene = new THREE.Scene();
// 여기에 복사 붙혀넣기
function animate() {
// 애니메이션
mesh.rotation.x += 0.01;
mesh.rotation.y += 0.01;
renderer.render(scene, camera);
requestAnimationFrame(animate);
}
animate();똑같이 index.js 15번째줄을 바꿔주시면 됩니다.
1.RingGeometry
중앙이 빈 2D 디스크 모양의 도형입니다. 인자로는 innerRadius,outerRadius, thetaSegments, phiSegments,thetaStart, thetaLength들을 받을 수 있습니다. 파인애플 같이 만들어볼게요
const innerRadius = 2;
const outerRadius = 7;
const thetaSegments = 18;
const geometry = new THREE.RingGeometry(
  innerRadius,
  outerRadius,
  thetaSegments,
);
const material = new THREE.MeshBasicMaterial({
  color: 'yellow',
});
const mesh = new THREE.Mesh(geometry, material);
scene.add(mesh);
조절해보기 : https://threejs.org/docs/#api/geometries/RingGeometry
2.ShapeGeometry
삼각형으로 이루어진 2D 윤곽선 도형입니다. 인자로는 shape, curveSegments가 있습니다. 공식 문서에 나와있는 예제로 하트를 만들어보겠습니다.
const shape = new THREE.Shape();
const x = -2.5;
const y = -5;
shape.moveTo(x + 2.5, y + 2.5);
shape.bezierCurveTo(x + 2.5, y + 2.5, x + 2, y, x, y);
shape.bezierCurveTo(x - 3, y, x - 3, y + 3.5, x - 3, y + 3.5);
shape.bezierCurveTo(x - 3, y + 5.5, x - 1.5, y + 7.7, x + 2.5, y + 9.5);
shape.bezierCurveTo(x + 6, y + 7.7, x + 8, y + 4.5, x + 8, y + 3.5);
shape.bezierCurveTo(x + 8, y + 3.5, x + 8, y, x + 5, y);
shape.bezierCurveTo(x + 3.5, y, x + 2.5, y + 2.5, x + 2.5, y + 2.5);
const geometry = new THREE.ShapeGeometry(shape);
const material = new THREE.MeshBasicMaterial({
  color: 'red',
});
const mesh = new THREE.Mesh(geometry, material);
scene.add(mesh);
조절해보기 :https://threejs.org/docs/#api/geometries/ShapeGeometry
3.SphereGeometry
구 모양의 도형입니다. 정말 많이 쓰는 것 같습니다. 클릭 이벤트나 버튼으로 넣기 좋습니다. 인자로는 radius, widthSegments, heightSegments, phiStart, phiLength, thetaStart, thetaLength가 있습니다.
const radius = 7;
const widthSegments = 12;
const heightSegments = 8;
const geometry = new THREE.SphereGeometry(
  radius,
  widthSegments,
  heightSegments,
);
const material = new THREE.MeshBasicMaterial({
  color: 'red',
  wireframe: true,
});
const mesh = new THREE.Mesh(geometry, material);
scene.add(mesh);
조절해보기 : https://threejs.org/docs/#api/en/geometries/SphereGeometry
4.TetrahedronGeometry
4면체 도형입니다. 인자로는 radius, detail이 있습니다.
const radius = 7;
const geometry = new THREE.TetrahedronGeometry(radius);
const material = new THREE.MeshBasicMaterial({
  color: 'green',
});
const mesh = new THREE.Mesh(geometry, material);
scene.add(mesh);
조절해보기 : https://threejs.org/docs/#api/en/geometries/TetrahedronGeometry
5.TextGeometry
3D 폰트와 문자열로 만든 3D 텍스트를 넣을 수 있습니다. 인자로는 text, { // 텍스트 설정
font: font,
size: 3,
depth: 0.2,
curveSegments: 12,
bevelEnabled: true,
bevelThickness: 0.15,
bevelSize: 0.3,
bevelSegments: 5,
} 를 받을 수 있습니다. 그런데 공식 문서나 라이브러리에 없는 걸 보아 사라진 것 같습니다.
조절해보기 : https://threejs.org/docs/#api/en/geometries/TextGeometry
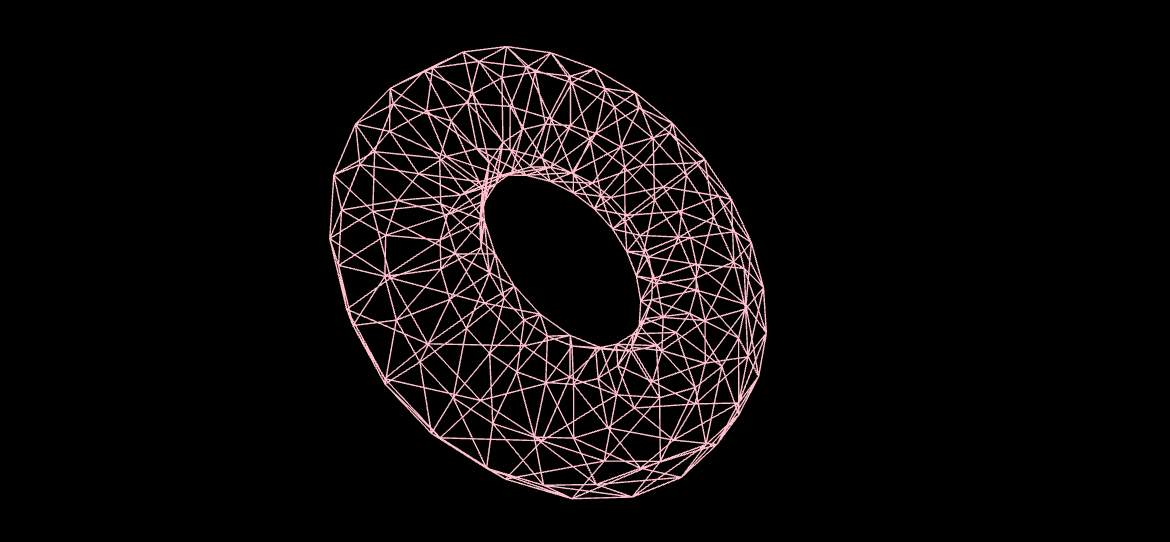
6.TorusGeometry
원환체(torus), 도넛(donut)이라고 불리는 도형을 만들 수 있습니다. 인자로는 radius, tubeRadius, radialSegments, tubularSegments가 있습니다.
const radius = 5;
const tubeRadius = 2;
const radialSegments = 8;
const tubularSegments = 24;
const geometry = new THREE.TorusGeometry(
  radius,
  tubeRadius,
  radialSegments,
  tubularSegments,
);
const material = new THREE.MeshBasicMaterial({
  color: 'pink',
  wireframe: true,
});
const mesh = new THREE.Mesh(geometry, material);
scene.add(mesh);
조절해보기 : https://threejs.org/docs/#api/en/geometries/TorusGeometry
끝으로
오늘도 6가지의 도형을 알아보았습니다. 이렇게 기본 도형들이 끝났습니다. 다음에는 재질과 카메라에 대해 알아보겠습니다.오늘도 고생하셨어요.