[오늘의 키워드]
- 기존에 내가 사용하던
ResourceManager는 Addressable을 이용했지만, 이번 팀 과제에는 Resources 폴더를 이용해 리소스 로드를 하기로 해서,ResourceManager의 구조를 Resources 폴더에 맞게 구조를 변경했다. - FPS 시점 구현을 위해 CinemachineExtension을 상속받는 CinemachinePOVExtension 클래스를 작성했다.
[ResourceManager 구조 변경]
Addressable에는 특정 에셋의 묶음을 Label이란 키를 이용해서 통째로 비동기 로드를 할 수 있지만, Resource를 이용한다면 에셋의 묶음을 통째로 비동기 로드를 할 순 없다.
이를 해결하려면 AssetBundle을 사용하거나, Resources.LoadAsync()를 여러번 호출하거나 둘 중 하나의 방법으로 해결해야했다.
프로젝트에서 Resources 방식을 이용하기로 했으므로 후자의 방법을 택했다.
ResourceManager.cs
    private Dictionary<string, UnityEngine.Object> _resources = new();

    public void LoadAsync<T>(string key, Action<T> callback = null) where T : UnityEngine.Object
    {
        if (_resources.TryGetValue(key, out var resource))
        {
            callback?.Invoke(resource as T);
            return;
        }

        var operation = Resources.LoadAsync<T>(key);
        operation.completed += op =>
        {
            _resources.TryAdd(operation.asset.name, operation.asset);
            callback?.Invoke(operation.asset as T);
        };
    }

    public void LoadAllAsync<T>(Action<string, int, int> callback = null) where T : UnityEngine.Object
    {
        string[] preloadKeys = new string[]
        {
            // 게임 시작 전 캐싱할 Object의 Resources 주소 입력
            @"Prefabs/Ground",
            @"Prefabs/PlayerCharacter",
            @"PlayerInputActions",
        };

        int loadCount = 0;
        int totalCount = preloadKeys.Length;

        // preloadKeys 배열의 주소들을 로드
        foreach (var key in preloadKeys)
        {
            LoadAsync<T>(key, obj =>
            {
                loadCount++;
                callback?.Invoke(key, loadCount, totalCount);
            });
        }
}preloadKeys라는 로컬 변수를 만들어, 여기에 로드할 리소스의 Resources 패스를 등록하면, 게임 시작 전 리소스 로드 단계 때 등록된 리소스를 반복문을 돌며 비동기로 로드할 수 있도록 했다.
[CinemachineExtension class]
참고자료
Unity3D DOCS : CinemachineExtension
Youtube Video : Cinemachine First Person Controller w/ Input System - Unity Tutorial
Cinemachine을 이용해서 FPS 에임 카메라를 구현하는데, 기본값은 레거시 InputAxis 값을 이용해 MouseDelta 값을 받아오고 있었다.
이를 InputSystem의 MouseDelta값을 받아오도록 구조를 변경해야했는데, 사실 버튼 하나면 알아서 구조가 변경되긴 한다.
Inspector / CinemachineVirtualCamera / Add Input Provider
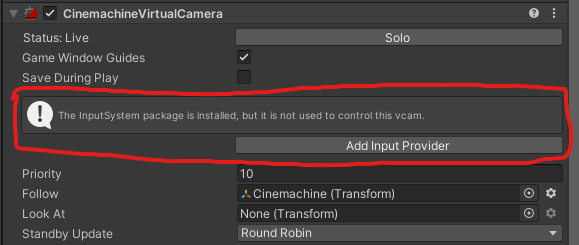
하지만 마우스 감도 설정값, 수직 감도 설정값 등등 추가 작업을 도와주진 않아서, CinemachineExtension이라는 클래스를 상속받아 카메라 이동을 직접 구현하는 방식을 찾아봤다.
CinemachinePOVExtension
using Cinemachine;
using UnityEngine;
public class CinemachinePOVExtension : CinemachineExtension
{
private InputManager _input;
private Vector3 _startingRotation;
// TODO: 마우스 감도 설정값에서 받아올 것
[SerializeField] private float mouseSensitivity = 10f;
[SerializeField] private float clampAngle = 70f;
protected override void Awake()
{
_input = InputManager.Instance;
base.Awake();
}
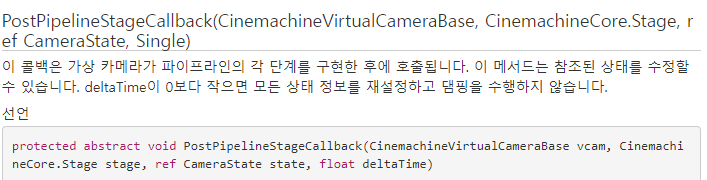
protected override void PostPipelineStageCallback(CinemachineVirtualCameraBase vcam, CinemachineCore.Stage stage, ref CameraState state, float deltaTime)
{
if (_input == null || vcam.Follow == null)
return;
if (stage == CinemachineCore.Stage.Aim)
{
if (_startingRotation == null)
_startingRotation = transform.localRotation.eulerAngles;
Vector2 deltaInput = _input.MouseDelta;
_startingRotation.x += deltaInput.x * Time.deltaTime * mouseSensitivity;
_startingRotation.y += deltaInput.y * Time.deltaTime * mouseSensitivity;
_startingRotation.y = Mathf.Clamp(_startingRotation.y, -clampAngle, clampAngle);
state.RawOrientation = Quaternion.Euler(-_startingRotation.y, _startingRotation.x, 0f);
}
}
}
game developer