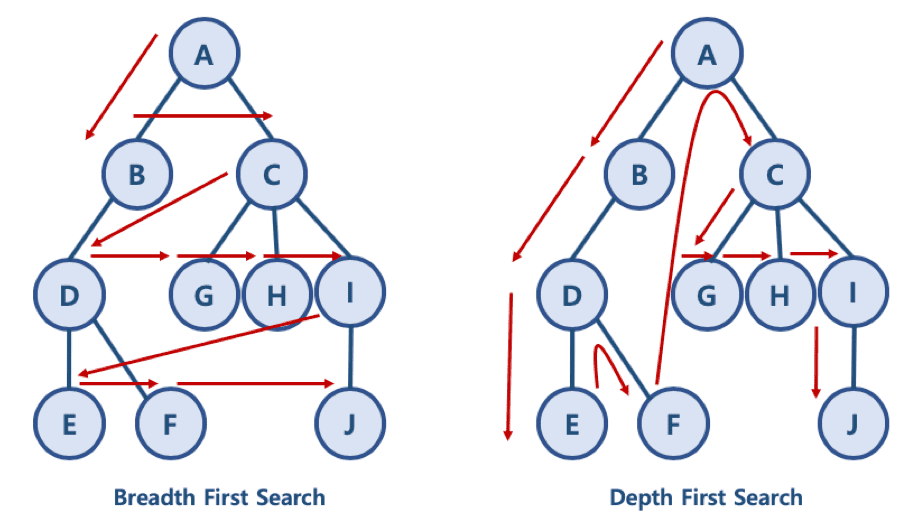
DFS: 깊이우선탐색
Depth-First Search
말 그대로 깊이를 우선적으로 생각해서 탐색하는 것이다.
그럼 왜 DFS라는 방식을 사용해 깊이를 우선적으로 탐색할까?
우선, DFS는 queue를 2번 사용해서 구현한다.
장점:
- BFS에 비해 저장공간의 소모가 적다. [재귀 사용 x]
- 찾아야 하는 노드가 깊이 있을수록 유리하다.
단점:
- 장점을 반대로 생각해보면 필요없이 너무 깊게 들어갈 수 있다.
- 현재까지 찾은 최단경로가 끝까지 탐색했을 때, 갱신이 안되리라는 보장이 없다.
BFS: 너비우선탐색
Breath-First Search
너비를 우선적으로 생각해서 탐색하는 알고리즘이다.
BFS는 다음과 같은 장,단점을 가진다.
장점:
- 최단 경로를 보장한다.
- 얕은 깊이에 있는 해를 찾을 때 유리하다.
단점:
- 필요없는 노드까지 저장해야한다. [재귀 사용 O]
- 노드의 수가 늘어나면 탐색해야 하는 노드도 매우 많아진다.
여기까지 BFS와 DFS의 기본 지식이였다.
하지만 우리가 알고싶은건? 과연 이러한 DFS, BFS를 알고리즘에서 어떻게 써먹느냐는 것이다.
JS를 가지고 3가지의 방법으로 DFS와 BFS를 풀어보겠다.
1. class
2. hash(object)+pop,shift
3. array+재귀
1. class를 사용한 DFS,BFS
클래스를 사용해 코드를 짜는 과정은 익숙하지 않았다.
하지만 클래스를 사용하는 이유가 객체 단위로 코드를 그룹화 할 수 있으며 코드를 재사용하기 위함이기에 이참에 공부해 보았다.
class Node {
    constructor(data) {
        this.data = data;
        this.children = [];
    }
    add(data) {
        this.children.push(new Node(data));
    }
    remove(data) {
        this.children = this.children.filter(child=>child.data === data ? false : true)
    }
}
class Tree{
}
우선, 기본적으로 노드를 관리하는 Node 클래스와, 트리를 관리하는 Tree 클래스가 존재한다.
[Node]: 노드의 데이터, 자식 노드의 주소 정보를 가지고 있다.
[Tree]: queue에 있는 node를 기준으로 순회한다.
DFS
class Node {
    constructor(data) {
        this.data = data;
        this.children = [];
    }
    add(data) {
        this.children.push(new Node(data));
    }
    remove(data) {
        this.children = this.children.filter(child=>child.data === data ? false : true)
    }
}
class Tree {
    constructor() {
        this.root = null;
    }
    DFS(fn) {
        if (this.root === null)
            return;
        const queue = [this.root];

        while (queue.length !== 0) {
            const node = queue.shift();
            queue.unshift(...node.children);
            fn(node)
        }

    }
}
const result = []
const t = new Tree();
t.root = new Node('a');
t.root.add('b');
t.root.add('d');
t.root.children[0].add('c')

t.DFS(node=>result.push(node.data))
여기서 핵심은 while문이다.
queue의 길이가 0이 될때까지 shift와 unshift를 반복하는 과정을 거친다.
DFS는 깊이 우선 탐색인데, 이러한 부분은 unshift를 통해 해결할 수 있었다.
unshift를 사용해 자식들을 맨 앞에 넣어주는 과정을 반복하다보면 계속해서 자식, 자식의 자식 순으로 점점 깊이 탐색하게 된다.
BFS
class Node {
    constructor(data) {
        this.data = data;
        this.children = [];
    }
    add(data) {
        this.children.push(new Node(data));
    }
    remove(data) {
        this.children = this.children.filter(child=>child.data === data ? false : true)
    }
}
class Tree {
    constructor() {
        this.root = null;
    }
    BFS(fn) {
        if (this.root === null)
            return;
        const queue = [this.root];

        while (queue.length !== 0) {
            const node = queue.shift();
            queue.push(...node.children);
            fn(node)
        }

    }
}
const result = []
const t = new Tree();
t.root = new Node('a');
t.root.add('b');
t.root.add('d');
t.root.children[0].add('c')

t.BFS(node=>result.push(node.data))
앞선 코드에서 DFS를 이해했다면 BFS역시 쉽게 이해할 수 있다.
현재 부모 노드의 자식들을 모두 queue에 담아주고, shift() 하는 과정을 통해,
부모>자식들>자식의 자식들 순으로 넓게 퍼져 순회하게 된다.
장,단점
장점: 장점으로는 class의 장점과 함께 push, shift만 바꾸면 DFS, BFS를 쉽게 전환시킬 수 있다는 점인것 같다.
단점: 코드가 길며, 자식들을 일일히 추가해야 한다.(함수로 해결 가능할듯)
2. hash를 사용한 DFS, BFS
가장 큰 특징은 재목 그대로 hash를 사용하는 알고리즘 방법이다. 정확히 말하자면, hash로 값을 입력받아 이를 활용해 pop,push,shift 메서드들을 가지고 알고리즘을 짜는 방법이다.
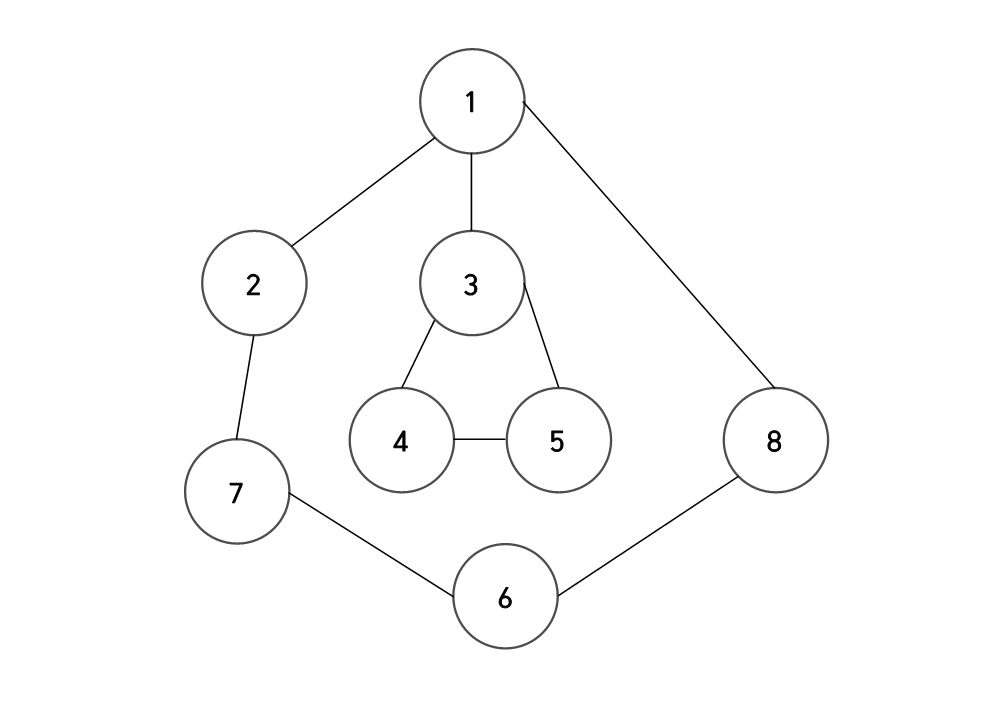
const graph =new Map(
[
  [1, [2,3,8]],
  [2, [1,7]],
  [3, [1,4,6]],
  [4, [3,5]],
  [5, [3,4]],
  [6, [7]],
  [7, [2,6,8]],
  [8, [1,7]]
  ]
)
hash의 key가 해당 node가 된고, value에 있는 배열의 원소들은 해당 node의 자식들이 된다.
2,3에서 사용하는 트리 구조는 다음 그림과 같다.

DFS
function DFS(graph, start) {
  // 탐색해야 할 노드
  var front = [];
  // 탐색이 끝난 노드
  var back = [];

  front.push(start);
  while (front.length !== 0) {
    // shift를 사용해 앞에서부터 노드를 찾아나가기에 DFS가 된다.
    var node = front.shift();
    // 탐색이 끝난 노드가 포함되어 있는지 확인
    if (!back.includes(node)) {
      back.push(node);
      // 탐색할 노드 = 탐색할 노드 + 현재 탐색한 노드의 자식 노드들
      front = [...front, ...graph.get(node).sort((a, b) => a - b)];
    }
  }
  return back;
}
console.log(DFS(graph, start));
BFS
function BFS(graph, start) {
  // 탐색해야 할 노드
  let front = [];
  // 탐색이 끝난 노드
  let back = [];

  front.push(start);
  while (front.length !== 0) {
    // shift가 아닌 pop을 사용하므로써 BFS 구현
    let node = front.pop();
    // 탐색이 끝난 노드가 포함되어 있는지 확인
    if (!back.includes(node)) {
      back.push(node);
      // 탐색할 노드 = 탐색할 노드 + 현재 탐색한 노드의 자식 노드들
      front = [...front, ...graph.get(node).sort((a, b) => b - a)];
    }
  }
  return back;
}
console.log(BFS(graph, 1));
장,단점
평가: 솔직히 class 대신 function을 사용하고, 입력 부분이 다른것 외에는 큰 차이점이 없는 것 같다.
장점: 뒤에 이어지는 코드의 단점이 되겠지만, [1,5,122]와 같이 엄청 떨어져있는 숫자나 문자들은 밀집되어있지 않아 위와 같은 방법으로 input받는것이 더 낫다.
단점: 입력받는 부분이 너무 까다롭다
3. visited, 재귀를 사용한 DFS, BFS
const graph = [
  [],
  [2, 3, 8],
  [1, 7],
  [1, 4, 5],
  [3, 5],
  [3, 4],
  [7],
  [2, 6, 8],
  [1, 7]
];
graph의 index가 해당 node가 된다.
DFS
코딩 테스드를 마주쳤을 때, 가장 효율적으로 짤 수 있는 코드인 것 같다.
function dfs(graph, node, visited) {
  visited[node] = true;
  console.log(node);
  // 자식 노드 탐색
  graph[node].map(n => {
    // 방문하지 않았다면
    if (!visited[n]) {
      dfs(graph, n, visited);
    }
  })
}
const visited = new Array(graph.length).fill(false);

dfs(graph, 1, visited);
각 노드들의 visited 정보를 저장하는 배열과 함께 재귀함수를 돌려, 탐색한다.
1을 탐색하고 첫 번째 자식인 2를 탐색하면, 또 그 자식인 7을 탐색하게된다.
따라서 재귀함수를 통해 쉽게 DFS를 만들 수 있다.
BFS
BFS는 1,2와 유사하게 풀 수 있다.
하지만 가장 큰 차이점은 역시나 visited의 유무이다.
function bfs(graph, node, visited) {
  const queue = [node];
  visited[node] = true;

  while (queue.length !== 0) {
    // shift를 통해 현재 노드의 자식들을 모두 처리한 뒤 그 자식들의 자식들을 처리하게 된다.
    const temp = queue.shift();
    console.log(temp);

    graph[node].forEach(n => {
      if (!visited[n]) {
        // 큐에 추가
        queue.push(n);
        visited[i] = true;
      }
    })
  }
}
const visited = new Array(graph.length).fill(false);

bfs(graph, 1, visited);
shift를 통해 현재 노드의 자식들을 모두 처리한 뒤 그 자식들의 자식들을 처리하게 된다.
따라서 너비를 우선적으로 탐색하게 된다.
장,단점
장점: 코드가 가장 간단, 직관적이다.(추천)
밀집된 경우 사용하기 편리하다.
단점: 노드들이 밀집되어있지 않으면, 공간 낭비가 심하다.
재귀함수를 사용해 속도가 약간 느려짐.
마무리
인터넷에 돌아다니는 dfs, bfs 해결법을 모두 짜집기하다보니, 약간은 난잡하다고 느낄 수 있다. 하지만, 여러 방법으로 input으로 들어오는 형식도 바꿔보고, 코드도 조금은 더 간단하게 만들다보니 DFS, BFS를 공부하는데 큰 도움이 됐던 것 같다.
참고 링크