댓글창 만들기
-> mongoose로 모델 만들기, 컨트롤러, route, 바닐라JS, status code, populate, mongoose relationship 등 여태 배운걸 이용할 것임.
16.1. Comment Models & relation ship with User, Video
- Comment.js 만들기 in models폴더
- Comment.js 작성
-> text, video, createdAt은 자동으로 그 내용이 추가될 것임. owner에 대해서는 session을 이용하여 누가 댓글의 주인인지 추가해줄 것임.
import mongoose from "mongoose";

const commentSchema = new mongoose.Schema({
    text: {type:String, required:true },
    owner: { type: mongoose.Schema.Types.ObjectId, required: true, ref:"User" }, // User와 mongoose relationship
    video: { type: mongoose.Schema.Types.ObjectId, required: true, ref:"Video" }, // Video와 mongoose relationship
    createdAt: {type:Date, required:true, default:Date.now },
});

const Comment = mongoose.model("Comment", commentSchema); //"Comment"는 다른 Schema 등에서 ref로 사용되는 곳과 일치하도록 써줘야함.

export default Comment;- Video model에서 video가 많은 댓글을 가지도록 Video Schema 수정
-> 비디오는 해당 비디오에 달린 댓글들을 comments array로 가짐.
//추가
comments: [{type: mongoose.Schema.Types.ObjectId, required: true, ref:"Comment"}], // ref는 const Comment = mongoose.model("Comment", commentSchema); 여기에서의 "Comment" 즉, 첫번째 인수와 같아야 함. -> Comment와 mongoose relationship- User가 많은 댓글을 가질 수 있도록 User Schema 수정
-> 사용자는 자기가 달은 댓글들을 comments array로 가지는 것임.
//추가
comments :[{type:mongoose.Schema.Types.ObjectId, ref:"Comment" }], //-> Comment와 mongoose relationship- init.js에 comment model import하기
import Comment from "./models/Comment";16.2 Comment Box
- client/js/commentSection.js 파일 만들기
- webpack이 인식하도록 만들기 (entry, output)
- webpack.config.js
const BASE_JS = "./src/client/js/";

//entry 추가
commentSection: BASE_JS + "commentSection.js",

// output은 이전의 설정으로 인해 자동 추가 - watch.pug에 commentSection.js import해주기 & 댓글html 만들기
block content
	if loggedIn
      div.video__comments
          form.video__comment-form#commentForm
              textarea(cols="30", rows="10", placeholder="Write a nice comment..")
              button Add Comment

if loggedIn
script(src="/assets/js/commentSection.js")- commentSection.js 작성
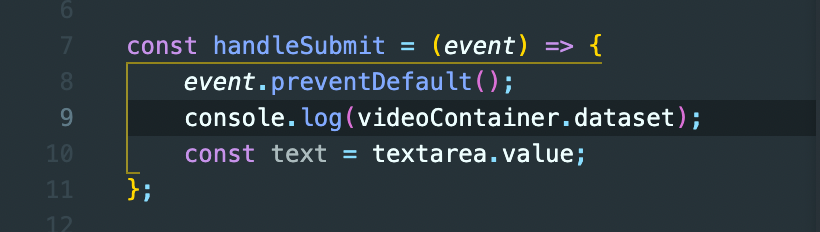
const videoContainer = document.getElementById("videoContainer");
const form = document.getElementById("commentForm");


const handleSubmit = (event) => {
    event.preventDefault();
    const textarea = form.querySelector("textarea");
    const text = textarea.value;
    const video = videoContainer.dataset.videoid

};

if(form){
    form.addEventListener("submit", handleSubmit);
} // form이 로그인 한 상태에서만 보이기 떄문임.
-> comment에 대해서 text, video, createdAt은 자동으로 그 내용이 추가될 것임. owner에 대해서는 session을 이용하여 누가 댓글의 주인인지 추가해줄 것임.

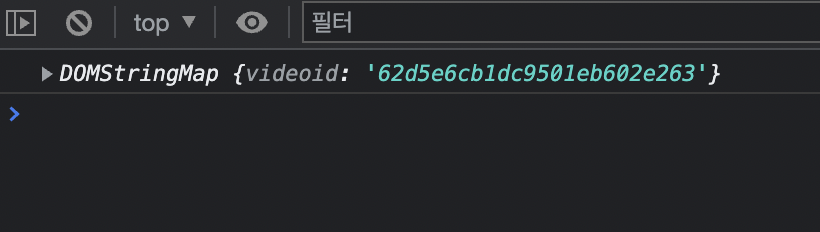
-> const video = videoContainer.dataset.videoid 로 불러서 쓸 수 있음.
16.3-4 API Router
comment api router 만들기 & fetch로 api로 데이터 보내기
- comment api router 만들기
- apiRouter.js
//추가
apiRouter.post("/videos/:id([0-9a-f]{24})/comment", createComment); // comment api router추가- videoController - createComment
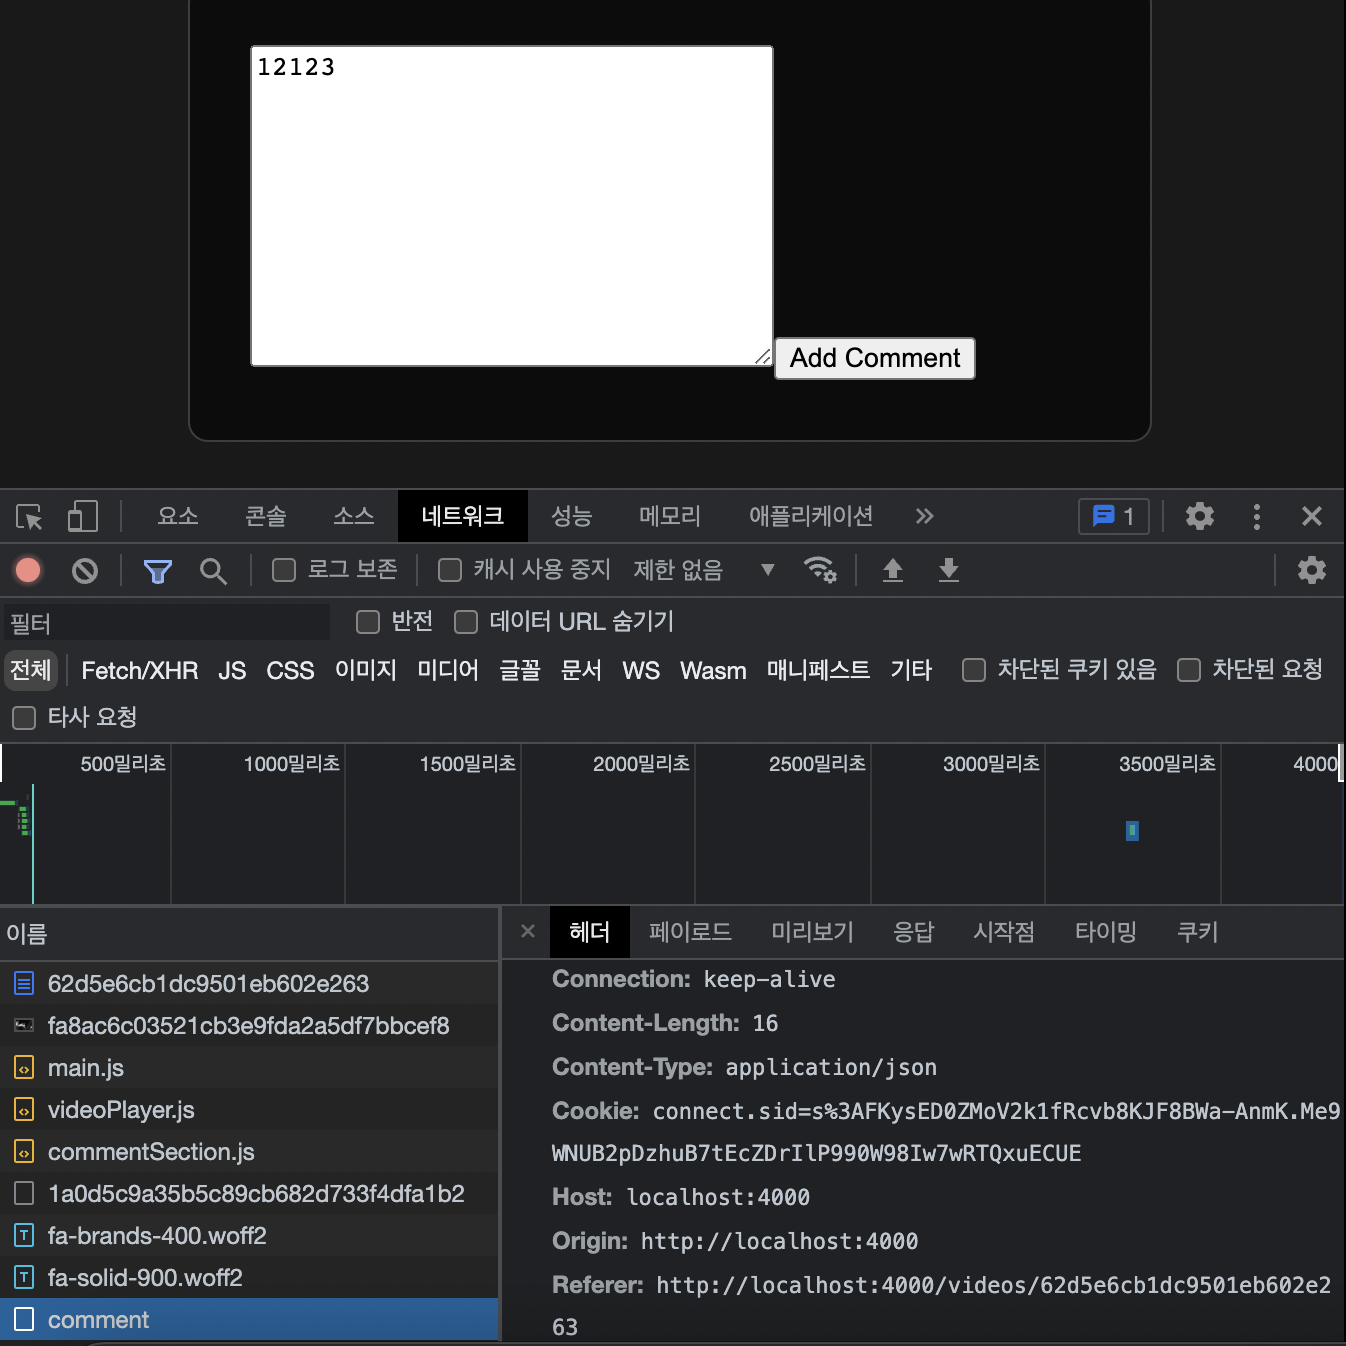
export const createComment = (req, res) => {
    console.log(req.params); // 이거는 결과값이 잘 나오는데
    console.log(req.body);// 이게 결과값이 안 나옴 -> 몇가지 고쳐줘야함 ! 서버가 이해할 수 있도록 고쳐줘야함.
    res.end();
};- fetch로 api로 데이터 보내기
- commentSection.js
const videoContainer = document.getElementById("videoContainer");
const form = document.getElementById("commentForm");

const handleSubmit = (event) => {
    event.preventDefault();
    const textarea = form.querySelector("textarea");
    const text = textarea.value;
    const videoId = videoContainer.dataset.videoid
    fetch(`/api/videos/${videoId}/comment`, {
        method: "POST",
        body: {// req.body를 만드는 과정, 해당 url로 req.body형태로 text의 값을 post한다는 뜻임.
            text,
        }
    })
  	textarea.value ="";
};

if(form){
    form.addEventListener("submit", handleSubmit);
} // form이 로그인 한 상태에서만 보이기 떄문임.
16.4 API Router - api로 보낸 value comment를 백엔드가 이해하기
-> (commentSection) handleSubmit으로 프론트엔드에서 api로 fetch를 통해 데이터(JSON 형태) POST하기 -> 미드웨어를 이용해 보낸 데이터(JSON형태) 백엔드에서 이해하기 -> Router를 이용하여 해당 api url에 대한 Route를 만든 뒤, 컨트롤러를 이용하여 받아온 data를 사용하기.
-> 문제: 1번의 console.log(req.body)가 빈 창으로 나오는 오류를 볼 수 있음.

알아둘 거:
1. 웹사이트로 들어오는 form을 이해하도록 만들어주는 미드웨어
server.js에서 app.use(express.urlencoded({extended:true}));
//이 미드웨어는 form의 내용을 js의 array object 형태로 바꿔줌-> req.body를 생성함! urlencoded에 관한 내용
해결책 1: 우리가 프론트엔드에서 fetch로 보내는 데이터를 text형태로 만들고, 우리의 백엔드가 이를 이해하도록 하는 미드웨어를 추가해줘야함. 이 때는 한 가지의 데이터만 보낼 수 있음.
- commentSection.js
fetch(`/api/videos/${videoId}/comment`, {
        method: "POST",
        body:text, // 이런 식으로 {} 없이 데이터를 보내주면 백엔드는 이를 text형식으로 이해함.
})- server.js
app.use(express.text());// 우리의 백엔드는, 누군가 text를 보내면 그걸 이해하고, 그걸 req.body에 넣어줄 것임.참고
-
express api 너무 중요함 !
-
express.text([options])
Express에 내장된 미들웨어 기능입니다.
body-parser를 기반으로 request payload로 전달한 문자열을 파싱합니다.
해결책 2: 우리가 앞으로 백엔드에 보낼게 text뿐만이 아니라 rating등도 보낼 수 있음. 즉, object형태로 보내줄 수 있기 때문에 보내줄 때는 json.stringify로 object를 string의 형태로 백엔드로 보내주고, 백엔드에서는 이를 json.parse를 실행하도록 하는 미드웨어를 선언해줘서 이 object를 이해할 수 있도록 해줘야함. 이 때 백엔드로 보내주는 data가 json형식인 것도 알려줘야함. 이 때는 여러가지의 데이터를 보낼 수 있음(object형식이라서)
-> fetch로 data를 보낼 때, 보통 object data를 json형태로 보내는 것이 국룰임.
-> frontend에서 backend로 매우 큰 object를 보내야 할 때 쓰는 방법임.

1. 프론트엔드에서 json.stringify를 이용하여 object를 string의 형태로 백엔드에 보냄. 이 때 보내는 data가 json형태인 것을 알려줘야함(Content-Type: application/json). 왜냐하면 express는 기본적으로 데이터를 text형태로 인식하기 때문임.
- commentSection.js
const handleSubmit = (event) => {
    event.preventDefault();
    const textarea = form.querySelector("textarea");
    const text = textarea.value;
    const videoId = videoContainer.dataset.videoid
    if(text === ""){
        return; //사용자가 아무것도 입력하지 않으면 req를 보내지 않음.
    }
    fetch(`/api/videos/${videoId}/comment`, {
        method: "POST",
        headers : {// header: 기본적으로 requests에 대한 정보를 담고 있음. 따라서 request에 추가할 수 있는 정보임. 이를 이용하여 Express에게 보내는 데이터가 json형태라고 알림.
            "Content-Type" : "application/json", // Content-Type을 해주는 이유: 우리가 백엔드로 보내는 데이터 Type이 json형식임을 알려주는 것임. -> 이걸 처리해주지 않으면 백엔드는 여전히 text를 보낸다고 알 것임.
        },
        body: JSON.stringify({ // 보내줄 때 JSON.stringify형태로 보내줌.
            text,
        })
    })
  	textarea.value ="";
};

if(form){
    form.addEventListener("submit", handleSubmit);
} // form이 로그인 한 상태에서만 보이기 떄문임.
2. 백엔드에서는 json형태로 온 data를 json.parse를 통해 이해하도록 해주는 미드웨어를 사용하여 이를 이해해야함
- server.js
app.use(express.json()); // express.json: 이건 프론트엔드에서 json.stringify로 보내준 object data를 json형태로 이해시켜서 object로 이해시키고, 이를 req.body에 넣어줌.참고
- express.json([options])
Express에 내장된 미들웨어 기능입니다.
body-parser를 기반으로 request payload로 전달한 JSON을 파싱합니다.
문자열을 받아서 json으로 바꿔줍니다.
주의할 점은 express.json()은 header에 Content-Type이 express.json()의 기본 값인 "application/json"과 일치하는 request만 보는 미들웨어를 반환합니다.
다시 말해, headers: { "Content-type": "application/json" }인 request만 express.json()을 실행한다.
16.5 Commenting -> comment한 걸 백엔드에서 컨트롤러를 이용해 comment 생성 in mongoDB
우리가 댓글을 쓰고 POST를 하면, 쿠키와 함께 comment가 보내지는 걸 알 수 있음.
-> 백엔드에 쿠키를 보내면, 백엔드는 세션을 찾아봄. 그 말은 우리가 그냥 api로 fetch requsets를 해서 POST하기만 해도 우리의 쿠키는 자동으로 브라우저에 의해 전송되고, 백엔드는 세션을 찾음. 그 말은 Controller에서 우리가 쓸 수 있는 뭔가(req.session)가 있다는 것임.
원리: 브라우저가 localhost:4000 ~~ 의 프론트엔드에서 localhost:4000 ~~의 백엔드로 보내는 것을 알기 때문에 쿠키의 원칙에 의해 우리는 자동으로 쿠키를 받을 수 있음.
controller에서 댓글을 만들고, 비디오에 댓글 넣어주기
- videoController - createComment
import Comment from "../models/Comment";
export const createComment = async (req, res) => {
const {session : {user}, body : {text}, params : {id}} = req;
const video = await Video.findById(id);
if(!video){
return res.sendStatus(404);
}
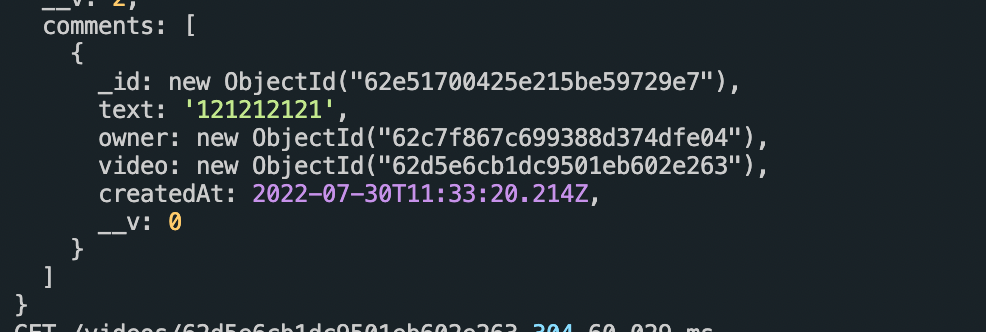
const comment = await Comment.create({
text,
owner: user._id,
video:id,
});
video.comments.push(comment._id); // 만들 댓글의 ObjId를 비디오의 comments array에 넣어줌
video.save(); // 비디오 저장 ㄱ ㄱ
res.sendStatus(201);
};-> 원한다면, req.session 이용해 사용자에게도 댓글을 넣어주어도 됨. User model에 comments array에 넣어주면됨. video와 동일하게
-
mongo에 comment생김

-
video의 comments array에 comment생김. (watch에서 populate해줘서 저렇게 object형태로 다 보이는 것임. 애초에 array에 넣어줄 때는 comment의 id만 넣어줬음)
16.6 Rendering Comments
단 comment를 화면에 보이도록 할 것임
- videoController - watch
const video = await Video.findById(id).populate("owner").populate("comments");// 댓글을 만들 때, 비디오의 comments array에 댓글의 id를 넣어줬음. 이 id를 이용해 각각의 comment의 내용을 가져온다는 것임. -> array의 내용이 더 이상 id가 아닌, obj형태로 정보를 담고있음. populat값은 video의 array명이 되야함.- watch.pug
// 업로드된 댓글 추가
 div.video__comments
        ul
            each comment in video.comments.reverse() // 최신 댓글이 위로 오도록 array를 뒤집어줌. reverse()만 해도 되는 이유: pug는 javascript언어를 실행하기 떄문.
               li.video__comment
                    i.fas.fa-comment
                    span  #{comment.text}
-> 과제:
1. 댓글에 사용자도 나타나도록 하기!
2. 사용자가 댓글 삭제하도록 하기 -> db에서 삭제해야겠죠? 사용자 array에서 삭제 (filter이용), comment db에서 삭제.
3. 댓글창 이쁘게 수정하기
- watch.scss -> client/scss/screens/watch.scss
  .video__comments {
    display: flex;
    flex-direction: column;
    max-width: 320px;
    width: 100%;
    margin: 0 auto;
    margin-top: 20px;
    .video__comment {
      padding: 10px;
      border-radius: 9999px;
      background-color: white;
      color: black;
      margin-bottom: 10px;
    }
  }
16.7 RealTime comments
-> 실시간으로 댓글이 달리면 화면에 보이도록 해줄것임.
commentSection(frontend)에서 작업해주기 -> 직접 html에 더해주는 것임.
- commentSection.js
-
async, fetch에 await추가 -> fetch에 await해주면 backend에서 DB랑 뭔가를 하고, statusCode를 return하고 다시 backend가 우리에게 돌아오는데 이 과정을 전부 기다려줌. 즉, 백엔드에서 모든 과정을 기다려줌.
-
fetch를 response로 정의해쥼 -> fetch는 console.log해주면 response를 출력함.
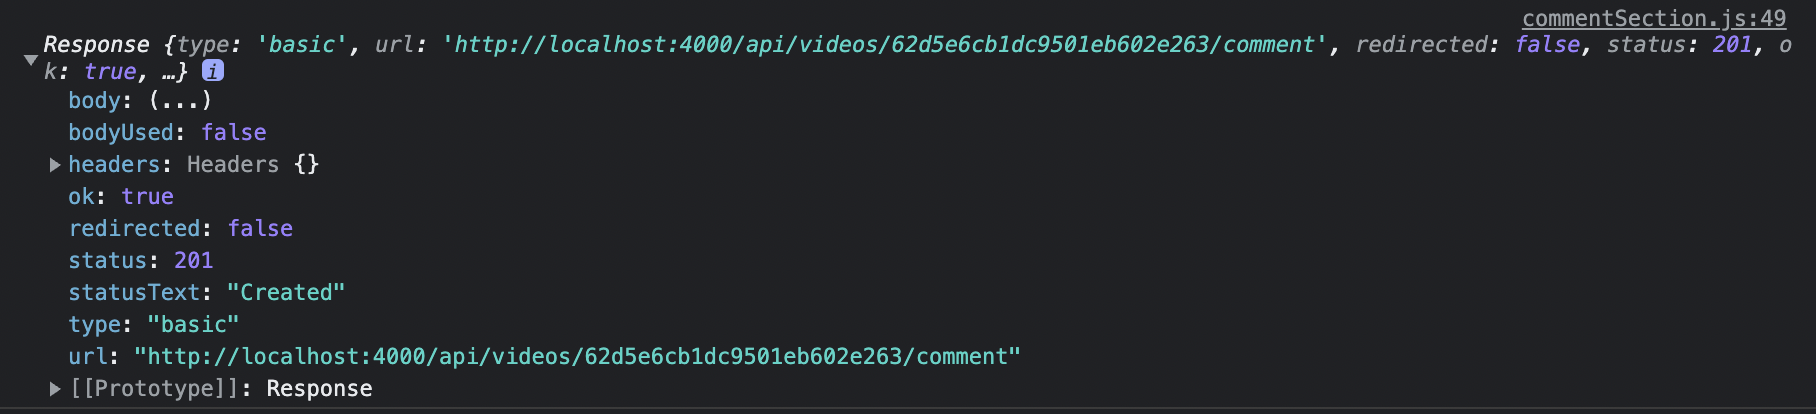
여기서 우리는 댓글이 잘 업로드 되었는지 status를 통해 알 수 있음. -> 201 즉, 댓글이 생성되었을 때만, html을 추가해줘서 댓글이 화면에 보이도록 만들기(이 댓글은 새로고침하면 사라짐 ! 대신 db에서 댓글을 가져오기 때문에 똑같이 보여질 것임).
지린다 진짜...
즉, 댓글을 단 이용자에게는 단지 html을 추가해서 댓글을 보여주고, 다른 이용자는 그 댓글을 실시간으로는 볼 수 없으나, 새로고침하면 db에서 가져오기 때문에 볼 수 있음. 새로고침 하면 html을 추가해준 것은 없어지고, db에서 가져오는 것들을 보게됨.
서로 다른 A, B라는 사람이 같은 페이지에 접속해있을 때 A가 댓글을 다는 것이 B에게 실시간으로 보여지는 것은 아님!
const addComment = (text) => {
    const videoComments = document.querySelector(".video__comments ul");
    const newComment = document.createElement("li");
    newComment.className = "video__comment";
    const icon = document.createElement("i")
    icon.className = "fas fa-comment";
    const span = document.createElement("span");
    span.innerText = ` ${text}`;
    newComment.appendChild(icon);
    newComment.appendChild(span);
    videoComments.prepend(newComment); // 새 댓글이 위로 오도록!
};

const handleSubmit = async (event) => {
    event.preventDefault();
    const textarea = form.querySelector("textarea");
    const text = textarea.value;
    const videoId = videoContainer.dataset.videoid
    if(text === ""){
        return; //사용자가 아무것도 입력하지 않으면 req를 보내지 않음.
    }
    const response = await fetch(`/api/videos/${videoId}/comment`, { // await을 하면 백엔드에서의 모든 과정을 기다려줌.
        method: "POST",
        headers : {// header: 기본적으로 requests에 대한 정보를 담고 있음. 따라서 request에 추가할 수 있는 정보임. 이를 이용하여 Express에게 보내는 데이터가 json형태라고 알림.
            "Content-Type" : "application/json", // Content-Type을 해주는 이유: 우리가 백엔드로 보내는 데이터 Type이 json형식임을 알려주는 것임. -> 이걸 처리해주지 않으면 백엔드는 여전히 text를 보낸다고 알 것임.
        },
        body: JSON.stringify({ // 보내줄 때 JSON.stringify형태로 보내줌.
            text,
        })
    })
    const status = response.status;
  	if(status === 201){
		addComment(text);
    }
    console.log(response);
  	textarea.value ="";
};

if(form){
    form.addEventListener("submit", handleSubmit);
} // form이 로그인 한 상태에서만 보이기 떄문임.
16.8 Comment Ids
댓글 삭제 기능 만들기
- watch.pug에서 댓글의 주인만 삭제 버튼을 볼 수 있도록 기능 설정 & 댓글에 dataset으로 comment의 id를 넣음
if (String(loggedInUser._id) === String(comment.owner))
span.removeBtn(data-commentId=comment._id) ❌- javascript에서 버튼을 누르면 fetch를 통해 remove api로 post하도록 만들고 이 때, 댓글의 dataset을 백엔드로 보내줌.
const removeBtn = document.querySelector(".removeBtn");

const handleRemoveComment = async (event) => {
    const videoId = videoContainer.dataset.videoid
    const child = event.target.parentElement;
    const commentid = event.target.dataset.commentid;
    if(!commentid){
        return child.remove();
    }
    const response = await fetch(`/api/videos/${videoId}/commentRemove`, {
        method : "POST",
        headers : {
            "Content-Type" : "application/json",
        },
        body: JSON.stringify({commentid}),
    });
    window.location.reload();
};

// add comment(fake comment)도 수정해줌
const addComment = (text) => {
    const videoComments = document.querySelector(".video__comments ul");
    const newComment = document.createElement("li");
    newComment.className = "video__comment";
    const icon = document.createElement("i")
    icon.className = "fas fa-comment";
    const span = document.createElement("span");
    span.innerText = ` ${text}`;
    const rmvBtn = document.createElement("span");
    rmvBtn.innerText = " ❌"
    rmvBtn.className = "removeBtn";
    rmvBtn.addEventListener("click", handleRemoveComment);
    newComment.appendChild(icon);
    newComment.appendChild(span);
    newComment.appendChild(rmvBtn);
    videoComments.prepend(newComment);
};
-> 한계점: fake comment를 이용할 때는, comment에 바로 dataset이 생기지 않으므로 handleRemoveComment의 fetch가 제대로 작동하지 않음. 따라서 이를 보완해주는 작업이 필요함. fake comment 상태에서도 바로 지울 수 있도록 만들기
- api Router 생성
apiRouter.post("/videos/:id([0-9a-f]{24})/commentRemove", removeComment);- controller로 백엔드에서 댓글db에서 댓글 지우고, video의 comments arr에서 filter를 이용해 댓글을 삭제해줌
export const removeComment = async (req, res) => {
    const {body :{commentid}, params :{id}, session} = req;
    const comment = await Comment.findById(commentid);
    const video = await Video.findById(id);
    if(!comment){
        req.flash("error", "Comment Not Found.");
        return res.sendStatus(404);
    }
    if(!video){
        req.flash("error", "Video Not Found.");
        return res.sendStatus(404);
    }
    if(String(comment.owner) !== session.user._id){
        req.flash("error", "You are not this comment's owner");
        return res.sendStatus(404);
    }
    await Comment.findByIdAndDelete(commentid);
    const newarr = video.comments.filter((comment) => String(comment) !== String(commentid));
    video.comments = newarr
    video.save();
    return res.sendStatus(200);
};
보완할 점
-> fake comment를 이용할 때는, comment에 바로 dataset이 생기지 않으므로 handleRemoveComment의 fetch가 제대로 작동하지 않음. 따라서 이를 보완해주는 작업이 필요함. fake comment 상태에서도 바로 지울 수 있도록 만들기
-> 원하는 기능: fake comment상태에서도 삭제를 하면 백엔드에서 삭제 됨과 동시에, child.remove()로만 삭제할 수 있도록 구현하고 싶음
보완완료
-> fakecomment를 만들 때, fetch를 이용해 비디오 comment arr를 가져와 그 id를 fakecomment dataset에 넣어주었음.
- commentsection
const addComment = async (text) => {
    const videoId = videoContainer.dataset.videoid
    const videoComments = document.querySelector(".video__comments ul");
    const newComment = document.createElement("li");
    newComment.className = "video__comment";
    const icon = document.createElement("i")
    icon.className = "fas fa-comment";
    const span = document.createElement("span");
    span.innerText = ` ${text}`;
    const rmvBtn = document.createElement("span");
    rmvBtn.innerText = " ❌"
    rmvBtn.className = "removeBtn";
  	//추가한 부분
    const response = await fetch(`/api/videos/${videoId}/comment`);
    const data = await response.json();
    const commentid = data[0];
    rmvBtn.dataset.commentid = commentid;
  	//
    rmvBtn.addEventListener("click", handleRemoveComment);
    newComment.appendChild(icon);
    newComment.appendChild(span);
    newComment.appendChild(rmvBtn);
    videoComments.prepend(newComment);
};- apiRouter
apiRouter.route("/videos/:id([0-9a-f]{24})/comment").post(createComment).get(getComment); // comment api router추가- controller
export const getComment = async (req, res) => {
    const { body , params: {id} } = req;
    const video = await Video.findById(id);
    if(!video){
        res.sendStatus(404);
    }
    res.status(200).send(video.comments.reverse());
};
----- 이게 내가 한 방법이고 니콜라스가 한 방법 --------
-> 애초에 comment를 만들고 백엔드에서 프론트엔드로 돌아올 때, commentid를 넘겨줬음. 또한 html에서 dataset-id:comment._id를 버튼에 넣지 않고, comment li에 넣었음 !
그리고 fetch를 할 때, params에 videoid를 넣고 body로 commentid를 넘겨주는 것이 아니라 commentid를 params에 넣어서 fetch를 실행함. 이렇게 해도 comment를 이용해 video를 찾을 수 있음. 백엔드에서 comment.video를 이용해 비디오를 찾음 !
- videoController
export const createComment = async (req, res) => {
    const {session : {user}, body : {text}, params : {id}} = req;
    const video = await Video.findById(id);
    if(!video){
        return res.sendStatus(404);
    }
    const comment = await Comment.create({
        text,
        owner: user._id,
        video:id,
    });
    video.comments.push(comment._id); // 만들 댓글의 ObjId를  비디오의 comments array에 넣어줌
    video.save(); //comments array에 변경사항 생겨서 저장해줌 !
    return res.status(201).json({ newCommentId: comment._id });
};

export const removeComment = async (req, res) => {
    const { params :{id}, session} = req;
    const comment = await Comment.findById(id);
    const videoid = String(comment.video);
    const video = await Video.findById(videoid);
    if(!comment){
        req.flash("error", "Comment Not Found.");
        return res.sendStatus(404);
    }
    if(!video){
        req.flash("error", "Video Not Found.");
        return res.sendStatus(404);
    }
    if(String(comment.owner) !== session.user._id){
        req.flash("error", "You are not this comment's owner");
        return res.sendStatus(404);
    }
    await Comment.findByIdAndDelete(id);
    const newarr = video.comments.filter((comment) => String(comment) !== String(id));
    video.comments = newarr
    video.save();
    return res.sendStatus(200);
};
- commentSection
const handleSubmit = async (event) => {
    event.preventDefault();
    const textarea = form.querySelector("textarea");
    const text = textarea.value;
    const videoId = videoContainer.dataset.videoid
    if(text === ""){
        return; //사용자가 아무것도 입력하지 않으면 req를 보내지 않음.
    }
    const response =  await fetch(`/api/videos/${videoId}/comment`, {
        method: "POST",
        headers : {
            "Content-Type" : "application/json",
        },
        body: JSON.stringify({
            text,// text(value값)만 보내면 object형태가 아닌 string형식의 text만 보내는 것임.
        })
    });
    if(response.status === 201){
        textarea.value ="";
        const { newCommentId } = await response.json(); // 백엔드로부터 보내온 걸 쓸려면 이렇게 const data = await response.json()을 해야 쓸 수 있음.
        addComment(text, newCommentId);
    }
};


const addComment = async (text, id) => {
    const videoComments = document.querySelector(".video__comments ul");
    const newComment = document.createElement("li");
    newComment.dataset.id = id;
    newComment.className = "video__comment";
    const icon = document.createElement("i")
    icon.className = "fas fa-comment";
    const span = document.createElement("span");
    span.innerText = ` ${text}`;
    const rmvBtn = document.createElement("span");
    rmvBtn.innerText = " ❌"
    rmvBtn.className = "removeBtn";
    rmvBtn.addEventListener("click", handleRemoveComment);
    newComment.appendChild(icon);
    newComment.appendChild(span);
    newComment.appendChild(rmvBtn);
    videoComments.prepend(newComment);
};


const handleRemoveComment = async (event) => {
    //const videoId = videoContainer.dataset.videoid
    const child = event.target.parentElement;
    const commentid = child.dataset.id;
    const response = await fetch(`/api/comment/${commentid}/remove`, {
        method : "DELETE",
    });
    if(response.status === 200){
        child.remove();
    };
};
- apiRouter
apiRouter.delete("/comment/:id([0-9a-f]{24})/remove", removeComment);또 다른 문제
-> 댓글을 쓴 후 새로고침 한 담에, 2개 연속으로 삭제하려 그려면 첫번째는 잘 삭제되는데 2번부터는 삭제가 안 돼서 새로고침 후 삭제해야 된다.
해결
- commentSection
const removeBtns = document.querySelectorAll(".removeBtn");

Array.from(removeBtns).forEach(btn => btn.addEventListener("click", handleRemoveComment)); // rmvBtn이 여러개니까 queryselectAll로 다 선언하고,(이 선언된 것의 type은 object이므로 이를 array로 바꾸고) 이 array를 forEach를 통해 각각의 btn에다가 이벤트 리스너 부여함.
fetch
fetch로 백 -> 프론트 or 프론트 -> 백엔드로 뭔가 데이터를 보낼 때는, json의 형태로 보내야 한다. 그리고 이 둘의 json 데이터를 주고 받기 위해 다음의 미드웨어가 반드시 필요함
미드웨어: app.use(express.json()); : 프 -> 백으로 데이터를 넘겨 받을 때, 프론트엔드에서 보낸 데이터는 JSON.stringify형태이다. 이 데이터를 백엔드에서 json()함수를 실행시켜줘서 백엔드에서 사용할 수 있도록 데이터 형태를 바꿔주는 미드웨어임. 즉 json.string을 받아서 js object로 바꿔주는 역할을 함. 이게 있어야 밑의 2번처럼 사용가능함.
- 프 -> 백 : headers : {"Content-Type" : "application/json",}, body:JSON.stringify(data) -> req.body 로 사용
- 백 -> 프 : res.json({ data: comment._id}) -> const datas = await response.json() / const data = datas.data 으로 사용하기
fetch는 프론트엔드에서 백엔드로 요청을 보내고, 백엔드에서 대답을 해주는 모든 과정을 fetch의 과정이라 할 수 있다.
챌린지 과제
챌린지 과제
- 댓글 삭제하기 (삭제시 비디오나 유저 도큐먼트에서도 삭제 필요)
- 댓글 추가 및 삭제시 실시간으로 댓글 갯수 변경 ✓
추가로 구현해볼 만한 기능들
- 댓글 수정하기 ✓
=>
- commentSection
const editBtns = document.querySelectorAll(".editBtn");

const handleEditSubmit = async (event) => {
    event.preventDefault();
    const commentid = event.target.parentElement.dataset.id;
    const span = event.target.parentElement.querySelector("span");
    const input = event.target.querySelector("input");
    const text = input.value.trim();
    if(text === ""){
        return; //사용자가 아무것도 입력하지 않으면 req를 보내지 않음.
    }
    const response =  await fetch(`/api/comment/${commentid}/edit`, {
        method: "POST",
        headers : {
            "Content-Type" : "application/json",
        },
        body: JSON.stringify({
            text,// text(value값)만 보내면 object형태가 아닌 string형식의 text만 보내는 것임.
        })
    });
    if(response.status === 200){
        span.innerText = input.value;
        input.value ="";
    }
};

const handleExitForm = (event) => {
    const li = event.target.parentElement.parentElement;
    const form = event.target.parentElement;
    form.remove();
};

const showEditComment = (event) => {
    const li = event.target.parentElement;
    const alreadyForm = li.querySelector("form");
    const form = document.createElement("form");
    form.addEventListener("submit", handleEditSubmit);
    const input = document.createElement("input");
    input.type = "text";
    input.value = li.querySelector("span").innerText;
    const btn = document.createElement("button");
    btn.innerText = "Edit";
    const exit = document.createElement("span");
    exit.className = "far fa-times-circle";
    exit.addEventListener("click", handleExitForm);
    form.appendChild(input);
    form.appendChild(btn);
    form.appendChild(exit);
    li.appendChild(form);
};

if(editBtns){
    Array.from(editBtns).forEach((editBtn) => editBtn.addEventListener("click", showEditComment));
};- apiRouter
apiRouter.post("/comment/:id([0-9a-f]{24})/edit", editComment);- videoController
export const editComment = async (req, res) => {
    const {body, params:{id}, session:{user : {_id}}} = req;
    const comment = await Comment.findById(id);
    if(!comment){
        req.flash("error", "Comment Not Found.");
        return res.sendStatus(404);
    }
    if(String(comment.owner) !== String(_id)){
        req.flash("error", "You are not this comment's owner");
        return res.sendStatus(404);
    }
    comment.text = body.text;
    comment.save();
    return res.sendStatus(200);
};
- 좋아요
- 좋아요 취소
- 해시태그 클릭시 비디오 찾기
Element.remove()
Element.remove() 메서드는 해당 요소가 속한 트리에서 요소를 제거합니다.
(remove대신 removeChild를 사용해서 엘리먼트 삭제도 가능)
https://developer.mozilla.org/en-US/docs/Web/API/Element/remove