
part 2 Word Vectors
part 2에서는 Word2Vec 알고리즘에 의해 만들어진 분산 단어 벡터에 대해 알아볼 것이다.
Word2vec은 2013년 구글에서 만들어진 neural network implementation으로, 단어에 대한 distributed representation을 학습한다. (Word2vec 모델은 이전에 개발된 distributed representation 학습 모델보다 빠른 속도로 학습이 가능함)
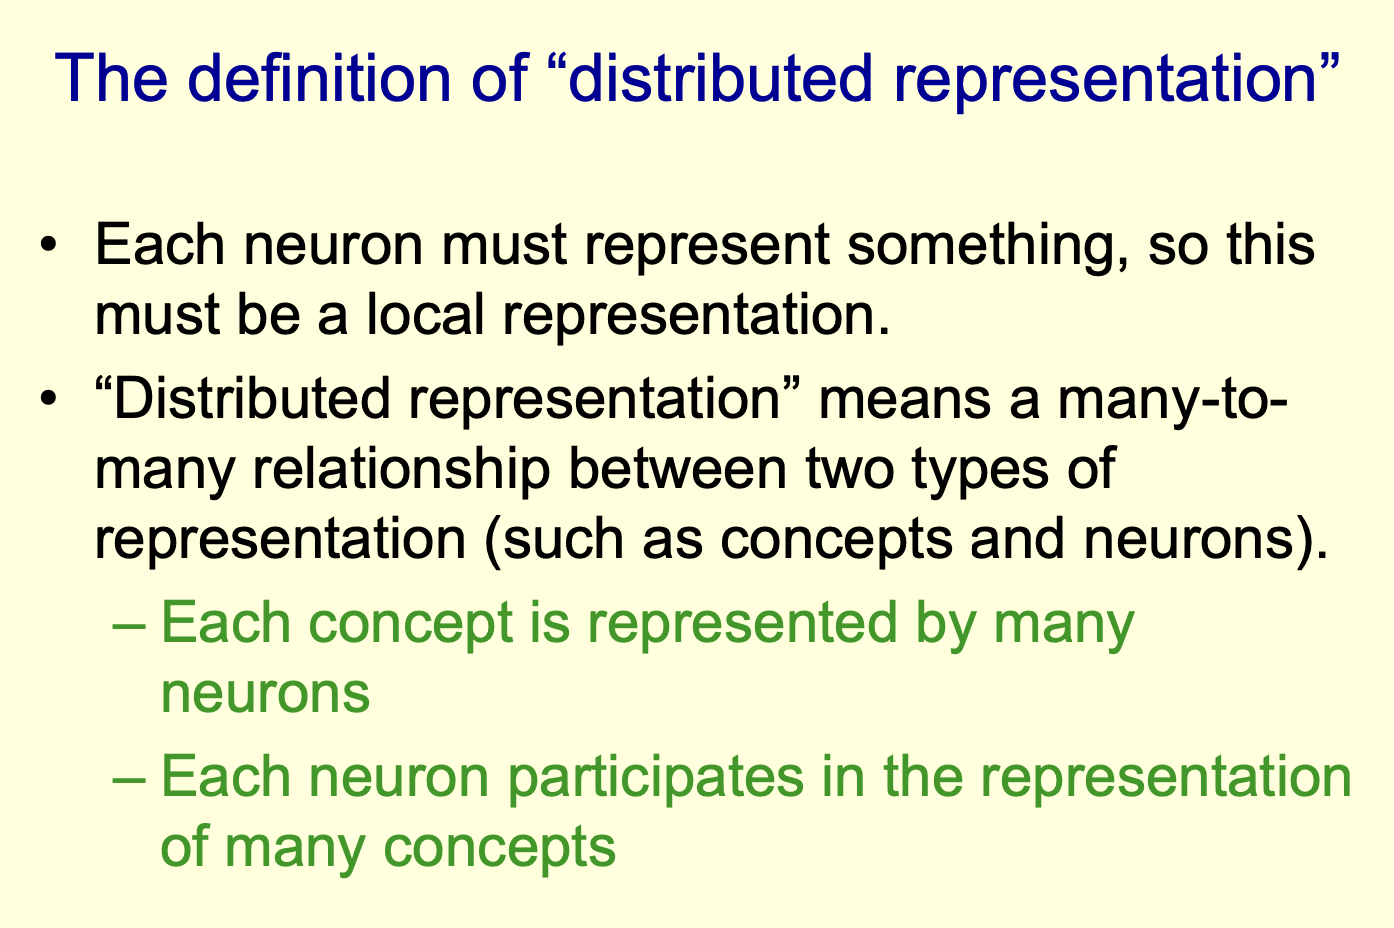
(distributed representation에 대해 잘 설명하고 있는 글을 찾아서 첨부하였습니다. 참고로 part 1에서 만들었던 feature vector들은 1또는 0으로만 구성되어있으므로 local representation임을 알 수 있습니다. - https://nrhan.tistory.com/entry/distributed-representation)
Word2Vec은 representation을 만들 때 데이터에 label이 없어도 된다. (실제 데이터들은 대부분 unlabeled 상태이므로 굉장히 유용함.) 모델이 학습 데이터에 대하여 유사한 단어 벡터들을 클러스터링하고, 클러스터들은 같은 vector space에 놓이게 된다. "king-man+woman=queen"과 같이 단어의 관계를 이용한 벡터 연산이 가능하다.
- 데이터 불러오기
import pandas as pd

# Read data from files
train = pd.read_csv( "labeledTrainData.tsv", header=0,
 delimiter="\t", quoting=3 )
test = pd.read_csv( "testData.tsv", header=0, delimiter="\t", quoting=3 )
unlabeled_train = pd.read_csv( "unlabeledTrainData.tsv", header=0,
 delimiter="\t", quoting=3 )

# Verify the number of reviews that were read (100,000 in total)
print "Read %d labeled train reviews, %d labeled test reviews, " \
 "and %d unlabeled reviews\n" % (train["review"].size,
 test["review"].size, unlabeled_train["review"].size )
part 1에서처럼 데이터를 불러오면 된다. part 1과 달리 이제 unlabeled train data를 사용할 수 있다.
- 데이터 전처리
데이터 전처리 과정도 part 1과 유사하다. 단, Word2Vec 모델 사용 시 더 넓은 맥락에서 단어를 학습하기 위해 stop words를 삭제하지 않는 것이 좋다. 아래 코드에서는 optional하게 stop words를 삭제하였다.
# Import various modules for string cleaning
from bs4 import BeautifulSoup
import re
from nltk.corpus import stopwords

def review_to_wordlist( review, remove_stopwords=False ):
    # Function to convert a document to a sequence of words,
    # optionally removing stop words.  Returns a list of words.

    # 1. Remove HTML
    review_text = BeautifulSoup(review).get_text()

    # 2. Remove non-letters
    review_text = re.sub("[^a-zA-Z]"," ", review_text)

    # 3. Convert words to lower case and split them
    words = review_text.lower().split()

    # 4. Optionally remove stop words (false by default)
    if remove_stopwords:
        stops = set(stopwords.words("english"))
        words = [w for w in words if not w in stops]

    # 5. Return a list of words
    return(words)
문단을 문장 단위로 입력할 수 있도록 문장부호를 삭제하고 tokenizing하는 함수를 만들었다.
# Download the punkt tokenizer for sentence splitting
import nltk.data
nltk.download()

# Load the punkt tokenizer
tokenizer = nltk.data.load('tokenizers/punkt/english.pickle')

# Define a function to split a review into parsed sentences
def review_to_sentences( review, tokenizer, remove_stopwords=False ):
    # Function to split a review into parsed sentences. Returns a
    # list of sentences, where each sentence is a list of words

    # 1. Use the NLTK tokenizer to split the paragraph into sentences
    raw_sentences = tokenizer.tokenize(review.strip())

    # 2. Loop over each sentence
    sentences = []
    for raw_sentence in raw_sentences:
        # If a sentence is empty, skip it
        if len(raw_sentence) > 0:
            # Otherwise, call review_to_wordlist to get a list of words
            sentences.append( review_to_wordlist( raw_sentence, \
              remove_stopwords ))

    # Return the list of sentences (each sentence is a list of words,
    # so this returns a list of lists
    return sentences
이 함수를 데이터에 적용하면 Word2Vec input 데이터 준비 끝!
sentences = []  # Initialize an empty list of sentences

print "Parsing sentences from training set"
for review in train["review"]:
    sentences += review_to_sentences(review, tokenizer)

print "Parsing sentences from unlabeled set"
for review in unlabeled_train["review"]:
    sentences += review_to_sentences(review, tokenizer)
- 모델 정하기&훈련
실행 시간과 최종 모델의 quality에 영향을 미치는 여러 parameter를 선택해야 한다.
architecture: Word2Vec은 skip-gram과 continuous bag of words 두 가지 방법으로 구현할 수 있다. skip-gram은 주어진 단어로부터 문맥 안의 주변 단어를 예측하는 방식, continuous bag of words는 주변 단어들을 통해 주어진 단어를 예측하는 방식이다. skip-gram이 조금 더 느리지만 더 나은 결과를 생성했다.
Training alorithm: Hierarchial Softmax(default)와 Negative Sampling 두 가지 방식이 있다. 전자는 계층 구조의 이진 트리를 사용하여 단어의 확률 분포를 학습한다. 후자는 계산 효율성을 개선하기 위해 개발된 방법으로, 여기서 "negative한 단어"란 주어진 단어와 함께 등장하지 않은 무작위 선택된 단어를 의미한다. Negative sampling은 학습 시 주어진 단어와 negative한 단어를 입력받아 이들을 구분하는 이진 분류 문제로 학습을 수행한다.
Downsampling of frequent words: "Downsampling"이란 자주 등장하는 단어를 희소하게 만드는 과정이다. 너무 자주 등장하는 단어가 학습 과정에서 지나친 중요도를 차지할 수 있기 때문이다. 구글의 문서에서는 단어의 다운샘플링 값을 0.00001 ~ 0.001 사이로 추천하고 있다.
Word vector dimensionality: 벡터의 차원을 선택해야 한다. 차원이 높을수록 더 많은 정보를 담을 수 있지만, 계산비용과 모델의 복잡도가 증가하며, 항상 더 나은 모델을 보장하지는 않는다. 이 경우 단어 벡터의 차원을 300으로 설정했다.
Context/window size: window size는 target 단어 양옆으로 얼마나 span할지를 결정한다. 양옆의 단어는 context(문맥) 단어로 consider됨.
Worker threads: 학습 과정에서 동시에 실행되는 프로세스의 수
Minimum word count: 단어의 최소 등장 횟수. 해당 단어가 minimum word count 이상으로 등장하지 않는 경우, 모델에서 무시된다. 이 경우, 각각의 영화에 대한 리뷰가 30개 있기 때문에 영화 제목에 큰 중요도를 두지 않기 위해 minimum word count를 40으로 설정했다. 이 값을 높이면 실행 시간을 줄일 수 있으며, 모델의 크기를 줄이는 데 도움이 된다.
이제 Word2Vec 모델을 생성해보자.
# Import the built-in logging module and configure it so that Word2Vec creates nice output messages

import logging
logging.basicConfig(format='%(asctime)s : %(levelname)s : %(message)s',\
    level=logging.INFO)

# Set values for various parameters
num_features = 300    # Word vector dimensionality
min_word_count = 40   # Minimum word count
num_workers = 4       # Number of threads to run in parallel
context = 10          # Context window size
downsampling = 1e-3   # Downsample setting for frequent words

# Initialize and train the model (this will take some time)
from gensim.models import word2vec
print "Training model..."
model = word2vec.Word2Vec(sentences, workers=num_workers, \
            size=num_features, min_count = min_word_count, \
            window = context, sample = downsampling)

# If you don't plan to train the model any further, calling
# init_sims will make the model much more memory-efficient.
model.init_sims(replace=True)

# It can be helpful to create a meaningful model name and
# save the model for later use. You can load it later using Word2Vec.load()
model_name = "300features_40minwords_10context"
model.save(model_name)- 모델 알아보기
doesnt_match 함수를 통해 word set 중 가장 유사하지 않은 단어를 찾을 수 있다.
>>> model.doesnt_match("man woman child kitchen".split())
'kitchen'
>>> model.doesnt_match("paris berlin london austria".split())
'paris'most_similar 함수를 통해 단어 클러스터에 대해 알아볼 수 있다.
>>> model.most_similar("awful")
[(u'terrible', 0.6812670230865479), (u'horrible', 0.62867271900177), (u'dreadful', 0.5879652500152588), (u'laughable', 0.5469599962234497), (u'horrendous', 0.5167273283004761), (u'atrocious', 0.5115568041801453), (u'ridiculous', 0.5104714632034302), (u'abysmal', 0.5015234351158142), (u'pathetic', 0.4880446791648865), (u'embarrassing', 0.48272213339805603)]
이 단어 벡터들을 지도학습에 어떻게 이용하는지는 part 3에...
참고 - https://www.kaggle.com/competitions/word2vec-nlp-tutorial