
01.공급 업체 접두사란?(autoprefixer)
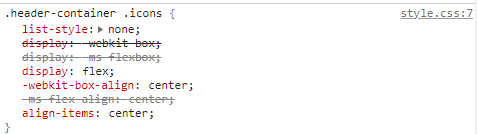
- 웹페이지 내에서 개발자 도구로 확인할 때
display: webkit-box등과 같이 코딩을 진행한 적이 없는 내용이 포함되어 있는 것을 볼 수 있습니다. - 이는 웹 표준이 권고안으로 나오기 전에 브라우저를 제작하는 벤더사인 예를 들면 크롬을 제작하는 구글, 인터넷 익스플로러를 제작하는 마이크로소프트 회사에서 미리 본인들의 브라우저 내에서 동작할 수 있는 구조를 만들어 놓습니다.
- 시험적인 기능을 적용하는 것이라 생각하시면 됩니다.
- 결국 비교적 신기술이 구현되지 않는 구형의 브라우저에서도 최신의
CSS기술이 동작할 수 있도록 일종의 보험을 들어두는 것이webkit이나ms로 시작하는 공급 업체 접두사(Vendor Prefix)를 적용하는 방식입니다. - 이러한 공급업체 접두사를 각 속성별로 모두 외워 사용하는 것은 거의 불가능하기에 이를 자동으로 진행해주는 패키지가
autoprefixer이며 이를 설치하는 방법에 대해 알아봅시다.
02.autoprefixer 설치 및 설정
2-1.패키지 설치
$ npm i -D postcss autoprefixer
postcss와autoprefixer두 가지 패키지를 개발용으로 설치해줍니다.
2-2.package.json
package.json파일에browerslist옵션을 코딩해줍니다.browerslist옵션은 현재NPM프로젝트에서 지원할 브라우저의 범위를 명시하는 용도입니다.
"browserslist": [
    "> 1%",
    "last 2 versions"
  ]
- 이것은 현재 프로젝트에서 전 세계의 점유율이 1% 이상인 모든 브라우저의 마지막 2개 버전까지 모두 지원을 하겠다는 의미입니다.
2-3.postcssrc.js 파일 생성
.postcssrc.js마침표로 시작하는rc(runtime configuration) 파일, 즉 구성 파일을 만들어줍니다.- 마침표로 시작하는 것은 구성 옵션이나 숨김 파일을 의미합니다.
2-4.import & export
.postcssrc.js파일 내에 아래 내용을 코딩해줍니다.
// ESM - 브라우저에서 사용되는 방식

// import autoprefixer from "autoprefixer";

/*
export {
  plugins: [
     autoprefixer
  ]
}
*/

// CommonJS - node.js 에서 사용되는 방식
//  const autoprefixer = require("autoprefixer");
/*
module.exports = {
  plugins: [
    autoprefixer
  ]
}
*/

module.exports = {
  plugins: [
    require("autoprefixer")
  ]
}
- 주로 사용하는
import,export키워드는 브라우저에서만 사용되는 방식(ESM)입니다.CommonJS방식인require(),module exports키워드는Node.js에서 사용되는 방식 입니다.
2-4.autoprefixer 버전 다운그레이드
- Error message:
PostCSS plugin autoprefixer requires PostCSS 8 - 위의 모든 단계를 완료하고 개발 서버를 오픈하려하면 위와 같이 에러 메시지가 발생하게 됩니다.
- 이는
autoprefixer와PostCSS의 버전이 충돌하고 있기 때문입니다.
$ npm i -D autoprefixer@9
- 이러한 이유로 10버전인
autoprefixer를 9버전으로 다운그레이드 해줍니다.
2-5.개발 서버 오픈
- 개발 서버를 열어서 패키지가 잘 설치되었는지 확인해줍니다.
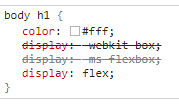
- 확인을 위해
CSS파일 내 한 요소에display: flex로 설정합니다.
- 웹 페이지에서
h1태그 영역 부분을 클릭했을때 아래와 같이 명시되어 있다면 성공적으로 설치되었음을 알 수 있습니다.

일취월장(日就月將) - 「날마다 달마다 성장하고 발전한다.」