01.설치
$ npm install react-simple-chatbot
02.사용 예제
파일 위치: src/component/pages/Chatbot.js
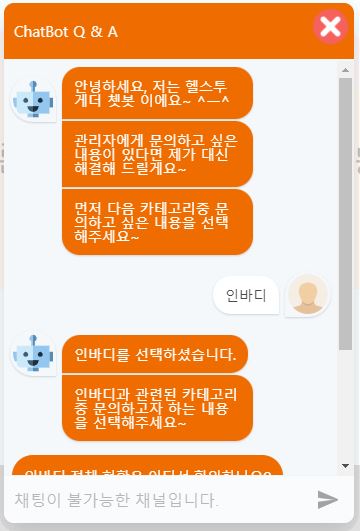
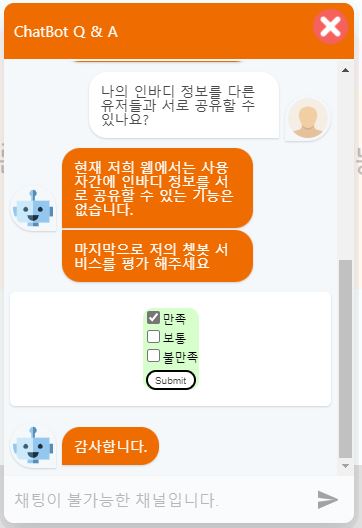
import React from "react" import styled, { ThemeProvider } from "styled-components" import ChatBot from "react-simple-chatbot" import ChatbotModal from "react-modal" import { Close } from "../../../image/index.js" import CheckBox from "./CheckBox.js" const Closebtn = styled.img` width: 35px; height: 35px; position: absolute; top: 3%; right: 3%; z-index: 1000; &:hover { cursor: pointer; } ` const steps = [ /////////////////////////////////////////////////////////////////// 질문 카테고리 선택 { id: "1", message: "안녕하세요, 저는 헬스투게더 쳇봇 이에요~ ^ㅡ^", trigger: "2", }, { id: "2", message: "관리자에게 문의하고 싶은 내용이 있다면 제가 대신 해결해 드릴게요~", trigger: "3", }, { id: "3", message: "먼저 다음 카테고리중 문의하고 싶은 내용을 선택해주세요~", trigger: "4", }, { id: "4", options: [ { value: "challenge", label: "첼린지", trigger: "5" }, { value: "inbody", label: "인바디", trigger: "6" }, { value: "calendar", label: "캘린더", trigger: "7" }, ], }, /////////////////////////////////////////////////////////////////// 넓은 범위 카테고리 선택 확인 메시지 { id: "5", message: "챌린지를 선택하셨습니다.", trigger: "8", }, { id: "6", message: "인바디를 선택하셨습니다.", trigger: "9", }, { id: "7", message: "캘린더를 선택하셨습니다.", trigger: "10", }, /////////////////////////////////////////////////////////////////// 세부 질문 카테고리 안내 메시지 { id: "8", message: "챌린지와 관련된 카테고리중 문의하고자 하는 내용을 선택해주세요~", trigger: "11", }, { id: "9", message: "인바디과 관련된 카테고리중 문의하고자 하는 내용을 선택해주세요~", trigger: "12", }, { id: "10", message: "캘린더와 관련된 카테고리중 문의하고자 하는 내용을 선택해주세요~", trigger: "13", }, /////////////////////////////////////////////////////////////////// 세부 질문 카테고리 선택 { id: "11", options: [ { value: "14", label: "첼린지 전체 현황은 어디서 확인하나요?", trigger: "14", }, { value: "15", label: "팔굽혀펴기 챌린지 참여는 어디서 할 수 있나요?", trigger: "15", }, { value: "16", label: "챌랜지의 모든 미션들을 완주하면 어떠한 보상이 주어지나요?", trigger: "16", }, ], }, { id: "12", options: [ { value: "17", label: "인바디 전체 현황은 어디서 확인하나요?", trigger: "17", }, { value: "18", label: "웹에서 사용자가 직접 물알람을 설정할 수 있나요?", trigger: "18", }, { value: "19", label: "나의 인바디 정보를 다른 유저들과 서로 공유할 수 있나요?", trigger: "19", }, ], }, { id: "13", options: [ { value: "20", label: "나의 헬스 캘린더는 어디서 확인할 수 있나요?", trigger: "20", }, { value: "21", label: "사용자가 직접 캘린더에 일정 등록 및 삭제를 할 수 있나요?", trigger: "21", }, { value: "22", label: "앱에 저장된 캘린더 일정들이 웹의 캘린더와 같이 연동되어 볼 수 있나요?", trigger: "22", }, ], }, /////////////////////////////////////////////////////////////////// 챌린지 답변 { id: "14", message: "챌린지 전체 현황은 내정보에서 확인할 수 있습니다.", trigger: "23", }, { id: "15", message: "팔굽혀펴기 챌린지는 챌린지 목록 리스트에서 팔굽혀펴기 챌린지의 참여하기 버튼을 누르면 참여할 수 있습니다.", trigger: "23", }, { id: "16", message: "챌린지의 모든 미션을 완주하셨다면 저에게 축하 메시지를 들을 수 있습니다.", trigger: "23", }, /////////////////////////////////////////////////////////////////// 인바디 답변 { id: "17", message: "인바디 전체 현황은 내정보에서 확인할 수 있습니다.", trigger: "23", }, { id: "18", message: "아직 웹에서는 물 알람을 사용자가 직접 설정할 수 있는 기능은 없습니다.", trigger: "23", }, { id: "19", message: "현재 저희 웹에서는 사용자간에 인바디 정보를 서로 공유할 수 있는 기능은 없습니다.", trigger: "23", }, /////////////////////////////////////////////////////////////////// 캘린더 답변 { id: "20", message: "웹 페이지의 두번째 색션에서 캘린더 원에 마우스를 올리면 나의 캘린더를 볼 수 있는 버튼이 있습니다.", trigger: "23", }, { id: "21", message: "캘린더에서 사용자가 직접 일정을 추가 및 삭제할 수 있습니다.", trigger: "23", }, { id: "22", message: "현재로서는 앱과 웹의 캘린더가 서로 연동되어 있지 않지만 곧 연동하여 헬스 일정을 앱과 웹에서 모두 확인할 수 있도록 할 예정입니다. \n 자세한 내용은 게시판에 공지하도록 하겠습니다. ", trigger: "23", }, /////////////////////////////////////////////////////////////////// 평가 체크리스트 { id: "23", message: "마지막으로 저의 쳇봇 서비스를 평가 해주세요", trigger: "24", }, { id: "24", component: <CheckBox />, waitAction: true, trigger: "25", }, { id: "25", message: "감사합니다.", end: true, }, ] const Chatbot = ({ isModal, setModal }) => { const theme = { background: "#f5f8fb", fontFamily: "Helvetica Neue", headerBgColor: "#EF6C00", headerFontColor: "#fff", headerFontSize: "15px", botBubbleColor: "#EF6C00", botFontColor: "#fff", userBubbleColor: "#fff", userFontColor: "#4a4a4a", } return ( <ChatbotModal isOpen={isModal} onRequestClose={() => setModal(false)} ariaHideApp={false} shouldCloseOnOverlayClick={false} style={{ content: { width: "320px", height: "500px", position: "relative", top: "200px", left: "680px", display: "flex", overflow: "hidden", border: "medium none black", justifyContent: "center", flexWrap: "wrap", alignContent: "center", borderRadius: "20px", backgroundColor: "transparent", }, }} > <Closebtn src={Close} onClick={() => setModal(false)} /> <ThemeProvider theme={theme}> <ChatBot steps={steps} hideHeader={false} headerTitle="ChatBot Q & A" placeholder={"채팅이 불가능한 채널입니다."} /> </ThemeProvider> </ChatbotModal> ) } export default Chatbot실행 결과
파일 위치: src/component/pages/CheckBox.js
import React, { Component } from "react" import styled from "styled-components" const Container = styled.div` background-color: #d7ffcc; border-radius: 10px; ` const Form = styled.form`` const FormCheck = styled.div`` const Input = styled.input`` const FormGroup = styled.div`` const Btn = styled.button` width: 50px; height: 20px; font-size: 10px; border-radius: 20px; margin-top: 5px; margin-left: 3px; background-color: #fff; color: #333; :hover { background-color: #333; color: #fff; cursor: pointer; } ` export default class CheckBox extends Component { constructor(props) { super(props) this.state = { satisfaction: false, average: false, unsatisfactory: false, trigger: false, } this.triggetNext = this.triggetNext.bind(this) } onChange = (checkedState) => (event) => { this.setState((initialState) => ({ [checkedState]: !this.state[checkedState], })) } onSubmit = async (e) => { e.preventDefault() let checkArray = [] for (var key in this.state) { if (this.state[key] === true) { checkArray.push(key) } } let checkData = { checkbox: checkArray.toString(), } console.log(checkData) this.triggetNext() } triggetNext() { this.setState({ trigger: true }, () => { this.props.triggerNextStep() }) } render() { return ( <Container> <Form onSubmit={this.onSubmit}> <FormCheck> <Input type="checkbox" onChange={this.onChange("satisfaction")} /> 만족 </FormCheck> <FormCheck> <Input type="checkbox" onChange={this.onChange("average")} /> 보통 </FormCheck> <FormCheck> <Input type="checkbox" onChange={this.onChange("unsatisfactory")} /> 불만족 </FormCheck> <FormGroup> <Btn>Submit</Btn> </FormGroup> </Form> </Container> ) } }실행 결과
03.겪었던 에러사항
문제 상황
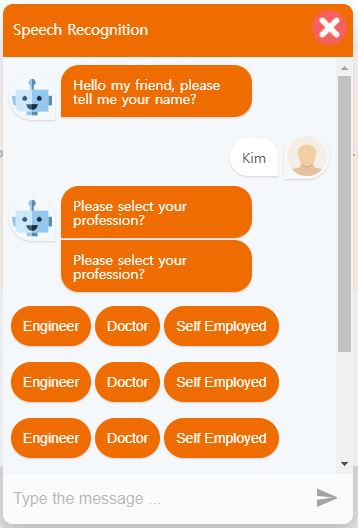
- 해당 사진처럼 처음
React-Chatbot을 만들때 메시지가 중복해서 출력되는 문제가 발생했었다.
문제 원인
- 랜더링이 두번 이상 되었기 때문에 메시지도 랜더링이 될때 마다 같이 다시 실행되어 메시지가 중복해서 출력되었다.
해결 방안
index.js파일에 있는<App />컴포넌트를 감싸고 있는<StrictMode>컴포넌트를 지운다.- 즉,
React개발도중 컴포넌트의Render가2번씩 반복되는 현상이 발생할 경우<React.StrictMode>태그를 지운채 실행하면 해결 된다.- 참고 블로그 바로가기
파일 위치: src/index.js (수정전)
import { StrictMode } from "react"
import { createRoot } from "react-dom/client"

import App from "./App"

import store from "./redux/configureStore"
import { Provider } from "react-redux"

// 👇️ IMPORTANT: make sure to specify correct ID
// must be the ID of the div element in your index.html file
const rootElement = document.getElementById("root")
const root = createRoot(rootElement)

root.render(
  <StrictMode>
  <Provider store={store}>
    <App />
  </Provider>
  </StrictMode>
)
// If you want to start measuring performance in your app, pass a function
// to log results (for example: reportWebVitals(console.log))
// or send to an analytics endpoint. Learn more: https://bit.ly/CRA-vitals
파일 위치: src/index.js (수정후)
import { StrictMode } from "react"
import { createRoot } from "react-dom/client"

import App from "./App"

import store from "./redux/configureStore"
import { Provider } from "react-redux"

// 👇️ IMPORTANT: make sure to specify correct ID
// must be the ID of the div element in your index.html file
const rootElement = document.getElementById("root")
const root = createRoot(rootElement)

root.render(
  <Provider store={store}>
    <App />
  </Provider>
)
// If you want to start measuring performance in your app, pass a function
// to log results (for example: reportWebVitals(console.log))
// or send to an analytics endpoint. Learn more: https://bit.ly/CRA-vitals

일취월장(日就月將) - 「날마다 달마다 성장하고 발전한다.」
안녕하세요! input box 에서 글적은거 말고 각 step 에서 버튼으로 선택한 값을 얻고 싶은데 방법 혹시 아시나요?