01.Redux 개발도구 없이 웹에서 바로 개발하기
https://stackblitz.com/사이트에서React클릭
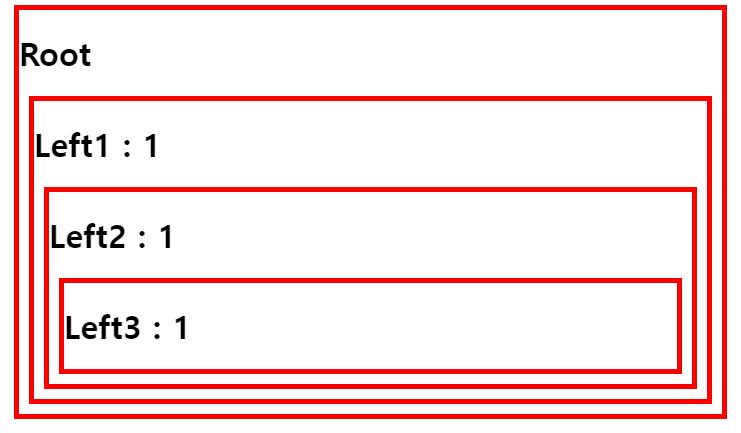
02.Left 만들기
App.jsx
import React, { useState } from 'react';
import './style.css';

export default function App() {
  const [number, setNumber] = useState(1);
  return (
    <div id="container">
      <h1>Root</h1>
      <Left1 number={number}></Left1>
    </div>
  );
}

function Left1(props) {
  return (
    <div>
      <h1>Left1 : {props.number}</h1>
      <Left2 number={props.number}></Left2>
    </div>
  );
}

function Left2(props) {
  return (
    <div>
      <h1>Left2 : {props.number}</h1>
      <Left3 number={props.number}></Left3>
    </div>
  );
}

function Left3(props) {
  return (
    <div>
      <h1>Left3 : {props.number}</h1>
    </div>
  );
}
style.css
#container,
#container div {
  border: 5px solid red;
  margin: 10px;
}
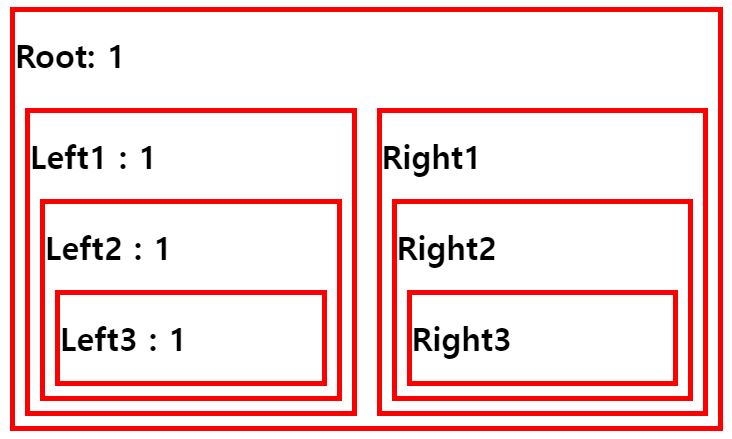
03.Right 만들기
App.js
import React, { useState } from 'react';
import './style.css';

export default function App() {
  const [number, setNumber] = useState(1);
  return (
    <div id="container">
      <h1>Root: {number}</h1>
      <div id="grid">
      <Left1 number={number}></Left1>
      <Right1></Right1>
      </div>
    </div>
  );
}

function Left1(props) {
  return (
    <div>
      <h1>Left1 : {props.number}</h1>
      <Left2 number={props.number}></Left2>
    </div>
  );
}

function Left2(props) {
  return (
    <div>
      <h1>Left2 : {props.number}</h1>
      <Left3 number={props.number}></Left3>
    </div>
  );
}

function Left3(props) {
  return (
    <div>
      <h1>Left3 : {props.number}</h1>
    </div>
  );
}

function Right1(props) {
  return (
    <div>
      <h1>Right1</h1>
      <Right2></Right2>
    </div>
  );
}

function Right2(props) {
  return (
    <div>
      <h1>Right2</h1>
      <Right3></Right3>
    </div>
  );
}

function Right3(props) {
  return (
    <div>
      <h1>Right3</h1>
    </div>
  );
}
style.css
#container,
#container > div div {
  border: 5px solid red;
  margin: 10px;
}

#grid {
  display: grid;
  grid-template-columns: 1fr 1fr;
}
실행 결과
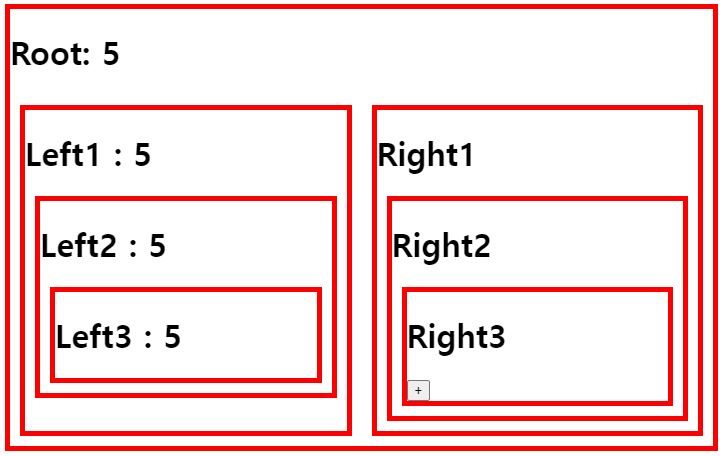
04.Right3에 1씩 증가하는 버튼 만들기
App.js
import React, { useState } from 'react';
import './style.css';

export default function App() {
  const [number, setNumber] = useState(1);
  return (
    <div id="container">
      <h1>Root: {number}</h1>
      <div id="grid">
        <Left1 number={number}></Left1>
        <Right1
          onIncrease={() => {
            setNumber(number + 1);
          }}
</Right1>
      </div>
    </div>
  );
}

function Left1(props) {
  return (
    <div>
      <h1>Left1 : {props.number}</h1>
      <Left2 number={props.number}></Left2>
    </div>
  );
}

function Left2(props) {
  return (
    <div>
      <h1>Left2 : {props.number}</h1>
      <Left3 number={props.number}></Left3>
    </div>
  );
}

function Left3(props) {
  return (
    <div>
      <h1>Left3 : {props.number}</h1>
    </div>
  );
}

function Right1(props) {
  return (
    <div>
      <h1>Right1</h1>
      <Right2
        onIncrease={() => {
          props.onIncrease();
        }}
</Right2>
    </div>
  );
}

function Right2(props) {
  return (
    <div>
      <h1>Right2</h1>
      <Right3
        onIncrease={() => {
          props.onIncrease();
        }}
</Right3>
    </div>
  );
}

function Right3(props) {
  return (
    <div>
      <h1>Right3</h1>
      <input type="button" value="+" onClick={() => props.onIncrease()}></input>
    </div>
  );
}
실행 결과
Right3 (+)버튼 클릭시 지나가는 컴포넌트 전달 순서:Right3 -> Right2 -> Right1 -> Root -> Left1 -> Left2 -> Left3props로 전달하기 때문에Right3 (+)버튼으로Left3의 값을 증가 시키기위해서는 모든 컴포넌트를 유선처럼 지나쳐야(props 으로 전달 해야) 한다.
05.React Redux 사용하기
React와Redux는 서로 다른 도구이다.- 서로 다른 도구 이기때문에 연결해주는 모듈이 필요하다.
state를 조회하기 위한useSelector를 사용할 수 있다.action을 발생시키기 위한useDispatch를 사용할 수 있다.
모듈 설치 방법
npm install redux react-redux
CreateStore
- 스토어를 생성할 때 사용합니다.
- 첫번째 매개변수에는 리듀서를 전달한다.
- 4개의 매서드가 들어있다. (
dispatch,subscribe,getState,replaceReducer)import { createStore } from 'redux'; const store = createStore(reducer);
Provider
Provider는 하나의 컴포넌트다.state값을 제공하고자하는 컴포넌트를 감싸준다.react로 작성된 컴포넌트들을Provider안에 넣으면 하위 컴포넌트들이Provider를 통해redux store에 접근이 가능해진다.Provider컴포넌트에 반드시store를 정의해줘야 한다.import { Provider } from 'react-redux' export default function App() { return ( <div id="container"> <h1>Root:</h1> <div id="grid"> // React의 props처럼 redux로 만든 store를 Provider에 적용한다. <Provider store={store}> // 이제 Left1, Right1 컴포넌트와 Left1, Right1 컴포넌트안에 있는 컴포넌트들은 Store에 접근이 가능하다. <Left1></Left1> <Right1></Right1> </Provider> </div> </div> ); }
useSelector
state값을 선택할때 사용connect함수를 이용하지 않고 리덕스의state를 조회할 수 있다.import { useSelector } from 'react-redux' function Left3(props) { // function f(state) { // return state.number; // } // const number = useSelector(f); // useSelect는 인자값을 함수로 받는다 const number = useSelector((state) => state.number); return ( <div> <h1>Left3 : {number}</h1> </div> ); }
useDispatch
state값을 변경할때 사용import { useDispatch } from 'react-redux'; // 현재의 State값, action(어땋게 바꿀갓인가?) function reducer(currenState, action) { // Store안의 상태값 변경 if (currenState === undefined) { return { number: 1, }; } const newState = { ...currenState }; // 과거의 State를 복제(불변성 유지) if(action.type === "PLUS") { // dispatch newState.number++; } return newState; } function Right3(props) { const dispatch = useDispatch(); return ( <div> <h1>Right3</h1> <input type="button" value="+" onClick={() => dispatch( { type: "PLUS" } )}></input> </div> ); }
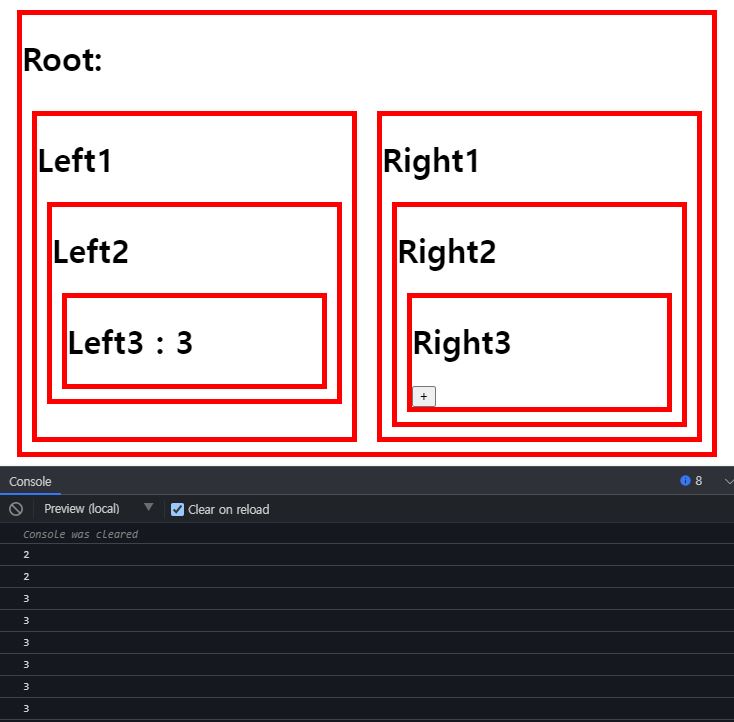
사용예제
import React, { useState } from 'react';
import './style.css';
import { createStore } from 'redux';
import { Provider, useSelector, useDispatch } from 'react-redux';

// 현재의 State값,  action(어땋게 바꿀갓인가?)
function reducer(currenState, action) {
  // Store안의 상태값 변경
  if (currenState === undefined) {
    return {
      number: 1,
    };
  }

  const newState = { ...currenState }; // 과거의 State를 복제(불변성 유지)

  if(action.type === "PLUS") {
    newState.number++;
  }
  return newState;
}
const store = createStore(reducer);

export default function App() {
  return (
    <div id="container">
      <h1>Root:</h1>
      <div id="grid">
        <Provider store={store}>
          <Left1></Left1>
          <Right1></Right1>
        </Provider>
      </div>
    </div>
  );
}

function Left1(props) {
  return (
    <div>
      <h1>Left1</h1>
      <Left2></Left2>
    </div>
  );
}

function Left2(props) {
  console.log("2")
  return (
    <div>
      <h1>Left2</h1>
      <Left3></Left3>
    </div>
  );
}

function Left3(props) {
  console.log("3")
  function f(state) {
    return state.number;
  }
  const number = useSelector((state) => state.number); // useSelect는 인자값을 함수로 받는다
  return (
    <div>
      <h1>Left3 : {number}</h1>
    </div>
  );
}

function Right1(props) {
  return (
    <div>
      <h1>Right1</h1>
      <Right2></Right2>
    </div>
  );
}

function Right2(props) {
  return (
    <div>
      <h1>Right2</h1>
      <Right3></Right3>
    </div>
  );
}

function Right3(props) {
  const dispatch = useDispatch();
  return (
    <div>
      <h1>Right3</h1>
      <input type="button" value="+" onClick={() => dispatch( { type: "PLUS" } )}></input>
    </div>
  );
}
출력결과
Right3의+버튼을 누르면 콘솔창에 3만 계속 출력되는것을 볼수 있는데 이는state를 사용하고 있는Left3컴포넌트의number만 값이 바뀌기 때문이다.
참고한 영상
https://www.youtube.com/watch?v=yjuwpf7VH74

일취월장(日就月將) - 「날마다 달마다 성장하고 발전한다.」