1. Node.js 설치

여기서 18.17.1 LTS(안정적, 신뢰도 높음) 설치하세요
2. IntelliJ 에서 Spring 프로젝트 생성
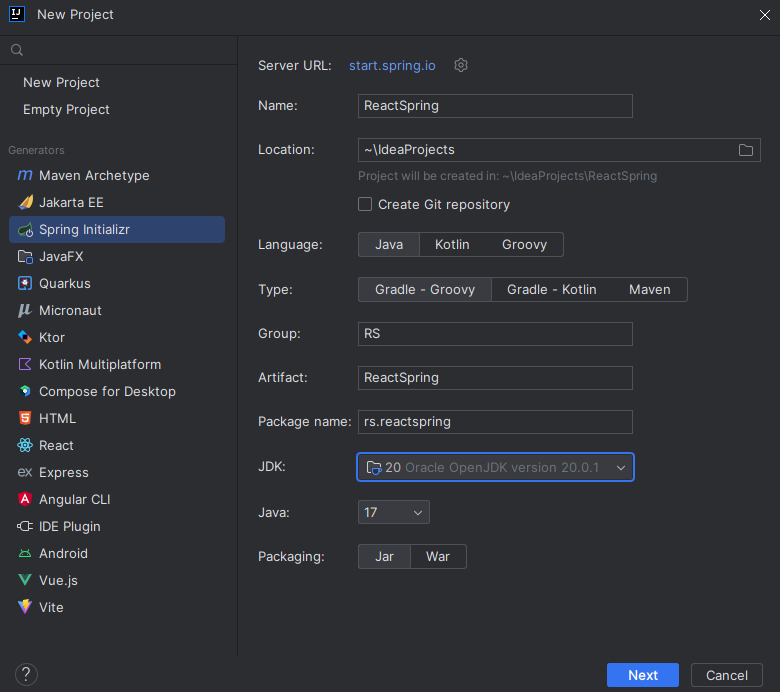
- 새 프로잭트 생성 후 Name(프로젝트 이름), Location(파일경로), Group(아무거나 지으셈), JDK(설치 안되어있으면 알아서 설치)
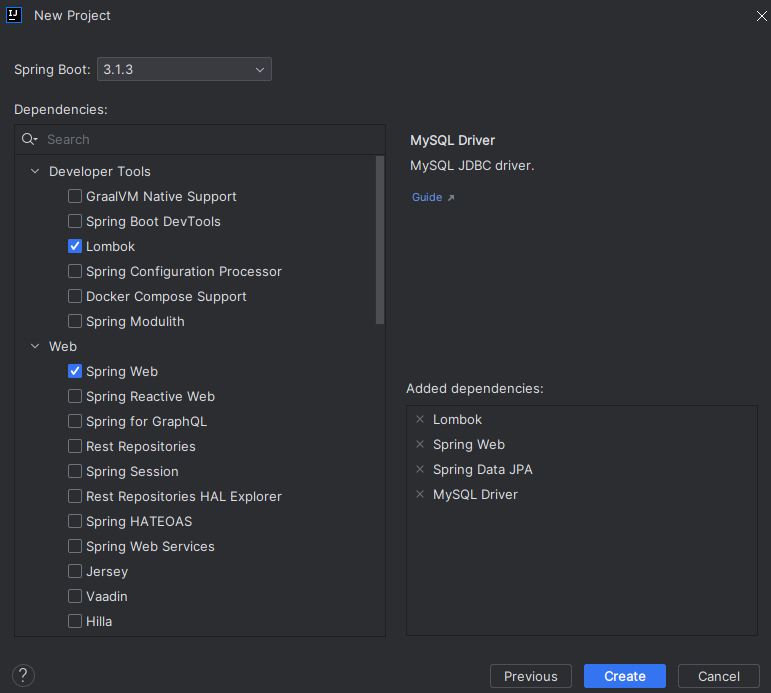
- Dependencies(의존성) 에서 체크해야할 2개가 있습니다.
Developer Tools(Lombok), Web(Spring Web)
여기서 SQL을 제외한 2가지만 하세요
3. Spring 프로젝트 에서 리액트 설치
- 리액트 설치하는 방법은 이 링크가서 보시던가 아니면 구글링해서 찾아보고 설치하세요
https://velog.io/@wlsdud11457/React-%EA%B0%9C%EB%B0%9C%ED%99%98%EA%B2%BD-%EA%B5%AC%EC%B6%95
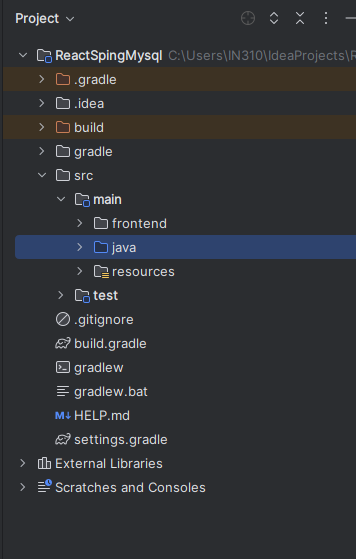
cd src/main
npx create-react-app frontend
ex) npx create-reeact [만들 프로젝트 이름]
4. Axios, Proxy 설정
React를 실행시키면 localhost : 3000, Spring을 실행시키면 localhost : 8080 기본 포트번호(3000, 8080)가 이렇게 되어있습니다.
이떄 React와 Spring의 포트번호가 다르니 CORS 라는 오류가 뜹니다
CORS 관련 오류를 방지하기 위해 Axios와 proxy를 설정해주도록 하겠습니다.
CORS(교차 출처 리소스 공유, Cross-Origin Resource Sharing) 오류
웹 애플리케이션 개발 중에 자주 발생하는 문제 중 하나입니다. 이 오류는 다음과 같은 상황에서 발생할 수 있습니다.
출처 (Origin)의 제한: 웹 브라우저는 보안 상의 이유로 동일한 출처에서 로드한 리소스만이 다른 출처의 리소스에 접근할 수 있도록 제한합니다. 출처란 프로토콜 (http 또는 https), 호스트 (도메인), 포트로 정의됩니다. 따라서 다른 출처에서 리소스를 요청하려 할 때 CORS 오류가 발생할 수 있습니다.
4-1 src/main/frontend 폴더에서 필요한 모듈을 설치해줍시다.
npm install http-proxy-middleware --save4-2 src/main/frontend/src 폴더에서 setupProxy.js 파일을 생성하고, 아래의 코드를 붙여넣기
const { createProxyMiddleware } = require('http-proxy-middleware');

module.exports = function(app) {
  app.use(
    '/api',
    createProxyMiddleware({
      target: 'http://localhost:8080',
      changeOrigin: true,
    })
  );
};
위의 과정을 제대로 잘 따라왔으면 프론트엔드에서 '/api'로 요청을 보내면, 스프링의 8080포트로 요청이 도착하게 됩니다.
4-3 Axios를 이용한 서버 통신
Axios란 JavaScript에서 HTTP 요청을 수행하는 데 사용되는 강력하고 인기 있는 라이브러리입니다. Axios는 브라우저 및 Node.js 환경에서 모두 사용할 수 있으며, 비동기적인 HTTP 요청을 쉽게 만들고 처리할 수 있도록 도와줍니다. 주로 웹 애플리케이션에서 서버와 데이터를 주고받을 때 많이 사용됩니다.
- src/main/frontend 폴더에서 axios를 설치.
npm install axios --savesrc/main/frontend/src/App.js 파일에다가 아래의 내용 복사 붙혀넣기.
// src/main/frontend/src/App.js
import React, {useEffect, useState} from 'react';
import axios from 'axios';
function App() {
const [hello, setHello] = useState('')
useEffect(() => {
axios.get('/api/hello')
.then(response => setHello(response.data))
.catch(error => console.log(error))
}, []);
return (
<div>
백엔드 데이터임 : {hello}
</div>
);
}
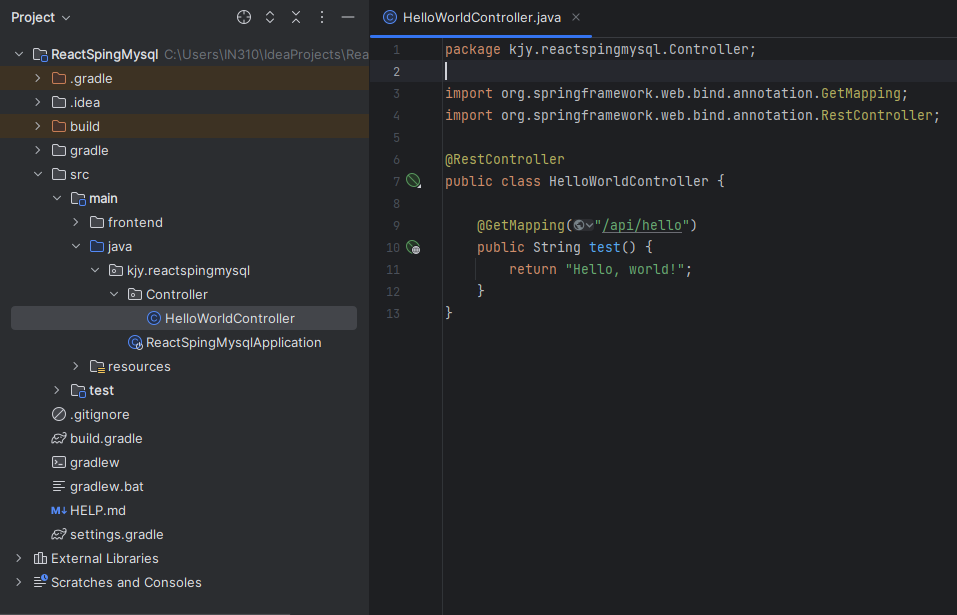
export default App;src/main/java/com.demogroup.demoweb(기본설정이라면 폴더이름이 이거임) 에서
Controller 패키지를 생성하고, HelloWorldController.java 파일 생성
- 만약에 아래와 같은 빨간색 밑줄이 쳐진다면 아까 프로젝트 생성때 프로젝트 명이나 Group 명을 변경했기때문임
빨간색 밑줄에 마우스 올리면 Replace ~~~ 라고 뜨는데 그거 클릭시 해결됨
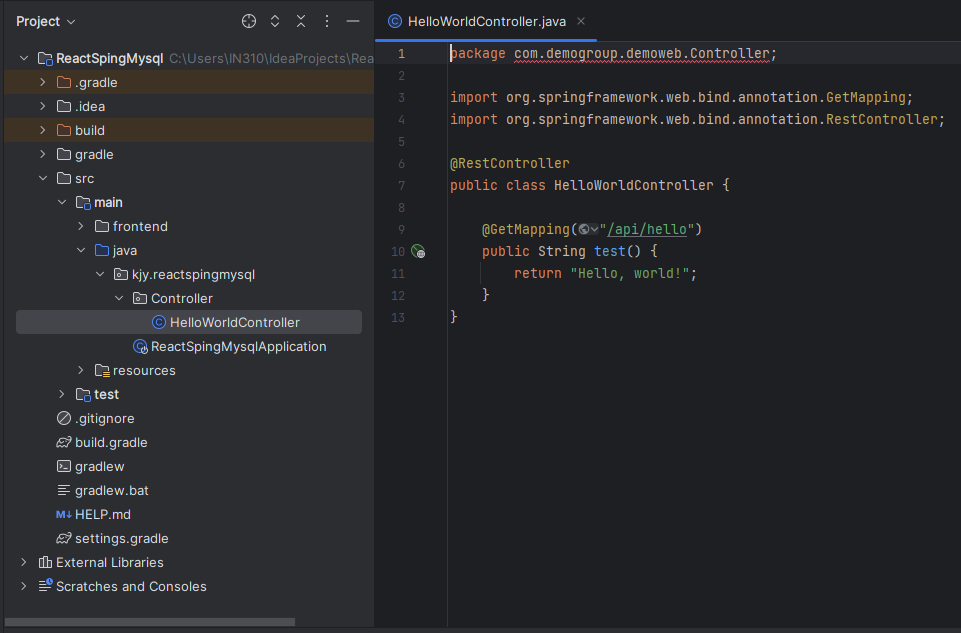
- 아래의 코드를 HelloWorldController.java 파일에 복붙해주세요
package com.demogroup.demoweb.Controller;
import org.springframework.web.bind.annotation.GetMapping;
import org.springframework.web.bind.annotation.RestController;
@RestController
public class HelloWorldController {
@GetMapping("/api/hello")
public String test() {
return "Hello, world!";
}
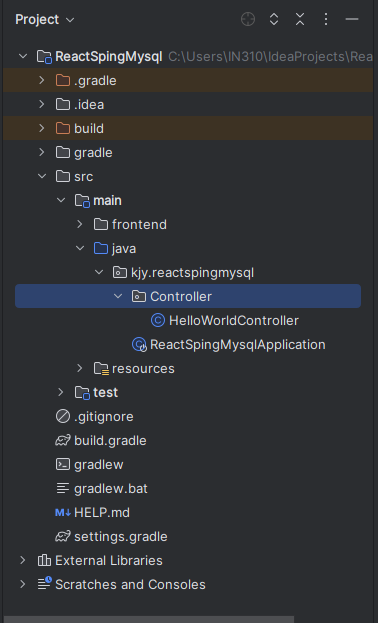
}그런다음 마지막으로 아래 스크린샷과 한번 비교해서 제대로 파일 있는지 확인해주세요
5. 연동 테스트 후 빌드
위의 과정을 잘 했으면 아래와 같이 잘 연동되어 있는걸 확인가능합니다
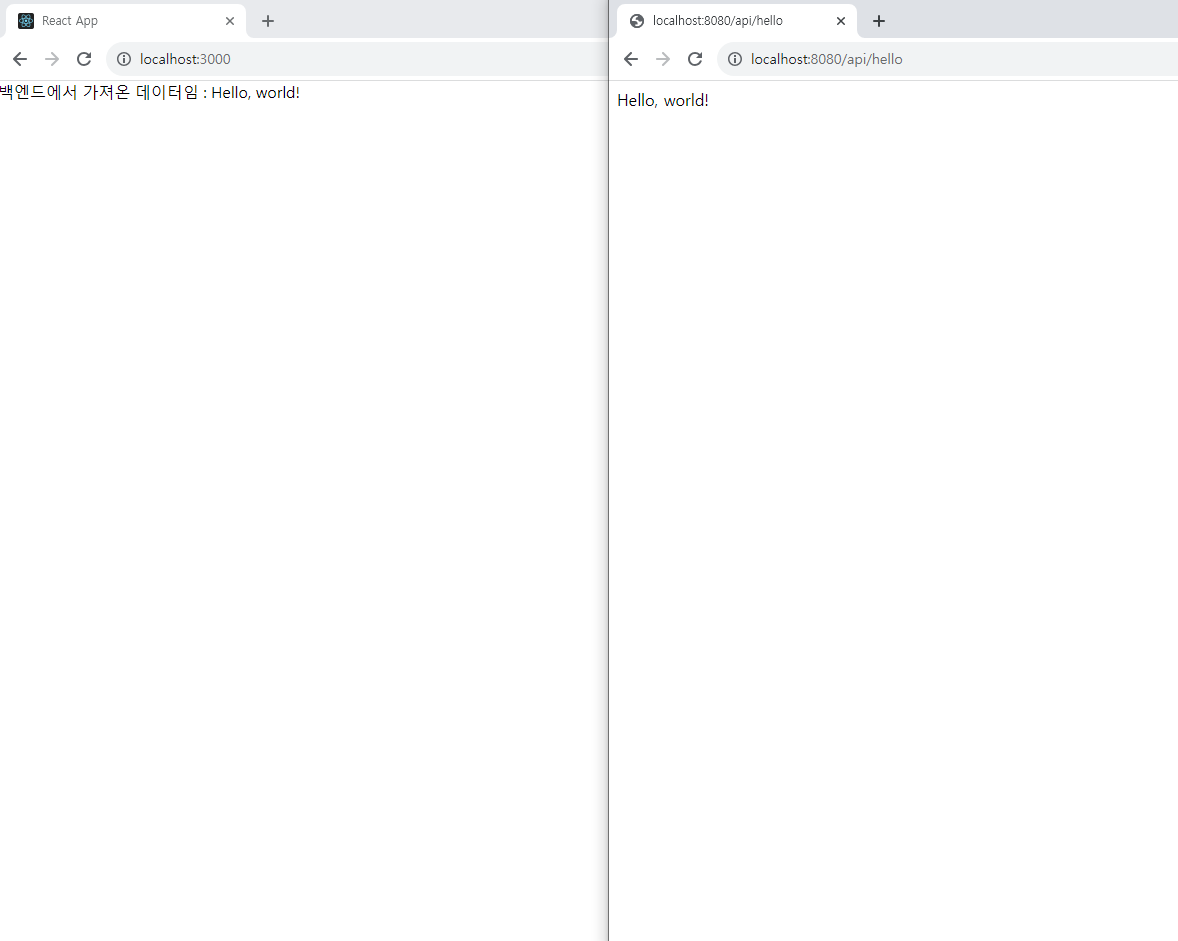
연동이 되어있는걸 잘 확인 했으니
build.gradle 파일 하단에 코드를 추가합니다.
아래의 코드는 이런 기능입니다.
- React 프런트엔드 애플리케이션을 관리하고 빌드합니다.
- React 애플리케이션을 설치하고 종속성을 해결합니다.
- 빌드된 React 애플리케이션의 결과 파일을 프로젝트의 정적 리소스 디렉토리로 복사합니다.
쉽게 말해, 이 코드는 프로젝트의 프런트엔드 부분을 관리하고 React 애플리케이션을 준비하여
웹 애플리케이션을 개발 또는 배포하기 위한 준비 작업을 자동화합니다.
def frontendDir = "$projectDir/src/main/frontend"

sourceSets {
    main {
        resources { srcDirs = ["$projectDir/src/main/resources"]
        }
    }
}

processResources { dependsOn "copyReactBuildFiles" }

tasks.register('installReact', Exec) {
    workingDir "$frontendDir"
    inputs.dir "$frontendDir"
    group = BasePlugin.BUILD_GROUP
    if (System.getProperty('os.name').toLowerCase(Locale.ROOT).contains('windows')) {
        commandLine "npm.cmd", "audit", "fix"
        commandLine 'npm.cmd', 'install'
    } else {
        commandLine "npm", "audit", "fix" commandLine 'npm', 'install'
    }
}

tasks.register('buildReact', Exec) {
    dependsOn "installReact"
    workingDir "$frontendDir"
    inputs.dir "$frontendDir"
    group = BasePlugin.BUILD_GROUP
    if (System.getProperty('os.name').toLowerCase(Locale.ROOT).contains('windows')) {
        commandLine "npm.cmd", "run-script", "build"
    } else {
        commandLine "npm", "run-script", "build"
    }
}

tasks.register('copyReactBuildFiles', Copy) {
    dependsOn "buildReact"
    from "$frontendDir/build"
    into "$projectDir/src/main/resources/static"
}
빌드까지 잘 하고 다시 실행시키면 포트 번호가 변경되어있는걸 확인 가능합니다.

6. 에러가 떠요
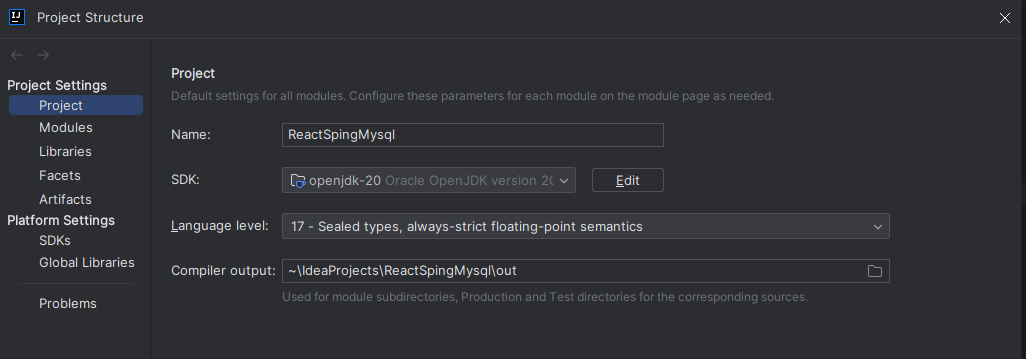
6-1 Gradel 버전과 Java 버전 호환 안됨

- 상단 화면 메뉴바에 File -> Project Structure 들어가서 아래와같이 SDK와 Language level이 사진과 같이 되어있는지 확인합시다.
6-2 폴더명 어쩌구저쩌구 에러(C:\Users\IN310\IdeaProjects\ReactSpingMysql\src ~~~)
- frontend 폴더가 Main\java\frontend 이렇게 경로가 있어야합니다 경로를 잘 확인하세요
참고자료 출처
https://velog.io/@u-nij/Spring-Boot-React.js-%EA%B0%9C%EB%B0%9C%ED%99%98%EA%B2%BD-%EC%84%B8%ED%8C%85
https://velog.io/@wrjang96/React-Spring-%EC%97%B0%EB%8F%99-%EC%97%90%EB%9F%AC-%EC%A0%95%EB%A6%AC