@SpringbootApplication에 있는 세 개의 애노테이션 @SpringBootConfiguration, @EnableAutoConfiguration, @ComponentScan을 이전 글로 확인해 보았다
그렇다면 @EnableAutoConfiguration이 어떻게 자동으로 스프링에 등록해주는지 차근차근 알아가보자.
HelloApplication
@MySpringBootApplication
public class HelloApplication {
    public static void main(String[] args) {
        SpringApplication.run(HelloApplication.class, args);
    }
}
우선 프로젝트를 만들어서 SpringbootApplication을 대체하는 간단한 메타 애노테이션을 한개 만들어볼것이다.
@MySpringBootApplication
@Retention(RetentionPolicy.RUNTIME)
@Target(ElementType.TYPE) // TYPE -> class, interface, enum
@Configuration
@ComponentScan
@EnableMyAutoConfig
public @interface MySpringBootApplication {
}
@EnableMyAutoConfig
그리고 EnableMyAutoConfig도 만들어 보았다.
@Retention(RetentionPolicy.RUNTIME)
@Target(ElementType.TYPE)
@Import({DispatcherServlet.class, TomcatWebServerConfig.class}) // component 애노테이션 혹은 메타 애노테이션으로 갖고 있는 애노테이션이 붙은 클래스들을 직접 추가
public @interface EnableMyAutoConfig {
}
Config에 등록된 클래스들
DispatcherServletConfig
@Configuration
public class DispatcherServletConfig {

    @Bean
    public DispatcherServlet dispatcherServlet() {
        return new DispatcherServlet()};
}
TomcatWebServerConfig
@Configuration
public class TomcatWebServerConfig {
    @Bean
    public ServletWebServerFactory servletWebServerFactory() {
        return new TomcatServletWebServerFactory();
    }
}
그런데 이렇게 할 경우 @EnableMyAutoConfig에서 Import로 계속해서 Config들을 추가해주어야 하는 불편함이 생겼다.
위와 같은 설정 클래스들을 모아둘 클래스를 만들어보자
MyAutoConfigImportSelector
ImportSelector 인터페이스에서 selectImports을 활용을 위해ImportSelector 인터페이스를 상속받은 DeferredImportSelector 인터페이스를 사용하였다.
public class MyAutoConfigImportSelector implements DeferredImportSelector {
    @Override
    public String[] selectImports(AnnotationMetadata importingClassMetadata) {
        return new String[] {
                "config.autoconfig.DispatcherServletConfig",
                "config.autoconfig.TomcatWebServerConfig"
        };
    }
}
위처럼 필요한 설정 클래스들을 모아두었고
EnableMyAutoConfig
EnableMyAutoConfig 애노테이션을 다음과 같이 바꿀 수 있었다.
@Retention(RetentionPolicy.RUNTIME)
@Target(ElementType.TYPE)
@Import(MyAutoConfigImportSelector.class)
public @interface EnableMyAutoConfig {
}
이제 하나하나 Import에 추가하는 것이 아니라, 클래스들을 읽어 오는 것이 아니라, MyAutoConfigImportSelector에서 구현한 클래스들을 가져오면 그 안에 있는 메서드를 실행시켜서 결과로 돌아오는 String 값에 해당하는 Config 클래스만 로딩하게 하였다.
잘 적용이 되었는지 확인하기 위해 MyAutoConfigImportSelector.selectImports에서 두 String을 주석처리하고 실행하면
APPLICATION FAILED TO START
Description:
Web application could not be started as there was no org.springframework.boot.web.servlet.server.ServletWebServerFactory bean defined in the context.
Action:
Check your application's dependencies for a supported servlet web server.
Check the configured web application type.
Process finished with exit code 1
다음과 같은 에러를 만날 수 있었다.
하드코딩과 역할의 문제
그러나 여전히 MyAutoConfigImportSelector 클래스는 하드코딩 상태이다. 우리는 작성만 하고 클래스 로더에서 읽을 수 있도록 바꾸어 보자.
MyAutoConfig 애노테이션이 읽을 클래스들은 여러개이기에 배열로 받지만, 익숙한 리스트를 만든 다음 배열로 다시 바꾸는 작업을 실행했습니다.
public class MyAutoConfigImportSelector implements DeferredImportSelector {
    private final ClassLoader classLoader;

    public MyAutoConfigImportSelector(ClassLoader classLoader) {
        this.classLoader = classLoader;
    }

    @Override
    public String[] selectImports(AnnotationMetadata importingClassMetadata) {
        List<String> autoConfigs = new ArrayList<>();
        ImportCandidates.load(MyAutoConfig.class, classLoader).forEach(candidate ->
                autoConfigs.add(candidate)
        );

        return autoConfigs.stream().toArray(String[]::new);
    };
}
ImportCandidates.load() 메서드를 확인하면 다음과 같은 경로를 읽는다고 한다.
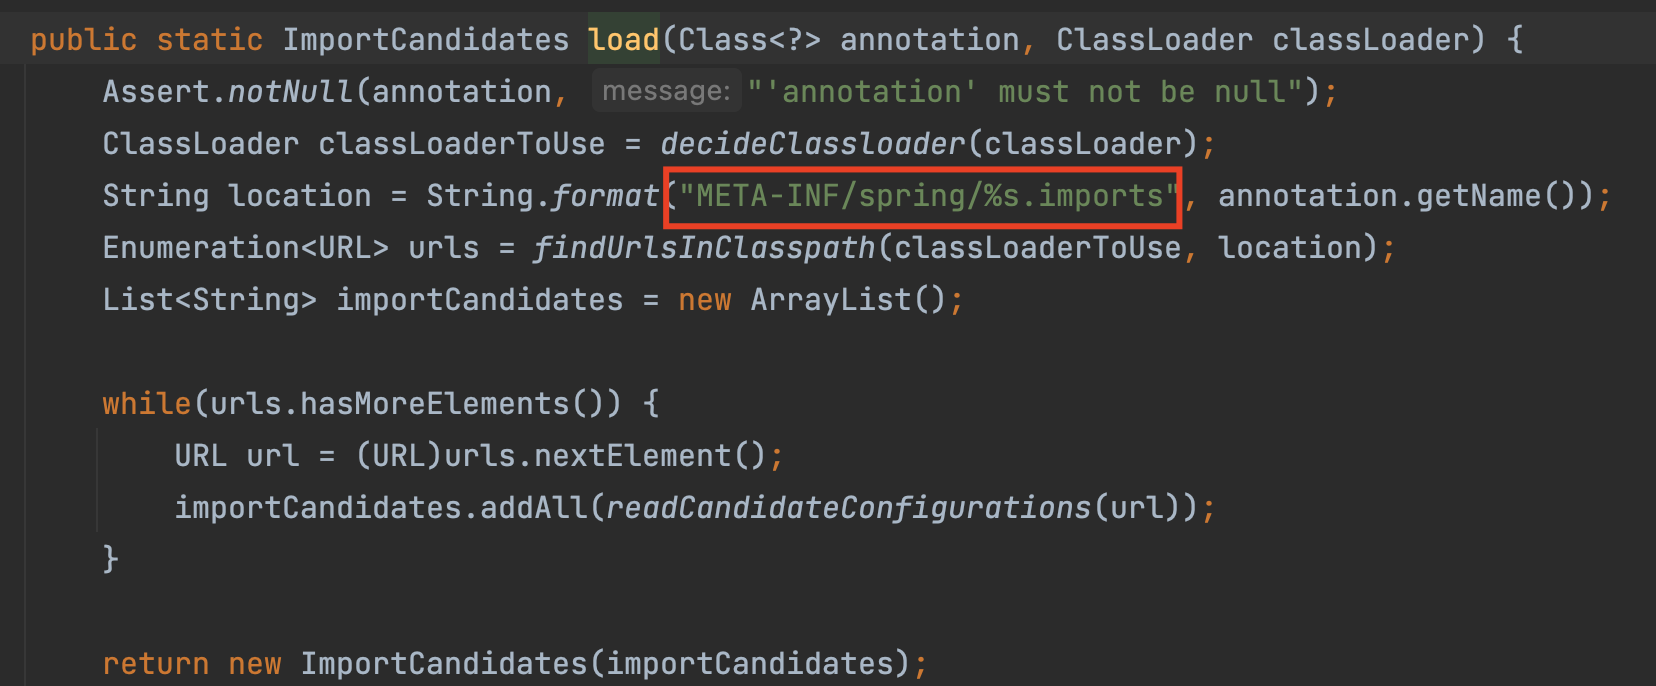
그래서 resources 아래 디렉토리와 파일을 만들자.
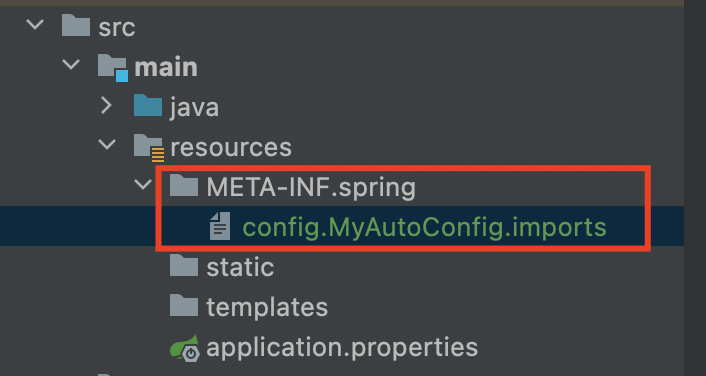

이제 자동 구성 정보 파일을 분리가 되었다. 이제 설정을 해두면 @MyAutoConfig 애노테이션이 붙은 설정 클래스들을 읽게 되었고, config.MyAutoConfig.imports 파일에 넣어두기만 하면 자동으로 클래스로더가 읽게 되었다.
스프링부트를 봐보자
스프링부트도 다음과 같은 .imports 파일을 META-INF/spring 안에 두었다.

그리고 @AutoConfiguration 애노테이션을 보면
@Target({ElementType.TYPE})
@Retention(RetentionPolicy.RUNTIME)
@Documented
@Configuration(
    proxyBeanMethods = false
)
@AutoConfigureBefore
@AutoConfigureAfter
public @interface AutoConfiguration {
	// ... 내용 ...
}
@Configuration(proxyBeanMethods = false) 형식을 볼 수 찾을 수 있었다.
스프링은 싱글톤이 보장한다. 보장하는 방식을 살펴보면, @Configuration이 있는 클래스를 객체로 생성할 때 CGLib 라이브러리를 사용해 프록시 패턴을 적용하고 @Bean이 있는 메소드를 여러 번 호출하여도 항상 동일한 객체를 반환하여 싱글톤을 보장한다.
static class MyConfigurationProxy extends MyConfiguration{
        private Common common;

        @Override
        Common common() {
            if (this.common == null) {
                this.common = super.common();
            }

            return this.common;
        }
    }

@Configuration
    static class MyConfiguration {
        @Bean
        Common common() {
            return new Common();
        }

        @Bean
        BeanA beanA() {
            return new BeanA(common());
        }

        @Bean
        BeanB beanB() {
            return new BeanB(common());
        }
    }
그런데 proxyBeanMethods = false 설정한 이유는 @Bean이 붙은 메서드를 실행할 때마다 다른 객체가 생성되도록 하고 싶기 때문이다.
