강의에서 다른 분들의 소스 코드를 보니, 보완할 점이 많아 리팩토링해보려고 한다.
이전 포스팅
1) Vanilla React로 Router 구현하기 - History API, popState, window.location
2) Vanilla React로 Router 구현하기 - useRouter 훅 분리하기
1. Router 컴포넌트
리팩토링 전
보시다시피 내가 만든 Router 컴포넌트는 props.children으로 받은 컴포넌트를 그대로 리턴하는 역할밖에 하고 있지 않다.
main.tsx
<Router>
  <Route path='/' component={<Root />} />
  <Route path='/about' component={<About />} />
</Router>
Router.tsx
type RouterProps = {
	children: ReactNode;
};

function Router({ children }: RouterProps) {
	return children;
}

export default Router;
Router 컴포넌트가 라우터 기능을 담도록 수정하려면, Router 컴포넌트 안에서 현재 path를 상태로 관리하고 자식 컴포넌트인 Route에게 전달해줘야 한다.
지금 코드에서는 currentPath 상태를 useRouter 훅에서 관리하고 내보내주고 있으며, Route 컴포넌트에서 아래와 같이 직접 받아서 사용하고 있었다.
// Route.tsx
const { currentPath } = useRouter();
이 currentPath 상태를 원래는 Router 컴포넌트에서 관리해야하므로 useRouter에 있는 관련 로직들도 Router 컴포넌트로 옮겨줄 예정이다.
Context API
이때 자식 컴포넌트의 중첩 단계가 깊어져도 값을 전달할 수 있도록, props보다는 Context API를 사용해서 path를 전역 상태로 관리하고 자신이 감싸고 있는 하위 컴포넌트들에 상태값을 전달할 수 있다.
Context API에 대해 이전에 정리한 글
// 중첩 라우팅 예시
<Router>
  <Route path='/:coinId' component={<Coin />}>
    <Route path='price' component={<Chart />} />
    <Route path='chart' component={<Price />} />
  </Route>
</Router>
리팩토링 후
routerContext.tsx
createContext() 메소드를 이용해 RouterContext를 만들고,
현재 경로를 담을 currentPath 변수 속성과
경로를 업데이트하는 함수를 담을 changePath 함수 속성을 만들었다. 기본값(default value)으로는 빈 문자열과 빈 함수를 주었다.
import { createContext } from 'react';

export type RouterContextValue = {
	currentPath: string;
	changePath: (path: string) => void;
};

export const RouterContext = createContext<RouterContextValue>({ currentPath: '', changePath: () => {} });
Router.tsx
- Router 컴포넌트에서
currentPath상태를 만들고,changePath함수를 만들었다.
changePath함수는 브라우저의 주소를 인자로 전달된 문자열로 변경시키고,currentPath상태를 업데이트하는 함수이다. RouterContext를 import하고,currentPath상태와changePath함수를 할당해주었다.- 이전에는 useRouter 훅에서
currentState상태를 관리하고,
뒤로가기 클릭시(popstate이벤트) 경로를 변경해주는 로직도 useEffect 훅에 담아 관리했었는데,
과제 목표에서 useRouter 훅은 최소한의push기능만 가지도록 하라고 했기 때문에, 이 로직들도 모두 Router로 옮겨주었다. - 마지막으로 리턴문에서
Provider컴포넌트로 하위 컴포넌트들을 감싸주면 된다.
import { ReactNode, useState, useEffect } from 'react';
import { RouterContext, RouterContextValue } from '../context/routerContext';

type RouterProps = {
	children: ReactNode;
};

function Router({ children }: RouterProps) {
	const [currentPath, setCurrentPath] = useState(window.location.pathname); // 1️⃣

	const changePath = (path: string) => {
		window.history.pushState(null, '', path); // 브라우저의 URL 변경
		setCurrentPath(path); // 리렌더링을 위한 currentPath 상태 업데이트
	};

	const contextValue: RouterContextValue = { currentPath, changePath }; // 2️⃣

    useEffect(() => { // 3️⃣
      const handleUrlChange = () => {
        setCurrentPath(window.location.pathname);
      };

      window.addEventListener('popstate', handleUrlChange);

      return () => {
        window.removeEventListener('popstate', handleUrlChange);
      };
	}, []);

	return (
      <RouterContext.Provider value={contextValue}> // 4️⃣
      // 2번 대신, <RouterContext.Provider value={{currentPath, changePath}}> 로 작성해도 됨
        {children}
      </RouterContext.Provider>
    );
}

export default Router;
Route.tsx
Route 컴포넌트에서는 useContext() 훅을 이용해 상태값을 불러올 수 있다.
객체 구조분해할당을 이용해 currentPath 값만 불러왔다.
import { ReactNode, useContext } from 'react';
import { RouterContext } from '../context/routerContext';

interface RouteProps {
	path: string;
	component: ReactNode;
}
const Route = ({ path, component }: RouteProps) => {
	const { currentPath } = useContext(RouterContext)!;
	return currentPath === path ? component : null;
};

export default Route;
이렇게 하면 <Provider>로 감싸진 하위 컴포넌트들은 context를 구독하게 되고, Provider의 value prop이 변경될 때마다 리렌더링된다.
useRouter.tsx
이전의 useRouter 훅은 push와 currentPath를 리턴했는데, 이제 최소한의 push 기능만 가진다.
type UseRouterReturnType = {
  push: (path: string) => void;
};

export const useRouter = (): UseRouterReturnType => {
  const push = (path: string) => {
    window.history.pushState(null, '', path); // pushState 메소드는 popState 이벤트를 발생시키지 않으므로
    const event = new PopStateEvent('popstate'); // 이벤트 객체를 생성하여
    dispatchEvent(event); // dispatchEvent를 이용해 이벤트를 실행시켜준다.
  };

  return { push };
};
2. Routes 컴포넌트 추가하기
main.tsx
ReactDOM.createRoot(document.getElementById('root')!).render(
  <React.StrictMode>
    <Router>
      <Route path='/' component={<Root />} />
      <Route path='/about' component={<About />} />
    </Router>
  </React.StrictMode>
);
Route.tsx
Route 컴포넌트는 props로 path와 component를 받아서,
RouterContext에서 받아오는 currentPath 값과 자신의 path 값이 일치하면 컴포넌트를 렌더링하고, 일치하지 않으면 null을 리턴하는 컴포넌트이다.
import { ReactNode, useContext } from 'react';
import { RouterContext } from '../context/routerContext';
interface RouteProps {
path: string;
component: ReactNode;
}
const Route = ({ path, component }: RouteProps) => {
const { currentPath } = useContext(RouterContext);
return currentPath === path ? component : null;
};
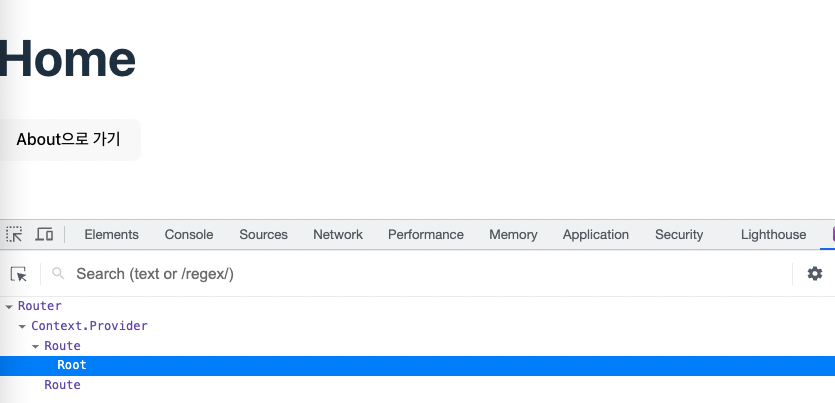
export default Route;그런데, / 경로에서 브라우저에서 React Developer Tools를 보면,
Root 컴포넌트를 렌더링하는 Route 컴포넌트만 렌더링된 것이 아니라,
About 컴포넌트를 렌더링하는 Route 컴포넌트도 함께 렌더링되는 것을 확인할 수 있다.
null을 리턴하더라도 렌더링되는 것이다.
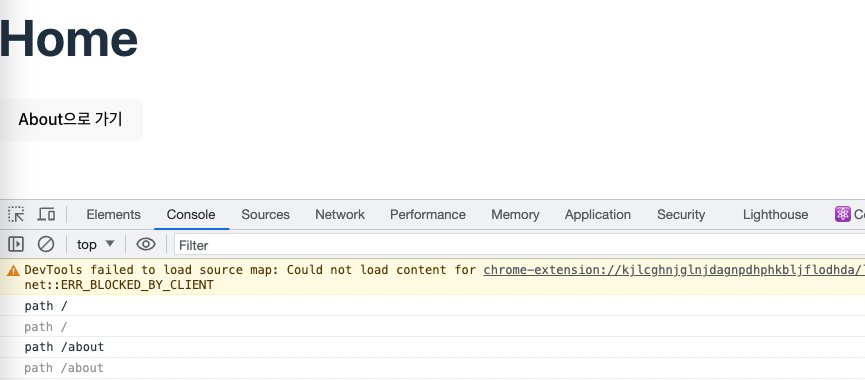
Route 컴포넌트에 console.log('path', path)를 출력해봤는데, 실제 화면에 표시되는 것은 Root 컴포넌트지만, 두 개의 Route 컴포넌트가 모두 마운트되고 있었다.
이는 모든 Route 컴포넌트가 RouterContext를 구독하고 있기 때문인 것 같다.
만약에 Route 컴포넌트가 100개라면, 매번 currentPath가 업데이트될 때마다 100개의 Route 컴포넌트가 불필요하게 렌더링될 것이다.
그래서 이 부분을 해결하기 위해 Route 컴포넌트들을 감싸는 Routes 컴포넌트를 만들어주고, currentPath에 대응하는 Route 컴포넌트를 찾아 해당 컴포넌트만 렌더링해주도록 할 것이다.
main.tsx
<Router>
  <Routes>
    <Route path='/' component={<Root />} />
    <Route path='/about' component={<About />} />
  </Routes>
</Router>
Routes.tsx
- Route 컴포넌트가 하나일 경우 find 메소드를 사용할 수 없으므로 배열에 넣어준다.
- 컴포넌트의
path속성이 Context의currentPath와 같은지 검증해주는 함수
isValidElement()함수는 인자로 전달한 객체가 React 엘리먼트인지 확인해주는 함수다.
아래에서 컴포넌트의 props에 접근하려면 인자로 받은 컴포넌트가 React 엘리먼트인지 검증해줘야 한다. find()메소드를 사용해childrenArr배열에서 일치하는 요소를 찾는다.
import { ReactNode, isValidElement, useContext } from 'react';
import { RouterContext } from '../context/routerContext';

interface RoutesProps {
  children: ReactNode;
}

function Routes({ children }: RoutesProps) {
  const { currentPath } = useContext(RouterContext);

  const childrenArr = Array.isArray(children) ? children : [children]; // 1️⃣

  const isCorrespondComponent = (component: ReactNode) => { // 2️⃣
    if (!isValidElement(component)) return false;

    return component.props.path === currentPath; // path가 일치하면 true, 일치하지 않으면 false 리턴
  };

  return <>{childrenArr.find(isCorrespondComponent)}</>; // 3️⃣
}

export default Routes;
Route.tsx
이제 Route 컴포넌트에서는 path와 currentPath를 비교하며 컴포넌트를 렌더링할지 말지 결정하지 않는다.
Routes 컴포넌트에서 렌더링할 컴포넌트를 결정하고, Route 컴포넌트는 아래처럼 컴포넌트를 리턴하기만 하면 된다.
import { ReactNode } from 'react';

interface RouteProps {
  path: string;
  component: ReactNode;
}
const Route = ({ path, component }: RouteProps) => {
  return component;
};

export default Route;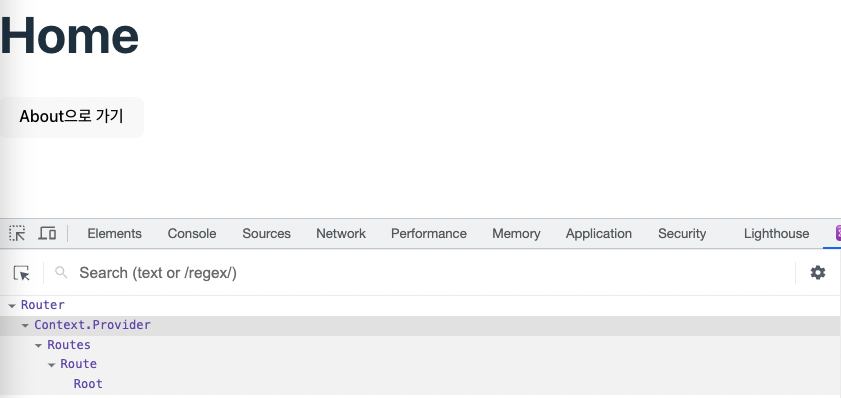
이제 / 경로에서 Root 컴포넌트를 담은 Route 컴포넌트 1개만 렌더링되는 것을 확인할 수 있다. 👍


글이 잘 정리되어 있네요. 감사합니다.