UI 구현하기
Widgets
수직 배치 : Column
수평 배치 : Row
Column 안에 row 그 안에 다시 Column을 선언하는 등으로 여러 배치를 할 수 있다.
Row의 MainAxis는 수평 방향, Column의 crossAxis는 수직방향
Column 의 MainAxis는 수직 방향 Row의 crossAxis는 수평방향
SizedBox : 여백을 주고 싶을 때
Padding : 패딩 주고 싶을 때,
Colors : black, blue 등
Color : Color.fromRGBO(255,255,255,opacity)
Layout이 헷갈리면 아래 그림의 돋보기를 눌러 개발자 도구를 보자

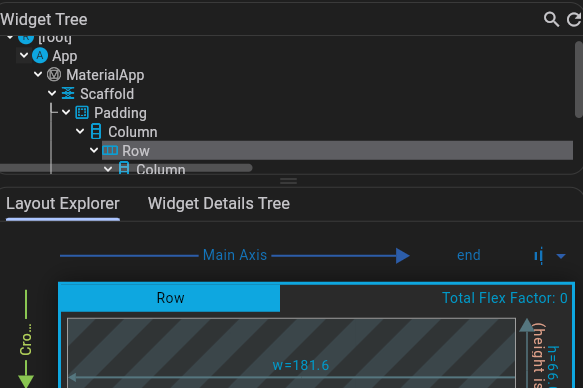
이 개발자 도구에서 자식 관계를 보거나 속성을 보고
appBar 배경색을 바꾸고싶을때는 아래와 같이
appBar: AppBar(
          backgroundColor: const Color(0xFF181818),
          elevation: 0,
        ),
elevation을 하지 않으면 색상으로 덮어지면서 appBar가 안보이게 된다. (존재는 함)
opacity속성이 기존에는 TextStyle 위젯의 color 안에 있어서
style : TextStyle(
	color : Colors.white.withOpacity(0.8)
)
이렇게 사용했지만, 업데이트가 되면서 사라진? 것 같다.
공식 문서를 보니 opacity 클래스가 별도로 존재하길래 다음과 같이 구현했다.
Opacity(
	opacity: 0.8,
	child: Text("Welcome back",
	style: TextStyle(
		color:Colors.white,
		fontSize: 18,
	),
  ),
)
Padding
padding을 줄 때는 다음과 같이한다
child: Padding(
	padding : const EdgeInsets.(all, symetric, only 중 택1)(~~~)
)- all : 4면 전체에
- symetric(vertical : n, horizontal : m) : 수직 수평 커스텀
물론 둘 중 한 개만 사용해도 된다. - only : 특정 영역만 지정
Container
html 태그의 div같은 역할.
child를 이용해서 요소를 배치한다. ex. child: Text(~~)
다양한 옵션들이 있고, 그 옵션을 사용해서 버튼처럼 만들기도 한다.
Container(
                    decoration: BoxDecoration(
                      borderRadius: BorderRadius.circular(45),
                      color: Colors.amber,
                    ),
                    child: Padding(
                      padding: const EdgeInsets.symmetric(vertical: 20, horizontal: 50),
                      child: Text("Transfer",
                        style: TextStyle(
                          fontSize: 20,
                        ),
                      ),
                    ),
                  ),
decoration으로 BoxDecoration. 그리고 옵션으로 circular(45) 모서리 둥글게.
color는 amber, 그리고 패딩까지 주면 아래 사진처럼 완성된다.

SizedBox
공란(여백)을 주고 싶을 때 사용한다.