이번에는 커스텀으로 달력을 만드는 작업을 해보고자 한다. 물론 Airbnb를 비롯하여 오픈소스로 다양한 캘린더를 가져다 쓸 수 있지만, 이왕 작업하는 거 자신만의 캘린더를 만들어 보는 것도 좋지 않은가.
이에 힘든 여정이지만 차근차근 나만의 캘린더를 만들고자 한다.
Custom Calendar #1
😚 First Step.
가장 먼저 할 일은 달력을 담을 View를 만드는 것. Date를 다루는 작업을 먼저 해도 상관은 없지만, 본인은 View를 먼저 만드는 것이 좋기 때문에 View부터 만들어 보겠다.
class ViewController: UIViewController {

    private lazy var weekStackView = UIStackView()
    private lazy var yearMonthLabel = UILabel()
    private lazy var calendarCollectionView = UICollectionView(frame: .zero, collectionViewLayout: UICollectionViewFlowLayout())

    override func viewDidLoad() {
        super.viewDidLoad()
        self.view.backgroundColor = .systemBackground
    }
}
내가 원하는 레이아웃은 요일 / 년월 / 달력의 형태이므로 각 요일을 담을 StackView와 년월을 출력해 줄 Label, 마지막으로 CollectionView를 생성해주었다.
이제 생성한 View들의 attribute나 레이아웃 설정을 해줄 로직을 private extension에 담고자 한다. (해당 로직들은 내부에서만 호출할 예정이므로 private extension에 작성)
private extension ViewController {

    func setViews() {
        self.configureWeekStackView()
        self.configureYearMonthLabel()
        self.configureCalendarCollectionView()
    }

    func configureWeekStackView() {
        self.view.addSubview(weekStackView)
        self.weekStackView.distribution = .fillEqually

        self.weekStackView.translatesAutoresizingMaskIntoConstraints = false
        NSLayoutConstraint.activate([
            self.weekStackView.topAnchor.constraint(equalTo: self.view.topAnchor, constant: 32),
            self.weekStackView.heightAnchor.constraint(equalToConstant: 24),
            self.weekStackView.leadingAnchor.constraint(equalTo: self.view.leadingAnchor),
            self.weekStackView.trailingAnchor.constraint(equalTo: self.view.trailingAnchor)
        ])

        self.configureWeekLabel()
    }

    func configureWeekLabel() {
        let dayOfTheWeek = ["일", "월", "화", "수", "목", "금", "토"]

        dayOfTheWeek.forEach {
            let label = UILabel()
            label.text = $0
            label.textAlignment = .center
            self.weekStackView.addArrangedSubview(label)

            if $0 == "일" {
                label.textColor = .systemRed
            } else {
                label.textColor = .systemBlue
            }
        }
    }

    func configureYearMonthLabel() {
        self.view.addSubview(yearMonthLabel)
        self.yearMonthLabel.text = "2022년 05월"
        self.yearMonthLabel.font = .systemFont(ofSize: 16, weight: .bold)

        self.yearMonthLabel.translatesAutoresizingMaskIntoConstraints = false
        NSLayoutConstraint.activate([
            self.yearMonthLabel.leadingAnchor.constraint(equalTo: self.view.leadingAnchor),
            self.yearMonthLabel.trailingAnchor.constraint(equalTo: self.view.trailingAnchor),
            self.yearMonthLabel.topAnchor.constraint(equalTo: self.weekStackView.bottomAnchor, constant: 24),
            self.yearMonthLabel.heightAnchor.constraint(equalToConstant: 23)
        ])
    }

    func configureCalendarCollectionView() {
        self.view.addSubview(calendarCollectionView)
        self.calendarCollectionView.dataSource = self
        self.calendarCollectionView.delegate = self
        self.calendarCollectionView.register(CalendarCollectionViewCell.self, forCellWithReuseIdentifier: CalendarCollectionViewCell.identifier)

        self.calendarCollectionView.translatesAutoresizingMaskIntoConstraints = false
        NSLayoutConstraint.activate([
            self.calendarCollectionView.leadingAnchor.constraint(equalTo: self.view.leadingAnchor),
            self.calendarCollectionView.trailingAnchor.constraint(equalTo: self.view.trailingAnchor),
            self.calendarCollectionView.topAnchor.constraint(equalTo: self.yearMonthLabel.bottomAnchor, constant: 16),
            self.calendarCollectionView.bottomAnchor.constraint(equalTo: self.view.bottomAnchor)
        ])
    }
}
가장 위에 위치할 StackView는 각 요일마다 동일한 크기로 배치되도록 fillEqually를 설정하고, 원하는 위치에 맞춰 autolayout을 설정해준다.
이와 함께 각각의 요일을 forEach문으로 돌리면서 label로 생성하여 StackView에 넣어줌과 함께 적절한 textColor를 설정.
이후의 View들도 각각의 View와의 위치를 고려하여 autolayout을 설정하고 필요한 로직들을 작성해주면 된다.
다만 CollectionView는 내부에 들어갈 cell이 필요하기 때문에 DataSource를 설정해주기 전에 아주 살포시 Cell을 만들고 와주자.
class CalendarCollectionViewCell: UICollectionViewCell {

    static let identifier = "CalendarCollectionViewCell"
    private lazy var dayLabel = UILabel()

    required init?(coder: NSCoder) {
        super.init(coder: coder)
    }

    override init(frame: CGRect) {
        super.init(frame: frame)
    }

    func configureLabel(text: String) {
        self.addSubview(dayLabel)
        self.dayLabel.text = text
        self.dayLabel.font = .systemFont(ofSize: 12, weight: .bold)

        self.dayLabel.translatesAutoresizingMaskIntoConstraints = false
        NSLayoutConstraint.activate([
            self.dayLabel.centerXAnchor.constraint(equalTo: self.centerXAnchor),
            self.dayLabel.centerYAnchor.constraint(equalTo: self.centerYAnchor)
        ])
    }

    func setSundayColor(){
        self.dayLabel.textColor = .systemRed
    }
}
위와 같이 UICollectionViewCell을 상속받는 customCell을 생성해주고 필요한 호출 메서드를 작성해준다.
이후에 다시 ViewController로 돌아와 DataSource를 작성해주면 된다. (물론 DataSource를 따로 분리하여 작성하여도 좋다.)
extension ViewController: UICollectionViewDelegate, UICollectionViewDataSource {
func collectionView(_ collectionView: UICollectionView, numberOfItemsInSection section: Int) -> Int {
return 40
}
func collectionView(_ collectionView: UICollectionView, cellForItemAt indexPath: IndexPath) -> UICollectionViewCell {
guard let cell = collectionView.dequeueReusableCell(withReuseIdentifier: CalendarCollectionViewCell.identifier, for: indexPath) as? CalendarCollectionViewCell else { return UICollectionViewCell()}
cell.configureLabel(text: "0")
return cell
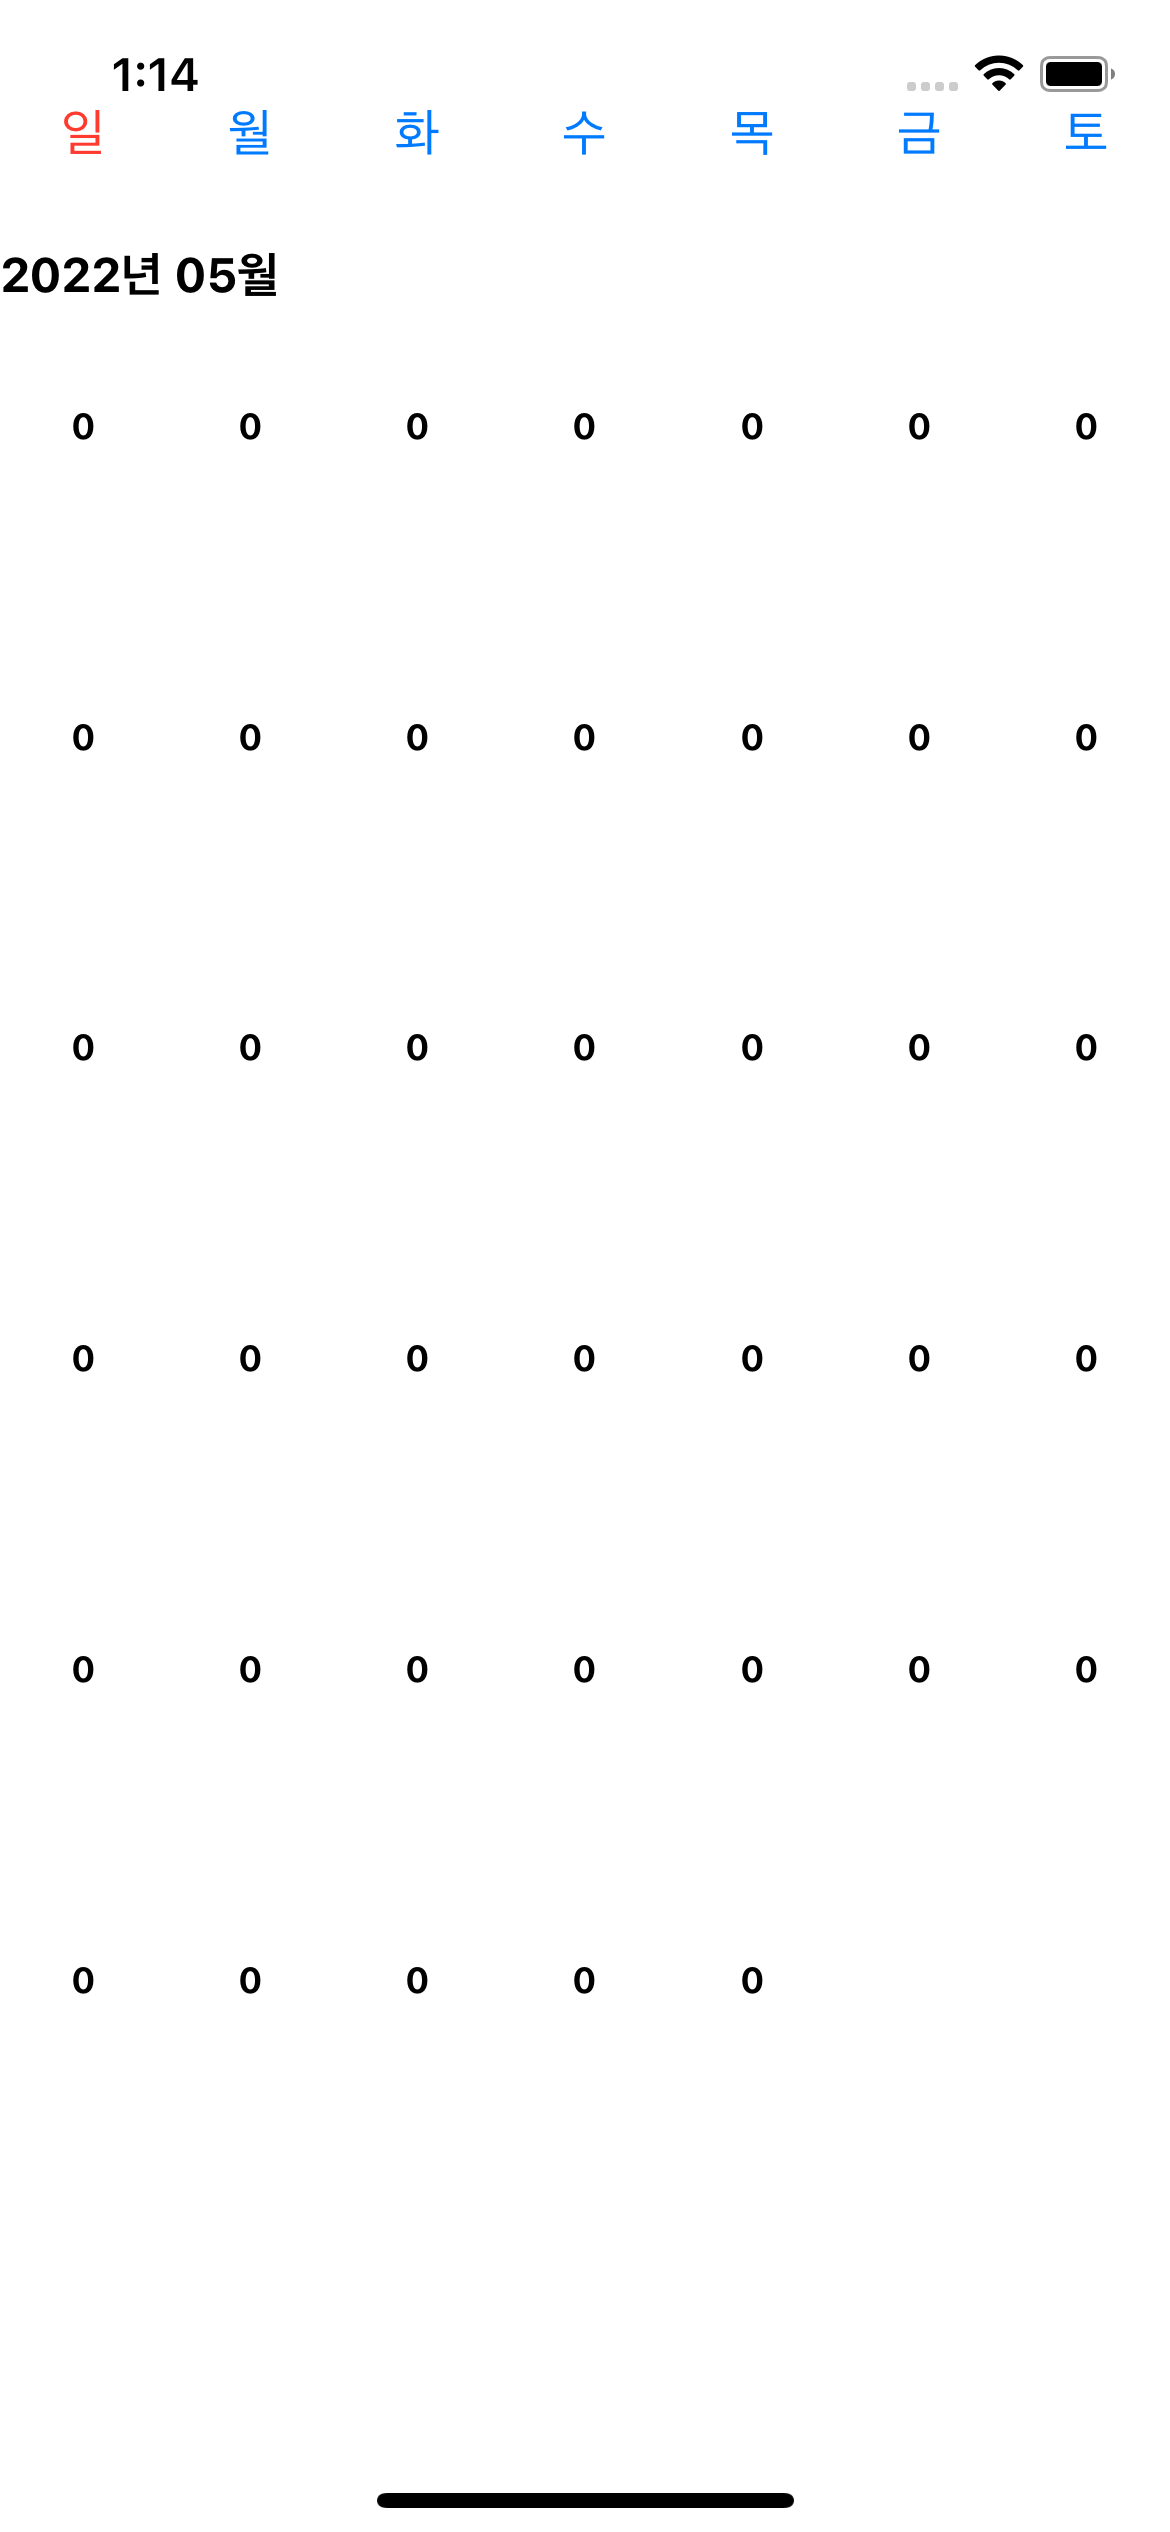
}해당 작업까지 마무리하게 되면 아래와 같이 본인이 원하는 형태의 달력의 형태가 잡히게 된다.
😚 Second Step.
View를 만들었으면 이제 원하는 데이터를 넣어줄 수 있게 데이터를 가공할 객체를 만들어줄 차례다.
class CalendarDateFormatter {
    private let calendar = Calendar.current
    private let dateFormatter = DateFormatter()
    private var nowCalendarDate = Date()
    private(set) var days = [String]()

    init() { }

    func getYearMonthText() -> String {
        let yearMonthText = self.dateFormatter.string(from: self.nowCalendarDate)

        return yearMonthText
    }
}
먼저 Calendar 구조체를 현재 달력으로 초기화시킨 calendar와 함께 현재 시간을 원하는 String 타입으로 변화시켜 줄 dateFormatter, 현재의 시간을 담고 있는 nowCalendarDate, 마지막으로 달력에 날짜를 표시할 수 있도록 관련 String 타입을 담을 배열 days를 선언한다.
이와 함께 년월 Label의 text에 담을 String 타입을 리턴해주는 getYearMonthText도 먼저 작성해주자.
private extension CalendarDateFormatter {

    func getStartingDayOfWeek() -> Int {
        return self.calendar.component(.weekday, from: self.nowCalendarDate) - 1
    }

    func getEndDateOfMonth() -> Int {
        return self.calendar.range(of: .day, in: .month, for: self.nowCalendarDate)?.count ?? 0
    }

    func configureCalendar() {
        let components = self.calendar.dateComponents([.year, .month], from: Date())
        self.nowCalendarDate = self.calendar.date(from: components) ?? Date()
        self.dateFormatter.dateFormat = "yyyy년 MM월"
    }
}
우리가 필요한 데이터를 가공하기 위해 필요한 내부 메서드들을 private extension에 정리해두면 좋은데, 먼저 configureCalendar는 년도와 월 데이터만 현재의 시간대에서 뽑아내주는 dateComponents 메서드를 사용하여 nowCalendarDate에 다시 담아주고, dateFormatter의 포맷 형태도 년월 형태로 설정해준다.
(Date는 세세한 시간까지 나오는데 해당 부분은 필요 없으니 이를 정리해주는 작업을 하는 것이다.)
이와 함께 getStartingDayOfWeek 메서드를 통해 해당 월의 1일이 시작되는 요일을 계산하여 리턴해주도록 한다.
(.component(.weekday,..)를 사용하면 일요일이 1로 토요일이 7로 반환되는데 배열의 인덱스에 맞추기 위해 -1을 해준다.)
getEndDateOfMonth 메서드는 해당 달의 날짜가 며칠까지 있는지를 반환해주도록 구현한다.
class CalendarDateFormatter {
    private let calendar = Calendar.current
    private let dateFormatter = DateFormatter()
    private var nowCalendarDate = Date()
    private(set) var days = [String]()

    init() {
        self.configureCalendar()
    }

    func getYearMonthText() -> String {
        let yearMonthText = self.dateFormatter.string(from: self.nowCalendarDate)

        return yearMonthText
    }

    func updateCurrentMonthDays() {
        self.days.removeAll()

        let startDayOfWeek = self.getStartingDayOfWeek()
        let totalDaysOfMonth = startDayOfWeek + self.getEndDateOfMonth()

        for day in 0..<totalDaysOfMonth {
            if day < startDayOfWeek {
                self.days.append("")
            } else {
                self.days.append("\(day - startDayOfWeek + 1)")
            }
        }
    }
}
필요한 내부 메서드를 정리한 뒤, 해당 객체가 생성될 때 configureCalendar를 호출하여 초기화해주도록 한다. 이와 함께 ViewController에서 해당 월의 날짜들을 초기화하고 접근할 수 있도록 updateCurrentMonthDays 메서드를 정리해준다.
2022년 5월의 경우, 1일이 일요일(1)이고 전체 날짜는 31일이므로 totalDaysOfMonth에는 32라는 Int 값이 담긴다. 이를 for문으로 돌리면서 시작 일자 전에 비는 요일은 ""로 설정한다.
(getStartingDayOfWeek 메서드는 요일별 설정된 숫자에 -1을 해주고 있기 때문에 현재 startDayOfWeek의 값은 0)
😚 Third Step.
이제 데이터 작업을 마쳤으니 이를 바로 연결하면 좋겠지만, 현재 CollectionView의 flowLayout이 제대로 작성되지 않은 상태이다.
따라서 해당 요소는 CompositionalLayout을 통해 설정하고자 하면 이 부분은 코드에 설명은 따로 하지 않고 빠르게 넘어갈 것이다.
struct CalendarCollectionLayout {

    func create() -> NSCollectionLayoutSection? {
        let itemFractionalSize: CGFloat = 1 / 7

        let itemSize = NSCollectionLayoutSize(widthDimension: .fractionalWidth(itemFractionalSize), heightDimension: .fractionalHeight(itemFractionalSize))
        let item = NSCollectionLayoutItem(layoutSize: itemSize)

        let groupSize = NSCollectionLayoutSize(widthDimension: .fractionalWidth(1), heightDimension: .fractionalHeight(itemFractionalSize))
        let group = NSCollectionLayoutGroup.horizontal(layoutSize: groupSize, subitems: [item])
        group.contentInsets = NSDirectionalEdgeInsets(top: 0, leading: 0, bottom: 3, trailing: 0)

        let section = NSCollectionLayoutSection(group: group)
        section.contentInsets = NSDirectionalEdgeInsets(top: 16, leading: 0, bottom: 0, trailing: 0)

        return section
    }
}

class ViewController: UIViewController {

    private lazy var weekStackView = UIStackView()
    private lazy var yearMonthLabel = UILabel()
    private lazy var calendarCollectionView = UICollectionView(frame: .zero, collectionViewLayout: self.getCollectionViewLayout())
    ....(중략)
}

private extension ViewController {

    func getCollectionViewLayout() -> UICollectionViewCompositionalLayout {
        UICollectionViewCompositionalLayout { (section, _) -> NSCollectionLayoutSection? in
            return CalendarCollectionLayout().create()
        }
    }
    ...(중략)
}
이와 같이 원하는 형태로 CompositionalLayout을 설정하고 이를 CollectionView의 collectionViewLayout에 넣어주면 된다.
😚 Fourth Step.
이제는 정말 마지막으로 우리가 정리했던 날짜 데이터를 적절하게 넣어주기만 하면 되는 단계이다.
class ViewController: UIViewController {

    private lazy var weekStackView = UIStackView()
    private lazy var yearMonthLabel = UILabel()
    private lazy var calendarCollectionView = UICollectionView(frame: .zero, collectionViewLayout: self.getCollectionViewLayout())

    let calendarDateFormatter = CalendarDateFormatter()

    override func viewDidLoad() {
        super.viewDidLoad()
        self.view.backgroundColor = .systemBackground
        self.updateCalendarData()
        self.setViews()
    }
}

private extension ViewController {

    func getCollectionViewLayout() -> UICollectionViewCompositionalLayout {
        UICollectionViewCompositionalLayout { (section, _) -> NSCollectionLayoutSection? in
            return CalendarCollectionLayout().create()
        }
    }

    func updateCalendarData() {
        self.calendarDateFormatter.updateCurrentMonthDays()
    }

    func setViews() {
        self.configureWeekStackView()
        self.configureYearMonthLabel()
        self.configureCalendarCollectionView()
    }

    func configureWeekStackView() {
        self.view.addSubview(weekStackView)
        self.weekStackView.distribution = .fillEqually

        self.weekStackView.translatesAutoresizingMaskIntoConstraints = false
        NSLayoutConstraint.activate([
            self.weekStackView.topAnchor.constraint(equalTo: self.view.topAnchor, constant: 32),
            self.weekStackView.heightAnchor.constraint(equalToConstant: 24),
            self.weekStackView.leadingAnchor.constraint(equalTo: self.view.leadingAnchor),
            self.weekStackView.trailingAnchor.constraint(equalTo: self.view.trailingAnchor)
        ])

        self.configureWeekLabel()
    }

    func configureWeekLabel() {
        let dayOfTheWeek = ["일", "월", "화", "수", "목", "금", "토"]

        dayOfTheWeek.forEach {
            let label = UILabel()
            label.text = $0
            label.textAlignment = .center
            self.weekStackView.addArrangedSubview(label)

            if $0 == "일" {
                label.textColor = .systemRed
            } else {
                label.textColor = .systemBlue
            }
        }
    }

    func configureYearMonthLabel() {
        self.view.addSubview(yearMonthLabel)
        self.yearMonthLabel.text = self.calendarDateFormatter.getYearMonthText()
        self.yearMonthLabel.font = .systemFont(ofSize: 16, weight: .bold)

        self.yearMonthLabel.translatesAutoresizingMaskIntoConstraints = false
        NSLayoutConstraint.activate([
            self.yearMonthLabel.leadingAnchor.constraint(equalTo: self.view.leadingAnchor),
            self.yearMonthLabel.trailingAnchor.constraint(equalTo: self.view.trailingAnchor),
            self.yearMonthLabel.topAnchor.constraint(equalTo: self.weekStackView.bottomAnchor, constant: 24),
            self.yearMonthLabel.heightAnchor.constraint(equalToConstant: 23)
        ])
    }

    func configureCalendarCollectionView() {
        self.view.addSubview(calendarCollectionView)
        self.calendarCollectionView.dataSource = self
        self.calendarCollectionView.delegate = self
        self.calendarCollectionView.register(CalendarCollectionViewCell.self, forCellWithReuseIdentifier: CalendarCollectionViewCell.identifier)

        self.calendarCollectionView.translatesAutoresizingMaskIntoConstraints = false
        NSLayoutConstraint.activate([
            self.calendarCollectionView.leadingAnchor.constraint(equalTo: self.view.leadingAnchor),
            self.calendarCollectionView.trailingAnchor.constraint(equalTo: self.view.trailingAnchor),
            self.calendarCollectionView.topAnchor.constraint(equalTo: self.yearMonthLabel.bottomAnchor, constant: 16),
            self.calendarCollectionView.bottomAnchor.constraint(equalTo: self.view.bottomAnchor)
        ])
    }
}

extension ViewController: UICollectionViewDelegate, UICollectionViewDataSource {

    func collectionView(_ collectionView: UICollectionView, numberOfItemsInSection section: Int) -> Int {
        return self.calendarDateFormatter.days.count
    }

    func collectionView(_ collectionView: UICollectionView, cellForItemAt indexPath: IndexPath) -> UICollectionViewCell {
        guard let cell = collectionView.dequeueReusableCell(withReuseIdentifier: CalendarCollectionViewCell.identifier, for: indexPath) as? CalendarCollectionViewCell else { return UICollectionViewCell()}

        cell.configureLabel(text: self.calendarDateFormatter.days[indexPath.item])

        if indexPath.item % 7 == 0 {
            cell.setSundayColor()
        }

        return cell
    }
}
앞서 작업한 View 내용의 전체적인 모습이자, 이전과 달리 우리가 작성한 dateFormatter의 데이터를 사용하여 View를 보여주고 있다.
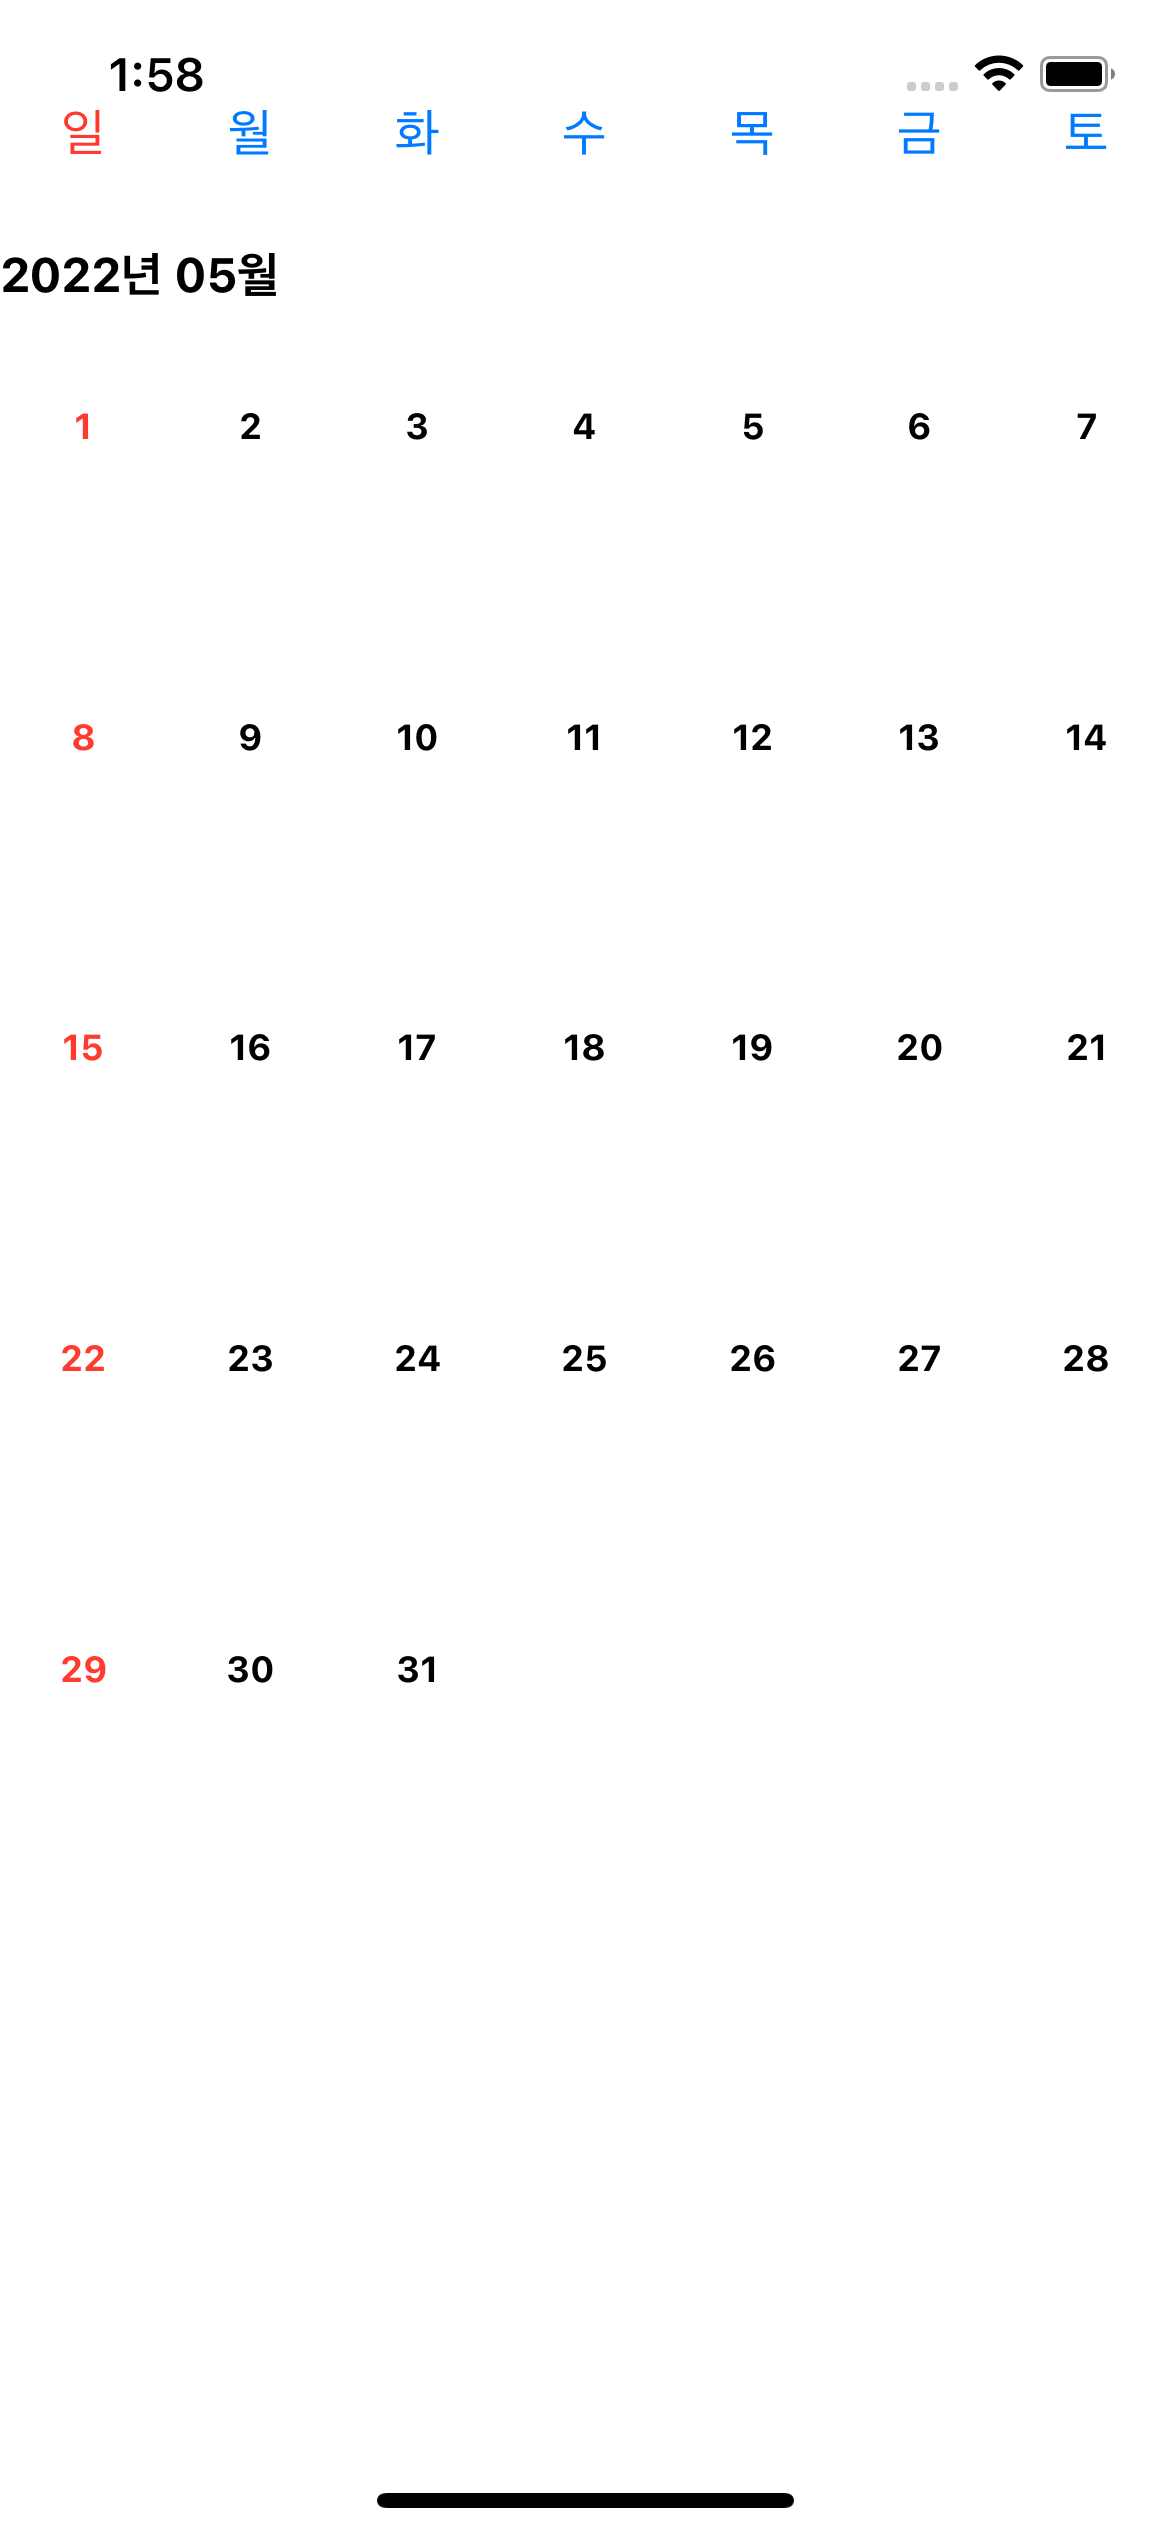
투박하지만 그래도 달력으로서의 모습은 갖추고 있다. 다만 현재는 당월의 달력만 보여주고 있는 형태인데 차근차근 다른 월도 볼 수 있는 형태로 수정해나가고자 한다.