작업을 하다보면 여러 ViewController를 담아 관리하는 ContainerController를 활용해야하는 상황이 종종 생긴다. 물론 커스텀으로도 작성할 수 있지만, 우리의 UIKit에서 기본적으로 제공하는 UITabBarController, UINavigationController, UIPageViewController등을 사용할 수도 있다.
이 중에서 NavigationController는 스택 기반으로 내부의 VC를 탐색하거나 출력할 수 있는 기능을 제공해준다.
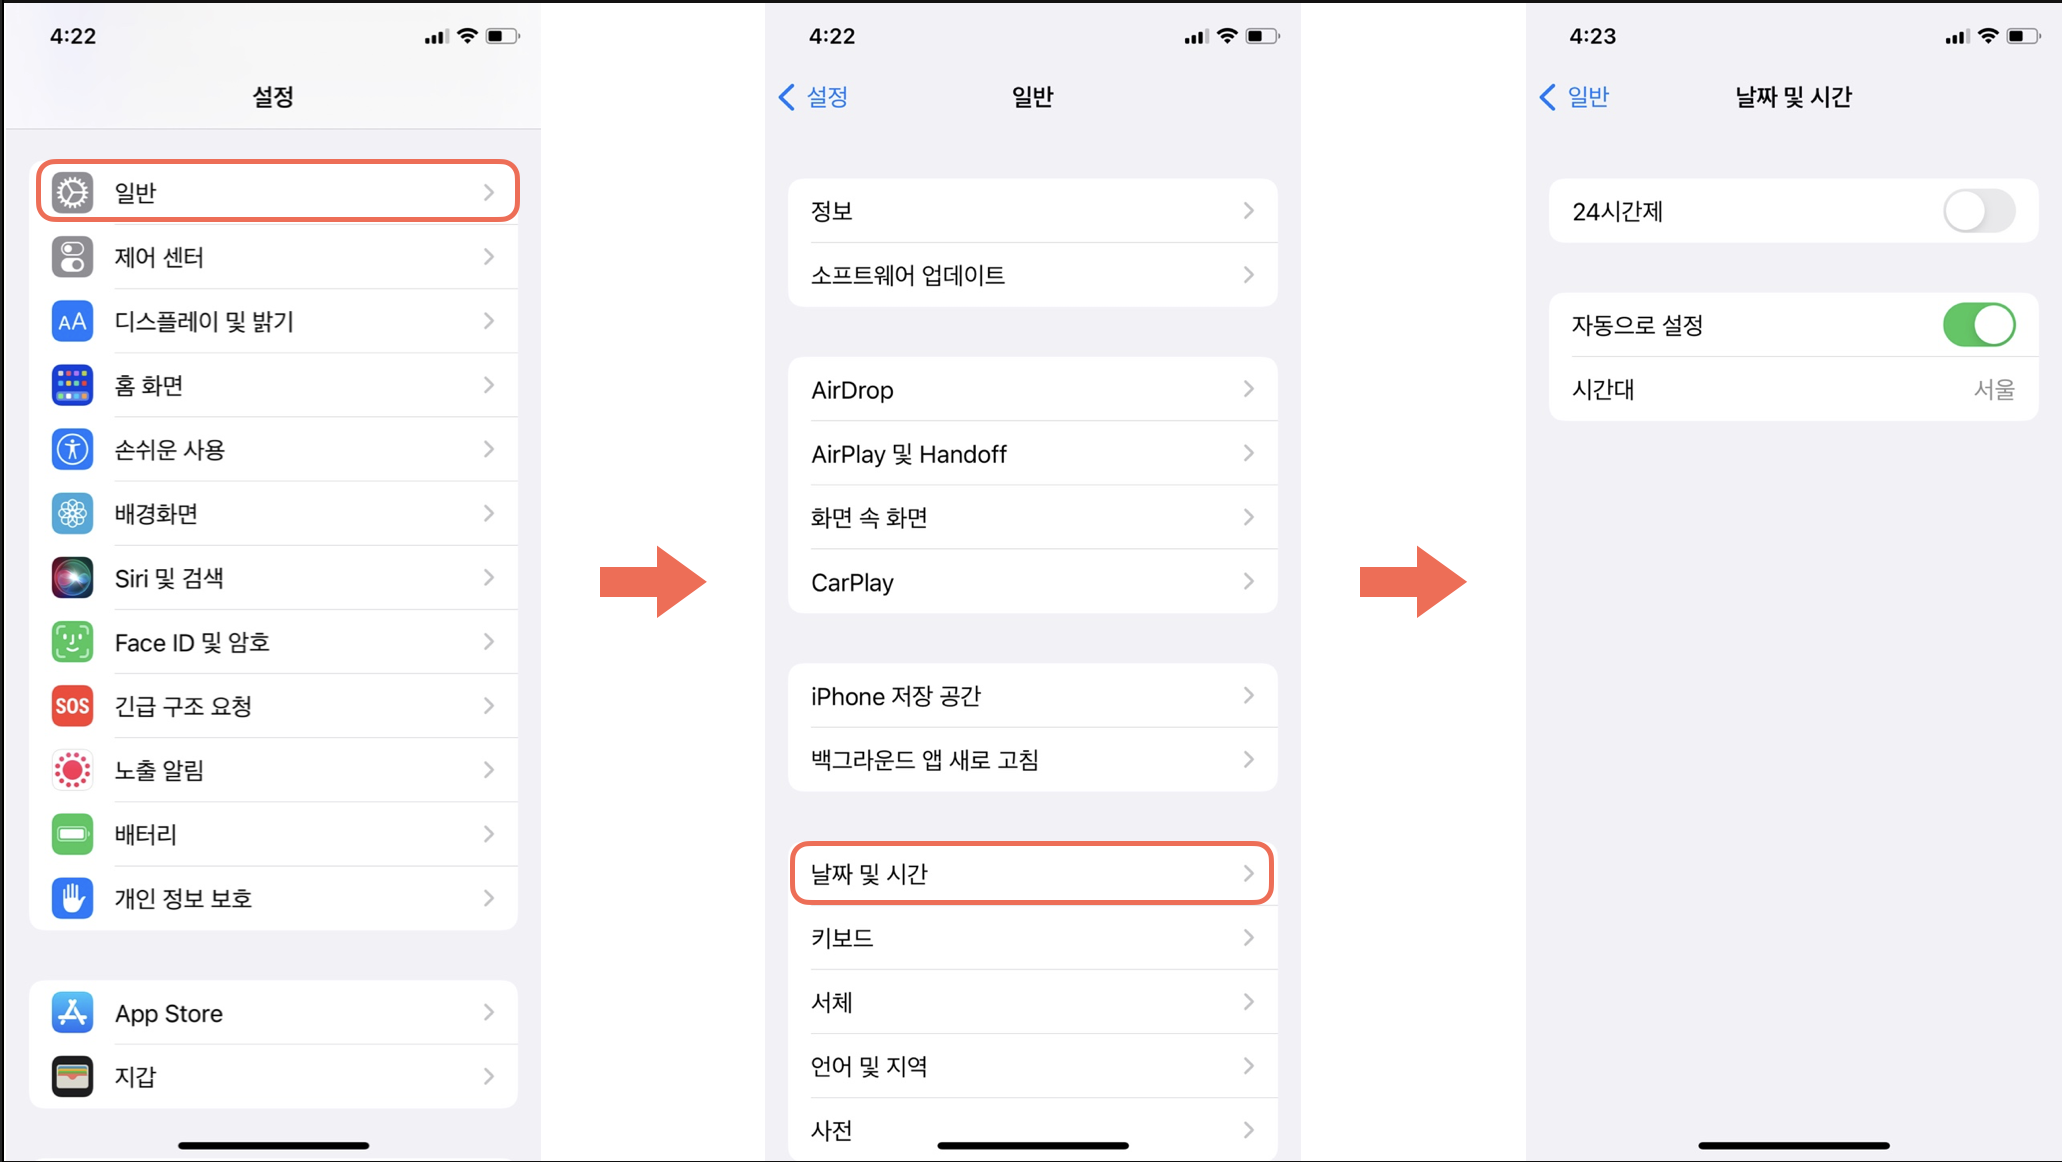
위와 같이 기본 앱에서 자주 볼 수 있고, 이러한 형태를 Navigation 구조라고 한다. 구현 자체는 그리 어렵지 않으며, Xcode 상단 바에서 [Editor] -> [Embed in] -> [Navigation Controller]를 통해 원하는 VC를 NavigationController로 embed할 수 있다.
하지만 가끔씩 반항아 기질이 발동해 굳이 코드로 구현해보고 싶어하는 나같은 사람들도 분명히 있기에, 이번 글에서는 코드로 어떻게 구현하는 지를 간략하게 정리하고자 한다.
NavigationController embed programmatically
😚 First Step.

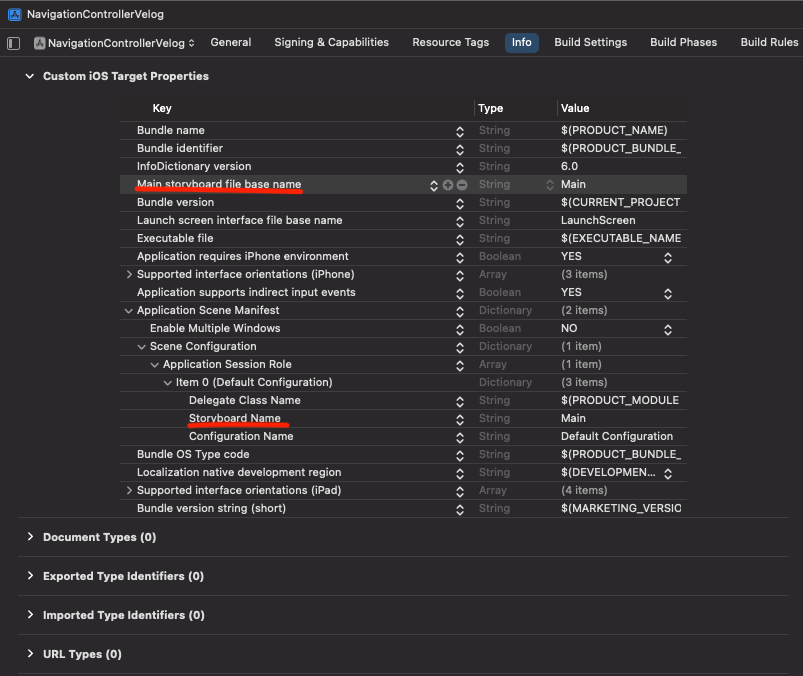
우리에게는 더 이상 기존의 storyboard 파일이 필요없다. 그저 무심하게, 시크하게 해당 파일을 삭제해주면 된다. 삭제를 한 뒤에는 Info로 이동하여 Main.storyboard에 대한 정보를 같이 지워줘야 한다.
물론 부수고 나면 새로운 것을 창조해야 하는 과정이 필요하다. 이 상태로 빌드해봤자 아무 것도 출력되지 않는데 어떻게 프로젝트를 진행할 것인가.
😚 Second Step.
우리는 이제 UILifeCycle을 담당하는 SceneDelegate로 이동하여 재창조의 과정을 진행하여야 한다. 참고로 SceneDelegate는 iOS 13이후의 버전에만 존재하니 이 부분은 필수 체크!
우리가 새로운 로직을 작성해야하는 부분은 scene이라는 메서드인데 총 3개의 매개변수를 가지고 있다. 매개변수 중 'scene'은 현재 앱에 연결 중인 scene 객체를, 'session'은 scene 구성에 대한 세부적인 정보를 가진 session 객체를, options는 scene 구성을 위한 추가적인 옵션으로 해당 정보를 사용하여 여러 액션을 처리할 수 있다.
해당 메서드는 앱이 UI의 인스턴스를 생성하거나 복원 시에 호출되며, 이에 대한 새로운 인스턴스를 요청하게 되면 UIKit 적절한 Scene을 생성하여 앱에 연결하여 준다. 즉, scenc메서드를 활용하면 새로운 scene에 대한 대응과 출력해야할 것들에 대한 모든 데이터를 로드할 수 있는 것이다.
func scene(_ scene: UIScene, willConnectTo session: UISceneSession, options connectionOptions: UIScene.ConnectionOptions) {
	guard let _ = (scene as? UIWindowScene) else { return }
}
scene 메서드의 초기 코드는 상기와 같다. 우리는 여기에 적절한 로직을 가미해 새로운 UI와 연결시켜주어야 한다.
func scene(_ scene: UIScene, willConnectTo session: UISceneSession, options connectionOptions: UIScene.ConnectionOptions) {
	guard let windowScene = (scene as? UIWindowScene) else { return }
	window = UIWindow(windowScene: windowScene)
	let mainViewController = ViewController()

	window?.rootViewController = mainViewController
	window?.makeKeyAndVisible()
}
먼저 UIWindowScene 인스턴스로 다운캐스팅하는 guard 구문에 상수명을 정해줘야 한다. 이후 앱의 UI 배경이나 view에 이벤트를 보내는 객체인 UIWindow 인스턴스와 ViewController 인스턴스를 생성한다.
마지막으로 UIWindow 인스턴스의 rootViewController를 ViewController로 설정해주는 과정을 진행해준다. 이와 같은 설정을 통해 우리는 storyboard 없이도 ViewController의 view 설정이 출력되는 것을 볼 수 있다.
(기본적으로 bg color가 black이므로 적절한 view 설정을 통해 가시적으로 구분할 수 있게 해주는 것이 확인 시에 편하다)
😚 Third Step.
방금 우리가 해준 작업은 단순히 rootViewController를 설정하여 적절한 View가 출력될 수 있도록 해준 것 뿐이다. 우리가 진정으로 원하는 NavigationController embed를 위해서는 아~주 약간의 조미만 더해주면 된다.
func scene(_ scene: UIScene, willConnectTo session: UISceneSession, options connectionOptions: UIScene.ConnectionOptions) {
	guard let windowScene = (scene as? UIWindowScene) else { return }
	window = UIWindow(windowScene: windowScene)
	let mainViewController = ViewController()
    let navigationContoller = UINavigationController(rootViewController: mainViewController)

	window?.rootViewController = navigationContoller
	window?.makeKeyAndVisible()
}
앞의 로직과 무엇이 달라졌을까? 아주 미묘한 차이라서 언뜻 보면 차이가 없어보일 수 있지만 새로이 UINavigationController를 생성하면서 mainVC를 NavigationController의 rootVC로 설정해주었다. 그리고 window의 rootVC에 해당 navigationController를 rootView로 지정해주는 로직이 더해졌다.
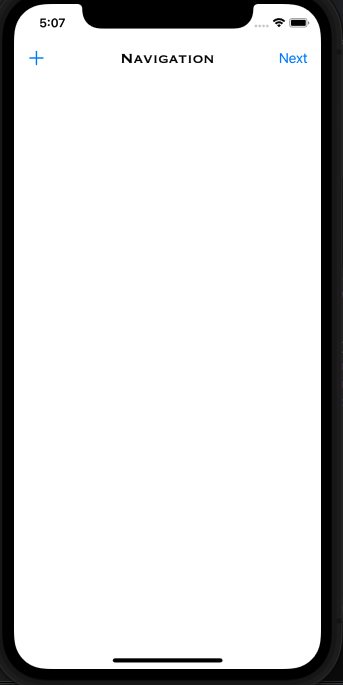
이제 Navigation의 rootVC에 해당하는 ViewController에서 세부적인 view 구성을 마친 뒤, 빌드를 하게 되면 원하는 화면이 출력되는 것을 확인할 수 있다.
class ViewController: UIViewController {
    override func viewDidLoad() {
        super.viewDidLoad()
        self.view.backgroundColor = .systemBackground
        setNavigationBar()
    }
}

private extension ViewController{
    func setNavigationBar(){
        configureNavigationTitle()
        configureNavigationButton()
    }

    func configureNavigationTitle(){
        self.title = "Navigation"
        self.navigationController?.navigationBar.titleTextAttributes = [NSAttributedString.Key.font: UIFont(name: "Copperplate", size: 21) ?? UIFont()]
    }

    func configureNavigationButton(){
        self.navigationItem.rightBarButtonItem = UIBarButtonItem(title: "Next", style: .plain, target: self, action: nil)
        self.navigationItem.leftBarButtonItem = UIBarButtonItem(image: UIImage(systemName: "plus"), style: .plain, target: self, action: nil)
    }
}
번외; Present 시의 Navigation Item
다들 프로젝트를 하다보면 Navigation의 push/pop과 일반적인 present의 차이는 알고있을 텐데, 그렇다면 present로 화면을 출력했지만 Navigation Item을 사용하고 싶다면 어떻게 해야할까?
private extension ViewController{
    func setNavigationBar(){
        configureNavigationTitle()
        configureNavigationButton()
    }

    func configureNavigationTitle(){
        self.title = "Navigation"
        self.navigationController?.navigationBar.titleTextAttributes = [NSAttributedString.Key.font: UIFont(name: "Copperplate", size: 21) ?? UIFont()]
    }

    func configureNavigationButton(){
        self.navigationItem.rightBarButtonItem = UIBarButtonItem(title: "Next", style: .plain, target: self, action: #selector(pushView))
        self.navigationItem.leftBarButtonItem = UIBarButtonItem(image: UIImage(systemName: "plus"), style: .plain, target: self, action: #selector(presentView))
    }

    @objc func pushView(){
        let pushVC = PushController()
        self.navigationController?.pushViewController(pushVC, animated: true)
    }

    @objc func presentView(){
        let presentVC = PresentController()
        presentVC.modalPresentationStyle = .fullScreen
        self.present(presentVC, animated: true)
    }
}
NavigationController의 rootVC에서 각각 push와 present로 VC 간의 이동을 설정하였다.
class PushController: UIViewController {
    override func viewDidLoad() {
        super.viewDidLoad()
        self.view.backgroundColor = .red
        setNavigationBar()
    }

    func setNavigationBar(){
        self.navigationItem.rightBarButtonItem = UIBarButtonItem(title: "Next", style: .plain, target: self, action: nil)
        self.navigationController?.navigationBar.topItem?.title = "Back"
    }
}

class PresentController: UIViewController {
    override func viewDidLoad() {
        super.viewDidLoad()
        self.view.backgroundColor = .blue
        setNavigationBar()
    }

    func setNavigationBar(){
        self.navigationItem.rightBarButtonItem = UIBarButtonItem(title: "Next", style: .plain, target: self, action: nil)
        self.navigationController?.navigationBar.topItem?.title = "Back"
    }
}
이동할 각각의 VC는 view의 화면 색상만 다를 뿐 NavigationItem에 대한 설정은 동일하게 구현하였는데 만약 출력을 한다면 어떻게 나올까?
역시 present 화면은 navigationItem에 대한 설정이 전혀 먹히지 않는다는 걸 알 수 있다. present로 띄운 VC는 기존의 Navigation과 다른 파로 인식되기 때문에 기본적인 UIViewController로 작동된다. 따라서 modal로 띄워주었지만 navigationItem을 쓰고 싶다면 해당 VC를 새로운 NavigationController의 rootView로 지정하여 기존 navigation들과 다른 파를 만들어주어야 한다.
@objc func presentView(){
	let presentVC = PresentController()
    let navController = UINavigationController(rootViewController: presentVC)
    navController.modalPresentationStyle = .fullScreen
    self.present(navController, animated: true)
}
위와 같이 신규 NavigationController를 present 해주면 우리가 원하는 대로 present된 view도 navigationItem을 가지고 있는 모습을 확인할 수 있다.