Android Start Point (진입점)
대게 IDE로 코드를 실행한다면 main 함수가 있습니다.
특히 자바에서는 따로 약속한 사실처럼
JAVA 는 어플리케이션이 실행되면 제일먼저 메인(main)메소드를 실행한다.
라는 명시적인 함수가 있는데, 바로 public static void main(String[] args) 이 메인 함수입니다. 그렇다면 안드로이드는 Java로 코드를 짜고 컴파일되는 언어인데 시작이 되는 main 함수는 어디있을까요?
ActivityThread.java 안에 main 함수가 있습니다.
public static void main(String[] args) {
        Trace.traceBegin(Trace.TRACE_TAG_ACTIVITY_MANAGER, "ActivityThreadMain");

        // Install selective syscall interception
        AndroidOs.install();

        // CloseGuard defaults to true and can be quite spammy.  We
        // disable it here, but selectively enable it later (via
        // StrictMode) on debug builds, but using DropBox, not logs.
        CloseGuard.setEnabled(false);

        Environment.initForCurrentUser();

        // Make sure TrustedCertificateStore looks in the right place for CA certificates
        final File configDir = Environment.getUserConfigDirectory(UserHandle.myUserId());
        TrustedCertificateStore.setDefaultUserDirectory(configDir);

        Process.setArgV0("<pre-initialized>");

        Looper.prepareMainLooper();

        // Find the value for {@link #PROC_START_SEQ_IDENT} if provided on the command line.
        // It will be in the format "seq=114"
        long startSeq = 0;
        if (args != null) {
            for (int i = args.length - 1; i >= 0; --i) {
                if (args[i] != null && args[i].startsWith(PROC_START_SEQ_IDENT)) {
                    startSeq = Long.parseLong(
                            args[i].substring(PROC_START_SEQ_IDENT.length()));
                }
            }
        }
        ActivityThread thread = new ActivityThread();
        thread.attach(false, startSeq);

        if (sMainThreadHandler == null) {
            sMainThreadHandler = thread.getHandler();
        }

        if (false) {
            Looper.myLooper().setMessageLogging(new
                    LogPrinter(Log.DEBUG, "ActivityThread"));
        }

        // End of event ActivityThreadMain.
        Trace.traceEnd(Trace.TRACE_TAG_ACTIVITY_MANAGER);
        Looper.loop();

        throw new RuntimeException("Main thread loop unexpectedly exited");
    }
이 함수에 대해 자세한 이야기는 아래에서 다룰 테니 대략적으로 이야기를 하고 넘어가자면
이 함수에서는 Activity Manager한테 프로세스가 성공적으로 시작되었다고 알린 후, 새 프로세스 시작을 notifying을 준 후 Activity Manager는 새 프로세스에 실제 작업을 수행하도록 알립니다.
그리고 나서야 매니페스트 정보에 따라 Activity Class를 create하고 OnCreate를 호출하는 것입니다.
	<activity
            android:name=".MainActivity"
            android:exported="true">
            <intent-filter>
                <action android:name="android.intent.action.MAIN" />

                <category android:name="android.intent.category.LAUNCHER" />
            </intent-filter>
        </activity>
즉, 앱이 실행되고 나면..
앱이 시작되면 커널 레벨 단에서 많은 일들이 일어납니다. Zygote을 Bootstrapping하고 JVM으로 클래스 로드합니다. 이 떄 JVM이 static void main(String args[]) 메서드를 찾아 호출합니다.
본격적으로 알아보기 위한 프로세스 로드맵
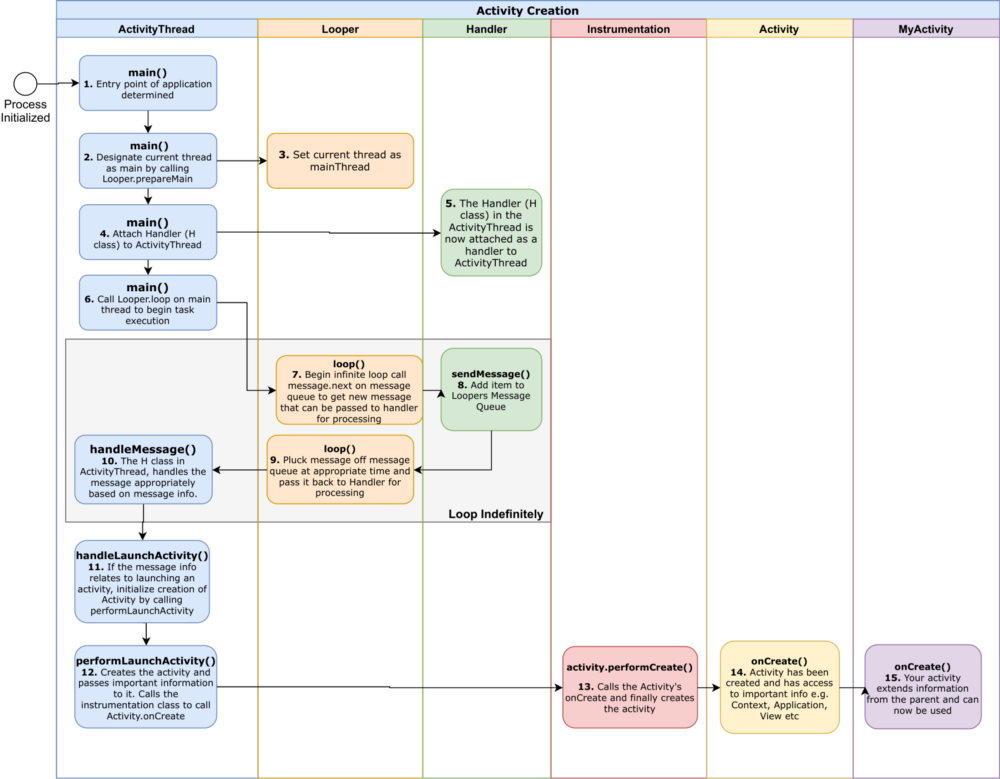
앞서 설명한 main을 포함해 실행될 액티비티까지 도달하기 전까지의 전체 작업을 자세하게 알아볼시각적으로 알아보기 위해 로드맵은 아래와 같습니다.

main method가 실행되고 Main Activity의 onCreate가 실행되기까지 15단계의 스텝이 있습니다.
Process 1
public static void main(String[] args) {
  //Modification - Removed unrelated initializers.
  //Android initializes some tracers, event loggers, enviroment initializers, trusted certificates and updates the process' state
        Looper.prepareMainLooper();
        ActivityThread thread = new ActivityThread();
        thread.attach(false);
        if (sMainThreadHandler == null) {
            sMainThreadHandler = thread.getHandler();
        }
        // More logging
        // End of event ActivityThreadMain.
        Trace.traceEnd(Trace.TRACE_TAG_ACTIVITY_MANAGER);
        Looper.loop();
        throw new RuntimeException("Main thread loop unexpectedly exited");
}
이 부분에서 볼 수 있듯이 3가지 중요한 일을 하는데, 다음과 같습니다.
첫번째, 메인 루퍼 준비 : process 2~3
Looper.prepareMainLooper로 메인 루퍼를 준비합니다. 이것은 main 함수를 애플리케이션 메인 스레드로 호출하는 모든 작업을 수행한 현재 임의 스레드를 표시합니다. Android 메인 스레드 및 UI 스레드를 지정하는 방법은 다음과 같습니다.
두번째, 핸들러 설정 : process 4~5
Activity Thread 안에는 private 내부 클래스인 H가 있습니다. Handler를 상속받는 클래스로, thread.getHandler();를 호출함으로써 스레드에서 주 핸들러 역할을 하도록 설정합니다.
H.class example
class H extends Handler {
        public static final int BIND_APPLICATION        = 110;
        @UnsupportedAppUsage
        public static final int EXIT_APPLICATION        = 111;
        @UnsupportedAppUsage
        public static final int RECEIVER                = 113;
        @UnsupportedAppUsage
        public static final int CREATE_SERVICE          = 114;
        @UnsupportedAppUsage
        public static final int SERVICE_ARGS            = 115;
        @UnsupportedAppUsage
        public static final int STOP_SERVICE            = 116;
세번째, 메인 스레드에서 loop() 호출 : process 6~7
메인스레드가 designated된 후, 메인 스레드에서 작업을 하기 위해Looper.loop 즉, loop 메서드를 호출합니다.
그리고 루퍼 메세지 큐에서 메세지 실행이 시작되고 메인 스레드에서 메세지 큐에 있는 작업들을 하나씩 꺼내서 처리할 수 있게됩니다.
그리고 메인 메서드의 마지막에 있는 throw은 loop()가 종료되면, 앱은 루프를 종료하고 RuntimeException을 발생시킵니다.
즉, 루프 메서드가 절대로 종기 종료되지 않아야 함을 알 수 있습니다.
Looper's infinite loop : process 7~9
  public static void loop() {
        final Looper me = myLooper();
        if (me == null) {
            throw new RuntimeException("No Looper; Looper.prepare() wasn't called on this thread.");
        }
        final MessageQueue queue = me.mQueue;

        // ....

        for (;;) {
            Message msg = queue.next(); // might block
            if (msg == null) {
                // No message indicates that the message queue is quitting.
                return;
            }
        }
    }
위 함수를 보면 알 수 있듯이 메세지큐가 있고 for 문 내에서 message.next가 호출됩니다. 핸들러에 의해 메세지 큐가 채워지고 Looper에 주어진 메세지가 null이 아닌 이상 종료되지 않습니다.
이 Looper 덕분에 메인 함수가 계속 실행될 수 있는데요, 그 후에는 어떤 작업을 실행하게 될까요?
MainActivity 시작 : process 10~15
여기까지 플로우를 타면서 한 가지 기억해야할 중요한 점은 이 모든 반복 및 처리가 ActivityThread 클래스 내에 있는 main 메서드에서 발생했다는 것입니다.
앞서 언급한 내부 클래스인 H는 메인 스레드의 전용 핸들러 역할을 하는데요. 이 클래스에는 handleMessage라는 메서드가 퐆함되어 있습니다. 그래서 Handler를 상속받는 모든 클래스는 이 함수를 override해야합니다.
private class H extends Handler {
    //Several Application State Identifiers ...
        public void handleMessage(Message msg) {
                //other code
                switch (msg.what) {
                    case LAUNCH_ACTIVITY: {
                        //create Activity records
                        handleLaunchActivity(r, null, "LAUNCH_ACTIVITY");
                        Trace.traceEnd(Trace.TRACE_TAG_ACTIVITY_MANAGER);
                        ...
                        //handle other cases e.g ResumeActivity, PauseActivity, BindService, UnbindService etc.
                    }
                }
    }
}
그리고 위 함수 속 switch 문에서 메세지 내용에 대해서 처리합니다. 즉, BindService, Resuming, Pausing, starting activity, 메모리 경고 등 50여 가지 사례를 처리한다는 것을 의미합니다.
process 11
또한, case LAUNCH_ACTIVITY에서 호출하는 handleLaunchActivity()는 performLaunchActivity()라는 다른 메서드를 호출하는데,
private void handleLaunchActivity(ActivityClientRecord r, Intent customIntent, String reason) {
        //... initialize graphics,do some logging, call GC if need be, etc
        Activity a = performLaunchActivity(r, customIntent);
        //... handle how to resume an existing activity
}Instrumentation, Context, Component, Intent 같은 액티비티 속 중요한 정보를 추가하고 Application 또한 설정합니다.
process 13
그리고 나서 Instrumenation.callActivityOnCreate()를 호출하면 아래에 삽입한 코드처럼 prePerformCreate와 activity.performCreate로
process 14~15
마지막 스텝인 Activity의 onCreate()를 호출합니다.
/**
 * @Retrieved from AOSP
 * Instrumentation class
 */
public void callActivityOnCreate(Activity activity, Bundle icicle) {
    //Note that the activity has already been initialized thanks to the prepareLaunchActivity().
    //all that remains is just calling onCreate()
    prePerformCreate(activity); //prepares the activity
    activity.performCreate(icicle); //calls the oncreate
    postPerformCreate(activity);
}
마치며
Android 앱을 실행하는데 사용할 수 있는 수많은 유용한 변수와 메서드가 로드되었습니다. 이 거대한 클래스의 7600(...)라인을 가진 클래스 덕분에 메인액티비티가 실행되고 앱을 만들어지는 것이었습니다.
항상 빌드를 돌리면서 당연하게 알았던 부분들을 짚어볼 수 있었습니다!
Reference
https://stackoverflow.com/questions/9293329/where-is-main-in-android
