상황
정형/비정형 물체에 대한 체적 알고리즘 코드를 받아서, 윈도우 환경에 포팅하고 UI 상에서 동작확인이 필요하다.
UI 상에서 3가지 정보가 확인되어야 한다.
- 실시간으로 물체의 체적 정보
- 체적 계산에 사용된 클라우드 정보
- Depth / Visual 정보
알고리즘 계산에는 opencv/pcl 라이브러리가 사용되고, 고객은 mfc 프로그램을 기대하고 있는걸로 보인다. 관련해서 프로그램을 작성한다.
작성하면서 알게된 내용에 대해
pcl 버전에 대해
pcl-1.14.1 을 사용 (pcl-1.13.x 대에선 임베드시 랜더링에 문제가 있었다)
Debug new 에 대해
Debug 모드에서는 new 가 Debug_New 로 define 되어 있으므로 pcl 객체를 할당할때는
다음 방법중 하나를 사용해야 한다.
- 방법 1
#ifdef _DEBUG
#undef new
#endif
	pcl::PointCloud<pcl::PointXYZ>::Ptr cloud(new pcl::PointCloud<pcl::PointXYZ>);
#ifdef _DEBUG
#define new DEBUG_NEW
#endif
- 방법 2
전처리기에 다음 매크로를 선언
NOMINMAX
PoseMessage / SendMessage 에 대해
PostMessage 의 경우 비동기 메시지 처리이므로, 스레드나 자원이 정리된 후에 실행되는 상황이 발생할 수 있다.
따라서 정리 로직과 메시지 처리 로직은 서로의 시나리오를 이해하고, 이에 맞게 작성해야 한다.
SendMessage 의 경우 동기 메시지 처리이므로, 특정 시나리오에서 메시지가 오지 않으면 스레드가 계속 block 되어 있게 된다.
따라서 적절한 Timeout 값을 사용해서 UI 갱신에 영향이 없게 구성한다.
eigen free 에러에 대해
pclvisualizer 기동시 eigen free 에러가 발생하는 경우가 있다.
- https://github.com/PointCloudLibrary/pcl/issues/4859
- c/c++ --> code generation --> enable enhanced instruction set 에서 /arch:AVX 를 활성화 한다.
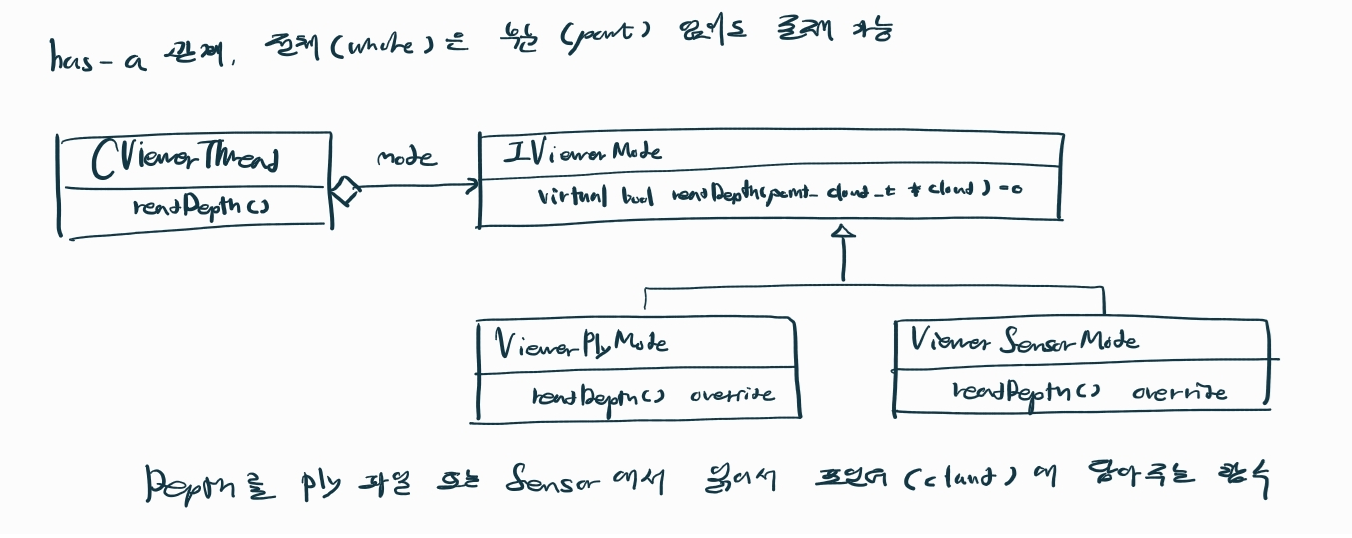
전략 패턴에 대해
알고리즘을 개발하는 인턴은 센서보드가 없어서, ply 파일을 통해 depth 정보를 획득하고 있었다.
실 개발에서도, depth 정보를 센서 보드에서 얻을지 ply 파일에서 얻을지를 선택할 수 있었으면 좋겠다.
- Viewer 스레드에서 readDepth() 함수를 실행하고 있다.
- 이 방법을 정할수 있게 Viewer 스레드 내에 IViewerMode 멤버를 두어 Aggregation 관계를 부여하였다.
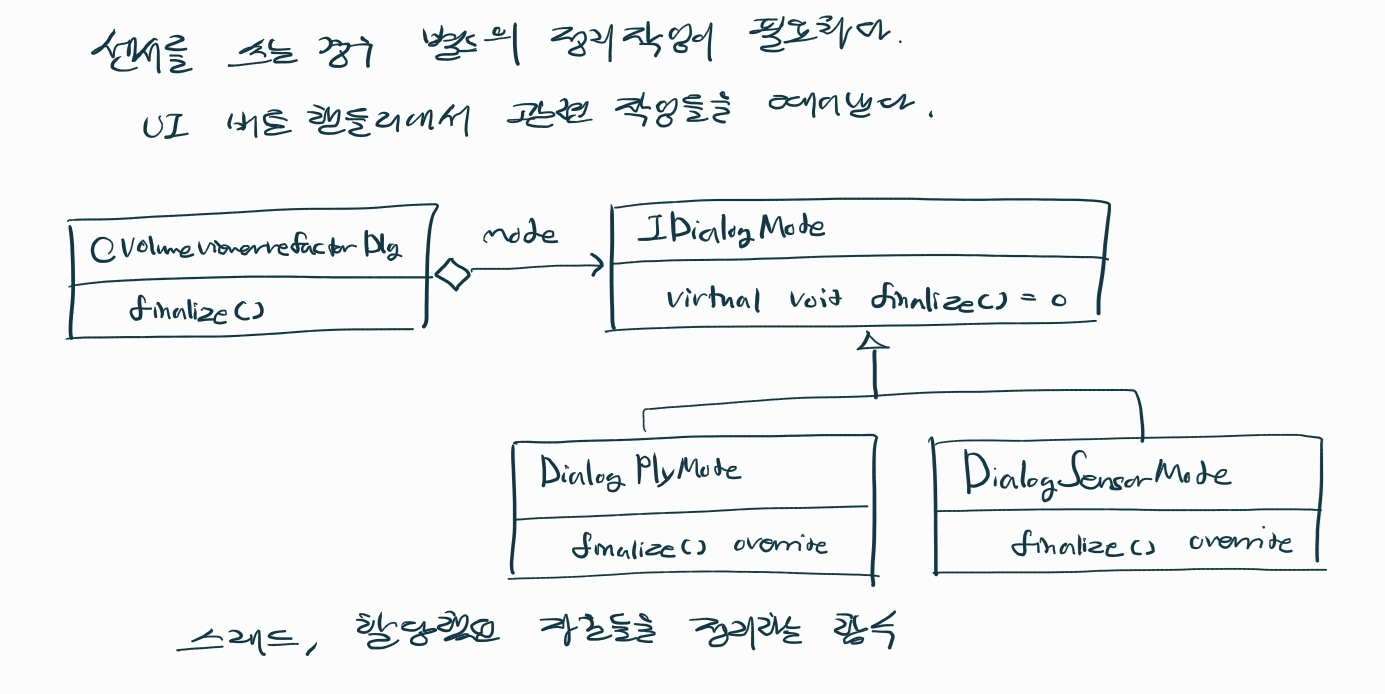
readDepth() 외에도 finalize() 작업도 선택이 필요하다.
이 작업은 Viewer 스레드에서 하지않고, Dialog 클래스에서 처리해야 한다.
- Dialog 클래스에서 finalize() 함수를 실행하고, 이 방법을 정할수 있게 Dialog 클래스 내에 IDialogMode 멤버를 두었다.
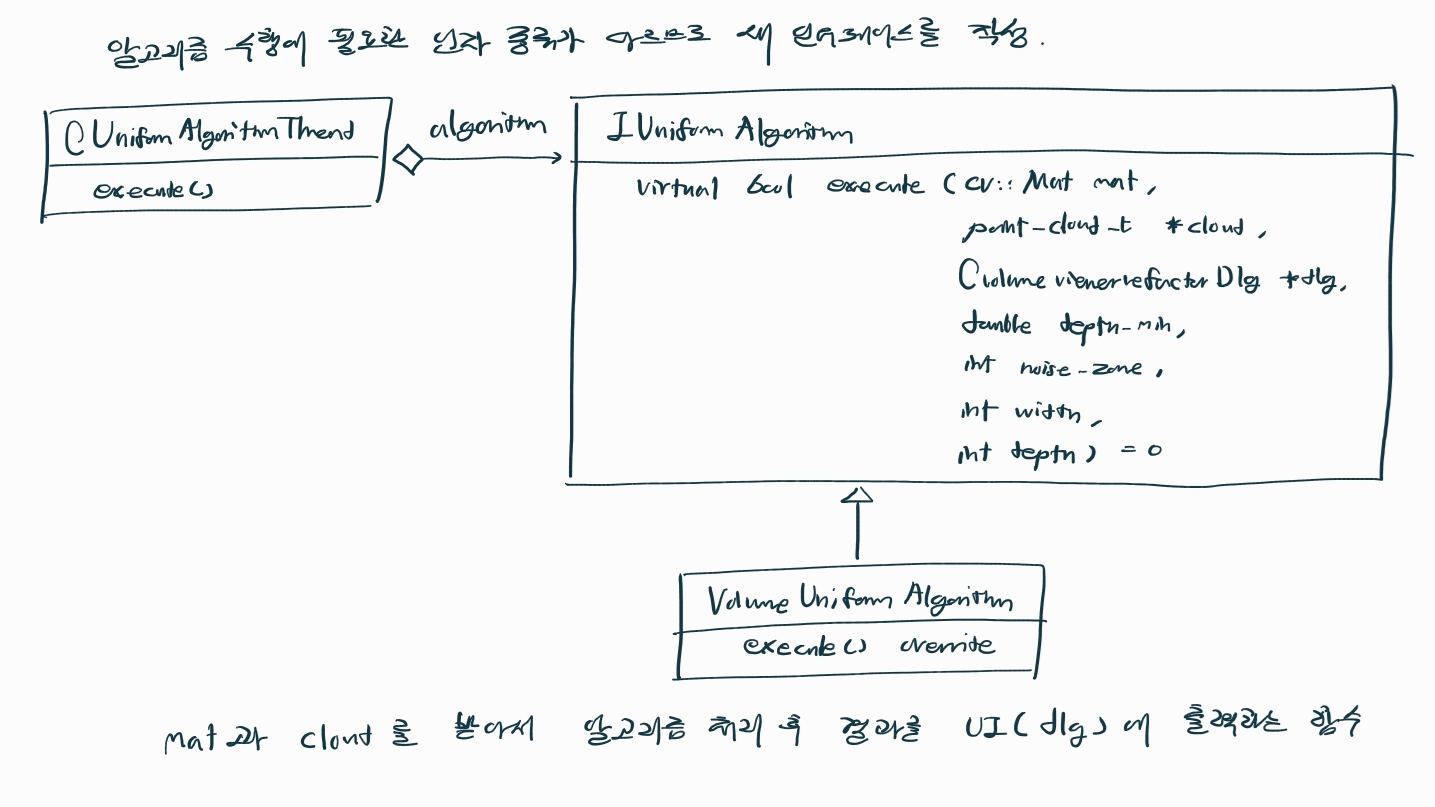
알고리즘도 변경이 가능했으면 좋겠다.
- Algorithm 스레드에서 execute() 함수를 실행하고 있다.
- 이 방법을 정할수 있게
Algorithm 스레드 내에 IAlgorithm 멤버를 두었다.

cloud queue 에 대해
알고리즘을 실행하려면 Viewer 스레드에서 Algorithm 스레드로 cloud 를 넘길 방법이 필요하다.
- cloud 를 넘길 동기화 queue 역활을 할 템플릿 클래스 CloudQueue 를 작성하였다.
//// ConcurrentQueue.h

#pragma once
#include <queue>
#include <mutex>
#include <condition_variable>

template <typename T>
class ConcurrentQueue
{
public:
	bool push(T value) {
		if (stop_)
			return false;

		std::lock_guard<std::mutex> lock(mtx_);
		q_.push(std::move(value));
		cv_.notify_one();

		return true;
	}

	bool pop(T& value) {
		std::unique_lock<std::mutex> lock(mtx_);
		cv_.wait(lock, [this] { return !q_.empty() || stop_; });

		// false : shutdown() called and empty queue
		if (stop_ && q_.empty())
			return false;

		// true : queue has data or shutdown() not called
		value = std::move(q_.front());
		q_.pop();

		return true;
	}

	bool try_pop(T& value) {
		std::lock_guard<std::mutex> lock(mtx_);

		if (stop_ || q_.empty()) {
			return false;
		}

		value = std::move(q_.front());
		q_.pop();

		return true;
	}

	void shutdown() {
		std::lock_guard<std::mutex> lock(mtx_);

		std::queue<T>().swap(q_);		// remove all data

		stop_ = true;
		cv_.notify_all();
	}

	void reset() {
		stop_ = false;
	}

private:
	std::queue<T> q_;
	std::mutex mtx_;
	std::condition_variable cv_;

	bool stop_ = false;			// pop() exit block
};

//// CloudQueue.h

#pragma once

#include <pcl/point_cloud.h>
#include <pcl/point_types.h>

#include "ConcurrentQueue.h"

using PointXYZ = pcl::PointXYZ;
using PointCloudXYZ = pcl::PointCloud<pcl::PointXYZ>;
using PointCloudXYZPtr = PointCloudXYZ::Ptr;
using CloudQueue = ConcurrentQueue<PointCloudXYZPtr>;

using PointCloudXYZRGB = pcl::PointCloud<pcl::PointXYZRGB>;
using PointCloudXYZRGBPtr = PointCloudXYZRGB::Ptr;
using PointXYZRGB = pcl::PointXYZRGB;
using CloudRGBQueue = ConcurrentQueue<PointCloudXYZRGBPtr>;
메모리 누수 의심현상에 대해
프로그램을 실행하면, 작업관리자에서 메모리가 빠른 속도로 (초당 10MB) 증가하는게 관측되는데 viewer 스레드에서 문제인지, algorithm 스레드에서 문제인지 모르겠다.
- 처음엔, 사용후에 해제를 잘못해서 그런거라고 생각했다. (algorithm 스레드를 의심)
- 하지만, 결국 문제는 viewer 스레드였다.
문제 시나리오는 다음과 같다.
1) viewer 스레드는 CloudQueue 에 넣을 cloud 데이터를 동적할당한다. (화살표 지점)
		pcl::PointCloud<pcl::PointXYZ>::Ptr cloud(new pcl::PointCloud<pcl::PointXYZ>);
		cloud->width = width;
		cloud->height = height;
		cloud->is_dense = true;
		cloud->points.reserve(cloud->width * cloud->height);    // <--
2) 동적할당한 cloud 데이터는 640x480 해상도의 xyz 데이터로, 약 3MB 의 메모리를 사용한다.
- 동적할당된 메모리를 실제 사용하기 전에는 메모리가 할당되지 않는다. (CoW)
3) algorithm 스레드가 직접 메모리에 접근하면, 그때 증가한다.
- 그래서 algorithm 스레드의 문제라고 오해하였다.
이 문제는 기본적으로 "viewer 스레드 push 속도 > algirhtm 스레드 pop 속도" 여서
발생한 현상이고, cloud memory pool 을 사용하는 방식으로 개선하였다.
- cloud 가 충분히 queue 에 들어가있으면 viewer 스레드를 잠시 대기
		pcl::PointCloud<pcl::PointXYZ>::Ptr cloud = pool->acquire();
		if (!cloud) {    // <--
			std::this_thread::sleep_for(std::chrono::milliseconds(1));
			continue;
}- 옛날 cloud 데이터가 랜더링되는 문제가 있어서, cloud pool 크기를 10 -> 1로 변경하였다.
알고리즘 결과 전달에 대해
알고리즘 결과는 체적 text 와 pclvisualizer 로 확인이 되어야 한다.
- 알고리즘 클래스가 정보를 Dialog 클래스로 넘길수 있게 2가지 채널을 제공한다.
- 1) text : PostMessage
- 2) color cloud : CloudRGBQueue
pclvisualizer 임베드에 대해
pclvisualizer 를 mfc picture control 에 임베드할때는 다음 방법을 사용한다.
void CvolumeviewerrefactorDlg::initCloudPicCtrl()
{
	// pclvisualizer 객체를 스마트포인터에 할당
	m_viewer.reset(new pcl::visualization::PCLVisualizer("viewer", false));

    // renderer window 를 mfc picture control 에 연결
	m_renderWindow = m_viewer->getRenderWindow();
	m_renderWindow->SetParentId(m_picCloud.GetSafeHwnd());

    // vtk interactor 객체를 스마트포인터에 만들고, render window 에 연결한다
	vtkNew<vtkRenderWindowInteractor> interactor;
	m_viewer->setupInteractor(interactor, m_renderWindow);

    // 이제 마우스 동작이 된다
	m_interactor = interactor;
	m_interactor->Initialize();

    // mfc picture control 크기를 구한다
	CRect rect;
	m_picCloud.GetClientRect(&rect);

    // render window 크기를 mfc picture control 크기에 맞춘다
	m_renderWindow = m_viewer->getRenderWindow();
	m_renderWindow->SetSize(rect.Width(), rect.Height());

    // pclvisualizer 화면설정을 수행한다
	m_viewer->setBackgroundColor(0.15, 0.15, 0.15);

	m_viewer->setPointCloudRenderingProperties(pcl::visualization::PCL_VISUALIZER_POINT_SIZE, 2, "sample cloud");
	m_viewer->addCoordinateSystem(100.0);

	// resetCamera 를 호출하려면 한번 getCameraParameters 를 호출해야 한다
	m_viewer->getCameraParameters(m_cam_init);
	m_viewer->resetCamera();

    // 30ms 마다 pclvisualizer spinOnce() 와 renderwer window Render() 를 수행
	SetTimer(1, 30, NULL);
}

void CvolumeviewerrefactorDlg::OnTimer(UINT_PTR nIDEvent)
{
	if (nIDEvent == 1 && m_viewer)
	{
		PointCloudXYZRGBPtr cloud = nullptr;

		// 이번에 그릴 cloud 를 획득
		latest_cloud_mutex.lock();
		cloud = latest_cloud;
		latest_cloud_mutex.unlock();

        // cloud 가 존재하면 update 시도
		if (cloud && m_checkCloudUpdate.GetCheck() == BST_CHECKED) {
			if (!m_viewer->updatePointCloud(cloud, "sample cloud")) {
				m_viewer->addPointCloud<pcl::PointXYZRGB>(cloud, "sample cloud");
				m_viewer->resetCamera();
			}
		}

		// pclvisualizer 응답을 위한 호출
		m_viewer->spinOnce(1);

		// render window Render() 를 호출해주어야 그림이 그려지는 현상이 있었다
		m_renderWindow->Render();
	}

	...

	CDialogEx::OnTimer(nIDEvent);
}
영상
git
https://gitlab.com/feather973/volume_viewer_refactor
- visual studio 2019 / 2022 에서 빌드
- pcl / opencv 라이브러리 경로는 다음으로 지정되어 있음
C:\Program Files\PCL 1.14.1
C:\opencv
보드 환경설정
- 사용중인 보드는 onsemi conductor 에서 제작한, 센서 데모용 보드 demo3 이다.
- 가이드 문서 : https://www.onsemi.com/download/software/pdf/devsuite_quickstartguide.pdf
- 문서 내 링크에서 DEVSUITE_SW.zip 를 받고 압축을 푼다.
- 보드를 USB3.0 포트에 연결하고, 장치 관리자에서 드라이버 업데이트를 수행한다.
( DEVSUITE_SW 폴더내에 드라이버가 존재 ) - python3 설치를 설치하고, 라이브러리 헤더 경로를 지정한다.
( .lib 을 바이너리에 링크하는 대신 python 을 사용하고 있다 )