지난 포스팅에서 PowerShell 스크립트를 통해 SpringBoot프로젝트를 원격 서버에 배포를 하는 과정을 정리하였습니다.
이번 포스팅에서는 Nginx + Docker를 사용하는 환경에서 블루/그린 배포 방식을 통해 무중단 배포를 구현한 과정을 소개하겠습니다.
📌 무중단 배포의 종류와 블루/그린 배포를 선택한 이유
무중단 배포란 서비스가 중단되지 않도록 새로운 버전을 배포하는 방식을 의미합니다. 무중단 배포에는 여러 가지 방법이 있습니다. 대표적인 방법으로는 카나리 배포(Canary Deployment), 롤링 배포(Rolling Deployment), 그리고 블루/그린 배포(Blue/Green Deployment)가 있습니다.
카나리 배포(Canary Deployment): 새로운 버전의 일부 트래픽만을 특정 서버로 보내어 문제 여부를 확인하는 방식입니다. 트래픽의 일부만을 새로운 버전으로 전달하여 문제가 발생하면 쉽게 롤백할 수 있는 장점이 있습니다.
롤링 배포(Rolling Deployment): 서버 그룹을 순차적으로 업데이트하여, 전체 시스템에 대한 배포를 진행하는 동안 일부 서버는 여전히 이전 버전으로 트래픽을 처리할 수 있도록 하는 방식입니다.
블루/그린 배포(Blue/Green Deployment): 두 개의 동일한 환경을 운영하여, 하나는 현재 트래픽을 처리하는 기존 버전(예: 블루), 다른 하나는 새로운 버전(예: 그린)을 배포하는 방식입니다. 새로운 버전이 정상적으로 작동하는지 확인한 후, 모든 트래픽을 새로운 버전으로 전환합니다. 문제가 발생하면 즉시 이전 버전으로 롤백할 수 있습니다.
현재 프로젝트는 24시간 가동되는 공장에서 사용되는 애플리케이션입니다. 이러한 특성상 다운타임(downtime)이 발생하면 생산 차질로 인해 큰 손실이 발생할 수 있습니다. 따라서
서비스 중단 없이 안전하게 새로운 버전을 배포하고, 만약 문제가 발생할 경우 빠르게 이전 버전으로 롤백할 수 있는 블루/그린 배포 방식을 채택하였습니다.
이 방식은 트래픽 전환이 빠르고 안전하며, 장애 발생 시 신속한 복구가 가능하다는 점에서 특히 유용합니다.
📌 Docker-Compose 설정
블루/그린 배포에서 중요한 요소 중 하나는 컨테이너 이름과 포트 번호를 유연하게 설정하는 것입니다. 이를 위해 Docker-Compose 파일에서 환경 변수를 사용하여 컨테이너 이름과 포트 번호를 설정했습니다. 또한, 환경 변수가 설정되지 않았을 때 기본값이 사용되도록 구성했습니다.
- docker-compose.yml 파일
version: '3'

services:
  spring-mes:
    container_name: ${CONTAINER_NAME:-spring-api-blue}  # 환경변수로 컨테이너 이름을 설정
    image: spring-api
    environment:
      SERVER_PORT: ${SERVER_PORT:-8080}  # 환경변수로 서버 포트를 설정
      SPRING_DATASOURCE_URL: jdbc:sqlserver://1.1.1.1:1433;databaseName=my_mes_db;trustServerCertificate=true;characterEncoding=UTF-8;
      SPRING_DATASOURCE_USERNAME: db_user
      SPRING_DATASOURCE_PASSWORD: db_password
      TZ: Asia/Seoul
    ports:
      - "${SERVER_PORT:-8080}:${SERVER_PORT:-8080}"  # 환경변수로 포트 매핑 설정
	// 생략...
환경 변수 설정을 통해 컨테이너 이름과 포트 번호를 동적으로 관리할 수 있으며, 기본값을 통해 안정성을 확보했습니다.
📌 nginx.conf 설정
배포된 컨테이너에 트래픽을 유연하게 전환하기 위해 Nginx 설정을 활용합니다. 특히, upstream 블록을 사용하여 proxy_pass 대상 서버를 변수로 관리할 수 있도록 설정했습니다. 이를 통해 배포 시 컨테이너 전환이 더 쉽고, 설정 관리가 단순화됩니다.
upstream spring-api {
	server spring-api-green:8877; # 이부분이 바뀌면서 proxy 설명이 변경
}

server {
	listen	   80;
	listen  [::]:80;
	server_name  localhost;

	location ~ ^/(api) {
		proxy_pass http://spring-api;
		proxy_redirect off;
		proxy_buffering off;
		proxy_set_header Host $host;
		proxy_set_header X-Real-IP $remote_addr;
		proxy_set_header X-Forwarded-For $proxy_add_x_forwarded_for;
	}
	#... other configurations
}
여기서 upstream spring-api 블록은 현재 활성화된 컨테이너를 가리킵니다. 배포 과정에서 server 설정을 업데이트하여 새로운 컨테이너로 트래픽을 전환할 수 있습니다.
📌 무중단 배포 스크립트 설명
- 전체 스크립트
#==============================================================================================
# local PC에 있는 프로젝트 경로(root 경로에 script가 있다고 생각하고 작성)
$localProjectPath = (Get-Location).Path
# 멀티모듈 서비스 패키지명
$serviceName = "service-api"
# 원격 서버의 IP주소
$remoteServerName = "example.com"
# 원격 서버 User명
$remoteUsername = "your_username"
# 원격 서버에 있는 프로젝트 경로
$remoteProjectPath = "D:\example"
# jar파일 이름
$jarFileName = "service-api-0.0.1-SNAPSHOT.jar"
# docker 이미지명
$dockerImageName = "spring-api"
# docker-compose 파일 이름
$dockerComposeFile = "docker-compose-spring-api.yml"
# Blue 및 Green 환경에 대한 컨테이너 이름 및 포트
$blueContainerName = "spring-api-blue"
$blueContainerPort = "8080"
$greenContainerName = "spring-api-green"
$greenContainerPort = "8082"
#===========================================================================================
# <Step 1: Clean/Build>
# 작업 디렉터리로 이동
Set-Location -Path $localProjectPath
Write-Output "CD to ${localProjectPath}"
# Gradle clean build 실행
$buildCommand = "./gradlew clean build"
Invoke-Expression $buildCommand
Write-Output "gradle clean build"
#===========================================================================================
# <Step 2: Transfer jarFile and get Credential>
# 사용자로부터 자격 증명 입력 받기
$credential = Get-Credential
# # SCP로 파일 전송
$localLibsPath = "${localProjectPath}\$serviceName\build\libs\${jarFileName}"
$remoteLibsPath = "${remoteProjectPath}\build\libs\"
$scpCommand = "scp ${localLibsPath} ${remoteUsername}@${remoteServerName}:${remoteLibsPath}"
Invoke-Expression $scpCommand
Write-Output "File transferred to ${remoteLibsPath} on ${remoteServerName}"
# SSH 세션 시작
$session = New-SSHSession -ComputerName $remoteServerName -Credential $credential
#===========================================================================================
# <Step 3: Start blue green deploy>
# 세션 객체가 유효한지 확인
if ($session -ne $null) {
Write-Output "SSH Session Create Success!"
#===========================================================================================
# <Step 3-1 : 활성화된 컨테이너 확인>
# 현재 활성화된 컨테이너 확인 (podman 사용)
$checkRunningCommand = "podman ps --format '{{.Names}}'"
$output = Invoke-SSHCommand -SSHSession $session -Command $checkRunningCommand
# 변수 선언
$greenActive = $false
$blueActive = $false
$activeContainer = $null
$activePort = $null
$newContainer = $null
$newPort = $null
# 결과를 PowerShell에서 필터링하여 활성화된 컨테이너 확인
if ($output.Output | Select-String $greenContainerName) {
$greenActive = $true
}
if ($output.Output | Select-String $blueContainerName) {
$blueActive = $true
}
if ($greenActive -and $blueActive) {
Write-Output "Both containers are active. Stop BLUE and Deploying to GREEN"
$psCommand = "podman stop --time 30 $blueContainerName; podman rm $blueContainerName;"
$command = "powershell -Command `" $psCommand `""
$output = Invoke-SSHCommand -SSHSession $session -Command $command
$activeContainer = $null
$activePort = $null
$newContainer = $greenContainerName
$newPort = $greenContainerPort
}
elseif ($greenActive) {
$activeContainer = $greenContainerName
$activePort = $greenContainerPort
$newContainer = $blueContainerName
$newPort = $blueContainerPort
}
elseif ($blueActive) {
$activeContainer = $blueContainerName
$activePort = $blueContainerPort
$newContainer = $greenContainerName
$newPort = $greenContainerPort
}
else {
Write-Output "No active containers. Deploying to GREEN as the initial deployment."
$activeContainer = $null
$activePort = $null
$newContainer = $greenContainerName
$newPort = $greenContainerPort
}
Write-Output "activeContainer : $activeContainer"
Write-Output "activePort : $activePort"
Write-Output "newContainer : $newContainer"
Write-Output "newPort : $newPort"
#===========================================================================================
# <Step 3-2 : 새로운 컨테이너 실행>
# PowerShell 명령 실행을 위한 스크립트 블록
$psCommand = "Set-Location -Path '$remoteProjectPath'; podman build -t $dockerImageName .; podman rm $newContainer; `$env:SERVER_PORT='$newPort'; `$env:CONTAINER_NAME='$newContainer'; docker-compose -f $dockerComposeFile --project-name $newContainer up -d;"
$command = "powershell -Command `" $psCommand `""
$output = Invoke-SSHCommand -SSHSession $session -Command $command
Write-Output "psCommand Run: $output"
#===========================================================================================
# <Step 3-3 : 새로운 컨테이너 Health Check>
# 새로운 컨테이너의 상태 확인
$containerReady = $false
$maxRetries = 12 # 최대 12번(최대 60초)까지 시도
$retries = 0
while (-not $containerReady -and $retries -lt $maxRetries) {
Write-Output "newContainer health checking retries: $retries"
Start-Sleep -Seconds 5 # 5초 대기
$psCommand = "(Invoke-WebRequest -Uri 'http://$remoteServerName:$newPort/swagger' -Method Get).StatusCode"
Write-Output "health check Command : $psCommand"
$command = "powershell -Command `" $psCommand `""
$output = Invoke-SSHCommand -SSHSession $session -Command $command
Write-Output "health check result: $output"
if ($output.Output -eq '200') {
$containerReady = $true
}
else {
$retries++
}
}
if (-not $containerReady) {
Write-Output "Error: $newContainer is not ready after 60 seconds. Aborting deployment."
exit 1
}
#===========================================================================================
# <Step 3-4 : 새롭게 활성화된 컨테이너로 nginx의 proxy 설정변경>
# Nginx 설정 변경
$psCommand = "(Get-Content '$nginxConfigPath') -replace 'server spring-mes-.*;', 'server ${newContainer}:${newPort};' | Set-Content '$nginxConfigPath'"
$command = "powershell -Command `" $psCommand `""
$output = Invoke-SSHCommand -SSHSession $session -Command $command
Write-Output "Nginx configuration updated: proxy_pass now points to $newContainer with port $newPort."
# Nginx 설정을 다시 로드하여 변경 사항 적용
$psCommand = "podman exec nginx nginx -s reload"
$command = "powershell -Command `" $psCommand `""
$output = Invoke-SSHCommand -SSHSession $session -Command $command
Write-Output "Nginx reloaded with new configuration."
#===========================================================================================
# <Step 3-5 : 기존에 실행되었던 컨테이너 중지>
# 이전 컨테이너 종료 (Graceful Shutdown)
if ($activeContainer -ne $null) {
$psCommand = "podman stop --time 30 $activeContainer;"
$command = "powershell -Command `" $psCommand `""
$output = Invoke-SSHCommand -SSHSession $session -Command $command
Write-Output "output: $output"
Write-Output "$activeContainer container stopped and removed."
}
# SSH 세션 종료
Remove-SSHSession -SessionId $session.SessionId
Write-Output "SSH Session Close."
}
else {
Write-Output "SSH Session Create Failure."
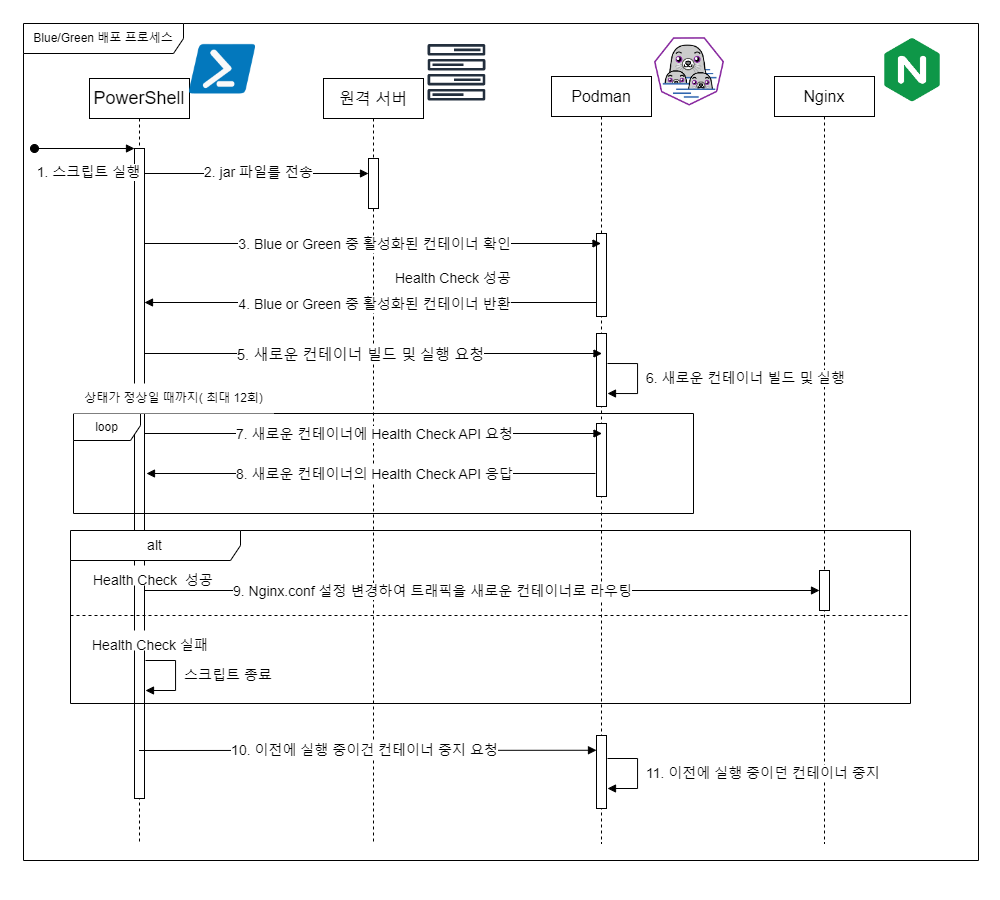
} Step3에 해당하는 blue/green 배포 과정부터 설명드리겠습니다. Step1, 2에 해당하는 build 과정과 jar파일을 옮기고 자격증명을 받는 과정은 이전 포스팅에 설명했으니 넘어가겠습니다.
- 활성화된 컨테이너 확인
- 새로운 컨테이너 실행
- 새로운 컨테이너 Health Check
- 새롭게 활성화된 컨테이너로 nginx의 proxy 설정 변경
- 기존에 실행되었던 컨테이너 제거
1. 활성화된 컨테이너 확인
배포를 시작하기 전에 현재 활성화된 컨테이너를 확인하여, 어느 컨테이너가 블루인지, 어느 컨테이너가 그린인지 파악합니다. 이를 통해 블루 또는 그린 중에 어떤 컨테이너를 실행시킬 지 중지시킬지 정하게됩니다.
# 현재 활성화된 컨테이너 확인 (podman 사용)
$checkRunningCommand = "podman ps --format '{{.Names}}'"
$output = Invoke-SSHCommand -SSHSession $session -Command $checkRunningCommand

# 변수 선언
$greenActive = $false
$blueActive = $false
$activeContainer = $null
$activePort = $null
$newContainer = $null
$newPort = $null

# 결과를 PowerShell에서 필터링하여 활성화된 컨테이너 확인
if ($output.Output | Select-String $greenContainerName) {
    $greenActive = $true
}
if ($output.Output | Select-String $blueContainerName) {
    $blueActive = $true
}

# 현재 활성화된 컨테이너가 블루와 그린 중 어느 쪽인지에 따라 새로운 컨테이너 결정
if ($greenActive -and $blueActive) {
    Write-Output "Both containers are active. Stop BLUE and Deploying to GREEN"
    $psCommand = "podman stop --time 30 $blueContainerName; podman rm $blueContainerName;"
    $command = "powershell -Command `" $psCommand `""
    $output = Invoke-SSHCommand -SSHSession $session -Command $command

    $activeContainer = $null
    $activePort = $null
    $newContainer = $greenContainerName
    $newPort = $greenContainerPort
} elseif ($greenActive) {
    $activeContainer = $greenContainerName
    $activePort = $greenContainerPort
    $newContainer = $blueContainerName
    $newPort = $blueContainerPort
} elseif ($blueActive) {
    $activeContainer = $blueContainerName
    $activePort = $blueContainerPort
    $newContainer = $greenContainerName
    $newPort = $greenContainerPort
} else {
    Write-Output "No active containers. Deploying to GREEN as the initial deployment."
    $activeContainer = $null
    $activePort = $null
    $newContainer = $greenContainerName
    $newPort = $greenContainerPort
}
이 코드에서는 podman ps --format '{{.Names}}' 명령어를 사용하여 현재 실행 중인 컨테이너 이름을 확인하고, 블루/그린 컨테이너 중 활성화된 컨테이너를 파악합니다.
2. 새로운 컨테이너 실행
이제 새로운 컨테이너를 실행합니다. 이는 비활성화된 컨테이너(예: 블루 또는 그린)를 새로운 버전으로 배포하는 단계입니다.
# PowerShell 명령 실행을 위한 스크립트 블록
$psCommand = "Set-Location -Path '$remoteProjectPath'; podman build -t $dockerImageName .; podman rm $newContainer; `$env:SERVER_PORT='$newPort'; `$env:CONTAINER_NAME='$newContainer'; docker-compose -f $dockerComposeFile --project-name $newContainer up -d;"
$command = "powershell -Command `" $psCommand `""
$output = Invoke-SSHCommand -SSHSession $session -Command $command
Write-Output "psCommand Run: $output"- $posCommand의 명령어들
# 패키지 경로를 이동(jar파일이 위치하고 있는 곳으로 가기 위함)
Set-Location -Path '$remoteProjectPath';

# 도커 이미지를 생성
podman build -t $dockerImageName .;

# 중지되어있던 컨테이너를 제거(뒤에서 추가설명)
podman rm $newContainer;

# 환경변수 설명 컨테이너명과 포트명을 동적을 설정
`$env:SERVER_PORT='$newPort';
`$env:CONTAINER_NAME='$newContainer';

# 새로운 컨테이너 실행
docker-compose -f $dockerComposeFile --project-name $newContainer up -d;
3. 새로운 컨테이너 Health Check
새로운 컨테이너가 제대로 실행되었는지 확인하기 위해 Health Check를 수행합니다. 이 단계에서는 새로운 컨테이너가 정상적으로 응답하는지 확인합니다.
# 새로운 컨테이너의 상태 확인
$containerReady = $false
$maxRetries = 12  # 최대 12번(최대 60초)까지 시도
$retries = 0
while (-not $containerReady -and $retries -lt $maxRetries) {
    Write-Output "newContainer health checking retries: $retries"
    Start-Sleep -Seconds 5  # 5초 대기
    $psCommand = "(Invoke-WebRequest -Uri 'http://$remoteServerName:$newPort/health-check' -Method Get).StatusCode"
    Write-Output "health check Command : $psCommand"
    $command = "powershell -Command `" $psCommand `""
    $output = Invoke-SSHCommand -SSHSession $session -Command $command

    Write-Output "health check result: $output"
    if ($output.Output -eq '200') {
        $containerReady = $true
    } else {
        $retries++
    }
}

if (-not $containerReady) {
    Write-Output "Error: $newContainer is not ready after 60 seconds. Aborting deployment."
    exit 1
}
http://$remoteServerName:$newPort/health-check health-check를 위한 GET api를 만들어서 상태 값을 정상적으로 반환하는지 확인하여 검증하였습니다.
이 코드는 새로운 컨테이너가 응답을 할 수 있는 상태가 될 때까지 60초간 Health Check를 반복적으로 시도합니다. 만약 60초 내에 컨테이너가 준비되지 않으면, 배포를 중단합니다.
4. 새롭게 활성화된 컨테이너로 Nginx의 proxy 설정 변경
새로운 컨테이너가 정상적으로 동작하면, 이제 Nginx의 proxy 설정을 업데이트하여 트래픽을 새로운 컨테이너로 전환합니다.
# Nginx 설정 변경
$psCommand = "(Get-Content '$nginxConfigPath') -replace 'server spring-mes-.*;', 'server ${newContainer}:${newPort};' | Set-Content '$nginxConfigPath'"
$command = "powershell -Command `" $psCommand `""
$output = Invoke-SSHCommand -SSHSession $session -Command $command
Write-Output "Nginx configuration updated: proxy_pass now points to $newContainer with port $newPort."

# Nginx 설정을 다시 로드하여 변경 사항 적용
$psCommand = "podman exec nginx nginx -s reload"
$command = "powershell -Command `" $psCommand `""
$output = Invoke-SSHCommand -SSHSession $session -Command $command
Write-Output "Nginx reloaded with new configuration."
여기서는 Nginx 설정 파일을 수정하여, Nginx가 새로운 컨테이너로 트래픽을 라우팅하도록 합니다. 그런 다음 nginx -s reload 명령어를 사용해 변경 사항을 적용합니다.
- 변경되는 nginx.conf 설정 값
upstream spring-api {
	server spring-api-green:8877; # 이부분이 바뀌면서 proxy 설명이 변경
}
5. 기존에 실행되었던 컨테이너 제거
마지막으로, 이전에 실행되었던 컨테이너를 종료하고 제거합니다. 이를 통해 시스템에서 사용하지 않는 리소스를 해제하고, 새로운 버전이 정상적으로 실행되도록 합니다.
# 이전 컨테이너 종료 (Graceful Shutdown)
if ($activeContainer -ne $null) {
    $psCommand = "podman stop --time 30 $activeContainer;"
    $command = "powershell -Command `" $psCommand `""
    $output = Invoke-SSHCommand -SSHSession $session -Command $command
    Write-Output "output: $output"
    Write-Output "$activeContainer container stopped."
}

# SSH 세션 종료
Remove-SSHSession -SessionId $session.SessionId
Write-Output "SSH Session Close."
podman stop --time 30 $activeContainer; 명령어를 통해 기존에 활성화된 컨테이너를 중지시킵니다. podman rm 명령어를 통해 제거를 하지 않는 이유는 새롭게 활성화된 컨테이너가 문제가 있을 때 빠르게 이전 버전으로 되돌리기 위해 종료는 하지 않고 중지까지만 하였습니다.
💣 트러블 슈팅
1. Blue와 Green 컨테이너가 동시에 실행되지 않는 문제
PS D:\example> $env:CONTAINER_NAME = "spring-api-blue"
PS D:\example> $env:SERVER_PORT = "8080"
PS D:\example> docker-compose -f docker-compose-spring-api.yml up -d
[+] Running 1/1
 ✔ Container spring-mes-blue  Started                                                                                                                                                                                                   0.3s
PS D:\example> $env:CONTAINER_NAME = "spring-api-green"
PS D:\example> $env:SERVER_PORT = "8082"
PS D:\example> docker-compose -f docker-compose-spring-api.yml up -d
[+] Running 2/2
 ✔ Container spring-api-blue   Recreated                                                                                                                                                                                                0.4s
 ✔ Container spring-api-green  Started
두 개의 컨테이너를 환경변수만 다르게 설정하여 동일한 docker-compose 파일을 사용해 실행을 시도했습니다. 그러나 blue 컨테이너를 실행한 후 green 컨테이너를 실행했을 때, blue 컨테이너가 종료되고 green 컨테이너만 실행되는 문제가 발생했습니다.
문제의 원인
docker-compose 명령어를 사용할 때 --project-name을 명시하지 않으면, docker-compose.yml 파일이 위치한 디렉토리의 이름이 프로젝트 이름으로 사용됩니다. 이로 인해 같은 디렉토리에 있는 docker-compose.yml 파일을 사용했기 때문에 프로젝트 이름이 동일하게 설정되었고, 이로 인해 동일한 이름의 컨테이너가 충돌하게 된 것입니다.
해결방법
이 문제를 해결하기 위해, spring-api-blue와 spring-api-green과 같이 프로젝트별로 컨테이너 이름을 구분하도록 --project-name 옵션을 사용했습니다. 이를 통해 각각의 프로젝트가 독립적으로 실행될 수 있게 되었습니다.
--project-name옵션을 명시한 명령어 예시
docker-compose -f docker-compose-spring-api.yml --project-name spring-api-blue up -d2. Health Check가 정상적으로 되지 않는 문제
처음에는 컨테이너가 정상적으로 실행되었는지 확인하기 위해 아래와 같은 스크립트를 작성했습니다.
podman inspect -f '{{.State.Running}}' $newContainer하지만 이 방법으로는 spring-boot 프로젝트가 완전히 기동되고 API 요청을 받을 준비가 되었는지를 정확히 확인할 수 없었습니다. 이로 인해 다운타임이 발생하는 문제가 있었습니다.
문제의 원인
podman inspect 명령어는 컨테이너가 실행 상태인지 여부만 확인할 수 있으며, 애플리케이션 내부에서 실제로 API가 요청을 받을 준비가 되었는지는 알 수 없습니다. spring-boot 프로젝트가 완전히 시작되기 전에도 컨테이너는 "Running" 상태로 표시되기 때문에, 실제 서비스 준비 상태와 차이가 발생합니다.
해결방법
이를 해결하기 위해, Health Check를 위한 API 엔드포인트를 추가하고, 이 엔드포인트를 통해 컨테이너가 실제로 서비스 준비가 완료되었는지 확인하도록 스크립트를 수정했습니다.
- Health Check를 위한 API 요청 스크립트
(Invoke-WebRequest -Uri 'http://$remoteServerName:$newPort/health-check' -Method Get).StatusCode✨ 마무리
기존에 사용중이던 배포 스크립트를 고도화하여 (Blue/Green Deployment) 방식으로 무중단 배포를 할 수 있도록 하였습니다.
무중단 배포는 특히 24시간 가동되어야 하는 환경에서 필수적인 요소입니다. 이번 과정에서는 컨테이너 이름과 포트 번호를 동적으로 관리하기 위해 Docker-Compose와 PowerShell 스크립트를 활용했고, 배포된 애플리케이션의 상태를 Health Check API를 통해 확인하여 신뢰성을 높였습니다. 또한, 빠르게 이전 버전으로 롤백할 수 있는 블루/그린 배포 방식을 사용하여, 배포 과정 중 발생할 수 있는 문제에 유연하게 대응할 수 있었습니다.
배포 과정에서 발생할 수 있는 문제들을 해결하고, 트래픽을 유연하게 전환하는 방법을 익힘으로써 서비스 안정성을 더욱 강화할 수 있었습니다. 앞으로도 상황에 맞는 무중단 배포 방식을 활용하여 안정적인 서비스 운영을 이어갈 계획입니다.