[Kubernetes] Security (API Groups, Authorization, Roles, RoleBinding, RBAC, Service Accounts, Image Security, Network Policy, ..)
kubernetes
API Groups
API 리소스들을 논리적으로 그룹화하는 방식
주요 API 그룹 예시
# Core API 그룹 (빈 문자열)
apiGroups: [""]
resources: ["pods", "services", "configmaps"]

# apps API 그룹
apiGroups: ["apps"]
resources: ["deployments", "replicasets", "daemonsets"]

# extensions API 그룹
apiGroups: ["extensions"]
resources: ["ingresses"]

# networking.k8s.io API 그룹
apiGroups: ["networking.k8s.io"]
resources: ["networkpolicies"]
RBAC에서의 사용 예시
apiVersion: rbac.authorization.k8s.io/v1
kind: Role
metadata:
  name: pod-reader
rules:
- apiGroups: [""]  # core API 그룹
  resources: ["pods"]
  verbs: ["get", "list"]
- apiGroups: ["apps"]
  resources: ["deployments"]
  verbs: ["get", "list", "create"]
Authorization
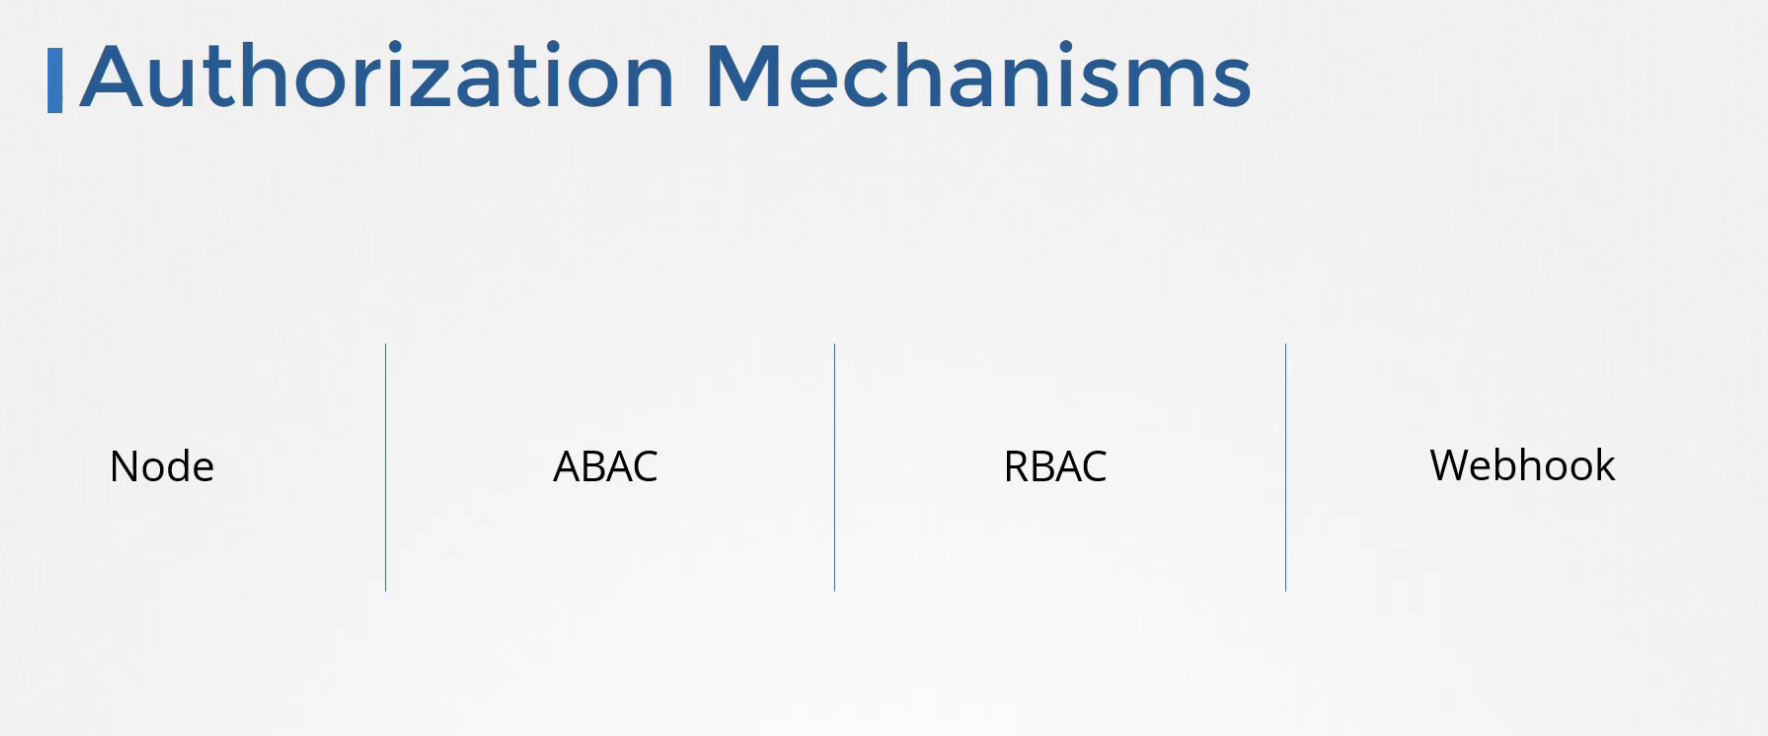
Command line authorization mode configuration
You can use the following modes:
kube-apiserver.yaml
--authorization-mode=ABAC (Attribute-based access control mode)
--authorization-mode=RBAC (Role-based access control mode)
--authorization-mode=Node (Node authorizer)
--authorization-mode=Webhook (Webhook authorization mode)
--authorization-mode=AlwaysAllow (always allows requests; carries security risks)
--authorization-mode=AlwaysDeny (always denies requests)
인증(Authentication) : 사용자나 서비스가 "누구인지" 확인하는 과정
주요 인증 방식
# 1. 서비스 어카운트 토큰
apiVersion: v1
kind: ServiceAccount
metadata:
  name: my-service-account
  namespace: default
# 2. X.509 클라이언트 인증서
apiVersion: v1
kind: Config
users:
- name: developer
user:
client-certificate: /path/to/client.crt
client-key: /path/to/client.key인가(Authorization) : 인증된 사용자가 "무엇을 할 수 있는지" 결정하는 과정
인증/인가 흐름
1) API 요청 → API 서버
2) 인증 단계 → 사용자/서비스 신원 확인
3) 인가 단계 → RBAC 규칙 검증
4) 승인 제어 → AdmissionController 검증
5) 요청 처리 → 실제 리소스 작업 수행
Authorization 종류
권한 확인 명령어
kubectl auth can-i get nodes --as michelle
Roles
kubectl create role NAME --verb=verb --resource=resource.group/subresource [--resource-name=resourcename][--dry-run=server|client|none]
kubectl edit role NAME
RoleBinding
kubectl create rolebinding NAME --clusterrole=NAME|--role=NAME [--user=username][--group=groupname] [--serviceaccount=namespace:serviceaccountname][--dry-run=server|client|none]
RBAC (Role Based Access Controls)
역할 기반 접근 권한 제어
role.yaml - pod-reader
apiVersion: rbac.authorization.k8s.io/v1
kind: Role
metadata:
  namespace: default
  name: pod-reader
rules:
- apiGroups: [""] # "" indicates the core API group
  resources: ["pods"]
  verbs: ["get", "watch", "list"]
rolebinding_with_role.yaml - read-pods (jane + pod-reader)
apiVersion: rbac.authorization.k8s.io/v1
# This role binding allows "jane" to read pods in the "default" namespace.
# You need to already have a Role named "pod-reader" in that namespace.
kind: RoleBinding
metadata:
  name: read-pods
  namespace: default
subjects:
# You can specify more than one "subject"
- kind: User
  name: jane # "name" is case sensitive
  apiGroup: rbac.authorization.k8s.io
roleRef:
  # "roleRef" specifies the binding to a Role / ClusterRole
  kind: Role #this must be Role or ClusterRole
  name: pod-reader # this must match the name of the Role or ClusterRole you wish to bind to
  apiGroup: rbac.authorization.k8s.io
Cluster Roles
kubectl create clusterrole
kubectl create clusterrole NAME --verb=verb --resource=resource.group [--resource-name=resourcename][--dry-run=server|client|none]
clusterrole.yaml
apiVersion: rbac.authorization.k8s.io/v1
kind: ClusterRole
metadata:
  creationTimestamp: "2025-09-10T05:43:11Z"
  name: michelle-role
  resourceVersion: "1092"
  uid: 5c34b300-5a2c-4a0c-b502-266ddb1a3617
rules:
- apiGroups:
  - ""
  resources:
  - nodes
  verbs:
  - get
  - list
  - watch
Cluster RoleBinding
kubectl create clusterrolebinding
kubectl create clusterrolebinding NAME --clusterrole=NAME [--user=username][--group=groupname] [--serviceaccount=namespace:serviceaccountname][--dry-run=server|client|none]
apiVersion: rbac.authorization.k8s.io/v1
kind: ClusterRoleBinding
metadata:
  creationTimestamp: "2025-09-10T05:44:02Z"
  name: michelle-role-binding
  resourceVersion: "1066"
  uid: 73bdafc1-4c30-459a-a931-758f250164cf
roleRef:
  apiGroup: rbac.authorization.k8s.io
  kind: ClusterRole
  name: michelle-role
subjects:
- apiGroup: rbac.authorization.k8s.io
  kind: User
  name: michelle
Service Accounts
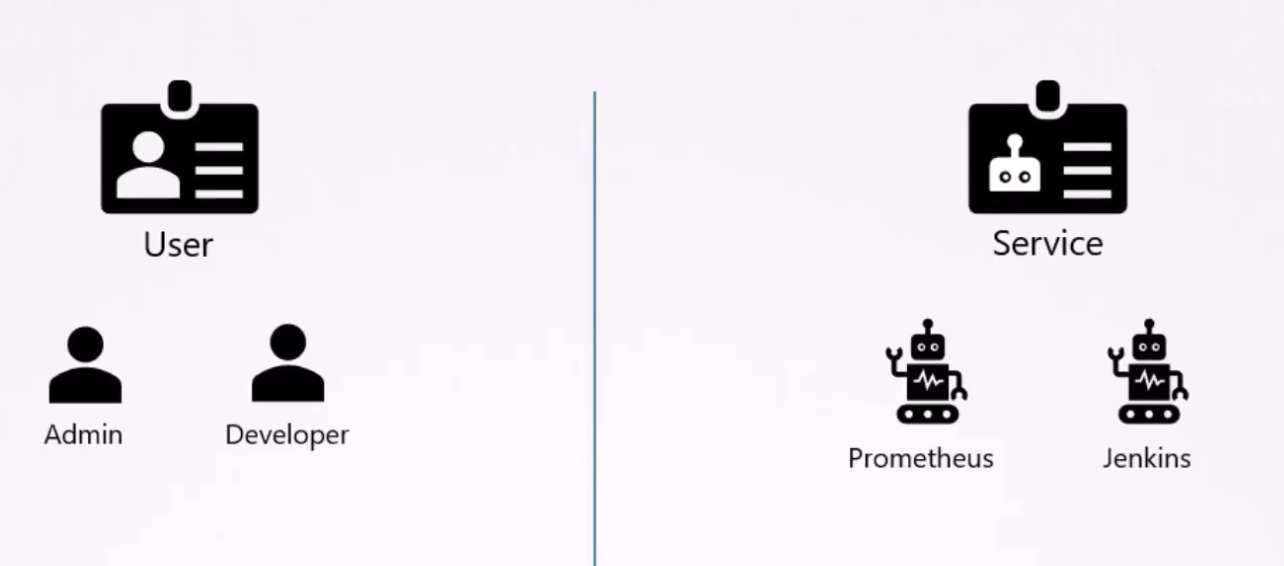
쿠버네티스 계정은 두 개로 나뉜다.
- User Accounts (by human)
- Service Accounts (by machine)
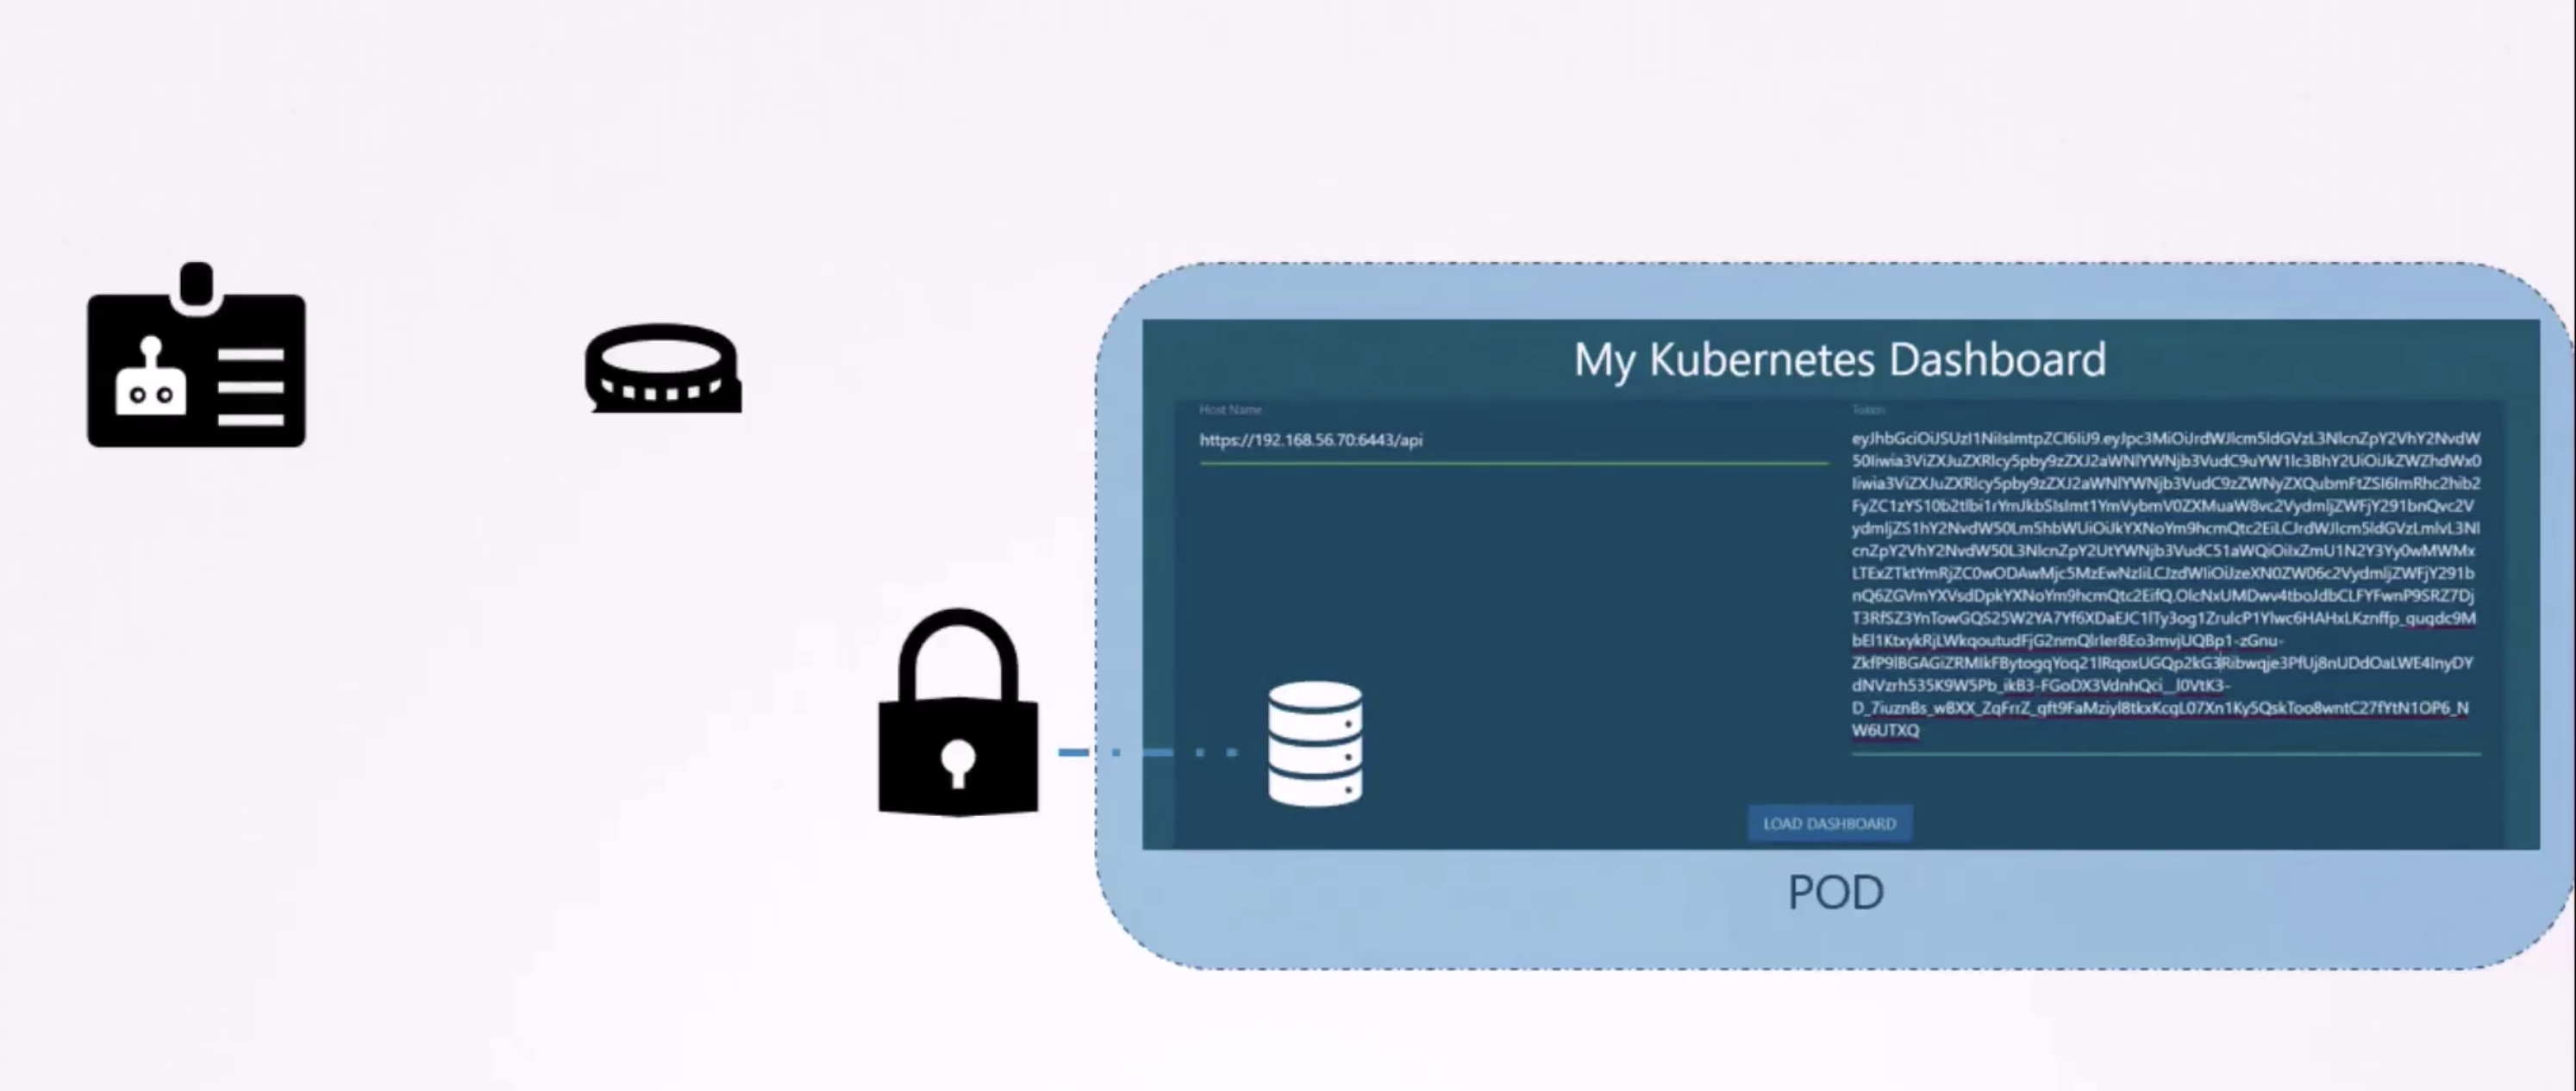
ex. 쿠버네티스 대시보드 어플리케이션을 생성하여 클러스터의 pod 목록을 kube-api를 통해 가져온다.
이 때 인증이 되어야 한다. 이런 경우 서비스 계정을 사용한다.
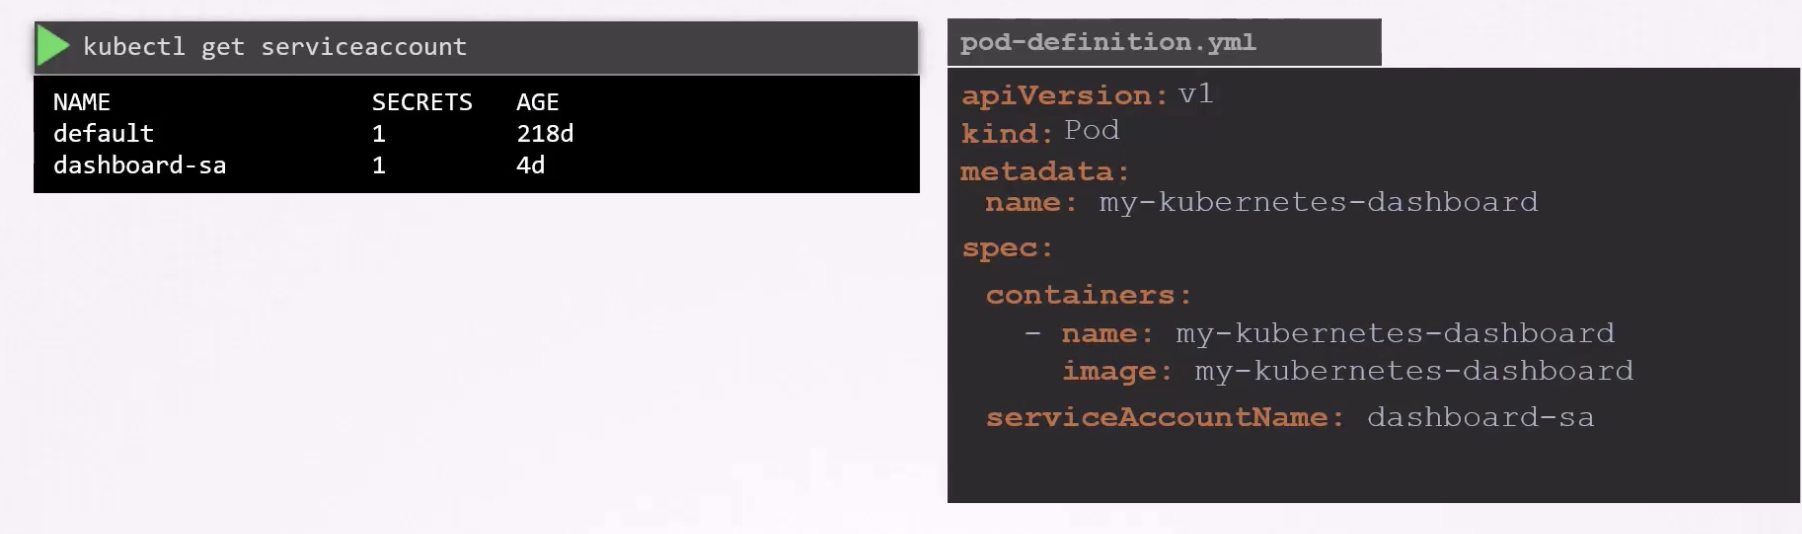
kubectl create serviceaccount dashboard-sa
kubectl get serviceaccount
서비스계정이 생성되면 자동으로 토큰도 생성된다.
kubectl describe serviceaccount dashboard-sa
Tokens: dashboard-sa-token-kbbdm # 외부에서 호출할 때 반드시 필요한, 계정을 위한 토큰 (Secret object로 생성되어 연결)
쿠버네티스 api를 사용할 때 bearer 토큰으로 사용될 수 있다.
kubectl describe secret dashboard-sa-token-kbbdm
서비스 계정과 토큰을 third party application을 구성하고 쿠버네티스 api를 인증하는데 사용할 수 있다.
third party application이 쿠버네티스 클러스터 자체에 호스팅되어있으면 어떨까?
쿠버네티스 대시보드나 프로메테우스 어플리케이션과 같이 third party application을 쿠버네티스 클러스터 자체에 배포할 수 있다.
이 경우, 모든 프로세스에 서비스 계정 토큰을 추출하여 third party application을 사용하기 위해 구성할 수 있다.
자동으로 서비스 토큰 secret을 pod 내의 volume으로 마운팅함으로써 가능하다.
이 방법으로, 토큰은 쿠버네티스 api에 access하기 위해 사용되고, pod 내에 이미 존재하며, 어플리케이션에 의해 쉽게 읽어질 수 있다.
관리자가 메뉴얼적으로 직접 제공할 필요가 없다.
dafault 이름의 service account는 모든 네임스페이스에 자동으로 생성된다.
각 네임스페이스는 해당 값을 보유하게 된다.
the default service account와 its token은 자동으로 volume으로 pod에 mount된다.
그리고 쿠버네티스 API를 Query하는 데 사용되게 된다.
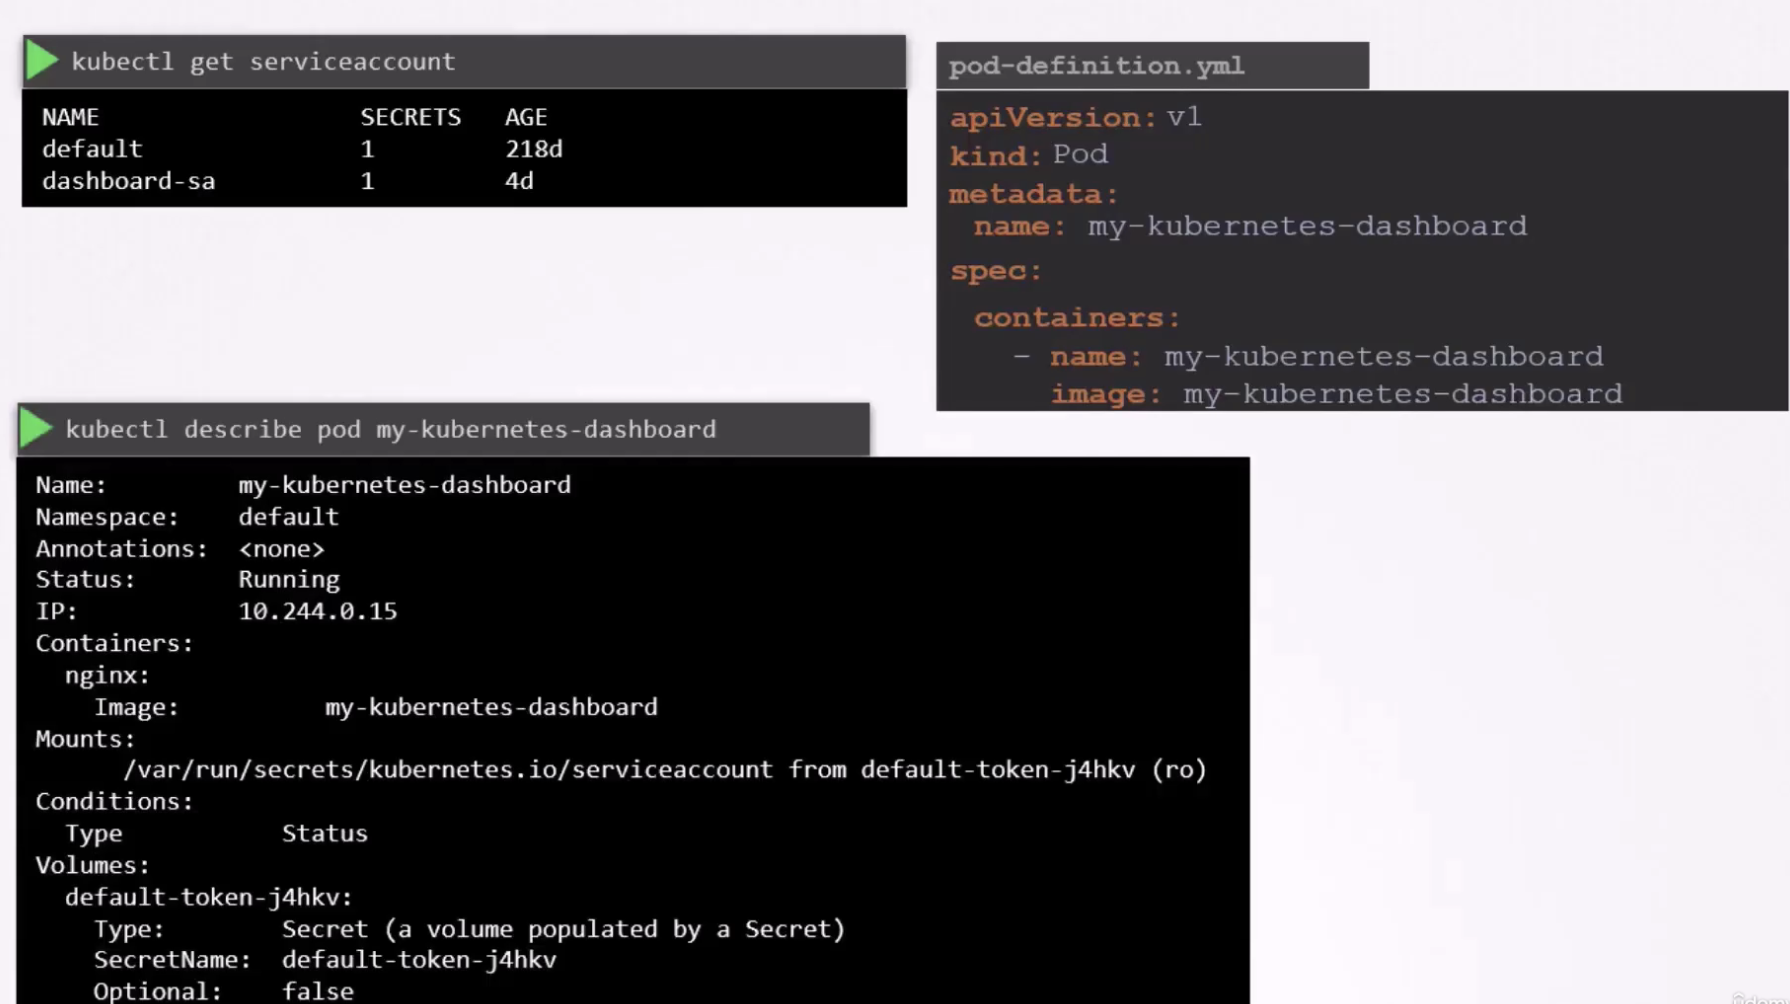
위와 같이 pod를 생성할 때에는 secret(token)의 정보가 없었지만, pod가 생성되고 나서는 자동으로 default-token이 mount된 것을 볼 수 있다.
시크릿 토큰은 /var/run/secrets/kubernetes.io/serviceaccount 경로에 pod 내에 마운트된다.
pod 내부로 들어가 해당 경로의 토큰 파일을 보려면..
kubectl exec -it <pod이름> -- ls /var/run/secrets/kubernetes.io/serviceaccount
kubectl exec -it <pod이름> -- cat /var/run/secrets/kubernetes.io/serviceaccount/token
실행되는 pod에 serviceaccount를 변경할 수 없다.
pod를 edit하여 serviceAccountName 필드를 수정하고, delete and recreate 해야한다.
deployment의 경우, edit이 가능하다. (new rollout)
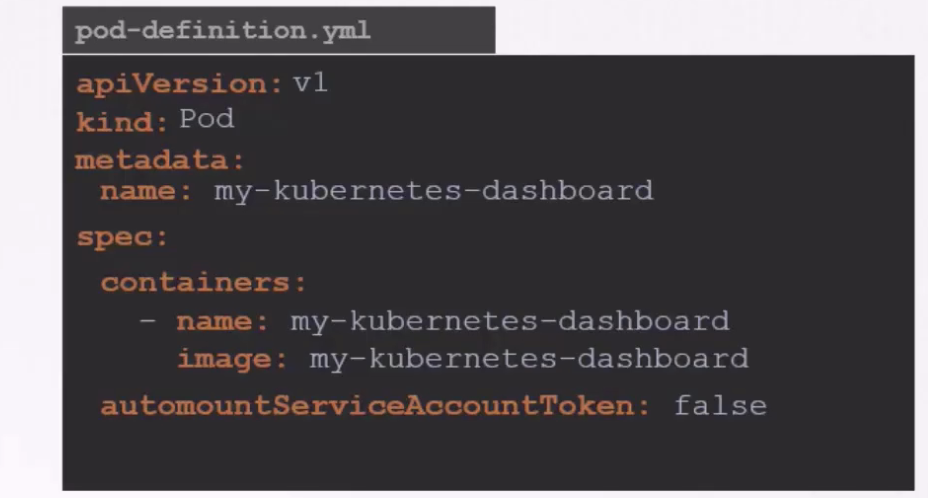
atomountServiceAccountToken 필드를 false로 하면 자동으로 default service account에 매핑되지 않는다.
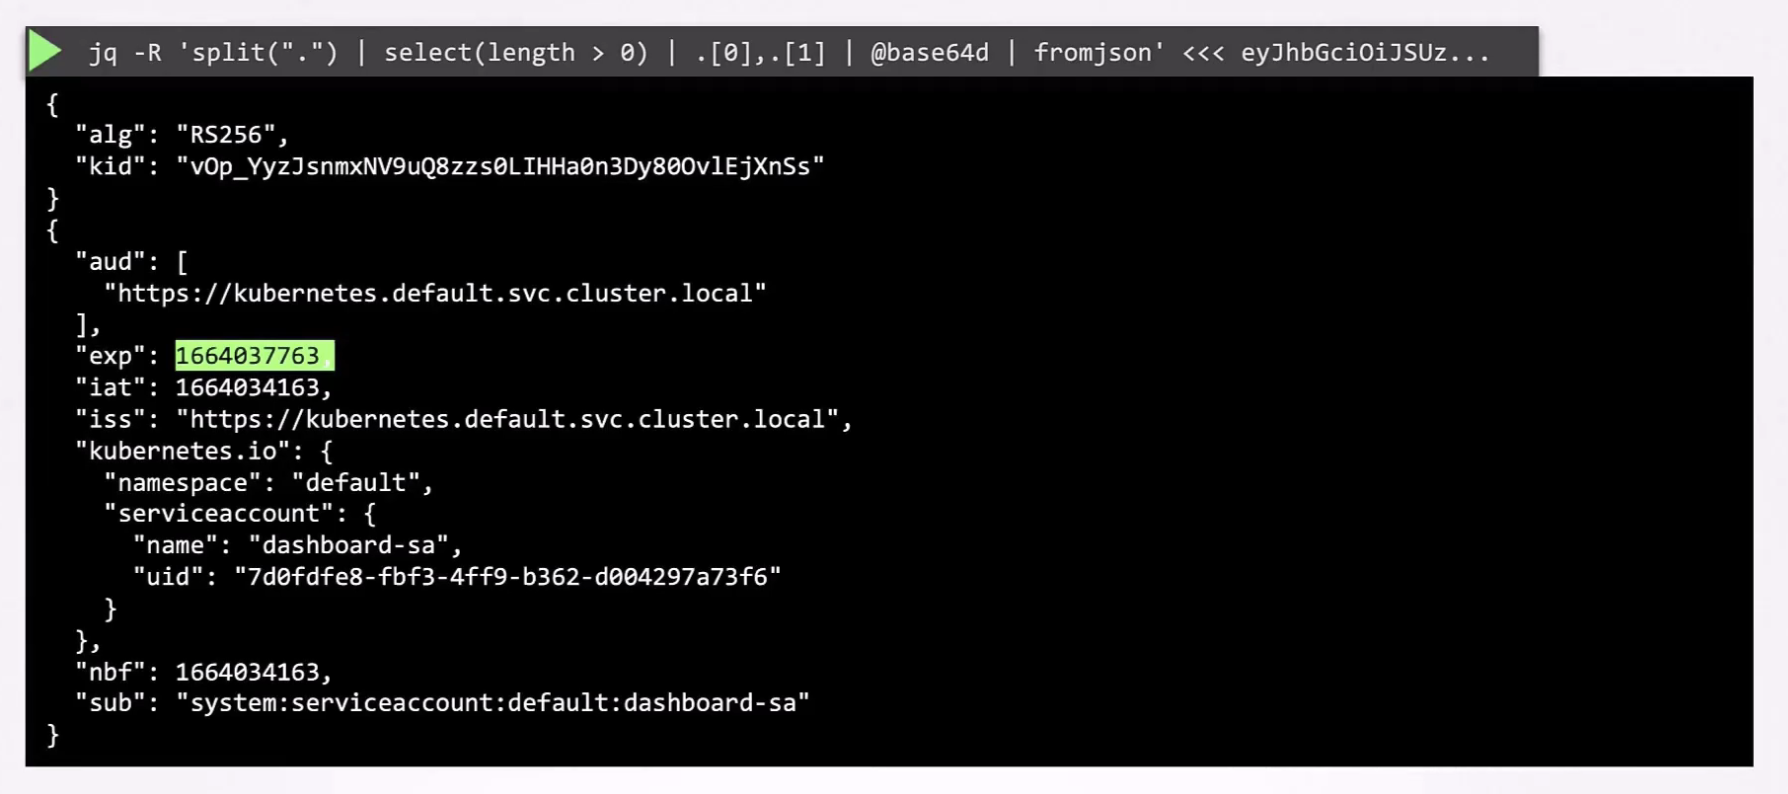
Bound Service Account Tokens (1.22 update)
시크릿 토큰을 JWT 디코딩하면, payload 섹션이 보인다.
Bound Service Account Tokens는 쿠버네티스 1.21부터 기본적으로 사용되는 개선된 ServiceAccount 토큰 방식이다.
기존의 Legacy Service Account Tokens보다 더 안전하고 효율적이다.
기존 방식 (Legacy Service Account Tokens)
- 영구적인 토큰: 만료 시간이 없어서 계속 유효
- Secret 오브젝트로 저장: 별도의 Secret 리소스에 토큰이 저장됨
- 보안 위험: 토큰이 유출되면 계속 사용 가능
Bound Service Account Tokens (새로운 방식)
- 시간 제한: 토큰에 만료 시간이 있음 (기본 1시간)
- Pod에 바인딩: 특정 Pod에서만 사용 가능
- 자동 갱신: 만료되기 전에 자동으로 새 토큰 발급
- 더 안전: 토큰이 유출되어도 시간이 지나면 무효화
Bound Service Account Tokens 토큰은 TokenRequestAPI에 위해 생성된다.
주요 특징:
1) 시간 제한 (Time-bound) : 토큰에 만료 시간이 설정됨
2) 대상 바인딩 (Audience-bound) : 특정 API 서버에서만 유효
3) 오브젝트 바인딩 (Object-bound) : 특정 Pod, Secret, 또는 다른 오브젝트에 바인딩됨, 해당 오브젝트가 삭제되면 토큰도 무효화
Pod 생성 시:
1) TokenRequest API 호출로 임시 토큰 생성
2) 토큰이 Pod의 /var/run/secrets/kubernetes.io/serviceaccount/token에 마운트
3) kubelet이 토큰 만료 전에 자동으로 갱신
controlplane ~ ➜ k describe pod web-dashboard-5f88cdc488-8jjq4
Name: web-dashboard-5f88cdc488-8jjq4
Namespace: default
Priority: 0
Service Account: default
.......
Containers:
web-dashboard:
Mounts:
/var/run/secrets/kubernetes.io/serviceaccount from kube-api-access-khsr7 (ro) # mount 경로
.......
Volumes:
kube-api-access-khsr7: # kube-api-access-khsr7는 ServiceAccount 인증에 필요한 3가지 데이터(토큰, 인증서, 네임스페이스)를 서로 다른 소스에서 가져와 하나의 경로에 마운트하는 Projected Volume
Type: Projected (a volume that contains injected data from multiple sources)
TokenExpirationSeconds: 3607
ConfigMapName: kube-root-ca.crt
Optional: false
DownwardAPI: true
QoS Class: BestEffort
Node-Selectors: <none>
Tolerations: node.kubernetes.io/not-ready:NoExecute op=Exists for 300s
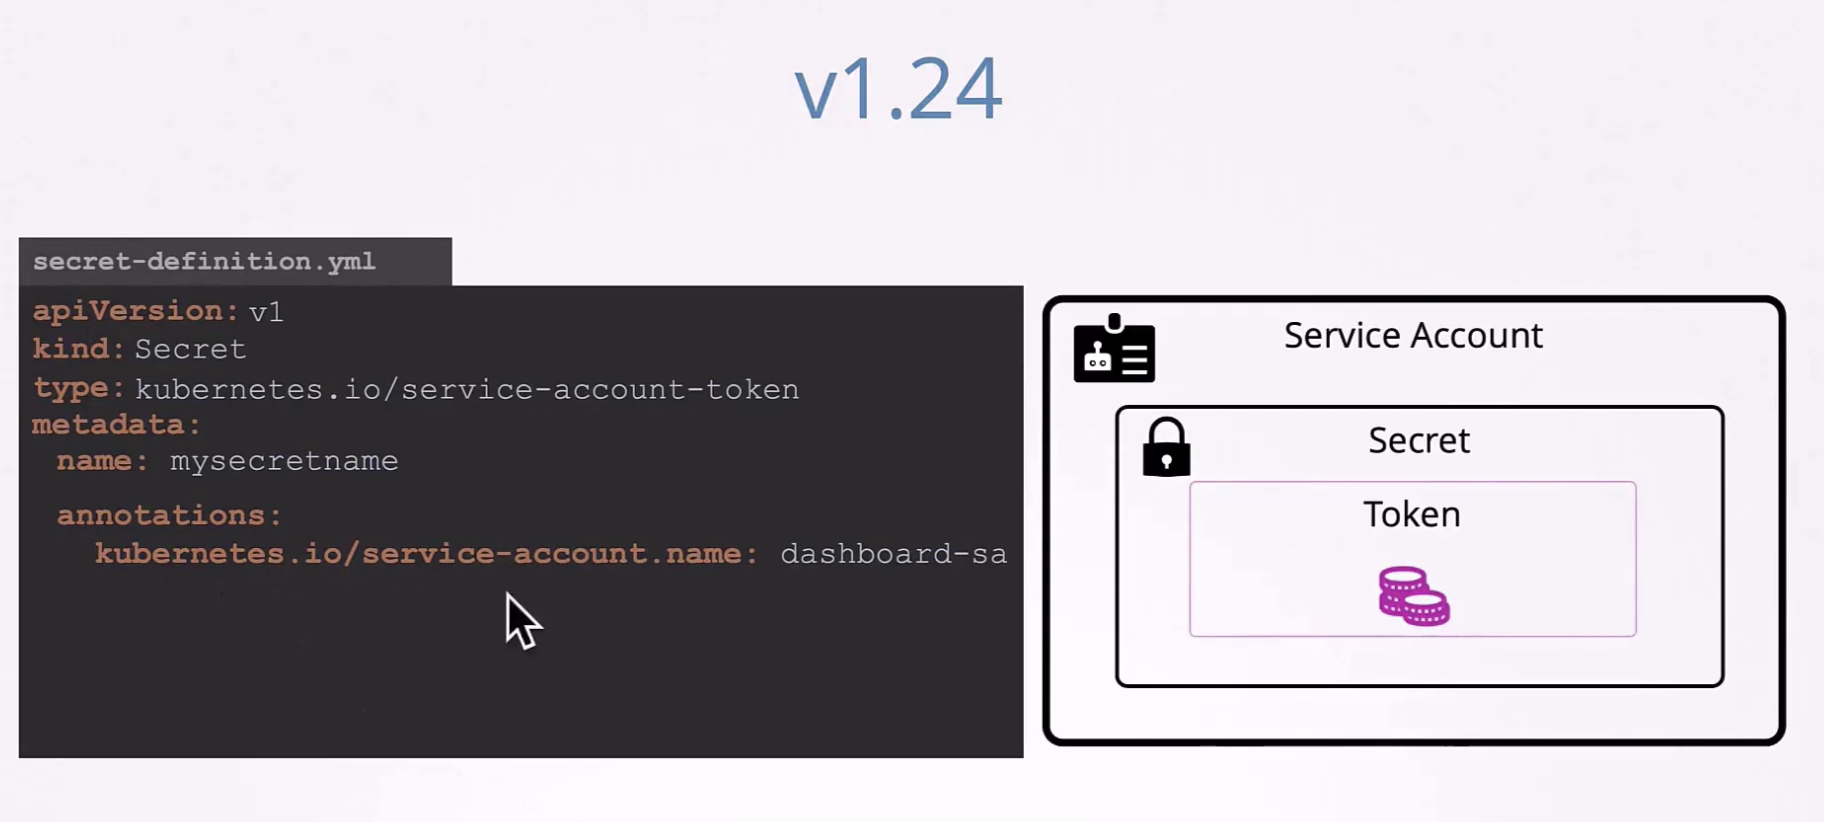
node.kubernetes.io/unreachable:NoExecute op=Exists for 300sReduction of Secret-based Service Account Tokens (1.24 update)
보안강화 & 리소스 효율성을 위해 기존의 Secret 기반 ServiceAccount 토큰을 줄이고 제거하는 정책
ServiceAccount Token 버전 변화
1) 1.20 이전 : Secret 자동 생성
2) 1.21 : Bound Tokens 도입, Secret 자동 생성 중단
3) 1.22 : Secret 자동 생성 완전 제거
4) 1.24+ : 기존 Secret 토큰 점진적 제거 권장
기존 방식의 문제점
1. 보안 위험
# 기존: 영구적인 토큰이 Secret에 저장
apiVersion: v1
kind: Secret
metadata:
  name: my-service-account-token-abc123
  annotations:
    kubernetes.io/service-account.name: my-service-account
type: kubernetes.io/service-account-token
data:
  token: <base64-encoded-permanent-token>  # 영구적, 위험!
2. 리소스 낭비
- 모든 ServiceAccount마다 Secret 오브젝트 생성
- etcd에 불필요한 데이터 저장
- 관리 복잡성 증가
3. 감사(Audit) 어려움
- 언제, 어디서 토큰이 사용되는지 추적 어려움
- 토큰 생명주기 관리 복잡
새로운 접근 방식
1. Bound Service Account Tokens 사용
# 이제는 이런 방식으로 동적 토큰 생성
kubectl create token my-service-account --duration=3600s
2. Pod에서 자동 토큰 프로비저닝
# Pod 스펙에서 자동으로 처리
apiVersion: v1
kind: Pod
metadata:
  name: my-pod
spec:
  serviceAccountName: my-service-account
  # 자동으로 Bound Token이 /var/run/secrets/... 에 마운트됨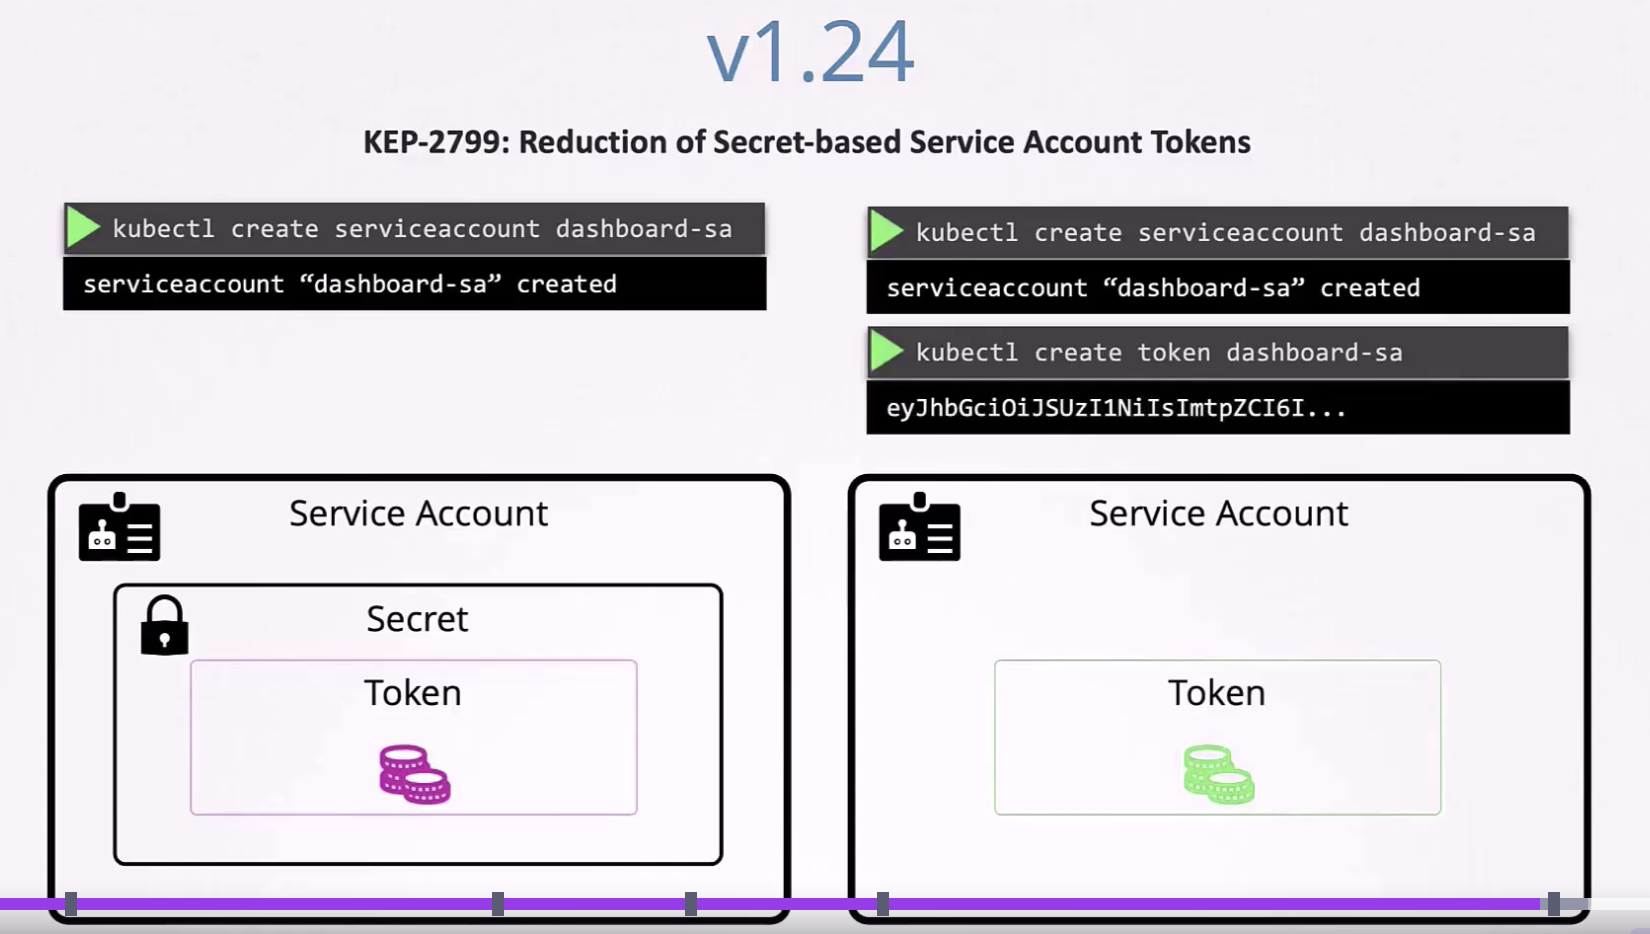
- 과거와 비교하여 현재는 secret이 자동 생성되지 않으며, token을 생성하는 kubecl 명령어를 실행해줘야 함
- 토큰 유효시간 존재
- 여전히 가능하긴 함
Image Security

image: docker.io/library/nginx
-> docker의 오픈 이미지
유출되지 않아야 하는 내부 이미지는 Private Repository에 보관한다.
pod의 containers.image 필드에 해당 경로를 지정한다.
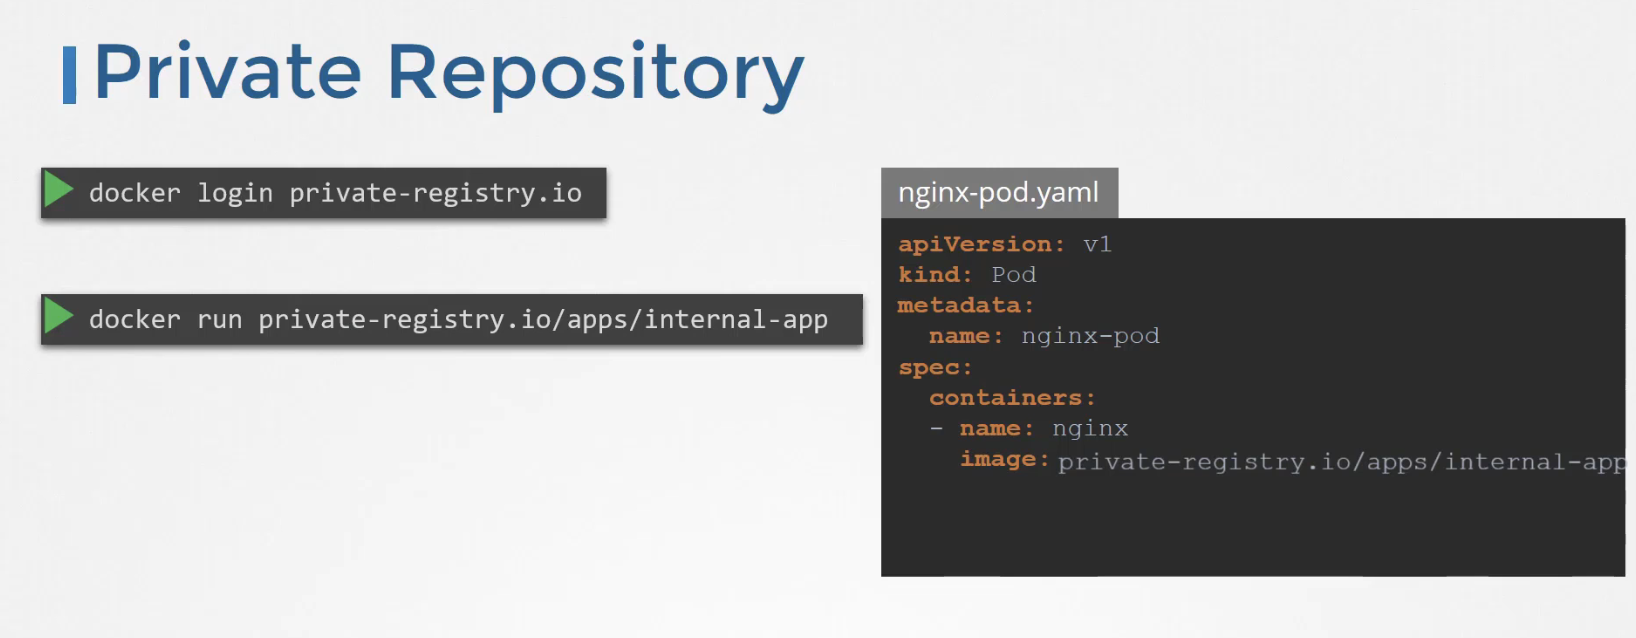
접근을 위해서는,
docker login private-registry.io # 레지스트리에 로그인
docker run private-registry.io/app/internal-app
인증, 로그인 파트는 어떻게 구현하여 워커 노드가 접근 가능하게 할까?
-> docker-registry 타입의 secret 을 생성하여 pod의 imagePullSecrets 필드에 기재한다.
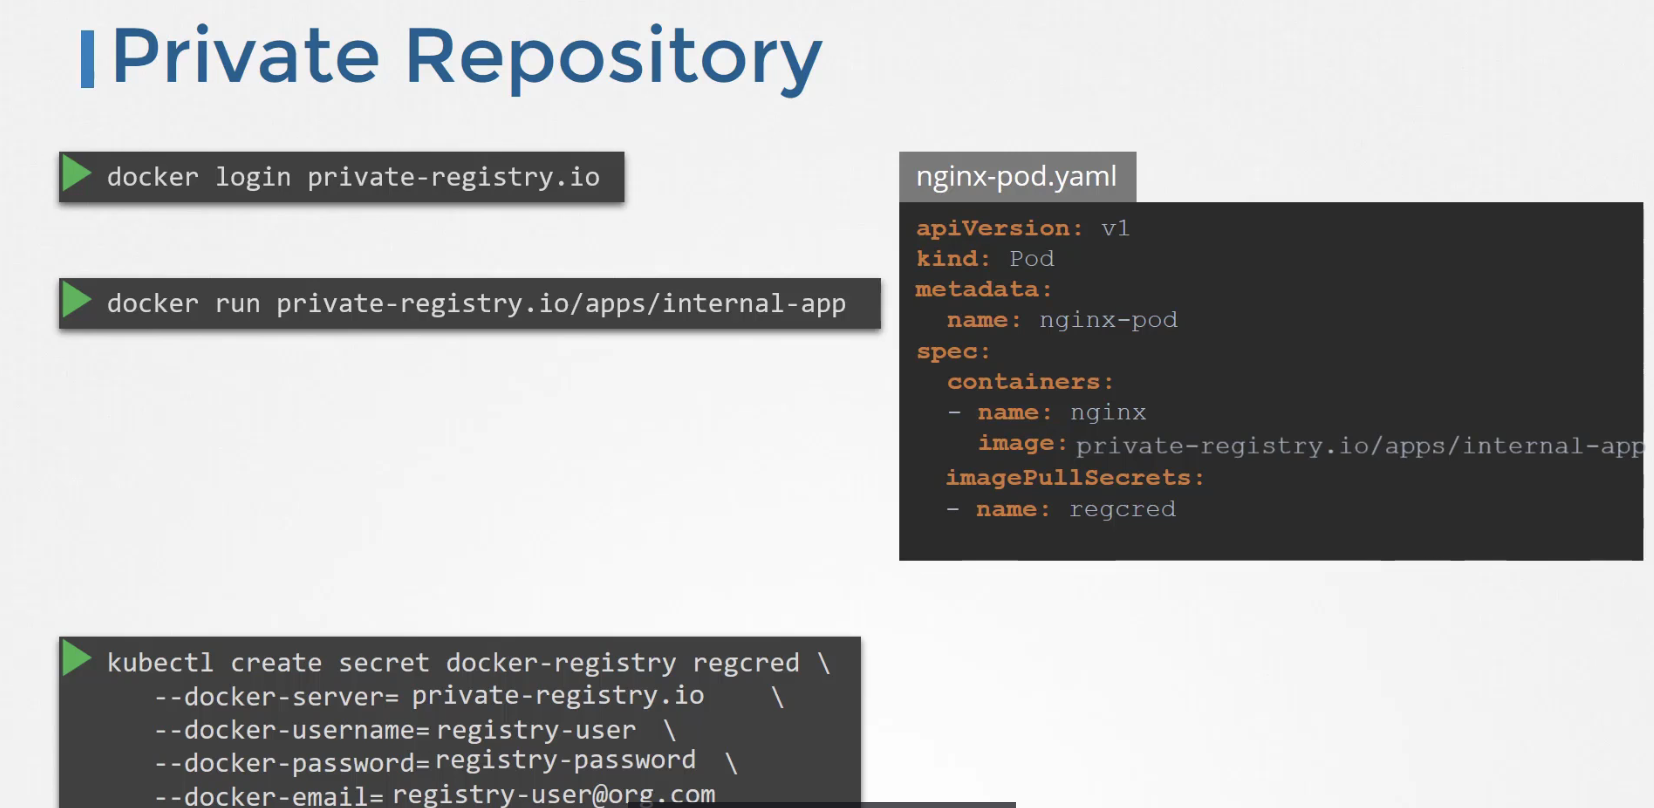
apiVersion: v1
kind: Pod
metadata:
  name: private-reg
spec:
  containers:
  - name: private-reg-container
    image: <your-private-image>
  imagePullSecrets:
  - name: regcred
SecurityContext
Pod와 Container의 보안 설정을 정의하는 기능
주요 역할
1) 컨테이너가 어떤 사용자(UID/GID)로 실행될지 결정
2) 파일시스템 권한 제어
3) 리눅스 권한(capabilities) 관리
4) 특권 모드 제어
주의! 해당 필드는 pod edit 불변한 필드 -> yaml 파일 만들고 replace --force -f 로 pod 재생성 (delete + apply = replace --force)
apiVersion: v1
kind: Pod
metadata:
  name: multi-pod
spec:
  securityContext: # 상위 단위
    runAsUser: 1001
  containers:
  -  image: ubuntu
     name: web
     command: ["sleep", "5000"]
     securityContext: # pod 단위
      runAsUser: 1002

  -  image: ubuntu
     name: sidecar # -> 이 경우, 상위 단위인 1001 runAsUser가 적용됨
     command: ["sleep", "5000"]
capability는 pod level로 관리하지 않고 컨테이너 level에서 관리하도록 기재해주면 된다.