쿠버네티스로 컨테이너 실행하기
Docker Playground 웹 사이트를 통해 실습환경을 생성하여 실습할 수 있다.
또는, 생성한 VM에서 실습을 진행할 수 있다.
kubectl이란?
쿠버네티스에게 내가 원하는 요청을 명령할 때 사용하는 명령어
kubectl 명령어 기본구조
kubectl {command} {TYPE} {NAME} {flags}
command - 자원(object)에 실행할 명령 (create, get, delete, edit 등)
type - 자원의 타입 (node, pod, service 등)
name - 자원의 이름
flags - 부가적으로 설정할 옵션 (--help, -o options 등)
ex. kubectl get pod webserver -o wide
kubectl commands 예시
kubectl --help
kubectl command --help
kubectl run <자원이름> <옵션>
kubectl create -f obj.yaml
kubectl apply -f obj.yaml
kubectl get <자원이름> <객체이름>
kubectl edit <자원이름> <객체이름>
kubectl describe <자원이름> <객체이름>
kubectl delete pod main
kubectl get pod -n kube-system
kubectl replace --force -f nginx.yaml
kubectl get all --selector env=dev,tier=frontend
kubectl get pods --watch
kubectl label node node01 color=blue
kubectl 명령어 실습
작업 노드 정보 보기
kubectl api-resources : 쿠버네티스 자원 약어 조회
kubectl --help : 쿠버네티스 명령어 도움말
kubectl logs --help : 쿠버네티스 logs 명령어 도움말
kubectl get nodes : 정보 조회
kubectl get nodes -o wide : 자세한 정보 조회
kubectl describe nodes k8s-master : 아주 자세한 정보 조회
컨테이너를 실행하면서 kubectl 명령어 사용해보기
kubectl run webserver --image=nginx:1.14 --port 80
➡ run - 컨테이너 파드를 만드는 명령어
root@k8s-master:/home/xabi# kubectl run webserver --image=nginx:1.14 --port 80
pod/webserver created
<이슈>
이슈 발생으로.. 다른 페이지에 내용을 정리하겠다.
요점은 VM에서 쿠버네티스를 설치했을 경우 IP 문제를 해결해줘야 한다.
아래 링크를 보고 해결하자!
https://velog.io/@xabxabit/Kubernetes-VM에서-k8s-설치-후-pod를-찾지-못하는-오류-pod-does-not-exist
kubectl create deployment mainui --image=httpd --replicas=3
➡ mainui 를 3개 실행해줘
root@k8s-master:/home/xabi# kubectl create deployment mainui --image=httpd --replicas=3
deployment.apps/mainui created

root@k8s-master:/home/xabi# kubectl get deployments.apps
NAME     READY   UP-TO-DATE   AVAILABLE   AGE
mainui   3/3     3            3           34s

root@k8s-master:/home/xabi# kubectl describe deployment mainui

root@k8s-master:/home/xabi# kubectl get pods
NAME                      READY   STATUS    RESTARTS   AGE
mainui-567f68c87d-65zh2   1/1     Running   0          95s
mainui-567f68c87d-9v6ws   1/1     Running   0          95s
mainui-567f68c87d-gflpc   1/1     Running   0          95s
webserver                 1/1     Running   0          19m
kubectl get pod webserver -o yaml
➡ yaml 형태로 보여줘
kubectl get pod webserver -o json
➡ json 형태로 보여줘
kubectl exec webserver -it -- /bin/bash
➡ pod 내부로 들어가줘 / webserver 컨테이너 내부로 들어가줘
kubectl edit deployment
➡ 실행중인 deployment를 수정할게
kubectl run webserver --image=nginx:1.14 --port 80 --dry-run
➡ 파드가 잘 생성되는지 확인만 할게 (--dry-run)
root@k8s-master:/home/xabi# kubectl run webserver --image=nginx:1.14 --port 80 --dry-run
W0828 23:44:18.049852   55347 helpers.go:703] --dry-run is deprecated and can be replaced with --dry-run=client.
pod/webserver created (dry run)
kubectl run webserver --image=nginx:1.14 --port 80 --dry-run -o yaml
➡ 파드 생성하는 내용 yaml 파일로 볼게
root@k8s-master:/home/xabi# kubectl run webserver --image=nginx:1.14 --port 80 --dry-run -o yaml
W0828 23:44:42.292713   55494 helpers.go:703] --dry-run is deprecated and can be replaced with --dry-run=client.
apiVersion: v1
kind: Pod
metadata:
  creationTimestamp: null
  labels:
    run: webserver
  name: webserver
spec:
  containers:
  - image: nginx:1.14
    name: webserver
    ports:
    - containerPort: 80
    resources: {}
  dnsPolicy: ClusterFirst
  restartPolicy: Always
status: {}
kubectl run webserver --image=nginx:1.14 --port 80 --dry-run -o yaml > webserver-pod.yaml
➡ 파드 생성하는 yaml 내용을 webserver-pod.yaml 이름으로 신규 yaml 파일 생성해줘
root@k8s-master:/home/xabi# kubectl run webserver --image=nginx:1.14 --port 80 --dry-run -o yaml > webserver-pod.yaml
W0828 23:45:11.302335   55673 helpers.go:703] --dry-run is deprecated and can be replaced with --dry-run=client.
root@k8s-master:/home/xabi# ls
 Desktop   Documents   Downloads   Music  '-n kube-system'   Pictures   Public   Templates   Videos   webserver-pod.yaml
# vi로 아래와 같이 내용 수정
apiVersion: v1
kind: Pod
metadata:
labels:
run: webserver
name: webserver
spec:
containers:
- image: nginx:1.14
name: webserver
ports:
- containerPort: 80kubectl delete pod webserver
➡ 파드 삭제해줘
kubectl delete deployment.apps mainui
➡ 디플로이먼트 삭제해줘
kubectl create -f webserver-pod.yaml
➡ webserver-pod.yaml 파일을 이용해 신규 파드를 생성해줘
kubectl scale rs new-replica-set --replicas=5
➡ ReplicaSet의 size를 5개로 변경해줘
kubectl edit rs new-replica-set
➡ ReplicaSet의 yaml 설정 값 변경
kubectl run redis --image=redis --labels="tier=db"
➡ pod 생성 시 라벨 붙이기
Create an NGINX Pod
- kubectl run nginx --image=nginx
Generate POD Manifest YAML file (-o yaml). Don't create it(--dry-run)
- kubectl run nginx --image=nginx --dry-run=client -o yaml
Create a deployment
- kubectl create deployment --image=nginx nginx
Generate Deployment YAML file (-o yaml). Don't create it(--dry-run)
- kubectl create deployment --image=nginx nginx --dry-run=client -o yaml
Generate Deployment YAML file (-o yaml). Don’t create it(–dry-run) and save it to a file.
- kubectl create deployment --image=nginx nginx --dry-run=client -o yaml > nginx-deployment.yaml
Make necessary changes to the file (for example, adding more replicas) and then create the deployment.
- kubectl create -f nginx-deployment.yaml
kubectl create deployment --help
Create a deployment named my-dep that runs the nginx image with 3 replicas
- kubectl create deployment my-dep --image=nginx --replicas=3
Create a deployment in namespace named dev-ns
- kubectl create deployment my-dev --image=nginx -n=dev-ns
- kubectl create deployment my-dev --image=nginx --namespace=dev-ns
POD
Create an NGINX Pod
- kubectl run nginx --image=nginx
Generate POD Manifest YAML file (-o yaml). Don't create it(--dry-run)
- kubectl run nginx --image=nginx --dry-run=client -o yaml
--dry-run 옵션에 client 유무 차이
- --dry-run=client (권장) : Generates the YAML locally without sending anything to the API server. It's the recommended way in newer versions.
- --dry-run (without =client): In older versions, it defaults to server-side dry run, which may behave differently or be deprecated.
위 명령어에 실제 yaml 파일을 생성하고 싶으면,
끝에 ‘> my.yaml’ 과 같이 파일을 생성하는 명령어를 같이 넣어줘야 한다.
Deployment
Create a deployment
- kubectl create deployment --image=nginx nginx
Generate Deployment YAML file (-o yaml). Don't create it(--dry-run)
- kubectl create deployment --image=nginx nginx --dry-run=client -o yaml
Generate Deployment with 4 Replicas
- kubectl create deployment nginx --image=nginx --replicas=4
You can also scale a deployment using the kubectl scale command.
- kubectl scale deployment nginx --replicas=4
Another way to do this is to save the YAML definition to a file and modify
- kubectl create deployment nginx --image=nginx --dry-run=client -o yaml > nginx-deployment.yaml
You can then update the YAML file with the replicas or any other field before creating the deployment.
Service
Create a Service named redis-service of type ClusterIP to expose pod redis on port 6379
-
kubectl expose pod redis --port=6379 --name=redis-service --dry-run=client -o yaml
-
(This will automatically use the pod's labels as selectors)
Or
-
kubectl create service clusterip redis --tcp=6379:6379 --dry-run=client -o yaml
-
(This will not use the pods labels as selectors, instead it will assume selectors as app=redis. You cannot pass in selectors as an option. So it does not work very well if your pod has a different label set. So generate the file and modify the selectors before creating the service)
Create a Service named nginx of type NodePort to expose pod nginx's port 80 on port 30080 on the nodes:
-
kubectl expose pod nginx --type=NodePort --port=80 --name=nginx-service --dry-run=client -o yaml
-
(This will automatically use the pod's labels as selectors, but you cannot specify the node port. You have to generate a definition file and then add the node port in manually before creating the service with the pod.)
Or
-
kubectl create service nodeport nginx --tcp=80:80 --node-port=30080 --dry-run=client -o yaml
-
(This will not use the pods labels as selectors)
Both the above commands have their own challenges. While one of it cannot accept a selector the other cannot accept a node port. I would recommend going with the kubectl expose command. If you need to specify a node port, generate a definition file using the same command and manually input the nodeport before creating the service.
생성한 pod가 어느 service에 있는지 확인
- kubectl get svc -A -o wide | grep <pod_name>
Create a service of type ClusterIP with the same name (httpd) that exposes the pod on port 80.
-
1) kubectl expose pod httpd --port=80 --name=httpd --type=ClusterIP
-
2) kubectl create service clusterip httpd --tcp=80:80 (but, Just remember, it won't automatically link to the pod unless the pod is labeled or you specify selectors, but for a simple pod, this works!)
Create a pod named httpd using the image httpd:alpine in the default namespace.
Then, create a service of type ClusterIP with the same name (httpd) that exposes the pod on port 80.
- kubectl run httpd --image=httpd --port=80 --expose=true
- expose=true 옵션을 하게 되면 type이 ClusterIP이고 pod와 연결된 service가 같이 생성됨! 그리고 이를 위해서는 --port 옵션을 지정해줘야 함.
- rum --expose=false:
If true, create a ClusterIP service associated withe the pod. Requires '--port'.
kubectl apply 명령어
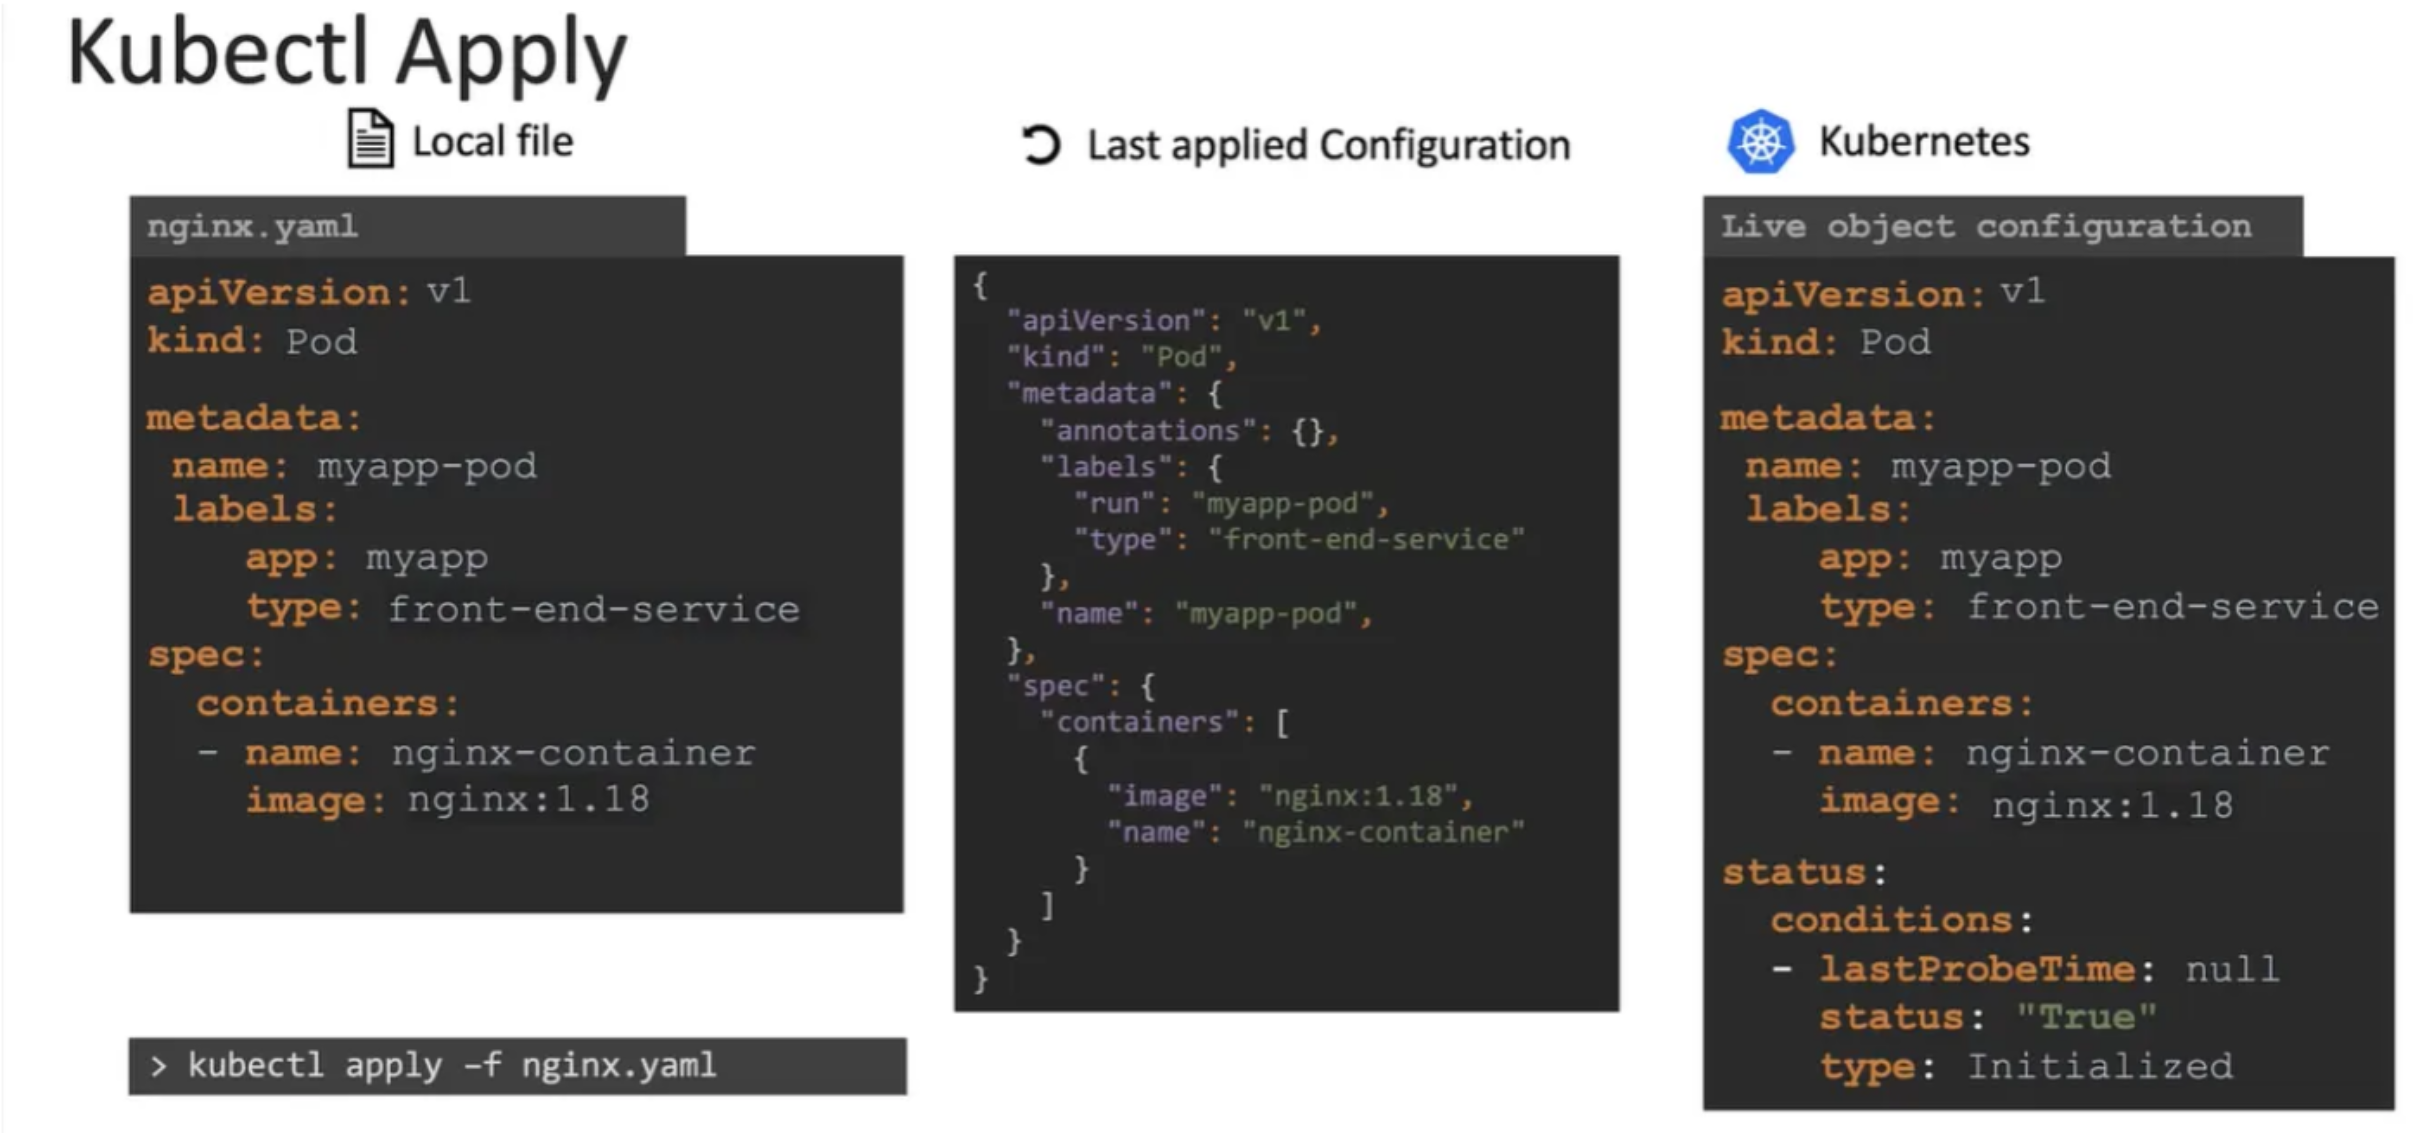
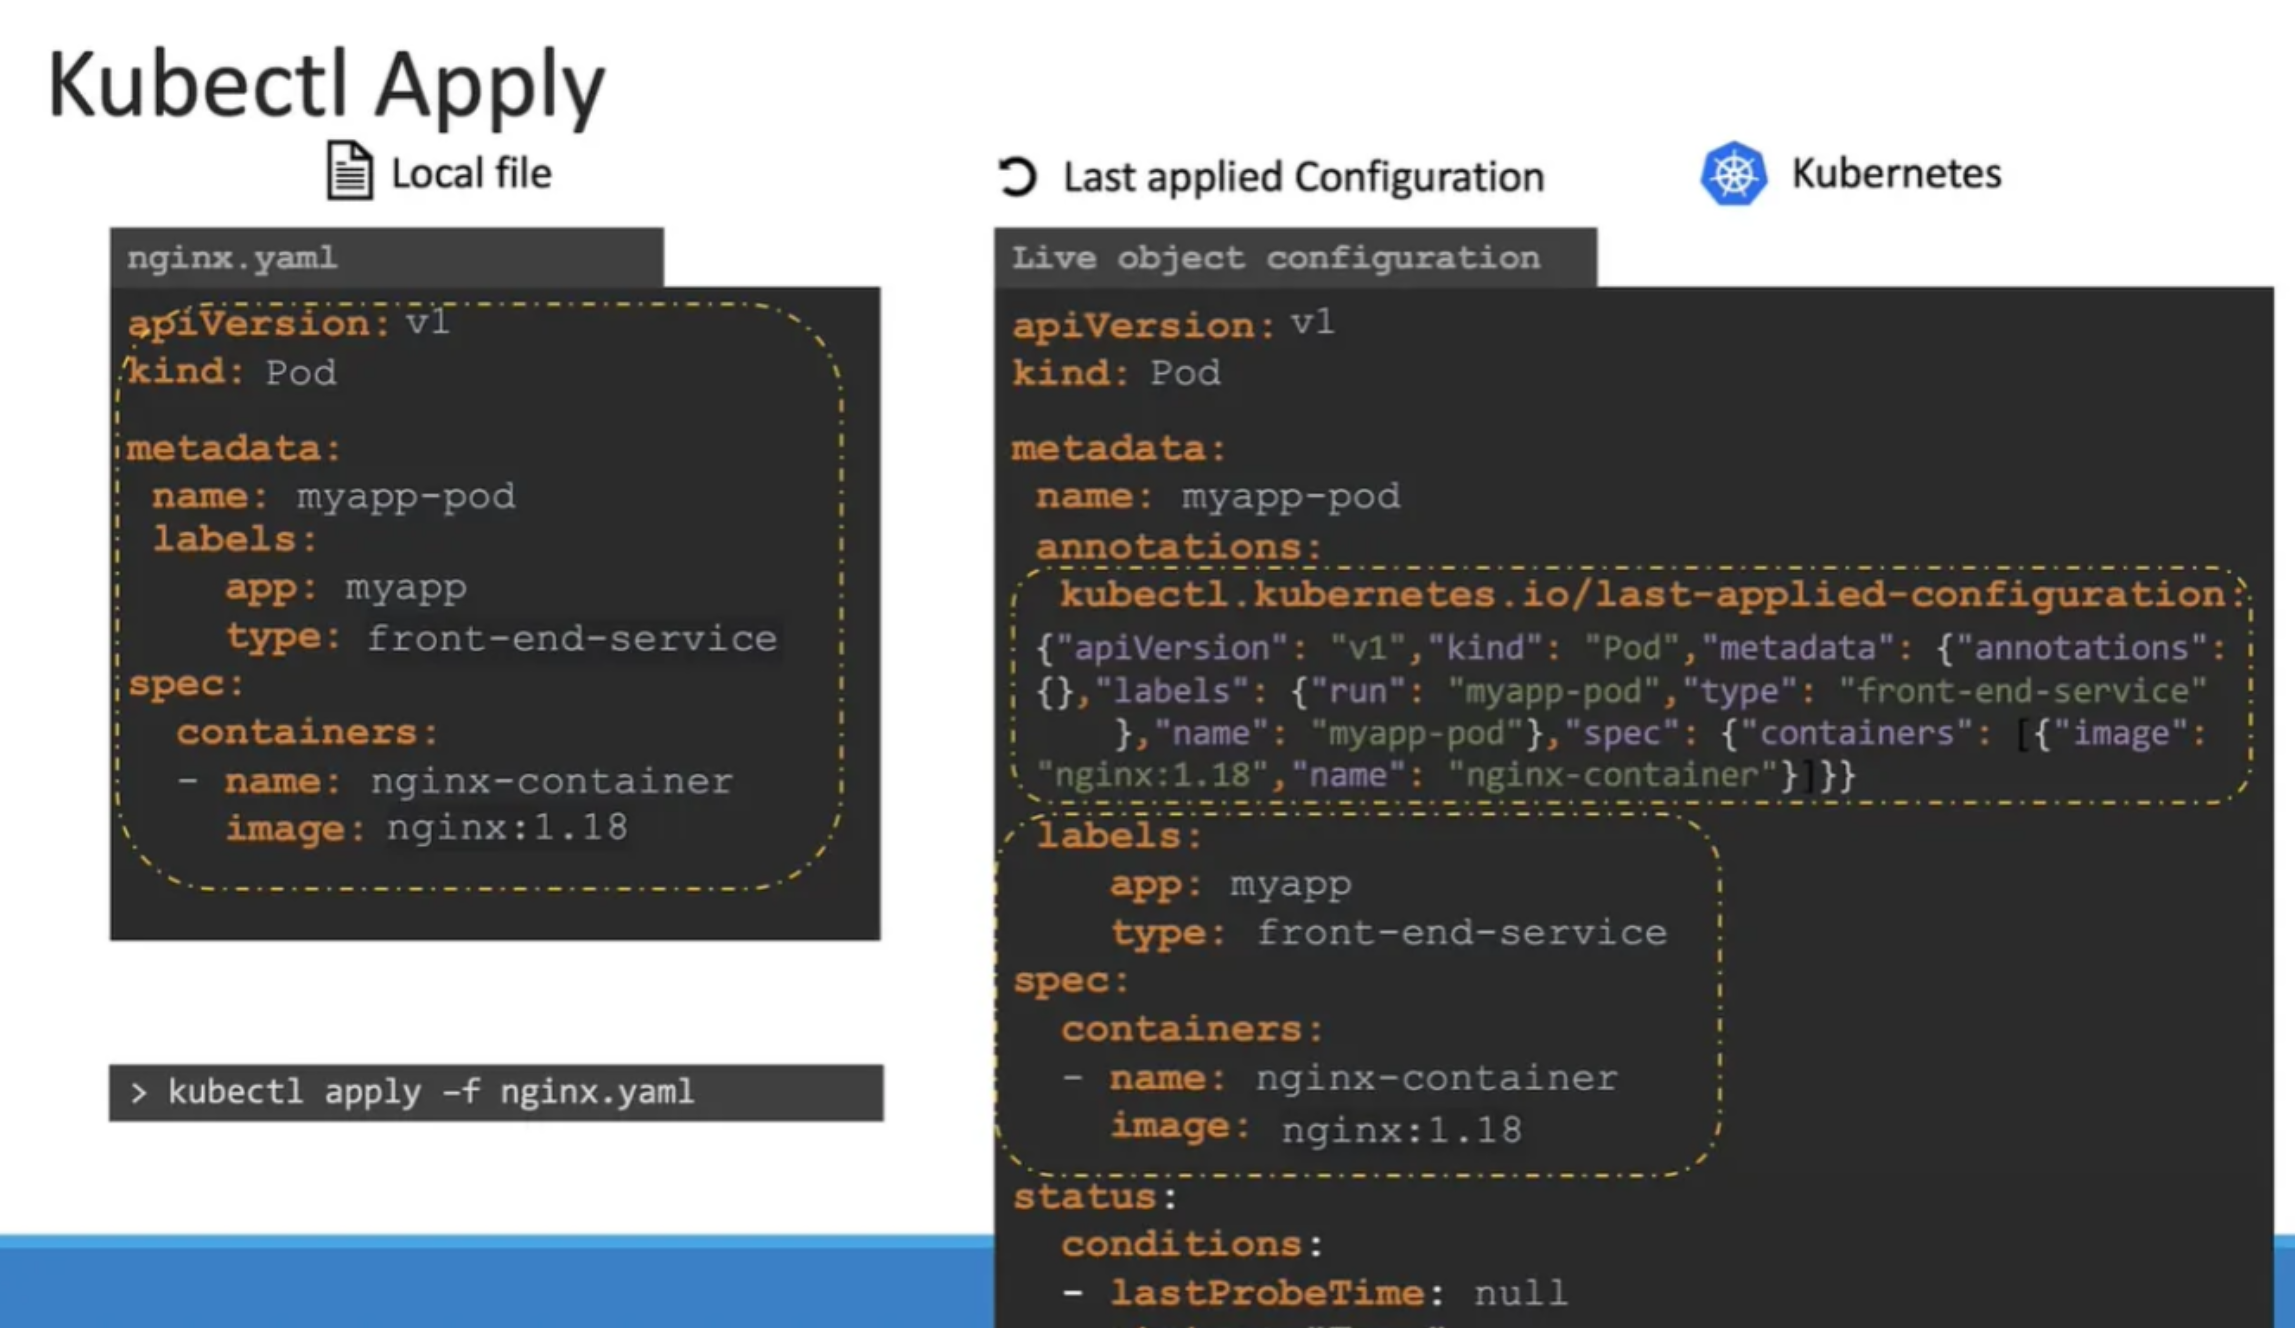
| Local file | Last applied Configuration | kubenetes Live object configuration |
|---|---|---|
| 현재 로컬의 yaml 파일 | 적용된 구성 파일 | 현재 운영 중인 구성 파일 |
Last applied Configuration
- 쿠버네티스 live 구성 파일 중 json 형태로 들어가 있다.
- apply 커맨드를 통해 변경 사항을 적용하려고 할 때, 현재의 live 구성 상태와 last applied configuration 구성 상태를 비교하여 변경사항을 체크해 적용한다.
- 따라서 Last applied Configuration 값은 현재 운영 중인 구성 상태와 비교하여 최신 변경 사항을 적용하기 위해 필요하다.