
화살표 함수
ES6에서 새로 도입 되었습니다.
함수 표현식
const substract = function (x, y) {
  return x - y
}
화살표 함수
return 생략이 가능합니다.
{} 중괄호(curly brace)는 사용하지 않습니다.
const substract = (x, y) => x - y

const substract = (x, y) => { x - y } // X, 에러 발생
const substract = (x, y) => (x - y)   // O, 정상 작동
클로저
함수 표현식
const substracter = function(x) {
  return function(y) {
    return x - y
  }
}
substracter(10)(7) // 3
화살표 함수
const substracter = x => y => x - y화살표 함수의 특징
- call, apply, bind를 사용할 수 없습니다.
- this를 가지지 않습니다. this는 화살표 함수를 감싸고 있는 스코프의 실행 컨텍스트에 의해 결정됩니다.
This 키워드
this는 함수 실행시 호출(invocation) 방법에 의해 결정되는 특별한 객체입니다. 함수 실행시 결정되므로, 실행되는 맥락(execution context)에 따라 this는 다르게 결정됩니다.
브라우저 환경에서 this는 기본적으로 window 객체를 가리킵니다.
함수 실행의 다섯가지 방법
- Global
console.log(this)
- Function 호출
foo()
- Method 호출
obj.foo()
- new 키워드를 이용한 생성자 호출
new Foo()
- .call 또는 .apply 호출
foo.call()
foo.apply()
함수 실행에 따른 this 바인딩 패턴
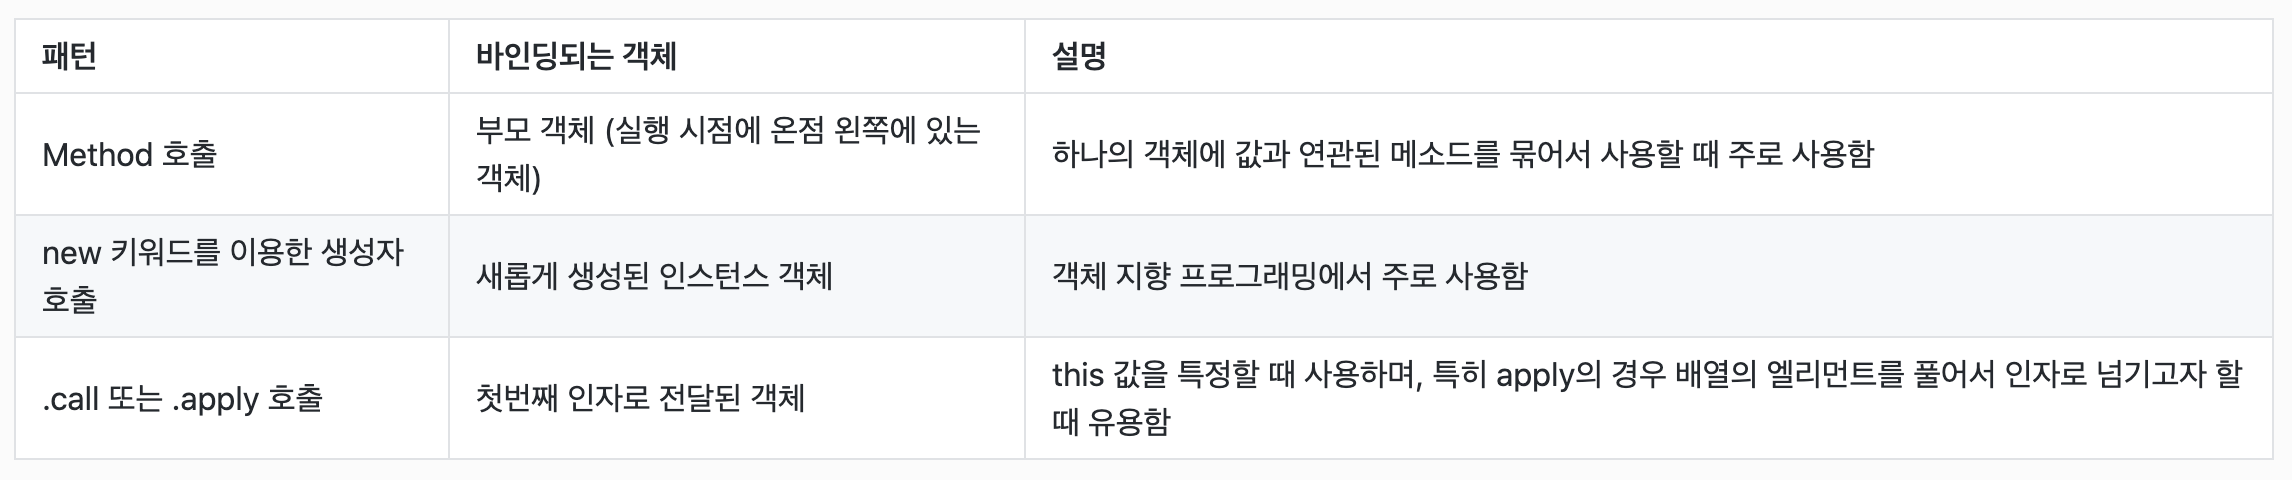
Method 호출
객체.메소드() 과 같이 객체 내에 메소드를 호출하는 방법을 의미합니다.
let counter1 = {
 value: 0,
 increase: function() {
   this.value++ // 메소드 호출을 할 경우, this는 counter1을 가리킵니다
 },
 decrease: function() {
   this.value--
 },
 getValue: function() {
   return this.value
 }
}

counter1.increase()
counter1.increase()
counter1.increase()
counter1.decrease()
counter1.getValue() // 2
생성자 호출
객체가 new 키워드를 이용해서 만들어졌다는 것이 다릅니다. 이 때의 객체는 우리가 인스턴스라고 부릅니다. 즉 인스턴스.메소드() 의 형태의 호출입니다.
class Counter {
  constructor() {
    this.value = 0; // 생성자 호출을 할 경우, this는 new 키워드로 생성한 Counter의 인스턴스입니다
  }
  increase() {
    this.value++
  }
  decrease() {
    this.value--
  }
  getValue() {
    return this.value
  }
}

let counter1 = new Counter() // 생성자 호출
counter1.increase()
counter1.getValue() // 1
let this_value_in_constructor;
function Car(name, brand, color) {
this.name = name;
this.brand = brand;
this.color = color;
this_value_in_constructor = this;
}
const mycar = new Car('mini', 'bmw', 'red')
console.log(mycar.name) // 'mini'
console.log(mycar.brand) // 'bmw'
console.log(mycar.color) // 'red'
console.log(this_value_in_constructor) // {name: "mini", brand: "bmw", color: "red"}
//new 키워드가 없다면?
const secondcar = Car('spark', 'chevrolet', 'violet')
// console. log(secondcar.name) //'spark' // 이 코드는 TypeError를 발생시킵니다.
expect(secondcar).to.eql(undefined) // new 키워드로 새롭게 만들어 주지 않았으므로 undefined.
expect(this_value_in_constructor).to.eql(window)call,apply 메소드
.call, .apply 호출은 명시적으로 this를 지정하고 싶을 때 사용합니다. 첫번째 인자가 항상 this값이 됩니다.
function foo() {
  return 'bar'
}

foo()
foo.call()
foo.apply()
let allDivs = document.querySelectorAll('div'); // NodeList라는 유사 배열입니다.
// allDivs를 this로 지정합니다.
[].map.call(allDivs, function(el) {
return el.className
})
// allDivs는 유사 배열이므로 map 메소드가 존재하지 않습니다.
// 그러나, Array prototype으로부터 map 메소드를 빌려와 this를 넘겨 map을 실행할 수 있습니다.const nodeList = {
length: 3,
0: 'div#target',
1: 'li',
2: 'span#new'
};
console. log (Array.prototype.slice.apply(nodeList, [0, 1])) // ['div#target']
console. log (Array.prototype.map.call(nodeList, node => node.split('#')[0])) // ['div','li','span']bind 메소드
.bind는 .call과 유사하게 this 및 인자를 바인딩하나, 당장 실행하는 것이 아닌 바인딩된 함수를 리턴하는 함수입니다. 첫번째 인자가 항상 this값이 됩니다. 첫번째 인자는 this, 두번째 인자부터는 필요한 파라미터를 전달합니다.
fn.bind(this값, 인자1, 인자2, ...)case1. 이벤트 핸들러
let target = document.querySelector('#target')
let users = ['김코딩', '박해커', '최초보']

users.forEach(function(user) {
  let btn = document.createElement('button')
  btn.textContent = user
  btn.onclick = handleClick.bind(user) // 이렇게 바꿔볼 수 있습니다.
  target.appendChild(btn)
});


function handleClick() {
  console.log(this)
}
case2. setTimeout
printAsync() {
  // 1초 후 사각형의 넓이를 콘솔에 표시합니다
  setTimeout(this.printArea.bind(this), 2000)
}printAsync() {
// 1초 후 사각형의 넓이를 콘솔에 표시합니다
setTimeout(() => {
this.printArea()
}, 2000)
}arguments
아규먼트가 파라미터 보다 많은 경우?
arguments란 모든 아규먼트를 유사배열 형태로 참조하는 값입니다.
function a(value1, value2) {
  console.log(arguments)
}

f(1, 2) // { "0": 1, "1": 2 }

f('a', 'b', 'c', 'd', 'e') // { "0": "a", "1": "b", "2": "c", "3": "d", "4": "e" }
rest 파라미터
ES6부터는 arguments를 사용하지 않습니다.
arguments와는 다르게 배열입니다.
const divide = (a, b, ...rest) => { // 반드시 마지막 파라미터에 ...을 붙여서 사용해야 합니다.
  console.log(a)    // 6
  console.log(b)    // 1
  console.log(rest) // [ 4, 7, 0, 2 ]
}
divide(6, 1, 4, 7, 0, 2)

const divide2 = (one, two, ...args) => { // 파라미터 이름은 자유롭게 할 수 있습니다.
}
spread 연산자
ES6에 추가된 spread 연산자 기능을 이용하면
배열, 문자열 등의 이터러블을 분해해서 개별요소로 만들 수 있습니다.
간단하게 배열을 분해한다고 생각하시면 됩니다.
const arr = ['a', 'b', 'c']
console.log(arr) // ['a', 'b', 'c']
console.log(...arr) // 'a' 'b' 'c'

const arr2 = [1, 2, 3]
console.log([...arr, ...arr2]) // ['a', 'b', 'c', 1, 2, 3]
// 배열 합치기에 사용할 수 있습니다.
객체 spread 연산자
ES6을 넘어 ES9에는 객체 또한 spread 연산자 사용이 가능합니다.
const obj1 = {a: 1, b: 2}
const obj2 = {c: 3}
console.log({...obj1, ...obj2}) // {a: 1, b: 2, c: 3}
// 객체 합치기에 사용할 수 있습니다.
배열 구조분해
..., rest 를 이용합니다.
const arr = ['a', 'b', 'c', 'd', 'e', 'f']
const [a, b, c, ...rest] = arr2 // ...을 이용해서 나머지를 모두 배열 몰아넣습니다.

console.log(a)     // 'a'
console.log(b)     // 'b'
console.log(c)     // 'c'
console.log(rest)  // ['d', 'e', 'f']
객체 구조분해
const obj1 = {a: 1, b: 2, c: 3}
const {c, b, a} = obj1 // key의 값을 가져오므로 순서는 상관없습니다.

console.log(c) // 3
console.log(b) // 2
console.log(a) // 1
const student = { name: '최초보', major: '물리학과' }
const { name, ...args } = student // ...을 이용해서 나머지를 모두 객체에 몰아넣습니다.
console.log(name) // '최초보'
console.log(args) // {major: '물리학과'}const user = {
name: '김코딩',
company: {
name: 'Java',
department: 'Development',
role: {
name: 'Software Engineer'
}
},
age: 35
}
const changedUser = {
...user, //...user의 위치에 따라 달라집니다.
name: '박해커',
age: 20
} //...user에서 name, age 변경
const overwriteChanges = {
name: '박해커',
age: 20,
...user
} //name,age에서 ...user 덮어쓰기