JSON : Javascript 객체 문법으로 구조화된 데이터를 표현하기 위한 문자 기반의 표준 포맷
_중괄호 : 객체
대괄호 : 순서가 있는 배열
*주석을 지원하지 않음
JSON 검사기로 파일 깨짐현상을 예방할 수 있음 [JSON검사기 사이트 바로가기]
Unity에서 JSON 사용하는 방법
Newtonsoft Json
압축 해제 후, Bin 파일에서 필요한 .net버전을 선택한다(보통 4.5)
 dll파일을 unity 프로젝트에 드래그 앤 드롭. 이후 Project Setting/Players/Other Settings/Configurations/API Compatibility Level을 .net4.x으로 설정한다. (일정 버전 이상에서는 .netframework로 표시)
[MICROSOFT .NET FRAMEWORK DOWNLOAD]
dll파일을 unity 프로젝트에 드래그 앤 드롭. 이후 Project Setting/Players/Other Settings/Configurations/API Compatibility Level을 .net4.x으로 설정한다. (일정 버전 이상에서는 .netframework로 표시)
[MICROSOFT .NET FRAMEWORK DOWNLOAD]
오브젝트를 JSON 데이터로 변환하기
<NewtonsoftJSON.cs>
using System;
using System.Collections;
using System.Collections.Generic;
using System.Drawing;
using UnityEngine;
// newtonsoft library 사용
using Newtonsoft.Json;
public class NewtonsoftJSON : MonoBehaviour
{
private void Start()
{
JsonTestClass jTest1 = new JsonTestClass();
//직렬화, 오브젝트를 매개변수로 넣어준다.
string jsonData = JsonConvert.SerializeObject(jTest1);
Debug.Log(jsonData);
}
}
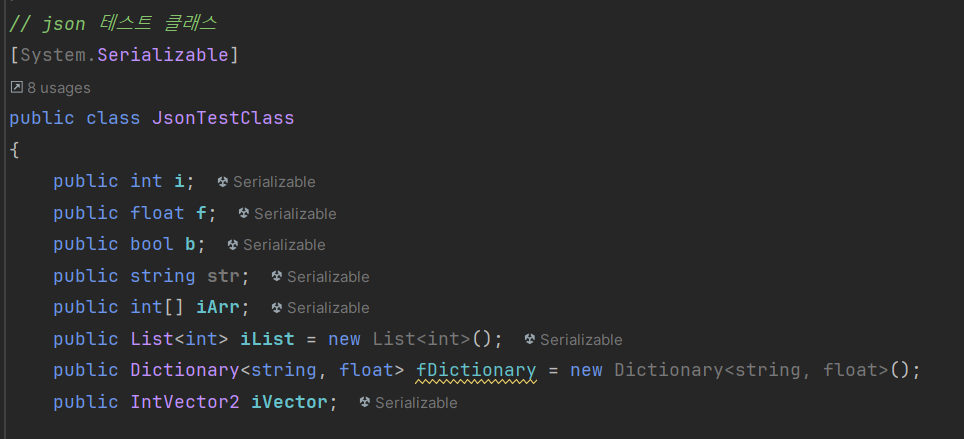
public class JsonTestClass
{
public int i;
public float f;
public bool b;
public string str;
public int[] iArr;
public List<int> iList = new List<int>();
public Dictionary<string, float> fDictionary = new Dictionary<string, float>();
public IntVector2 iVector;
public JsonTestClass()
{
i = 10;
f = 99.9f;
b = true;
str = "JSON Test String";
iArr = new int[] { 1, 2, 3, 4, 5, 8, 12, 21, 34, 55 };
for (int idx = 0; idx < 5; idx++)
{
iList.Add(2*idx);
}
fDictionary.Add("PIE", Mathf.PI);
fDictionary.Add("Epsilon", Mathf.Epsilon);
fDictionary.Add("Sqrt(2)", Mathf.Sqrt(2));
iVector = new IntVector2(3, 2);
}
// 오브젝트 형식 출력용 함수
public void PrintElements()
{
Debug.Log("i : " + i);
Debug.Log("f : " + f);
Debug.Log("b : " + b);
for (int idx = 0; idx < iArr.Length; idx++)
{
Debug.Log(string.Format("iArray[{0}] : {1}", idx, iArr[idx]));
}
for (int idx = 0; idx < iList.Count; idx++)
{
Debug.Log(string.Format("iList[{0}] : {1}", idx, iList[idx]));
}
foreach (var data in fDictionary)
{
Debug.Log(string.Format("fDictionary[{0}] : {1}", data.Key, data.Value));
}
Debug.Log("iVector : " + iVector.x + ',' + iVector.y);
}
// serialize용 vector2 클래스
public class IntVector2
{
public int x;
public int y;
// 클래스 생성자
public IntVector2(int x, int y)
{
this.x = x;
this.y = y;
}
}
}
create empty를 한 후, NewtonsoftJSON 스크립트를 추가해준다.
아래와 같이 문자열로 변환되어 출력되는 것을 알 수 있다.

데이터를 오브젝트로 변환하기
위에서 오브젝트를 데이터로 변환해줬다면, 이번엔 다시 오브젝트 형식으로 바꿔보자.
: Start() 에 jTest2만 추가해주면 된다.
    private void Start()
    {
        JsonTestClass jTest1 = new JsonTestClass();
        //직렬화, 오브젝트를 매개변수로 넣어준다. -> 오브젝트를 데이터 형식으로 변환
        string jsonData = JsonConvert.SerializeObject(jTest1);
        Debug.Log(jsonData);
        // json데이터를 다시 오브젝트로 변환할때에는 Json데이터를 어떤 오브젝트로 변환하는지 명식적으로 알려줘야함.
        JsonTestClass jTest2 = JsonConvert.DeserializeObject<JsonTestClass>(jsonData);
        // 오브젝트 출력
        jTest2.PrintElements();
    }
오브젝트 형식으로 출력되는 것을 확인할 수 있다. (길어서 뒷 부분 출력은 잘랐음)

*유니티에서 JSON 사용 시 주의할 점
_<1> MonoBehaviour를 상속받는 클래스의 오브젝트를 JSON 데이터로 serialize할 수 없음(자기 참조 루프에 빠짐 gameobject.gameobject.gameobject...).
1. 스크립트가 가지고 있는 프로퍼티 중에서 필요한 부분만 클래스로 묶어서 해당 클래스만 serialize (위의 예제처럼)_
2. jsonUtility 기능 사용
using UnityEngine;

public class TestMono : MonoBehaviour
{
    public Vector3 v3 = new Vector3(0,0,0);
}

using UnityEngine;

public class JsonUtilityExample : MonoBehaviour
{
    private void Start()
    {
        // 게임오브젝트에 MonoBehaviour를 상속받은 TestMono를 붙이고, TestMono의 v3를 데이터 형식으로 직렬화함
        GameObject gm = new GameObject();
        gm.AddComponent<TestMono>();
        string jsonData3 = JsonUtility.ToJson(gm.GetComponent<TestMono>());
        Debug.Log(jsonData3);

        // 새로운 오브젝트를 만들지 못했다고 실패함
        JsonUtility.FromJson<TestMono>(jsonData3);
    }
}
잘 출력됨.. 하지만 DeSerialize시 실패함 ㅠ=ㅠ

2-1. DeSerialize 실패 시 해결방법
: JsonUtility.FromJson<TestMono>(jsonData3)가 아닌, JsonUtility.FromJsonOverwrite(jsonData3, gm2.AddComponent<TestMono>())를 해준다.
즉, MonoBehaviour를 상속받는 오브젝트의 JSON데이터를 다시 오브젝트 형식으로 만들려면 같은 형태를 가진 오브젝트를 미리 생성한 후, DeSerialize해야 한다. (Save & Load 기능으로 사용할 수 있음)
void Start()
{
// 게임오브젝트에 MonoBehaviour를 상속받은 TestMono를 붙이고, TestMono의 v3를 데이터 형식으로 직렬화함
GameObject gm = new GameObject();
gm.AddComponent<TestMono>();
string jsonData3 = JsonUtility.ToJson(gm.GetComponent<TestMono>());
Debug.Log(jsonData3);
// DeSerialize된 오브젝트를 gm2에 덮어씌우는 방식
GameObject gm2 = new GameObject();
JsonUtility.FromJsonOverwrite(jsonData3, gm2.AddComponent<TestMono>(););
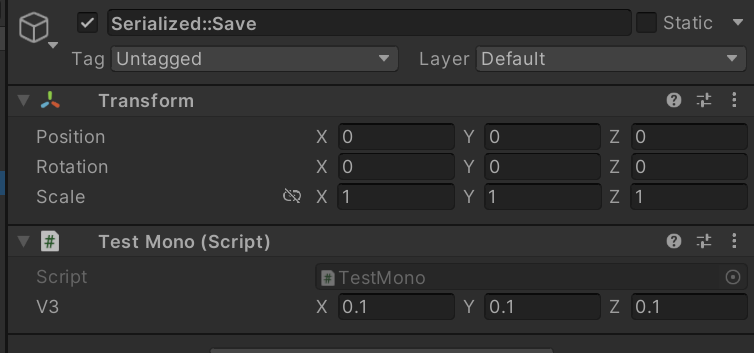
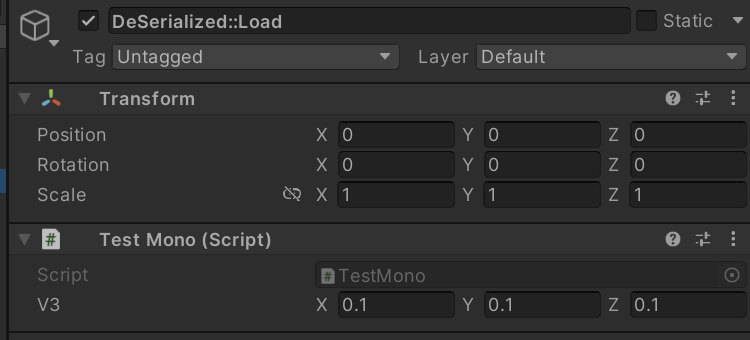
}<활용방안::Save&Load기능>
값을 저장했다가, 불러오는 기능. v3의 값이 같음
using UnityEngine;

public class JsonUtilityExample : MonoBehaviour
{
    private void Start()
    {
        // 게임오브젝트에 MonoBehaviour를 상속받은 TestMono를 붙이고, TestMono의 v3를 데이터 형식으로 직렬화함
        GameObject gm = new GameObject();
        gm.name = "Serialized::Save";
        TestMono test1 = gm.AddComponent<TestMono>();
        test1.v3.x /= 10;
        test1.v3.y /= 10;
        test1.v3.z /= 10;
        string jsonData3 = JsonUtility.ToJson(gm.GetComponent<TestMono>());
        Debug.Log(jsonData3);

        GameObject gm2 = new GameObject();
        gm2.name = "DeSerialized::Load";
        JsonUtility.FromJsonOverwrite(jsonData3, gm2.AddComponent<TestMono>());
    }
}
<Save&Load - 파일로 저장하는 방법>
using UnityEngine;
//파일 입출력, 문자열 처리를 위함
using System.IO;
using System.Text;
using Newtonsoft.Json;

public class JsonSaveLoader : MonoBehaviour
{
    // Start is called before the first frame update
    void Start()
    {
        // 현재 경로/test.json으로 파일을 만듦
        FileStream stream = new FileStream(Application.dataPath + "/test.json", FileMode.OpenOrCreate);
        // 데이터형식으로 오브젝트 변환 후 문자열에 저장
        JsonTestClass jTest1 = new JsonTestClass();
        string jsonData = JsonConvert.SerializeObject(jTest1);
        // 문자열인 jsonData를 byte배열로 변환
        byte[] data = Encoding.UTF8.GetBytes(jsonData);
        // 파일에 data의 0번째부터 마지막까지 작성 후 닫음
        stream.Write(data, 0, data.Length);
        stream.Close();
    }
}
플레이 후 json파일이 생성됨
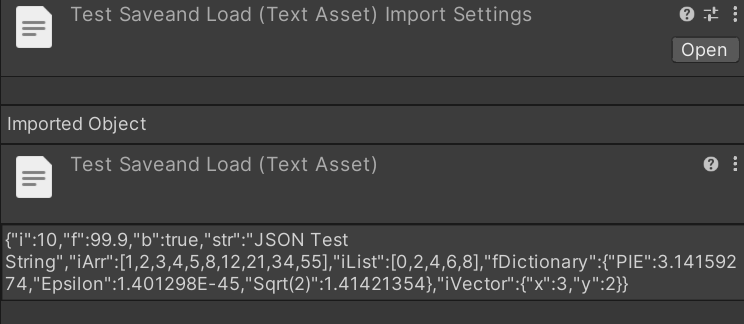
파일로 저장한 JSON 데이터 불러오기
using System.Collections;
using System.Collections.Generic;
using UnityEngine;
//파일 입출력, 문자열 처리를 위함
using System.IO;
using System.Text;
using Newtonsoft.Json;
using Unity.VisualScripting;

public class JsonSaveLoader : MonoBehaviour
{
    // Start is called before the first frame update
    void Start()
    {
        // 이미 파일이 존재할 경우 읽고, 기존 파일을 삭제함
        if (System.IO.File.Exists(Application.dataPath + "/testSaveandLoad.json"))
        {
            FileStream rStream = new FileStream(Application.dataPath + "/testSaveandLoad.json", FileMode.Open);
            byte[] rData = new byte[rStream.Length];
            rStream.Read(rData, 0, rData.Length);
            rStream.Close();
            string jData = Encoding.UTF8.GetString(rData);
            JsonTestClass jTest2 = JsonConvert.DeserializeObject<JsonTestClass>(jData);
            jTest2.PrintElements();
            System.IO.File.Delete(Application.dataPath + "/testSaveandLoad.json");
        }
        // 현재 경로/test.json으로 파일을 만듦
        FileStream stream = new FileStream(Application.dataPath + "/testSaveandLoad.json", FileMode.Create);
        // 데이터형식으로 오브젝트 변환 후 문자열에 저장
        JsonTestClass jTest1 = new JsonTestClass();
        string jsonData = JsonConvert.SerializeObject(jTest1);
        // 문자열인 jsonData를 byte배열로 변환
        byte[] data = Encoding.UTF8.GetBytes(jsonData);
        // 파일에 data의 0번째부터 마지막까지 작성 후 닫음
        stream.Write(data, 0, data.Length);
        stream.Close();
    }
}
<2> Vector3를 serialize할 경우에도 자기참조 루프에 빠짐 (Vector3의 프로퍼티인 normalized에서 다시 normalized를 호출할 수 있기 때문)
1. JsonSerializerSetting을 통해 ReferenceLoopHandling을 ignore로 설정. (불필요한 벡터 값들도 존재하기 때문에 용량이 늘어날 수 있음)_
	private void Start()
    {
        JsonVector jVec = new JsonVector();
        // vector3 serialize시 self reference loop를 ignore하도록 설정
        JsonSerializerSettings settings = new JsonSerializerSettings();
        settings.ReferenceLoopHandling = ReferenceLoopHandling.Ignore;
        Debug.Log(JsonConvert.SerializeObject(jVec.vector3, settings));
        // 하지만 normalized 벡터나 벡터의 길이 등 불필요한 값들도 serialize되기 때문에 쓸데없이 용량이 늘어남.
        // Vector의 좌표값만 serialize되기를 원한다면 별도의 Vector 클래스를 만들어서 serialize해야함.
    }
    public class JsonVector
    {
        public Vector3 vector3 = new Vector3(3, 3, 3);
        public SerializableVector3 serializableVector3 = new SerializableVector3(3, 3, 3);
    }
2. 별도의 serialize용 vector3 클래스를 만들어서 필요한 값만 존재하게 함.
    private void Start()
    {
        JsonVector jVec = new JsonVector();
        Debug.Log(JsonConvert.SerializeObject(jVec.serializableVector3));
    }
}
// serialize용 vector3 클래스
[System.Serializable]
public class SerializableVector3
{
    public float x;
    public float y;
    public float z;

    public SerializableVector3(float x, float y, float z)
    {
        this.x = x;
        this.y = y;
        this.z = z;
    }
}
// vector3 클래스
[System.Serializable]
public class JsonVector
{
    public SerializableVector3 serializableVector3 = new SerializableVector3(3, 3, 3);
}
3. jsonUtility 기능 사용
public class JsonUtilityExample : MonoBehaviour
{
    private void Start()
    {
        JsonVector jVec = new JsonVector();
        string jsonData2 = JsonUtility.ToJson(jVec);
        Debug.Log(jsonData2);
    }
}
필요한 좌표값만 출력되는 것을 확인할 수 있다.

_
JSON UTILITY?
using UnityEngine;

public class JsonUtilityExample : MonoBehaviour
{
    private void Start()
    {
        JsonTestClass jTest1 = new JsonTestClass();
        // Json에 jTest1을 보내서 데이터형식으로 변환함
        string jsonData = JsonUtility.ToJson(jTest1);
        Debug.Log(jsonData);

        // Json으로부터 jsonData를 JsonTestClass형식으로 변환하여 가져옴
        JsonTestClass jTest2 = JsonUtility.FromJson<JsonTestClass>(jsonData);
        jTest2.PrintElements();
    }
}
단점 : 기본적인 데이터타입, 배열, 리스트에 대한 직렬화만 지원함 (cf. Dictionary, 직접 생성한 클래스XX)
1. 직접 생성한 클래스의 경우, [System.Serializable] 특성을 붙여주면 해결됨.
- Dictionary는 아예 지원하지 않음 -> 외부 라이브러리를 사용해야함.