🚨 공부중인 사람의 글입니다 🚨
- 쿠키 설정은 HTTPS를 사용한다.
📌 클라이언트 구조 파악 및 서버 기본 설정
🧩 client/app.js
credentials(such as cookies, authorization headers or TLS client certificates)이 있는 CORS 요청은 클라이언트와 서버에서 각각 이것을 허용한다는 설정을 해야 쿠키를 주고 받을 수 있게 된다.
axios에서 withCredentials = false가 기본값이므로
CORS 요청시 withCredentials = true로 설정해야 요청에 쿠키를 포함할 수 있다.
//모든 요청에 withCredentials = true 전역 설정
axios.defaults.withCredentials = true;
🧩 server/index.js
- 서버에서의 CORS 설정
{credentials: true}
const express = require('express');
const cors = require('cors');
const app = express();

const corsOptions = {
  origin: "http://localhost:3000",
  credentials: true,
  methods: ['GET', 'POST', 'OPTIONS']
};
app.use(cors(corsOptions));
- 프로토콜 설정
2-1. 인증서 파일이 있을시 https 프로토콜 사용하는 서버 실행
2-2. 인증서 파일이 없으면 http 프로토콜 사용하는 서버 실행
let server;

if (fs.existsSync('./key.pem') && fs.existsSync('./cert.pem')) {
  const privateKey = fs.readFileSync(__dirname + '/key.pem', 'utf8');
  const certificate = fs.readFileSync(__dirname + '/cert.pem', 'utf8');
  const credentials = {
    key: privateKey,
    cert: certificate,
  };
  server = https.createServer(credentials, app);
  server.listen(HTTPS_PORT, () => console.log(`🚀 HTTPS Server is starting on ${HTTPS_PORT}`));
}

else {
  server = app.listen(HTTPS_PORT, () => console.log(`🚀 HTTP Server is starting on ${HTTPS_PORT}`));
}
📌 클라이언트와 서버의 로그인 기능 구현
🧩 client/src/pages/Login.js
- ID 입력창과 PW 입력창 input value를
loginInfostate로 관리한다.
  const [loginInfo, setLoginInfo] = useState({
    userId: '',
    password: '',
  });

  const handleInputValue = (key) => (e) => {
    setLoginInfo({ ...loginInfo, [key]: e.target.value });
  };

/* 중	략 */

//ID input
<input onChange={handleInputValue('userId')} />

//Password input
<input onChange={handleInputValue('password')} />

//console.log(loginInfo)
//{userId: 'dfisdga', password: 'sdfjsg'}
//위와 같이 사용자 입력값을 받아온다.
loginInfo값으로
2-1. 로그인 실패하면 화면상에 에러메세지를 업데이트
2-2. 로그인 성공하면 POST 요청으로 로그인 정보를Mypage에 렌더링
- App 컴포넌트에서 props로 받은 state 변경 함수
setIsLogin(isLogin = 로그인 여부 boolean값)와setUserInfo(userInfo = res.data 객체) 활용
위의 로직을 로그인 버튼(type=submit)의 onClick 이벤트 핸들러 함수로 작성한다.
const loginRequestHandler = () => {

    if(!loginInfo.userId || !loginInfo.password) {
      //둘 중 하나라도 입력이 안되면 에러메시지 return
      setErrorMessage('아이디와 비밀번호를 입력하세요')
      return;
    }else {
      //그 외 경우 에러메시지 숨김
      setErrorMessage('')
    }

  //case 로그인 성공
    return axios
    		//login을 담당하는 endpoint
      .post('https://localhost:4000/login', {loginInfo, checkedKeepLogin})

  //응답으로 받은 데이터가 Mypage에 렌더링되도록 State를 변경
      .then((res) => {
        console.log(res.data)
        setUserInfo(res.data)
        setIsLogin(true)
      	setErrorMessage('')
    })
      .catch((err) => {
        console.log(err.response.data)
        setErrorMessage('로그인에 실패했습니다.')
      })
};- console에 출력된 req.body
- res.data
    {
      id: '0',
      userId: 'kimcoding',
      password: '1234',
      email: 'kimcoding@authstates.com',
      name: '김코딩',
      position: 'Frontend Developer',
      location: 'Seoul, South Korea',
      bio: '경제적, 사회적 배경에 상관없이 누구나 잠재력을 발휘할 수 있도록 현장에 필요한 교육을 제공합니다.'
}- err.response.data
Not Authorized- userInfo = 초기값 null인 상태
🧩 server/controllers/users/login.js
- 서버에 존재하는 아이디와 비밀번호를 입력하면 로그인 성공에 대한 응답을 전송해야 한다.
=> 응답과 함께 보낼 쿠키만 구현하고
=> 서버의/userinfo로 리다이렉트하여/userinfo에서 클라이언트에 응답 전송할 예정- 존재하지 않는 아이디와 비밀번호를 입력하면 로그인 실패에 대한 응답을 전송해야 한다.
res.cookie(쿠키 이름, 쿠키값, 쿠키옵션) //로그인 성공시에만 cookie 전송
const cookieOptions = {
domain: 'localhost',
path: '/',
// maxAge or Expires: 유효기간은 로그인 체크 여부에 따라 달라지므로 여기서 작성하지 않음
httpOnly: true, //자바스크립트에서 쿠키에 접근하지 못하게 함
sameSite: 'none',
// sameSite: Lax = GET 요청에만 쿠키 전송 => 클라이언트에서 로그인을 POST로 보내주고 있으므로 지금 사용하기엔 부적합
// sameSite: Strict = same-site만 가능. 현재 클라이언트는 http 프로토콜 + 3000번 포트, 서버는 https 프로토콜 + 4000번 포트로 same-site 아닌 상태
//sameSite: 'none'일 경우 secure 옵션 필요
secure: true, //true = https 프로토콜에서만 쿠키 전송 가능
}
if (userInfo.id === undefined) {
//1 로그인 실패
console.log("no login")
res.status(401).send('Not Authorized');
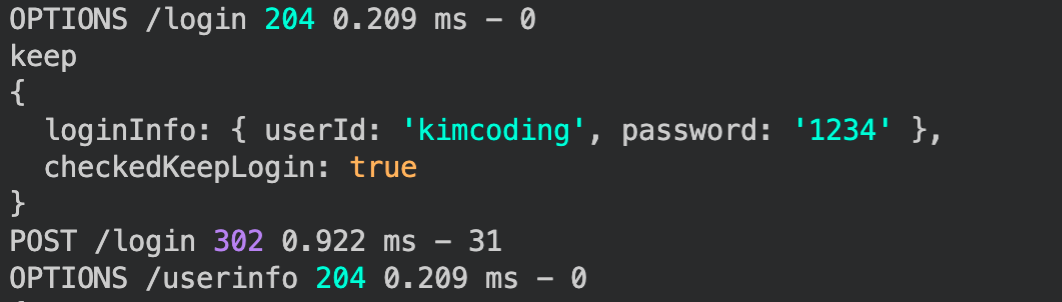
} else if (checkedKeepLogin) {
//2 로그인 성공 - 로그인 유지
console.log("keep")
cookieOptions.maxAge = 1000 * 60 * 30 //로그인 유지를 선택했으므로 쿠키옵션에 maxAge값 추가 (=> 유효시간 30분)
res.cookie('cookieId', userInfo.id, cookieOptions);
res.redirect('/userinfo');
} else {
//3 로그인 성공 - 로그인 유지 안함
console.log("no keep")
res.cookie('cookieId', userInfo.id, cookieOptions); // Expires 옵션이 없는 Session Cookie
res.redirect('/userinfo');
}📌 마이페이지 구현
🧩 server/controllers/users/userInfo.js
/login에서는 쿠키 발급만 하고 /userinfo로 리다이렉트
쿠키 발급 path !== 쿠키 검증 path
/userinfo에서 쿠키 검증 & 유저 정보를 전달
- 클라이언트에
cookieId라는 쿠키가 존재하는지 확인
쿠키가 있다면 브라우저 요청에 자동으로 포함되어 들어온다.console.log(req.cookies) //클라이언트가 요청에 포함하여 보낸 cookie를 먼저 확인해보자
- 쿠키가 존재하면 쿠키에 존재하는, DB와 일치하는 회원 정보를 응답으로 전달
2-1. 쿠키가 존재하지 않으면 요청을 거절한다.
const { USER_DATA } = require('../../db/data'); //DB 불러오기

module.exports = (req, res) => {
  const cookieId = req.cookies.cookieId;
  const userInfo = {
    ...USER_DATA.filter((user) => user.id === cookieId)[0],
  };
  //case 쿠키아이디가 존재하지 않으면 로그인 실패
  if (!cookieId || !userInfo.id){
    res.status(401).send('Not Authorized');
  } else {
  //case DB에 일치하는 회원정보를 찾으면 응답에 전달
  //⭐️ 비밀번호는 민감한 정보라서 삭제 후 보내야 한다.
  delete userInfo.password
  res.send(userInfo)
  }
};
클라이언트에 회원 정보를 보낼 때 비밀번호는 삭제해야 한다.
🧩 client/src/App.js
return문에서 조건부 렌더링으로 로그인 여부에 따라
Mypage컴포넌트 또는Login컴포넌트를 렌더링한다.
return (
    <BrowserRouter>
      <div className='main'>
        <Routes>
          <Route
            path='/'
            element={
              isLogin ? (
                <Mypage
                  setIsLogin={setIsLogin}
                  isLogin={isLogin}
                  setUserInfo={setUserInfo}
                  userInfo={userInfo}
                />
              ) : (
                <Login
                  setIsLogin={setIsLogin}
                  setUserInfo={setUserInfo}
                />
              )
            }
          />
        </Routes>
      </div>
    </BrowserRouter>
  );
useEffect
💡 최초 로그인 요청에서 로그인 유지를 체크한 경우 두번째 요청(새로고침, 재접속)부터 쿠키를 확인하고 경우에 따라
Mypage가 렌더링 돼야한다.
useEffectHook에 서버에 회원 정보 GET 요청을 보내는 authHandler 함수 작성- 쿠키를 확인하고 일치하는 유저 정보를 보내주는 엔드포인트가
/userinfo이므로 이곳으로 GET요청을 보낸다.
  const authHandler = () => {

    //초기 화면 렌더링시, 서버에 유저 정보를 요청하여 Login 또는 Mypage가 렌더링
    return axios
      .get("https://localhost:4000/userinfo")
      .then((res) => {
        setIsLogin(true)
        setUserInfo(res.data)
        console.log(userInfo)
      })
      .catch((err) => {
        console.log(err.response.data)
      });

  };

  useEffect(() => {
    // 컴포넌트 생성 시 함수 실행
    authHandler();
  }, []);
📌 클라이언트와 서버의 로그아웃 기능 구현
🧩 server/controllers/users/logout.js
로그아웃 = 쿠키 삭제
res.clearCookie('삭제할 쿠키 이름', 쿠키 만들 때와 동일한 cookieOption)method 사용
module.exports = (req, res) => {
  const cookiesOption = {
    domain: 'localhost',
    path: '/',
    httpOnly: true,
    sameSite: 'none',
    secure: true,
  }

  res.status(205).clearCookie('cookieId', cookiesOption).send("logout")
};
🧩 client/src/pages/Mypage.js
로그아웃 버튼에 onClick 이벤트 핸들러 함수를 작성한다.
//버튼을 누르면 Login 페이지로 돌아간다.
  const logoutHandler = () => {

    return axios
    .post('https://localhost:4000/logout')
    .then((res) => {
      //로그아웃 성공
      setIsLogin(false)
      setUserInfo(null)
    })
    .catch((err) => {
      //로그아웃에 실패하면 err 출력
      console.log(err.response.data)
    });
  };
이제 로그아웃 버튼을 누르면 isLogin === false되므로 App.js의 조건부 렌더링으로 로그인 페이지가 화면에 표시된다.
🏝 완성한 로그인 & 로그아웃 로직 정리
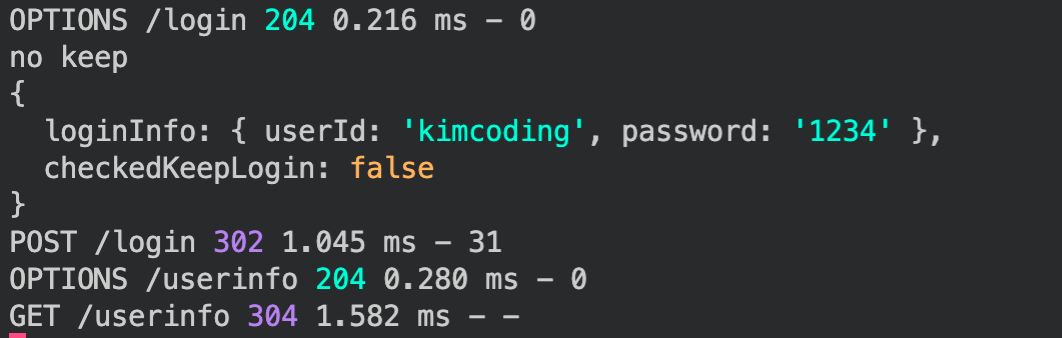
-
OPTIONS /login 204
/login 도메인으로 CORS 요청 -
POST /login 302
POST요청으로 회원 정보 입력 -> DB와 일치할 경우 서버가 클라이언트에 쿠키 발급, /userinfo로 리다이렉트 -
OPTIONS /userinfo 클라이언트가 쿠키를 포함한 CORS 요청
-
GET /userinfo
클라이언트의 쿠키를 검증하여 DB에 일치하는 회원 정보를 응답
클라이언트의 쿠키가 검증되지 않으면(쿠키가 존재하지 않으면) 요청 거절 -
클라이언트가 응답으로 받은 회원정보를 화면에 렌더링
+++ 로그아웃 버튼 클릭

- POST /logout 205
클라이언트에 저장된 쿠키 값을 초기화한다.
쿠키가 없음에 따라 로그인 컴포넌트가 렌더링된다.