[Stack Navigation]
- 화면 이동시, Screen 하나씩을 Stack에 넣고 빼는 구조
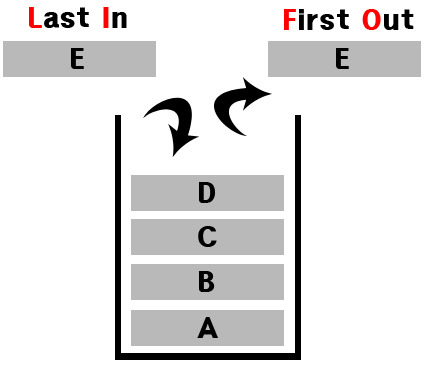
- 화면 전환시, 다른 화면으로 넘어가는게 아니고 새 화면이 스택의 제일 위에 쌓이는 것
다음 화면으로 이동한다면 화면 상으로는 이전 화면이 사라지고 새로운 화면이 보이지만, 구조적으로는 컨테이너에 최초 스크린이 push 되고 다음 화면이 push 되어서 컨테이너에 2개의 노드가 쌓인 격이다.
(출처: https://velog.io/@naseriansuzie/imcourseTIL28) - Stack 네비게이터 안에 있는 화면만 헤더를 가짐
1. Start Stack Navigator
1-0. Installing stack navigator library
npm install @react-navigation/stack1-1. Creating a stack navigator
createStackNavigator
Screen과Navigator속성을 포함하는 객체를 반환하는 함수Screen과Navigator는 navigator를 구성하는데 사용되는 리액트 컴포넌트Navigator는Screen을 child로 반드시 포함하고 있어야 함
NavigationContainer
- navigation tree를 관리하고, navigation state를 포함하는 컴포넌트
- 모든 naviagator 구조들을 감싸고 있어야 함!
- 보통 App.js에 render시킴
1-2. Configuring the navigator
import * as React from 'react';
import { View, Text } from 'react-native';
import { NavigationContainer } from '@react-navigation/native';
import { createStackNavigator } from '@react-navigation/stack';

function HomeScreen() {
  return (
    <View style={{ flex: 1, alignItems: 'center', justifyContent: 'center' }}>
      <Text>Home Screen</Text>
    </View>
  );
}

const Stack = createStackNavigator();

function App() {
  return (
    <NavigationContainer>
      <Stack.Navigator>
        <Stack.Screen name="Home" component={HomeScreen} />
      </Stack.Navigator>
    </NavigationContainer>
  );
}

export default App;- Screen 컴포넌트는 navigate에 사용할 route의 name과 상응하는
nameprop을 받음 - 렌더될 컴포넌트에 상응하는
componentprop을 받음
1-3. Specifying options
- Navigator에 있는 각 Screen은
options를 특정할 수 있다
(ex. header에 render될 title 같은 것들)
<Stack.Screen
  name="Home"
  component={HomeScreen}
  options={{ title: 'Overview' }}
/>- Navigator에 있는 모든 Screen에 같은 옵션을 주고 싶을 때는 Navigator의
screenOptions사용하기
1-4. Passing additional props
- Screen에 추가로 prop를 보내는 방법
-
React context 을 사용하고 context provider로 Navigator를 감싸기 (추천 방법)
-
render Callback 사용하기
<Stack.Screen name="Home">
  {props => <HomeScreen {...props} extraData={someData} />}
</Stack.Screen>
2. Moving between screens
2-1. Navigating to a new screen
import * as React from 'react';
import { Button, View, Text } from 'react-native';
import { NavigationContainer } from '@react-navigation/native';
import { createStackNavigator } from '@react-navigation/stack';

function HomeScreen({ navigation }) {
  return (
    <View style={{ flex: 1, alignItems: 'center', justifyContent: 'center' }}>
      <Text>Home Screen</Text>
      <Button
        title="Go to Details"
        onPress={**() => navigation.navigate('Details')**}
      />
    </View>
  );
}
navigation
navigation prop은 Stack Navigator에 있는 모든 Screen 컴포넌트에 보내짐
navigate('Details')
navigation의 prop으로 navigate 함수 호출하기
2-2. Navigate to a route multiple times
function DetailsScreen({ navigation }) {
  return (
    <View style={{ flex: 1, alignItems: 'center', justifyContent: 'center' }}>
      <Text>Details Screen</Text>
      <Button
        title="Go to Details... again"
        onPress={() => navigation.navigate('Details')}
      />
    </View>
  );
}
같은 screen으로 가고 싶을 때는?
navigate 대신 push 사용하기!
navigate: 이 screen으로 go하기!
(하지만, 이미 그 screen에 가있다면, 아무것도 안하는 것처럼 보임.)
navigate를 호출하면 먼저 해당 이름의 기존 route를 찾고, stack에 아직 route가 없는 경우에만 새로운 route를 추가해줌
push: 이 screen을 add하기!
navigation hitory에 관계없이 route를 screen 위에 추가할 수 있음
push를 호출하면 stack에 새 route를 추가함
2-3. Going back
navigation.goBack()
이전 screen으로 돌아가기
navigation.popToTop()
stack의 첫 screen으로 돌아가기
참고
https://reactnavigation.org/docs/hello-react-navigation
https://reactnavigation.org/docs/navigating

Frontend Developer