부모/조상 ↔ 자식/후손 관계가 아닌 컴포넌트 간의 데이터 공유는 어떻게 할까?
전역화된 데이터를 두고 각각의 컴포넌트에서 이에 접근하고, 변경시킬 수 있다. 하지만, 프로젝트가 크고 복잡해지면 매번 이 작업으로 해결하기엔 한계가 있다.
전역화할 데이터에 반응성을 준다. reactive
import {reactive} from ' vue'

export const state = **reactive**({
  msg: "Hello vue?",
  count: 1,
});
store/index.js에서 전역으로 사용할 반응형 데이터를 만들어두고, 각각의 컴포넌트는 이 데이터에 접근하여 사용한다.
import { state } from "~/store";반응형 데이터를 변경할 때에는 mutations 옵션을 사용한다.
그외 로직엔 actions 옵션을 사용한다.
computed처럼 계산된 데이터를 사용하기 위해 getters 옵션을 사용한다.
import { reactive } from "vue";

export const state = reactive({
  msg: "Hello vue?",
  count: 1,
});

export const mutations = {
  increaseCount() {
    state.count += 1;
  },
  decreaseCount() {
    state.count -= 1;
  },
  **updateMsg(newMsg) {
    state.msg = newMsg;
  },**
};
export const actions = {
  async fetchTodo() {
    const todo = await fetch(
      "https://jsonplaceholder.typicode.com/todos/1"
    ).then((res) => res.json());
    console.log(todo);
    **mutations.updateMsg = todo.title; // 데이터 변경하는 mutations 메소드 호출!**
  },
};
//World.vue
<template>
<h1>World.vue</h1>
<div>{{ reversedMsg }}</div>
<div @click="decreaseCount">{{ count }}</div>
</template>
<script>
import { state, mutations, getters } from "~/store";
export default {
data() {
return state;
},
methods: {
decreaseCount: mutations.decreaseCount,
},
computed: {
reversedMsg: getters.reversedMsg, // 여기서reversedMsg메소드 활용
},
};
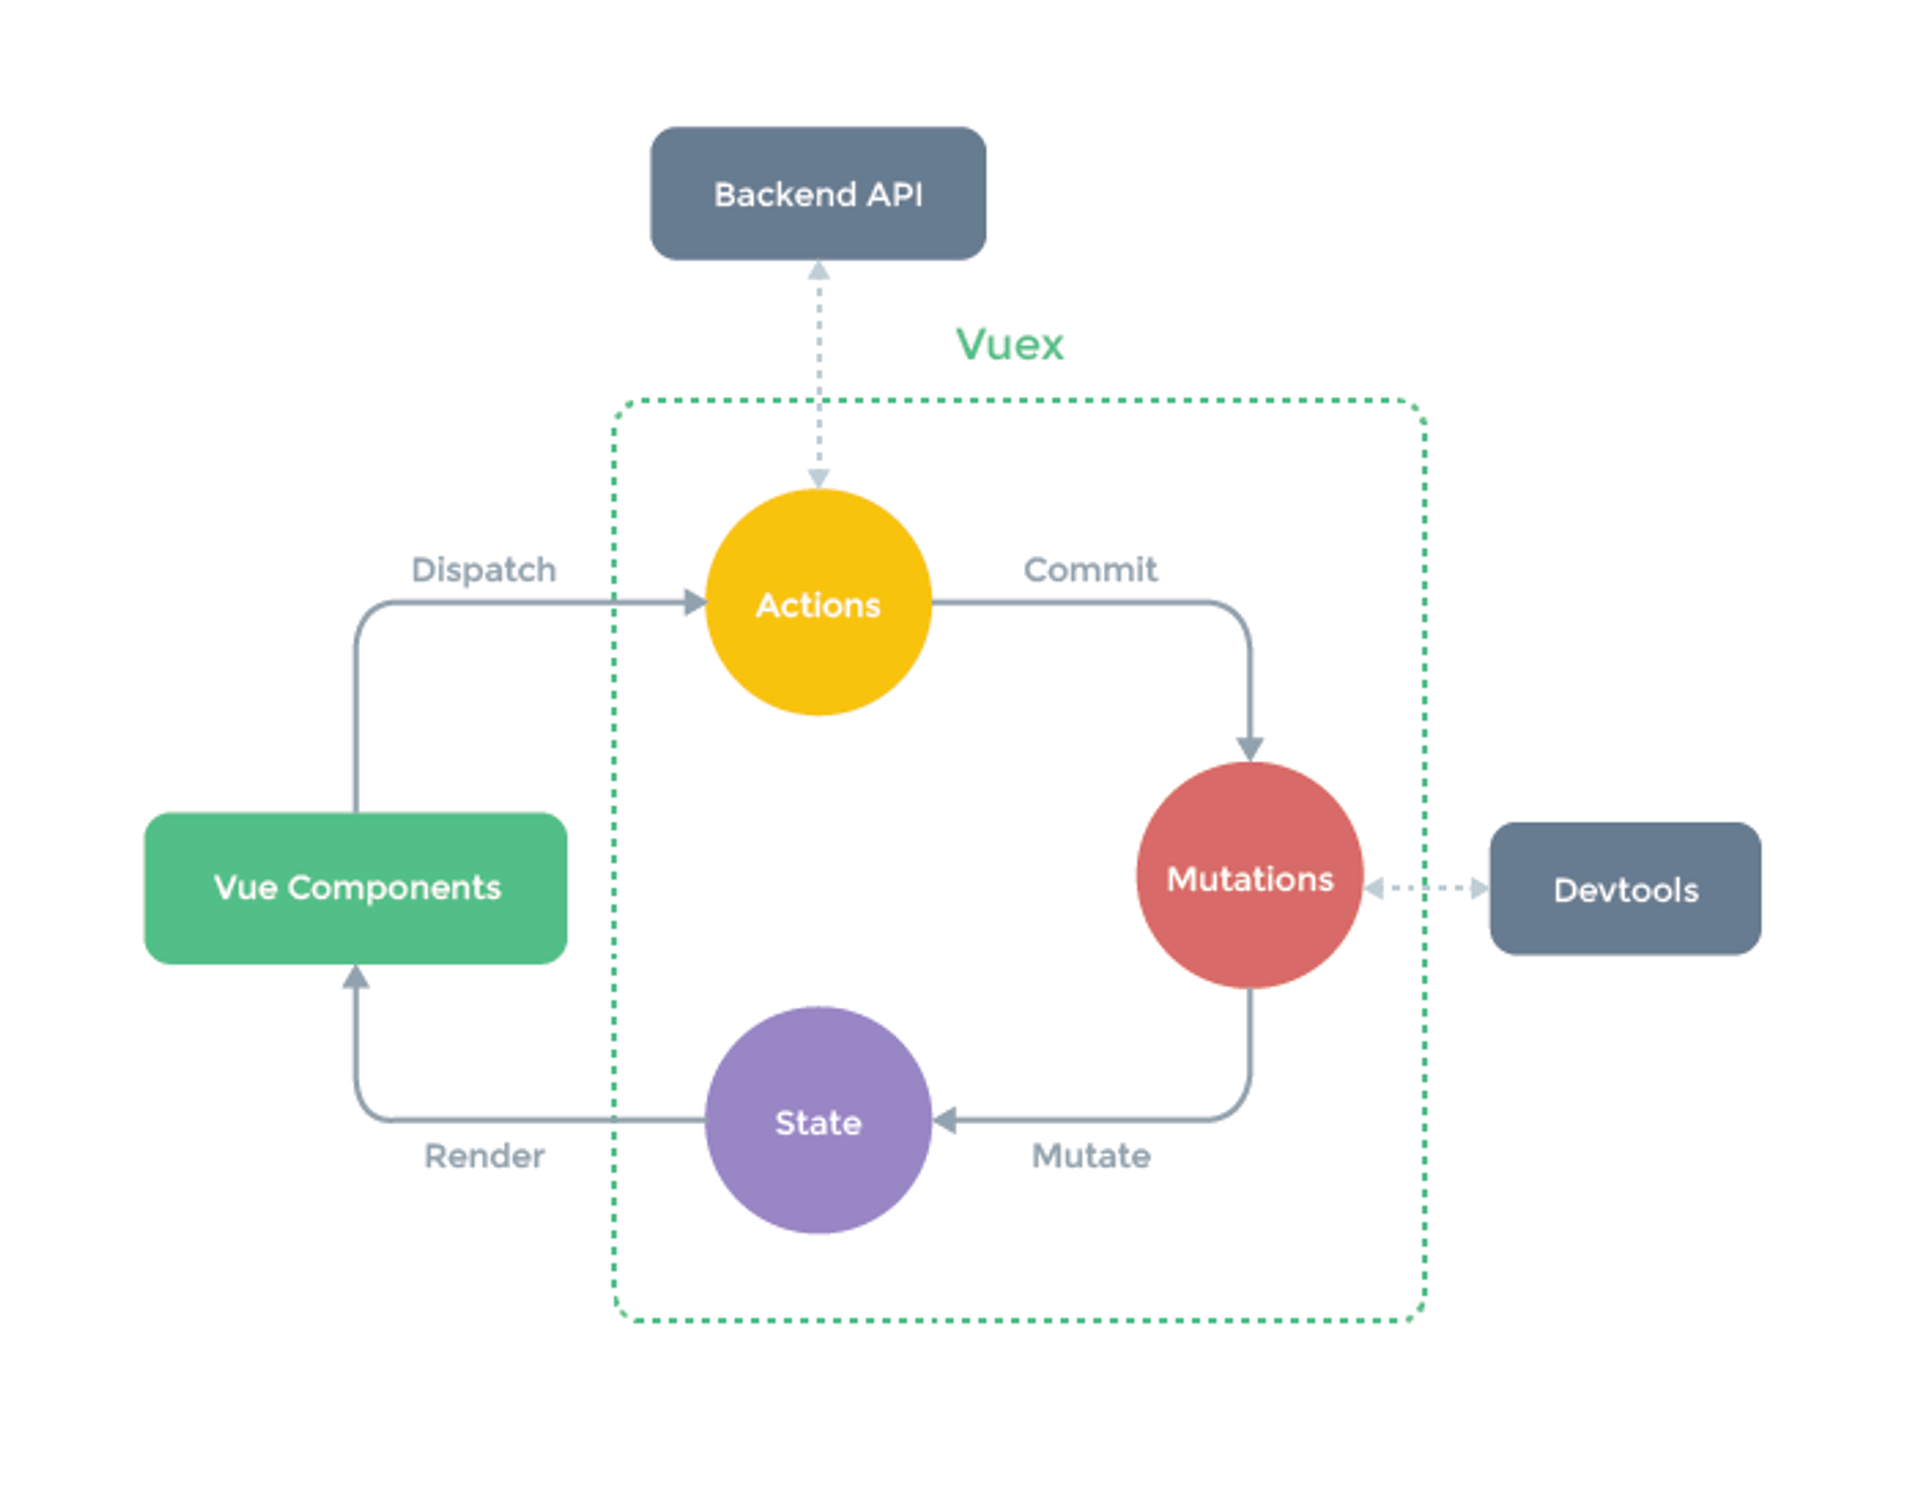
</script>이와 같은 작업들을 간단하면서 최적화되어 사용하는 라이브러리가 있다! === Vuex !
Vuex
Vue.js 애플리케이션에 대한 상태 관리 패턴 + 라이브러리
npm install vuex@next
main.js에 모든 데이터를 중앙집중화 하여 관리할 수 있지만, 데이터와 작업이 많아지면 번잡해지므로, 따로 관리하는 파일을 만들자 ⇒ src/index.js
컴포넌트에선 이 src/index.js에 접근하여 데이터 변경함수를 호출한다.
//index.js

import { createStore } from "vuex";

export default createStore({
  **state() { // 사용할 데이터**
    return {
      msg: "hello?",
      count: 1,
    };
  },
  **getters: { // computed와 같은 데이터에 대해서 계산된 데이터**
    reversedMsg(**state**) { **// 인자로 데이터인 state !!!**
      return state.msg.split("").reverse().join("");
    },
  },
  **mutations: { // 데이터를 변경하는 로직**
    increaseCount(**state**) { // 인자로 데이터인 state!! 이후에 내부 접근 가능
      state.count += 1;
    },
    updateMsg(state, newMsg) {
      state.msg = newMsg;
    },
  },
  **actions: { // 그 외 로직**
    async fetchTodo(**context**) { // 딘자로 다른 actions에 접근할 수 있는 **context**를 제공
      // context => state, getters 접근 가능. commit, dispatch로 접근 가능
      const todo = await fetch(
        "https://jsonplaceholder.typicode.com/todos/1"
      ).then((res) => res.json());
      // mutations 옵션을 사용할 땐 **commit** 사용
      context.**commit**("updateMsg", todo.title); // (실행할 변이메소드명, 인수)

      // fetchTodo({commit}) 으로 구조분해 했다면 그냥 commit으로
    },
  },
});
state() { }
사용할 데이터getters : { }
computed와 같은 데이터에 대해서 계산된 데이터mutations : { }
데이터를 변경하는 로직actions: { }
그 외 로직
각 내부 메소드엔 인자로 context를 받는다. 해당 객체에서의 state, getters에 각각 commit과 dispatch 메소드를 사용하여 접근할 수 있다!
//App.vue
<template>
  <h1>{{ msg }}</h1>
  <Hello />
  <button @click="increaseCount">INCREASE!</button>
  <World />
  <button @click="$store.dispatch('fetchTodo')">Update Msg!</button>
</template>

<script>
import Hello from "~/components/Hello";
import World from "~/components/World";

export default {
  components: {
    Hello,
    World,
  },
  data() {
    return {
      msg: "Hello webpack",
    };
  },
  methods: {
    increaseCount() {
      this.$store**.commit("increaseCount");** /////!! 이전엔 mutations.increaseCount로 썼었음
    },
    fetchTodo() {
      //action을 실행할 땐 dispatch!
      this.$store**.dispatch("fetchTodo");**
    },
  },
};
</script>
- 사용할 컴포넌트를 import한다.
- components 옵션에 그 컴포넌트들을 명시한다.
- 옵션들에서 store데이터에 접근할때에는 this.$store.메소드 방식을 사용한다.
main.js에서 app.use로 store파일을 플러그인 등록했기 때문에 $store로 접근 가능!- 데이터를 변경하는 mutations 메소드를 발생시키기 위해 commit 메소드 사용!!
- actions 메소드를 발생시키기 위해 dispatch 사용!!
//World.vue

<template>
  <h1>World.vue</h1>
  <div>{{ reversedMsg }}</div>
</template>
<script>
export default {
  computed: {
    reversedMsg() {
      return this.$store.getters.reversedMsg;
    },
  },
};
</script>
- 일반 데이터에 접근할때는 this.store.getters.데이터로 가능
📌 정리
상태관리js에서
데이터는 state(), 계산된데이터 getters, 데이터변경메소드 mutations, 그외메소드 actions
컴포넌트vue에서
데이터에 접근할땐 this.store.~ mutations메소드를 호출할땐 this.store.commit(~
actions메소드를 호출할땐 this.$store.distpacth(~
모듈화
현재, index.js에 모든 store데이터를 관리하고 있어서 모든 컴포넌트가 이 파일로 접근한다. 규모가 커질 수록 내용이 길어지고 복잡해지기 때문에 “모듈화”를 이용해보자.
- 데이터를 각각의 파일에서 관리하도록 분리한다.
- 해당 범위로 제한하는
namespaced: true를 지정한다.- index.js에선 해당 파일을 modules 옵션에서 객체의 멤버로 호출한다.
- 컴포넌트vue에서 사용시,
state의 데이터를 가져올땐 점표기법 -this.$store.state.NS.DATA
getters를 가져올 땐 -this.$store**['NS/DATA']**
변이메소드 mutations 호출할 땐 -this.$store.**commit**('NS/DATA')
actions메소드 호출할 땐 -this.$store.**dispatch**('NS/DATA')
(NS: 네임스페이스명(=모듈명, 주로 파일명), 데이터 명)
<template>
  <h1>Hello.vue</h1>
  <div>{{ count }}</div>
  <button @click="increaseCount">+</button>
  <button @click="decreaseCount">-</button>
  <div>{{ msg }} // {{ reversedMsg }}</div>
  <!-- hi from message.js // sj.egassem morf ih -->
  <button @click="fetchTodo">Fetch Todo</button>
</template>
<script>
export default {
  computed: {
    count() {
      return this.$store.state.count.count;
    },
    msg() {
      return this.$store.state.message.msg;
    },
    reversedMsg() {
      return this.$store.getters["message/reversedMsg"]; // getters 값에 대해선 이렇게..!
    },
  },
  methods: {
    increaseCount() {
      this.$store.commit("count/increaseCount"); //   모듈명/변이메소드명
    },
    decreaseCount() {
      this.$store.commit("count/decreaseCount");
    },
    fetchTodo() {
      this.$store.dispatch("message/fetchTodo"); // action메소드 실행엔 dispatch!
    },
  },
};
</script>
<style scoped lang="scss">
h1 {
  color: yellow;
}
</style>
매핑 기능
위의 코드에서 데이터와 메소드가 많아질 수록 길어지고 복잡해진다! 이때, “매핑”을 사용한다!
import { mapState, mapGetters, mapMutations, mapActions } from "vuex";
<template>
  <h1>Hello.vue</h1>
  <div>{{ count }}</div>
  <button @click="increaseCount">+</button>
  <button @click="decreaseCount">-</button>
  <div>{{ msg }} // {{ reversedMsg }}</div>
  <!-- hi from message.js // sj.egassem morf ih -->
  <button @click="fetchTodo">Fetch Todo</button>
  <div>전역데이터인 msg : {{ msg }}</div>
</template>
<script>
import { mapState, mapGetters, mapMutations, mapActions } from "vuex";

export default {
  computed: {
    // mapState()가 실행되고 난 결과를 전개한다는 뜻
		// **mapState(모듈명, [사용할상태들이름들])**
    ...mapState(["msg"]), // 모듈아니고 전역일때는 이렇게!
    ...mapState("count", ["count"]),
    // count() {
    //   return this.$store.state.count.count;
    // },
    ...mapState("message", ["msg"]),
    // msg() {
    //   return this.$store.state.message.msg;
    // },
    ...mapState("message", ["reversedMsg"]),
    // reversedMsg() {
    //   return this.$store.getters["message/reversedMsg"]; // getters 값에 대해선 이렇게..!
    // },
  },
  methods: {
    ...mapMutations("count", ["increaseCount", "decreaseCount"]),
    // increaseCount() {
    //   this.$store.commit("count/increaseCount"); //   모듈명/변이메소드명
    // },
    // decreaseCount() {
    //   this.$store.commit("count/decreaseCount");
    // },
    ...mapActions("message", ["fetchTodo"]),
    // fetchTodo() {
    //   this.$store.dispatch("message/fetchTodo"); // actions메소드 실행엔 dispatch!
    // },
  },
};
</script>
<style scoped lang="scss">
h1 {
  color: yellow;
}
</style>
- mapState(모듈명, [사용할상태들이름들])
모듈의 state, getters와 같은 데이터를 호출할 때- mapMutations(모듈명/변이메소드명)
모듈의 mutations과 같은 변이 메소드를 호출할 때- mapActions(모듈명/ actions메소드명)
모듈의 actions 메소드를 호출할 때
📌 정리
state, getter ↔ 기본호출 , mapState
mutations ↔ commit, mapMutations
actions ↔ dispatch, mapActions