
shaodw DOM
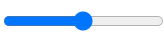
<input type="range"></input>크롬 개발자도구 - 설정 - show user agent shadow DOM 체크시,
여러개의 div 를 이용해 만들어진 것을 알 수 있다.

이걸 shadow DOM이라고 하는데 ‘일반적으로 볼 수 없는 숨겨진 HTML’을 의미한다.
만드는 방법
// html...
<div class="mordor"></div>

// script...
let el = document.querySelector('mordor')
el.attachShadow({mode: 'open'});
el.shadowRoot.innerHTML = `<p>심연에서 왔도다</p>`
attachShadow() 로 shadowRoot 라는 공간을 만들고 shadowRoot 에 원하는 html 을 넣으면 숨겨진다.
거의 모든 태그는 shadowRoot를 만들 수 있고 shadowRoot 안에 있는 모든 요소들을 shadowDOM 이라고 칭하는데 web component 문법과 함께 썻을 때 진가를 발휘하게 된다.
Web component의 단점 - 스타일 오염
class 클래스 extends HTMLElement {
  connectedCallback() {
    this.innerHTML = `<label>이름을 입력하쇼</label><input>
      <style> label { color : red } </style>`
  }
}

customElements.define("custom-input", 클래스);<custom-input></custom-input>
<label>왜 나까지 빨개짐?</label>Web Component문법에 스타일을 넣고 싶을 경우 약간의 문제가 있다.
스타일까지 지정해 컴포넌트화 할 수 있는데 이럴 경우 컴포넌트와 관계가 없는 다른 태그까지 오염이 발생한다.
이럴 때 shadow DOM 안에 스타일 코드를 넣어 놓으면 바깥에 있는 다른 요소에 영향을 끼치지 않는다.
class 클래스 extends HTMLElement {
  connectedCallback() {
    this.attachShadow({mode : 'open'});
    this.shadowRoot.innerHTML = `<label>이름을 입력하쇼</label><input>
      <style> label { color : red } </style>`
  }
}

customElements.define("custom-input", 클래스);
컴포넌트를 만들 때 html이 길어지면 <template> 태그에 임시 보관이 가능하다.
<custom-input></custom-input>

  <template id="template1">
    <label>이메일을 입력하쇼</label><input>
    <style>label { color : red }</style>
  </template>

  <script>
    class 클래스 extends HTMLElement {
      connectedCallback() {
        this.attachShadow({mode : 'open'});
        this.shadowRoot.append(template1.content.cloneNode(true));
      }
    }
    customElements.define("custom-input", 클래스);
  </script>
<template> 은 특수한 태그로 여기에 적힌 html은 렌더링 되지 않는다.