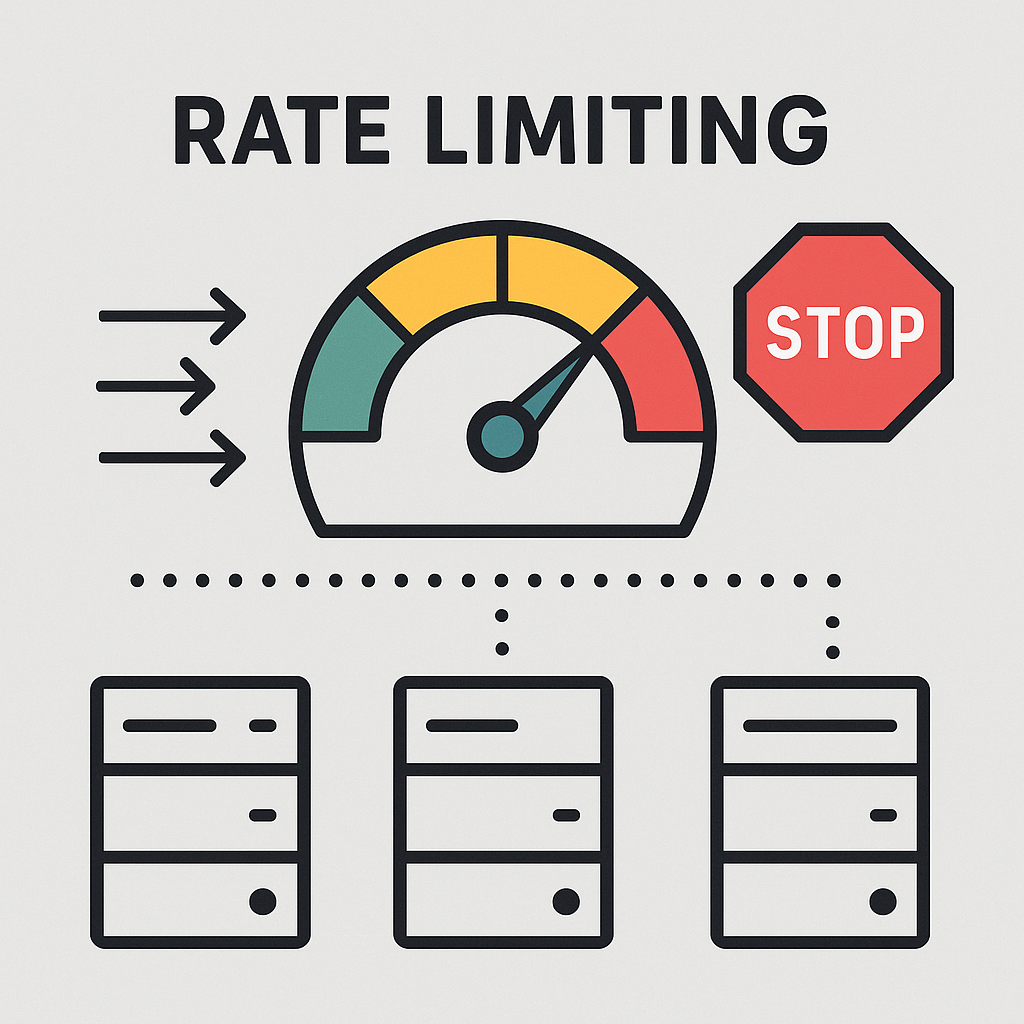
서비스를 개발한다면 악의적인 DDOS 공격을 예방하고, 특정 API, 사용자의 호출량을 제한하기 위해 Rate limiting 정책을 지정합니다. 현재 개발하는 서비스에서 Feed의 작성, 조회에 대해 호출량을 제한하는 요구사항이 존재하여 Rate limiting을 할 수 있는 방안을 단계별로 실행해봤습니다.
어디서 Rate limiting 을 지정하는지?
- 클라이언트
- 미들웨어
- 어플리케이션 서버
클라이언트에서 Rate limiting 정책을 사용하면, 추가적인 리소스가 들지 않는 장점이 있으나, 쉽게 우회될 수 있있다는 단점이 있습니다. API Gateway, Nginx 등 과 같은 미들웨어에서 진행한다면 시스템 전체에 적용이 가능하다는 장점이 있으나, 비교적 유언성이 낮다는 단점이 있습니다.
마지막으로 어플리케이션 서버에서 제한한다면 상대적으로 유연하고 사용자의 상태/로직을 반영할 수 있느나, 추가적인 서버 리소스의 소모가 있고, 분산 환경에서의 대응 및 고려가 필요합니다.
이번에는 Spring Application에서 제한하는 방법에 대해 알아보려고 합니다.
API Calling Limit 알고리즘
- 누출 버킷 (leaky bucket)
- 고정 윈도 카운터 (fixed window counter)
- 토큰 버킷 (Token Bucket)
- 슬라이딩 윈도우 (Sliding Window Log)
Leaky Bucket
요청을 버킷(큐)에 담고 일정한 속도로 처리하여 트래픽을 평준화합니다. 버킷이 가득 차면 새 요청은 거부되거나 대기됩니다. 주로 서버 안정성이 중요한 환경에 적합합니다.
서버 안정성이 중요한 환경에 적합합니다.
Fixed Window Counter
고정된 시간 구간(예: 1분)마다 요청 횟수를 카운트하여 제한합니다. 구현이 단순하고 효율적이지만, 윈도우 경계에서 순간적인 폭주가 허용될 수 있습니다. 간단한 속도 제한에 적합합니다.
Token Bucket
버킷에 일정한 속도로 토큰을 채우고, 요청마다 하나씩 소비합니다. 토큰이 있다면 요청을 허용하므로 버스트 트래픽도 일정 수준까지 처리 가능합니다. 유연하고 사용자 경험이 중요한 API에 적합합니다.
Sliding Window Log
요청마다 타임스탬프를 기록하고, 최근 일정 시간 내 요청 수를 계산합니다. 정확한 시간 기반 제어가 가능하지만, 메모리 사용량이 많습니다. 프리미엄 API나 정밀한 제어가 필요한 서비스에 적합합니다.
Spring Application 환경에서의 Rate limiting
- Java 자료구조와 직접 알고리즘을 구현하여 제한
- Bucket4j 라이브러리 사용
- 분산환경에서의 API 호출 제한
세 가지 방법 모두에 적용되는 RateLimiter Interface, Ratelimited Annotation, RateLimitedAspect.class를 정의 해 줍니다.
RateLimiter Interface
public interface RateLimiter {

    /**
     * 해당 요청을 처리할 수 있는지 확인하는 함수
     */
    boolean isAllowed(String key, int limit, int durationInSeconds);
}
RateLimited annotation.class
@Target(ElementType.METHOD)
@Retention(RetentionPolicy.RUNTIME)
public @interface RateLimited {
    int limit() default 5;
    int durationInSeconds() default 60;
}
limit, duratinoInSeconds를 필드로 가지는 Custom annotation인 @RatedLimited 입니다.
RateLimitAspect.class
@Aspect
@Component
@RequiredArgsConstructor
public class RateLimitAspect {

    private final RateLimiter rateLimiter;

    @Around("@annotation(com.server.sns.global.common.ratelimit.RateLimited)")
    public Object rateLimit(ProceedingJoinPoint joinPoint) throws Throwable {
        Method method = ((MethodSignature) joinPoint.getSignature()).getMethod();
        RateLimited annotation = method.getAnnotation(RateLimited.class);

        Long userId = AuthContextHolder.get().getUserId();
        String key = userId.toString() + ":" + method.getName();

        boolean allowed = rateLimiter.isAllowed(key, annotation.limit(), annotation.durationInSeconds());

        if (!allowed) {
            throw new RateLimitExceededException(ExceptionCode.RATE_LIMIT_EXCEPTION);
        }

        return joinPoint.proceed();
    }
}
Spring AOP를 활용하여 @RatedLimited annotation 이 붙은 Method에 대해 Rate limiting 을 적용하는 Aspect 클래스 입니다.
AuthContextHolder 클래스는 ThreadLocal를 사용하여 현재 스레드에 바인딩된 사용자 정보 저장소 입니다. AuthContextHolder로 부터 userId를 밭아오고, userId와 method이름을 조합하여 key값을 만들어 줍니다.
rateLimiter.isAllowed() 가 true이면 jointPoint.proceed를 통해 해당 메서드를 실행하고, false일 경우에 RateLimitExceededExcpetion 예외를 던져줍니다.
Java 자료구조와 Sliding Window Log 알고리즘을 활용하는 방식
Sliding Window Log는 요청이 들어온 시간을 모두 저장하고, 매번 요청 시점 안에 있는 요청 수를 카운팅 하는 방식입니다.
요청이 들어올 때 윈도우 바깥에 있는 로그를 제거하고, 남은 로그 수가 제한 limit보다 작으면 허용하고, 아니면 차단합니다.
@Component
public class InMemoryRateLimiter implements RateLimiter {

    private final Map<String, Deque<Long>> requestLog = new ConcurrentHashMap<>();

    @Override
    public boolean isAllowed(String key, int limit, int durationInSeconds) {
        long now = System.currentTimeMillis();
        long windowStart = now - durationInSeconds * 1000L;

        requestLog.putIfAbsent(key, new LinkedList<>());
        Deque<Long> times = requestLog.get(key);

        synchronized (times) {
            while (!times.isEmpty() && times.peekFirst() < windowStart) {
                times.pollFirst();
            }

            if (times.size() >= limit) {
                return false;
            }

            times.addLast(now);
            return true;
        }
    }
}
Spring application은 다수의 사용자가 동시에 요청하기 때문에, 이 requestLog에 동시에 여러 쓰레드가 접근할 수 있습니다. 만약 일반 HashMap을 사용하면, 동시에 put, get, computeIfAbsent, remove 등의 연산이 충돌하여 데이터 불일치가 발생할 수 있습니다.
ConcurrentHashMap은 내부적으로 세분화된 락을 사용해 다중 쓰레드가 동시에 읽거나 쓰더라도 안전하게 동작합니다.
Deque는 멀티 스레드 환경에서 thread-safe를 보장하지 않기 때문에 synchronized로 동기화를 해줘야 합니다. 실제로 API가 호출되는 환경은 멀티 스레드 환경이기 때문에 해당 로직이 실패할 확률이 있습ㄴ디ㅏ.
synchronized로 동기화 하거나 ConcurrentLinkedDeque같이 멀티 스레드 환경에서 thread-safe를 보장하는 자료구조를 사용하여야합니다.
sychronized로 동기화 하지 않고 멀티 스레딩 환경에서 isAllowed()를 실행하면 실패하는 경우가 아래 테스트 코드를 통해 볼 수 있습니다.
InMemoryRateLimterTest.class
@Test
    void testConcurrentAccess() throws InterruptedException {
        String key = "concurrentKey";
        int limit = 100;
        int durationInSeconds = 60;

        ExecutorService executor = Executors.newFixedThreadPool(10);
        CountDownLatch latch = new CountDownLatch(200);
        AtomicInteger allowedCount = new AtomicInteger();

        for (int i = 0; i < 200; i++) {
            executor.submit(() -> {
                if (rateLimiter.isAllowed(key, limit, durationInSeconds)) {
                    allowedCount.incrementAndGet();
                }
                latch.countDown();
            });
        }

        latch.await();
        // limit보다 allowedCount가 크면 테스트 ㅅ리패
        assertTrue(allowedCount.get() <= limit);
    }
직접 테스트 해본 10번중에 2-3번 정도 실패하였습니다.
슬라이딩 윈도우 알고리즘을 구현된 rate limiting은 어느 순간의 윈도우를 보더라도, 허용되는 요청의 개수가 시스템의 처리율 한도를 넘지 않아 정교하다는 장점이 있으나, 요청 수 만큼 로그를 저장하므로 많은 메모리를 사용한다는 단점이 있습니다.
Bucket4j 라이브러리 사용
Bucket4j는 Token Bucket 알고리즘에 기반하여 Java 환경에서 rate limiting을 효과적으로 구현할 수 있게 도와주는 라이브러리로서 Thread-safe하며 Redis, MySQL 등의 외부 스토리자와의 연동을 지원합니다.
Token Bucket 알고리즘?
Token Bucket은 지정된 용량을 갖는 컨테이너로, 이 Bucket에는 사전에 설정된 양의 토큰이 주기적으로 채워지게 됩니다.
각 요청이 와서 처리 될 때마다 하나의 토큰을 사용하며, 요청이 도착한 후 버킷에 가용한 토큰이 있는 경우, 버킷에서 토큰 하나를 꺼내서 사용하고, 가용한 토큰이 없는 경우 해당 요청을 거부됩니다.
Bucket4j 의존성 추가
implementation("com.bucket4j:bucket4j-core:8.7.0")Bucket4jRateLimiter.class
@Component
public class Bucket4jRateLimiter implements RateLimiter{

    private final Map<String, Bucket> bucketMap = new ConcurrentHashMap<>();

    @Override
    public boolean isAllowed(String key, int limit, int durationInSeconds) {

        bucketMap.putIfAbsent(key, Bucket.builder()
                .addLimit(bucketLimit -> bucketLimit.capacity(limit).refillIntervally(limit, Duration.ofSeconds(durationInSeconds)))
                .build());

        Bucket bucket = bucketMap.get(key);

        return bucket.tryConsume(1);
    }
}Capacity는 토큰 버킷 알고리즘의 개녕메서 유래한 용어로, 버킷에 담을 수 있는 최대 개수를 의미하며, 버킷을 생성할 때 반드시 설정해야 합니다.
버킷의 Refill 방식에는 Greedy, Intervally, IntervallyAligned 방식이있으며, Greedy는 전체 주기를 기다리지 않고, 가능한 빨리 조금씩 자주 토큰을 채우며, Intervally는 일정 주기마다 한 번에 토큰을 채운다.
마지막으로 IntervallyAligned는 Intervally와 비슷하지맘, 첫 번째 리필이 언제 발생해야 하는지 시간을 지정할 수 있습니다. 여기서는 Intervally 방식으로 durationInSeconds 기간마다 리필하도록 하였습니다.
Buckey.tryConsume()은 현재 가용한 토큰이 없다면 false를 return 합니다.
분산환경에서의 Rate limiting
단일 인스턴스에서 환경이 아닌 분산 환경에서 rate limiting을 적용하려면, 외부 저장소를 사용하여 RDBMS나 Redis같은 key-value storage가 필요하다.
RDBMS는 디스크 기반으로 속도가 Redis에 비해 느리기 때문에 Redis를 사용해봤습니다.
Bucket4j는 Redis, Jedis, Lettuce를 모두 지원하며, 여기서는 Lettuce를 사용하였습니다.
의존성 추가
	implementation 'com.bucket4j:bucket4j-core:8.7.0'
	implementation 'com.bucket4j:bucket4j-redis:8.7.0'
RedisConfig.class
@Configuration
public class RedisConfig {

    @Value("${spring.data.redis.port}")
    private int port;
    @Value("${spring.data.redis.host}")
    private String host;

    @Bean
    public RedisClient redisClient() {
        return RedisClient.create(RedisURI.builder()
                .withHost(host)
                .withPort(port)
                .build());
    }

    @Bean
    public ProxyManager<String> lettuceBasedProxyManager() {
        RedisClient redisClient = redisClient();
        StatefulRedisConnection<String, byte[]> redisConnection = redisClient
                .connect(RedisCodec.of(StringCodec.UTF8, ByteArrayCodec.INSTANCE)); // 키는 UTF-8 문자로, 값은 바이트 배열로 직렬화

        LettuceBasedProxyManager<String> proxyManager = LettuceBasedProxyManager.builderFor(redisConnection)
                .withExpirationStrategy(ExpirationAfterWriteStrategy.basedOnTimeForRefillingBucketUpToMax(ofSeconds(10)))
                .build();

        return proxyManager;
    }
}
Redis 사용을 위한 설절 클래스입니다. RedisClient와 ProxyManger를 Bean으로 등록하며 ProxyManer의 구현체는 LettuceBasedProxyManager입니다. ExpirationAfterWriteStrategy는 버킷 정보를 Redis에서 얼마나 유지할지 결정하는 전략으로 여기서는 리필 주기 기준 TTL 10s로 설정하였습니다.
RedisRateLimiter.class
@Component
@RequiredArgsConstructor
public class RedisRateLimiter implements RateLimiter{

    private final ProxyManager<String> proxyManager;

    @Override
    public boolean isAllowed(String key, int limit, int durationInSeconds) {

        BucketConfiguration bucketConfiguration = BucketConfiguration.builder()
                .addLimit(bucketLimit -> bucketLimit.capacity(limit).refillIntervally(limit, Duration.ofSeconds(durationInSeconds)))
                .build();

        // 해당 버킷이 있으면 반환, 없으면 생성
        BucketProxy bucket = proxyManager.builder().build(key, bucketConfiguration);

        // 요청을 처리할 수 있는지 확인하고, 남은 토큰 수 정보 반환
        ConsumptionProbe probe = bucket.tryConsumeAndReturnRemaining(1);

        return probe.isConsumed();
    }
}
기존 Bucket4jRateLimiter.class 에서는 ConcurrentHashMap을 사용하여 버킷에 대한 정보를 관리하였는데, 여기서는 Redis에 저장합니다.
BucketConfiguration.builder() 에서 최대 limit개의 요청을 허용하고, durationInSeconds마다 limit만큼 리필 되도록 설정하였습니다.
BucketProxy bucket = proxyManager.builder().build(key, bucketConfiguration);지정한 key값으로 Redis에 저장된 버킷을 가져오거나 없으면 새로 생성합니다.
ConsumptionProbe probe = bucket.tryConsumeAndReturnRemaining(1);
return probe.isConsumed();
1개의 요청을 처리할 수 있는지 확인하고, 남은 토큰 수 정보를 반환합니다. Probe 클래스에는 consumed , remainingTokens, nanosToWaitForRefill, nanosToWaitForReset 값이 들어있으며, 가용한 토큰이 충분하다면, consumed = true가 되고 remainingTokens에는 남아있는 token값이 들어갑니다.
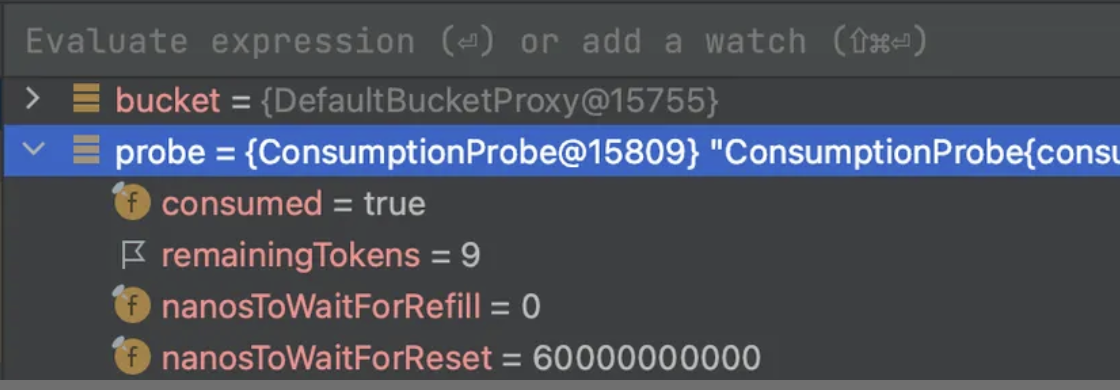
한번 요청을 보낸 후 디버깅해서 ramaininTokens 값은 9가 됨을 볼 수 있습니다.
Reference
- https://jonghoonpark.com/2023/05/17/처리율-제한-장치-설계#방법-1-서버-측에서-구현
- https://bucket4j.com/8.14.0/toc.html#about-bucket4j
- https://github.com/bucket4j/bucket4j/blob/master/bucket4j-redis/bucket4j-lettuce/src/main/java/io/github/bucket4j/redis/lettuce/cas/LettuceBasedProxyManager.java
- https://velog.io/@kny8092/처리율-제한-장치-붙이기-여정#사용하기
