💡 라우터 만들기
[{ path : '',
//path: url 주소
component:'',
// component: url 주소로 갔을 때 표시될 컴포넌트 }]
- 라우터 파일 만들기
src 폴더 내에 router.js 파일 생성
(혹은 라우터 폴더를 만들어서 그 안에 index.js나 router.js 등 파일 생성)
import { createWebHistory, createRouter } from "vue-router";
import NewList from "@/components/NewList.vue";
import NewHome from "@/components/NewHome.vue";

const routes = [
    {
        path: "/list",
        component: NewList,
    },
    {
        path: "/",
        component: NewHome,
    }
];

📍 어떤 경로를 치면 , 어떤 컴포넌트로 가겠다!


const router = createRouter({
    history: createWebHistory(),
    routes,
});

export default router;- main.js에도 라우터를 쓴다고 말하기
import router from './router'
createApp(App).use(router).mount('#app') - App.vue 에서 원하는 곳에 router-view 태그 추가
<router-view></router-view>App.vue의 HTML내부 아무데나 저 태그를 추가해주면
라우터로 구분된 페이지를 그 자리에 보여준다.
- props도 함께 전송 (만약 있다면!)
<router-view :블로그글="블로그글"></router-view> 📍 페이지 이동링크를 만들고 싶다면 ?
<router-link to="/list">이동하기</router-link>이런 버튼을 추가해주면 되는데 a태그랑 비슷하다.
to="" 안에 마음대로 경로설정이 가능하다.
📍 router 폴더 생성
(src> main.js)

import { createApp } from 'vue'
import App from './App.vue'
import router from '/src/router/index';

createApp(App).use(router).mount('#app')
(src> router> index.js)
import AskView from "../views/AskView.vue";
import NewsView from "../views/NewsView.vue";
import JobsView from "../views/JobsView.vue";
import { createRouter} from 'vue-router';
import {createWebHistory} from "vue-router";
const routes = [
{
path : '/news',
//path: url 주소
component: NewsView,
// component: url 주소로 갔을 때 표시될 컴포넌트
},
{
path : '/ask',
component: AskView,
}
,
{
path : '/jobs',
component: JobsView,
}
];
const router = createRouter({
history: createWebHistory(), routes
});
export default router;라우터 내 폴더에서 컴포넌트들의 경로를 관리한다.
💡 파라미터 문법
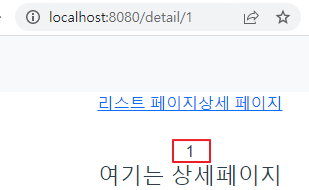
일반적인 사이트를 보면
/상품명/123 또는 /상품명/234 이런 식으로 주소창이 보이는데 이런걸 해보자.
(router.js)
const routes = [
  {
    path: '/detail/:id',
    component: Detail,
  },
];
주소창에 /detail/ 뒤에 아무거나 작성했을 때, 항상 Detail.vue를 보여주세요 라는 뜻!
: 콜론기호 붙이고 뒤에 아무거나 작명해주면 된다.
📍 컴포넌트 안에서 URL 파라미터에 뭐가 써있는지 출력하고 싶으면
{{ $route.params.파라미터명 }}파라미터명은 위에서 : 파라미터 만들 때 작명했던 그것 !!
그러면
> Detail.vue

<template>
  {{ $route.params.id }}
  <div>
    <h4>상세페이지입니다.</h4>
    <h5>{{블로그글[$route.params.id].title}}</h5>
    <p>{{블로그글[$route.params.id].content}}</p>
  </div>
📍 파라미터에 정규식 기능 추가
(router.js)


    {
        path: "/detail/:id(\\d+)", // 숫자만 :id 입력가능
        component: Detail,
    },

// detail/ 아무런 문자를 입력해도 Detail 컴포넌트가 보여지는데
//코드처럼 작성하면 파라미터에 숫자 입력시에만 컴포넌트가 보여지게 해줌
    {
        path: "/detail/:id* ", // /id가 계속 몇번이고 반복될 수 있음.
        component: Detail,
    },
------------------------------------------------------------------

// 에러 보여 줄 컴포넌트는 맨 아래에 해야 다른 라우팅 주소들과 중복이안됨.
    {
        path: "/:anything(.*)", // 모든 문자라는 정규식 문법.
        component: Err,
    },
// 주소창에 아무거나 치면 에러 페이지의 컴포넌트 보여줘
💡 Nested routes & push
- 특정 페이지 내에서 또 라우트를 나눌 때 사용한다.(뒤로가기 앞으로가기 버튼이 동작)
- 라우터로 페이지를 이동할 때 최소 2개 이상의 컴포넌트를 화면에 나타낼 수 있다.(상위 컴포넌트 1개에 하위 컴포넌트 1개를 포함하는 구조)
예를들어 http://localhost:8080/detail/0/author 이렇게 작성할 수 있는데 /detail 라우터 안에서 Children으로 author와 comment 라우터가 있는 것이다.
1. router.js에서 children을 작성한다.
	[{
        path: "/detail/:id",
        component: DetailPage,
        children: [
            { path : "author", component : AuthorList },
            { path : "comment", component : CommentList },
        ]
    },
    {
        path: "/list",
        component: NewList,
    },
    {
        path: "/",
        component: NewHome,
    },
];
2. children이 있는 본 컴포넌트에 가서 children요소들을 어디에 배치할 지 작성한다.
<router-view></router-view> 을 작성한다 !!!! router-view는 페이지 표시 태그로, 변경되는 url에 따라 해당 컴포넌트를 뿌려주는 영역이다.
아래는 사용 예시이다.
<div>
    <h4>상세페이지입니다.</h4>
    <h5>{{블로그글[$route.params.id].title}}</h5>
    <p>{{블로그글[$route.params.id].content}}</p>

    <router-view></router-view>
  </div>
그러면 /detail/:id/author 로 접속했을 때 자리에 Author 컴포넌트가 보인다.
💡 또 다른 페이지 이동 방법
$router.push('/detail/0') HTML안에 넣거나 밑에 기능개발하는 곳에 넣거나 할 수 있다.
<router-link 대신 쓸 수 있는데 장점은 변수도 집어넣을 수 있다는 것.
$router.go(-1)뒤로가기를 뜻하고, 1을 넣으면 앞으로 가기, -2 는 두번 뒤로 가기
📍 route vs router 비교
-
route는 현재 페이지 경로 관련
route.fullPath : 전체 url 출력 -
router는 페이지 이동 관련
router.go(1 ,-1, -2) : 앞으로, 뒤로, 2페 뒤로