새로 만든 EC2에 docker를 연결해보자!
sudo yum install docker -y
명령어를 사용해 docker를 설치해준다
docker -v
로 버전 확인
sudo service docker start
docker 시작!!
docker run -d -it --name ai_detect -p 5000:5000 ubuntu:22.04
docker를 만들어줍니다 포트 번호는 5000.
docker에 접속하는 방법은
docker ps -a
로 아이디를 검색하고
docker start (docker ID 3자리)
docker attach (docker ID 3자리)
입력하면 실행창 아이디 부분이 root@docker의ID로 바뀌는 걸 확인할 수 있습니다.
apt update
apt-get install sudo
sudo apt-get install nano
sudo apt-get install git
sudo apt-get install wget
wget https://repo.anaconda.com/miniconda/Miniconda3-latest-Linux-x86_64.sh \
&& sh Miniconda3-latest-Linux-x86_64.sh
순서대로 실행 후, cd ~와 ll을 통해 .bashrc 파일을 찾아 편집해줍니다.
nano .bashrc
export PATH=/root/miniconda3/bin:$PATH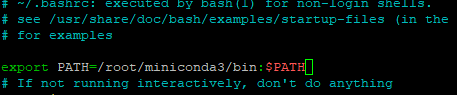
나와서
source .bashrc
그 후
미니콘다에 가상환경을 만들어줍니다
conda create -n py3916 python==3.9.16
잘 설치되었는지 확인해주고
conda env list
conda init
exit 후 docker에 다시 접속해줍니다.
conda activate py3916
python --version
로 파이썬 버전 확인이 가능합니다.
git clone https://github.com/ultralytics/yolov5
파이썬 안에 yolov5을 설치
cd yolov5
pip install -r requirements.txt
yolov5를 설치해줍니다.
그 다음은 roboflow에서 원하는 걸 학습시킨 뒤 best.pt 파일을 다운 받아둡니다.
apt-get install nano
명령어 실행 뒤
nano detect.py
로 detect.py 파일을 편집해줍니다.
마지막에 부분에
def detect(image, txt, crop, exp):
    run(source=image, save_txt=txt, save_crop=crop, name=exp)
함수를 추가해주고,
run 함수의 첫번째 부분에
'yolov5s.pt' 파일을 'best.pt' 파일로 수정해줍니다.
나가는 방법은 ctrl+x > 'y' > enter
그리고 scp명령어로 다운 받아둔 best.pt 파일을 ec2 안으로 옮겨줍니다!
scp -i "옮길 파일 경로" best.pt ec2-user@"ec2 IP":"ec2내 경로"
그 다음은 ec2 내의 docker 안으로 best.pt 파일을 옮겨줍니당~
docker cp /home/ec2-user/best.pt "컨테이너ID":/yolov5(저장될 경로)
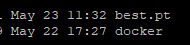
ll 명령어로 확인해보면

이제는 서로 파일을 잘 주고받나를 테스트 해봐야 합니다!
먼저 ec2 환경 docker 안에 detector.py 파일을 만들어줍니다.
nano detector.py
detector.py
import os, shutil
from flask import Flask, request
from yolov5 import detect as Detect
import base64
import json


prev_id = ''
app = Flask(__name__)

@app.route('/detect', methods=['POST'])
def detect_target():

    f = request.files['image']
    print(f.filename)
    fpath = './' + f.filename
    f.save(fpath)
    # global prev_id
    # file_name = request.form.get('img_path')
    # uuid = request.form.get('uuid')
    # print(file_name)

    if os.path.isdir('/AI/yolov5/runs/detect/'폴더명''):
        shutil.rmtree('/AI/yolov5/runs/detect/'폴더명')
    Detect.detect(fpath, True, True, '폴더명')

    ret_file =  open('/AI/yolov5/runs/detect/'폴더명'/'+f.filename, 'rb' )
    image_binary = ret_file.read()
    encoded_string = base64.b64encode(image_binary)

    image_dict = {
        'file_name':f.filename,
        f.filename: encoded_string.decode()
    }

    image_json = json.dumps(image_dict)

    print(image_json)
    # prev_id = uuid
    return image_json

if __name__ == '__main__':
    app.run(host='0.0.0.0')
를 하려고 하는데 모듈 오류가 떴습니다. 모듈을 다운 받아줍니다.
pip install flask
apt-get -y install libgl1-mesa-glx
apt-get install libglib2.0-0
그 후 파이썬 실행
python detector.py
경로를 잘 설정하지 않으면 에러가 발생하니까 경로를 꼭꼭 확인해주세요

연결이 성공했으면, visual studio에서 새로운 테스트 파일을 만들어 줍니다. 이 파일을 실행시켜 서버에서 파일을 제대로 받는지 확인합니다.
test.py
import requests
import base64
import json

# img_path should be a file_name without path since docker have a different path
image_url = '이미지가 위치하는 경로'
# UUID ='uri_01'

# #ret = requests.post("http://0.0.0.0:5000/detect", data = {'img_path': image_url, 'uuid':UUID})

files_ =  open(image_url, 'rb')
upload = { 'image' : files_ }
print(upload)
ret=requests.post("http://"EC2의 IP":5000/detect", files=upload)
files_.close()

content = json.loads(ret.content.decode('utf-8'))

ret_filename = content['file_name']
file_binary = content[ret_filename]
img = base64.b64decode(file_binary)

with open('ret_'+ret_filename, 'bw') as  f :
	f.write(img)

print(ret.content)
실행하면 ec2의 실행창에

가 떴습니다. 파일을 잘 주고 받았습니다!!
이때 ec2 인바운드 규칙에 5000번 포트가 열려있어야 합니다.
