메인스레드
- 앱이 처음 시작될 때 시스템이 생성하는 스레드
역할
- 액티비티의 모든 생명 주기 관련 콜백 실행을 담당
- 버튼, 에디트텍스트와 같은 UI 위젯을 사용한 사용자 이벤트와 UI 드로잉 이벤트를 담당(UI 스레드)
작업량이 큰 연산 등 처리에 긴 시간이 걸리는 작업을 메인스레드의 큐에 넣고 작업하면 한 작업을 처리가 완료될 때까지 다른 작업을 처리하지 못함
👉 "앱이 응답하지 않습니다" 메시지 반환됨
이 때 메인 스레드에서 너무 많은 일을 처리하지 않도록 백그라운드 스레드를 만들어 일을 덜어줌
UI 스레드 활용
- Handler 클래스
- AsyncTask 클래스
- runOnUiThread() 메소드
백그라운드 스레드
- 메인스레드의 일을 덜어주는 스레드
역할
- 복잡한 연산, 네트워크 작업, 데이터베이스 작업 등
❗주의
각 백그라운드 스레드가 언제 처리를 끝내고 UI에 접근할지 순서를 알 수 없기 때문에
UI 관련 작업은 절대 백그라운드 스레드에서 하면 안됨백그라운드 스레드에서 UI 자원을 사용하려면,
메인 스레드에 UI 자원 사용 메시지를 전달하는 방법 이용
xml 베이스라인
- 텍스트뷰들의 텍스트끼리 일직선 상에 정확히 놓을 때 사용
- 정렬할 텍스트뷰 위에서 마우스 우클릭
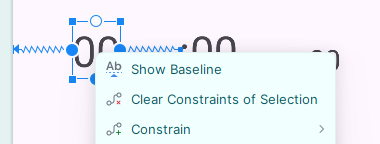
- Show Baseline 클릭
- 해당 텍스트의 아래쪽에 베이스라인 막대 보임

- 정렬할 텍스트뷰의 막대를 기준이 되는 텍스트뷰의 막대로 드래그
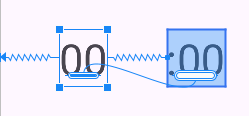
- 텍스트 아래쪽의 높낮이가 맞춰짐
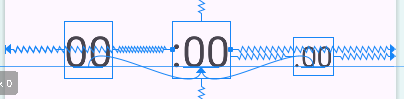
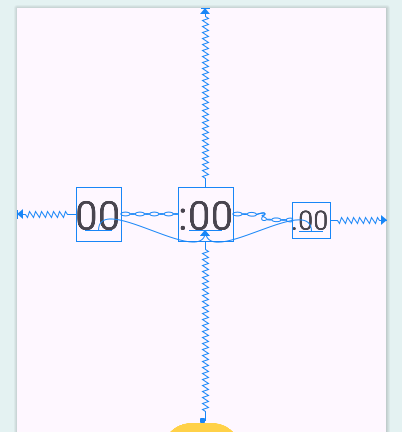
xml 체인
- 뷰 여러 개의 수직 또는 수평 여백을 손쉽게 관리 가능
- 체인으로 묶을 뷰들을 모두 선택한 후 마우스 우클릭
- Chains ➡️ Create Horizontal Chain
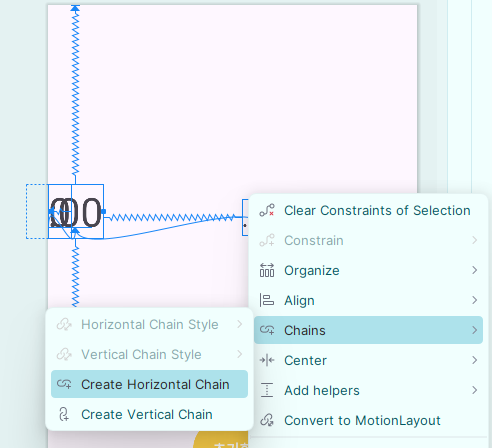
- 뷰들이 체인으로 묶여 세 텍스트뷰가 수평 방향으로 균등한 여백을 두고 위치
체인 모드 설정
- 체인으로 묶인 텍스트뷰 중 아무 텍스트뷰 위에서 마우스 우클릭
- Chains ➡️ Horizontal Style ➡️ packed
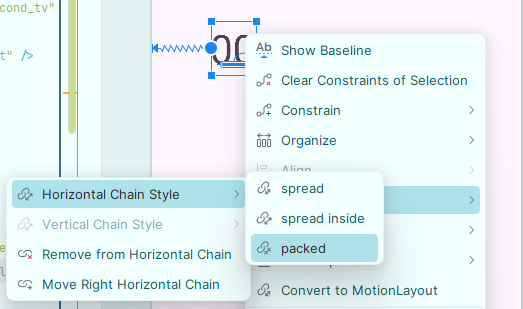
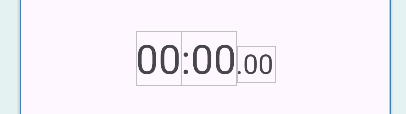
- 텍스트뷰들이 모여서 위치
버튼에 이벤트 연결하기
- 클릭 이벤트를 처리하는 View.OnClickListener 인터페이스 구현
(View.OnClickListener 인터페이스는 반드시 onClick() 함수를 오버라이드 해야함) - findViewById() 함수로 xml에서 정의한 뷰들을 액티비티에서 사용할 수 있도록 가져옴
- setOnClickListener() 메서드를 이용해 onClickListener를 추가해 버튼에 클릭이 가능하도록 구현
- 클릭 이벤트가 발생했을 때 수행할 기능을 오버라이드한 onClick() 함수에 구현
👉 안드로이드 View.OnClickListener인터페이스 공식 문서
코드(각각의 기능 함수는 구현 전)
import androidx.appcompat.app.AppCompatActivity
import android.os.Bundle
import android.view.View
import android.widget.Button
import android.widget.TextView

class MainActivity : AppCompatActivity(), View.OnClickListener {
    var isRunning = false

    private lateinit var start_btn: Button
    private lateinit var refresh_btn: Button
    private lateinit var minute_tv:TextView
    private lateinit var second_tv: TextView
    private lateinit var millisecond_tv: TextView
    override fun onCreate(savedInstanceState: Bundle?) {
        super.onCreate(savedInstanceState)
        setContentView(R.layout.activity_main)

        start_btn = findViewById(R.id.start_btn)
        refresh_btn = findViewById(R.id.refresh_btn)
        minute_tv = findViewById(R.id.minute_tv)
        second_tv = findViewById(R.id.second_tv)
        millisecond_tv = findViewById(R.id.millisecond_tv)

        start_btn.setOnClickListener(this)
        refresh_btn.setOnClickListener(this)
    }
    override fun onClick(v: View?) {
        when(v?.id) {
            R.id.start_btn -> {
                if (isRunning) {
                    pause()
                } else {
                    start()
                }
            }
            R.id.refresh_btn -> {
                refresh()
            }
        }
    }
}
스톱워치 시작 기능 구현
- timer(period=[주기]){} 함수 사용해 일정한 주기로 반복되는 시간 카운트 동작 수행
👉 {} 안의 작업은 백그라운드 스레드에서 수행 - 1000밀리초 = 1초, period=10이면 10밀리초(0.01초)마다 시간 카운트 동작 수행
- runOnUiThread 사용해 텍스트뷰를 수정하는 UI 작업을 UI 스레드에서 수행
- if문 추가해 시간이 한 자리일 때도 01, 02 처럼 두 자리로 유지하도록 구현
    private fun start() {
        start_btn.text = "일시정지"
        start_btn.setBackgroundColor(getColor(R.color.red))
        isRunning = true

        timer = timer(period = 10) {
            time++

            val milli_second = time % 100
            val second = (time % 6000) / 100
            val minute = time / 6000

            millisecond_tv.text =
                if (milli_second < 10) {
                    ".0${milli_second}"
                } else {
                    ".${milli_second}"
                }

        }
    }
위과 같이 MainActiviy.kt의 start() 함수를 구현하면 이러한 에러가 뜨며 스톱워치 시작과 동시에 종료된다.
Only the original thread that created a view hierarchy can touch its views.
오류의 원인은 위에서 말했던 백그라운드 스레드에서 UI 작업을 했기 때문이다.
그럼 start() 함수 내에서 분, 초, 밀리초를 출력하는 텍스트뷰가 UI 스레드에서 실행되도록 다음과 같이 수정하면 된다.
    private fun start() {
        start_btn.text = "일시정지"
        start_btn.setBackgroundColor(getColor(R.color.red))
        isRunning = true

        timer = timer(period = 10) {
            time++

            val milli_second = time % 100
            val second = (time % 6000) / 100
            val minute = time / 6000

            runOnUiThread {
                if (isRunning) {
                    millisecond_tv.text =
                        if (milli_second < 10)
                        ".0${milli_second}"
                        else
                        ".${milli_second}"
                    second_tv.text =
                        if (second < 10)
                            ":0${second}"
                        else
                            ":${second}"
                    minute_tv.text = "${minute}"
                }
            }
        }
    }
스톱워치 멈춤, 초기화 기능 구현
- cancel() 함수로 백그라운드 스레드에 있는 큐를 깔끔하게 비워 멈춤
    private fun pause() {
        start_btn.text = "시작"
        start_btn.setBackgroundColor(getColor(R.color.blue))

        isRunning = false
        timer?.cancel()
    }

    private fun refresh() {
        timer?.cancel()

        start_btn.text = "시작"
        start_btn.setBackgroundColor(getColor(R.color.blue))
        isRunning = false

        time = 0
        millisecond_tv.text = ".00"
        second_tv.text = ":00"
        minute_tv.text = "00"
    }
전체 코드
import androidx.appcompat.app.AppCompatActivity
import android.os.Bundle
import android.view.View
import android.widget.Button
import android.widget.TextView
import java.util.Timer
import kotlin.concurrent.timer

class MainActivity : AppCompatActivity(), View.OnClickListener {
    var isRunning = false
    var timer : Timer? = null
    var time = 0
    private lateinit var start_btn: Button
    private lateinit var refresh_btn: Button
    private lateinit var minute_tv:TextView
    private lateinit var second_tv: TextView
    private lateinit var millisecond_tv: TextView
    override fun onCreate(savedInstanceState: Bundle?) {
        super.onCreate(savedInstanceState)
        setContentView(R.layout.activity_main)

        start_btn = findViewById(R.id.start_btn)
        refresh_btn = findViewById(R.id.refresh_btn)
        minute_tv = findViewById(R.id.minute_tv)
        second_tv = findViewById(R.id.second_tv)
        millisecond_tv = findViewById(R.id.millisecond_tv)

        start_btn.setOnClickListener(this)
        refresh_btn.setOnClickListener(this)
    }
    override fun onClick(v: View?) {
        when(v?.id) {
            R.id.start_btn -> {
                if (isRunning) {
                    pause()
                } else {
                    start()
                }
            }
            R.id.refresh_btn -> {
                refresh()
            }
        }
    }

    private fun start() {
        start_btn.text = "일시정지"
        start_btn.setBackgroundColor(getColor(R.color.red))
        isRunning = true

        timer = timer(period = 10) {
            time++

            val milli_second = time % 100
            val second = (time % 6000) / 100
            val minute = time / 6000

            runOnUiThread {
                if (isRunning) {
                    millisecond_tv.text =
                        if (milli_second < 10)
                        ".0${milli_second}"
                        else
                        ".${milli_second}"
                    second_tv.text =
                        if (second < 10)
                            ":0${second}"
                        else
                            ":${second}"
                    minute_tv.text = "${minute}"
                }
            }
        }
    }

    private fun pause() {
        start_btn.text = "시작"
        start_btn.setBackgroundColor(getColor(R.color.blue))

        isRunning = false
        timer?.cancel()
    }

    private fun refresh() {
        timer?.cancel()

        start_btn.text = "시작"
        start_btn.setBackgroundColor(getColor(R.color.blue))
        isRunning = false

        time = 0
        millisecond_tv.text = ".00"
        second_tv.text = ":00"
        minute_tv.text = "00"
    }
}
<?xml version="1.0" encoding="utf-8"?>
<androidx.constraintlayout.widget.ConstraintLayout xmlns:android="http://schemas.android.com/apk/res/android"
xmlns:app="http://schemas.android.com/apk/res-auto"
xmlns:tools="http://schemas.android.com/tools"
android:layout_width="match_parent"
android:layout_height="match_parent"
tools:context=".MainActivity">
<TextView
android:id="@+id/minute_tv"
android:layout_width="wrap_content"
android:layout_height="wrap_content"
android:text="00"
android:textSize="45sp"
app:layout_constraintBaseline_toBaselineOf="@+id/second_tv"
app:layout_constraintEnd_toStartOf="@+id/second_tv"
app:layout_constraintHorizontal_bias="0.5"
app:layout_constraintHorizontal_chainStyle="packed"
app:layout_constraintStart_toStartOf="parent" />
<TextView
android:id="@+id/second_tv"
android:layout_width="wrap_content"
android:layout_height="wrap_content"
android:text=":00"
android:textSize="45sp"
app:layout_constraintBottom_toTopOf="@+id/refresh_btn"
app:layout_constraintEnd_toStartOf="@+id/millisecond_tv"
app:layout_constraintHorizontal_bias="0.5"
app:layout_constraintStart_toEndOf="@+id/minute_tv"
app:layout_constraintTop_toTopOf="parent" />
<TextView
android:id="@+id/millisecond_tv"
android:layout_width="wrap_content"
android:layout_height="wrap_content"
android:text=".00"
android:textSize="30sp"
app:layout_constraintBaseline_toBaselineOf="@+id/second_tv"
app:layout_constraintEnd_toEndOf="parent"
app:layout_constraintHorizontal_bias="0.5"
app:layout_constraintStart_toEndOf="@+id/second_tv" />
<Button
android:id="@+id/refresh_btn"
android:layout_width="wrap_content"
android:layout_height="wrap_content"
android:layout_margin="50dp"
android:backgroundTint="@color/yellow"
android:padding="20dp"
android:text="@string/refresh"
android:textSize="16sp"
android:textStyle="bold"
app:layout_constraintBottom_toTopOf="@+id/start_btn"
app:layout_constraintEnd_toEndOf="parent"
app:layout_constraintStart_toStartOf="parent" />
<Button
android:id="@+id/start_btn"
android:layout_width="wrap_content"
android:layout_height="wrap_content"
android:layout_marginTop="635dp"
android:layout_marginBottom="80dp"
android:backgroundTint="@color/blue"
android:padding="20dp"
android:text="@string/start"
android:textSize="16sp"
android:textStyle="bold"
app:layout_constraintBottom_toBottomOf="parent"
app:layout_constraintEnd_toEndOf="parent"
app:layout_constraintStart_toStartOf="parent" />
</androidx.constraintlayout.widget.ConstraintLayout>실행 결과
- 시작 누르면 타이머 진행, 일시정지 누르면 타이머 멈춤
- 일시정지 상태에서 초기화, 타이머 진행 상태에서 초기화 모두 가능
- 타이머 진행 상태에서 초기화 시 일시정지 버튼이 시작으로 바뀜

Android 짱이 되고싶은 개발 기록 (+ ios도 조금씩,,👩🏻💻)