🖥️ 액티비티와 프래그먼트
액티비티
- 사용자에게 사용자 인터페이스를 제공하는 앱 구성요소
- 화면 전체를 차지
프래그먼트
- 각 영역을 담당하는 개념
- 한 액티비티에서 여러 프래그먼트를 보여줄 수 있음
- 여러 액티비티에서 하나의 프래그먼트 재활용 가능
🖥️ 안드로이드 4대 구성요소
안드로이드
- 액티비티: 사용자에게 사용자 인터페이스 제공
- 서비스: 백그라운드 조작 수행
- 브로드캐스트 리서버: 앱의 밖에서 일어난 이벤트를 앱에 전달
- 콘텐트 프로바이더: 데이터를 관리하고 다른 앱의 데이터를 사용할 수 있게 함
🖥️ 액티비티
액티비티의 생명주기
생명주기
- 액티비티가 생성되고 종료되기까지
- 액티비티는 사용자의 활동에 따라 새로운 상태에 들어감
👉 시스템은 미리 정의된 콜백 함수를 실행
액티비티 생명주기 흐름도
- onCreate()함수 호출 👉 액티비티가 생성된 상태
- 멈춰진 상태 👉 onDestroy()함수 호출 👉 앱 종료
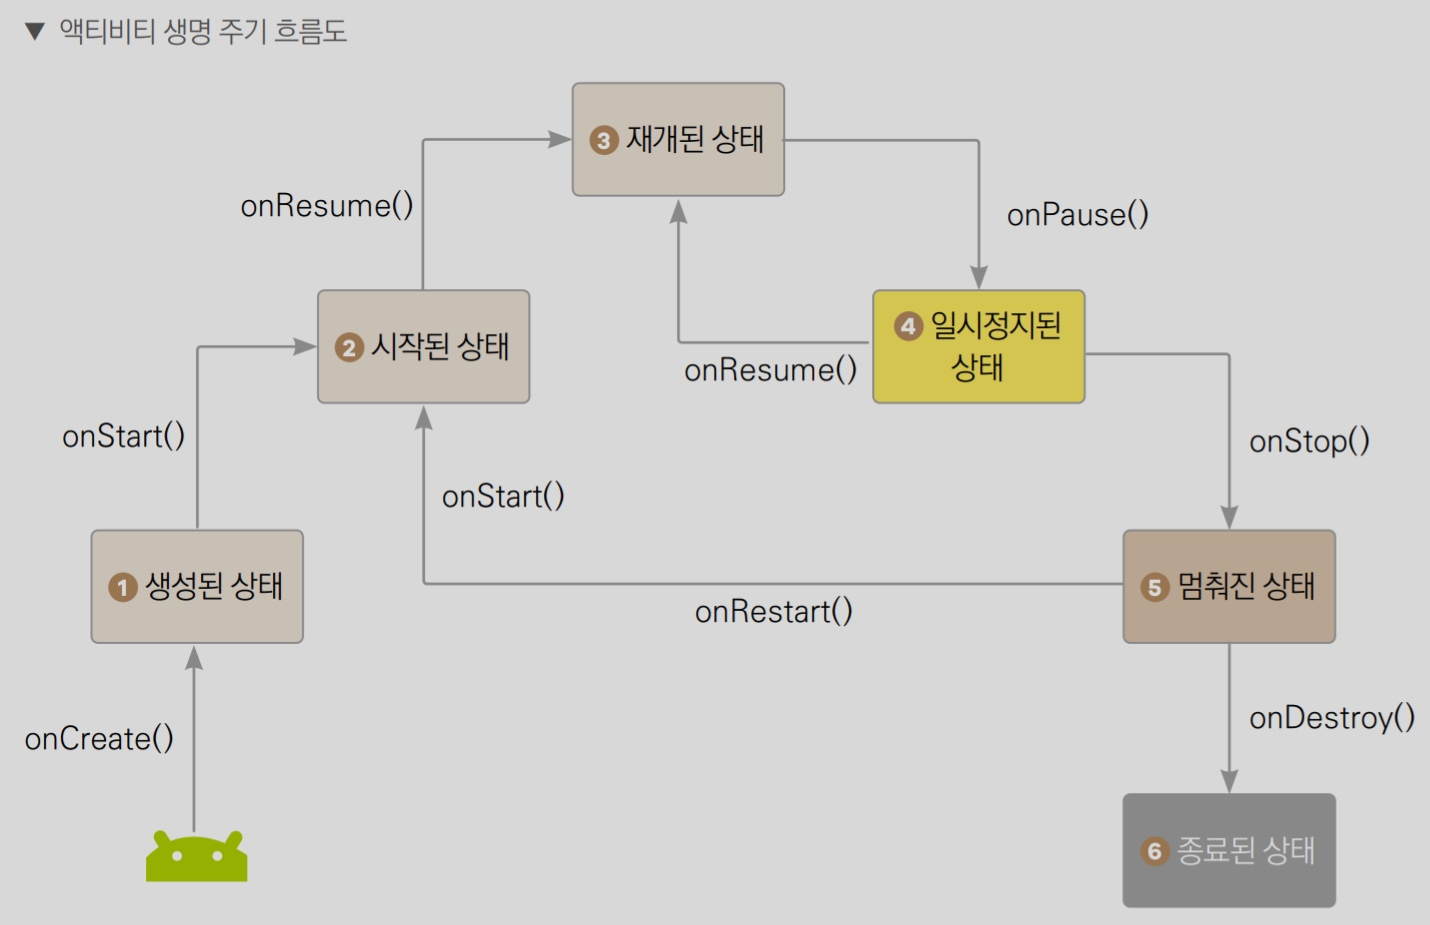
액티비티가 시작될 때 실행되는 콜백 함수
onCreate()
- 시스템이 액티비티를 처음 시작할 때 실행
- 레이아웃 지정, 클래스 범위 변수 초기화 등 기본적인 앱 시작 로직 구현
onStart()
- 액티비티가 시작된 상태에 들어가기 직전에 실행
- UI 관련 로직을 초기화하는 코드 구현
onResume()
- 액티비티가 재개된 상태로 들어가기 직전에 실행
- 액티비티와 사용자의 상호작용 가능
액티비티가 호출될 때 실행되는 콜백함수
onPause()
- 사용자가 액티비티를 떠나는 경우 처음 실행
- 액티비티가 보이지 않을 때 더 이상 실행할 필요가 없는 부분들을 비활성화함
- 지속되는 시간이 짧기때문에 중요하거나 시간이 오래 걸리는 작업은 다음 콜백인 onStop() 활용
onStop()
- 액티비티가 사용자에게 더 이상 표시 안 되는 중단된 상태에 들어가기 직전에 실행
- 데이터베이스에 정보를 저장하는 등 부하가 큰 작업 구현
onDestroy()
- 액티비티가 완전히 소멸되기 직전에 호출
액티비티간의 화면전환
Intent 사용하기
    fun settingButton () {
        //xml 파일에서 추가한 버튼 객체를 변수로 만듦
        //findViewById()함수는 뷰의 id값을 인수로 받음
        val button = findViewById<Button>(R.id.button)

        //버튼일 클릭되었을 때 행동을 SetOnClickListener()에 지정
        button.setOnClickListener {
            //intent 변수 생성 후 인턴드 객체 생성
            //Intent(현재 객체, 이동할 목적지)
            val intent = Intent(this, SubActivity::class.java)
            // startActivity() 함수는 방금 만든 인텐트 객체를 인수로 받아 새로운 액티비티 시작
            startActivity(intent)
        }
    }
👉 전체 작동 코드
MainActivity.ktimport android.content.Intent import android.os.Bundle import android.widget.Button import androidx.activity.ComponentActivity class MainActivity : ComponentActivity() { override fun onCreate(savedInstanceState: Bundle?) { super.onCreate(savedInstanceState) setContentView(R.layout.activity_main) settingButton() } fun settingButton () { val button = findViewById<Button>(R.id.button) button.setOnClickListener { val intent = Intent(this, SubActivity::class.java) startActivity(intent) } } }activity_main.xml
<?xml version="1.0" encoding="utf-8"?>
<androidx.constraintlayout.widget.ConstraintLayout
    xmlns:android="http://schemas.android.com/apk/res/android"
    xmlns:app="http://schemas.android.com/apk/res-auto"
    xmlns:tools="http://schemas.android.com/tools"
    android:layout_width="match_parent"
    android:layout_height="match_parent">
    <TextView
        android:id="@+id/test1"
        android:text="Hi"
        android:textSize="35dp"
        android:layout_width="wrap_content"
        android:layout_height="wrap_content"
        app:layout_constraintLeft_toLeftOf="parent"
        app:layout_constraintRight_toRightOf="parent"
        app:layout_constraintBottom_toBottomOf="parent"
        app:layout_constraintTop_toTopOf="parent"/>
    <Button
        android:id="@+id/button"
        android:layout_width="wrap_content"
        android:layout_height="wrap_content"
        android:text="Go to SubActivity"
        app:layout_constraintBottom_toBottomOf="parent"
        app:layout_constraintEnd_toEndOf="parent"
        app:layout_constraintStart_toStartOf="parent"
        app:layout_constraintTop_toBottomOf="@+id/test1" />
</androidx.constraintlayout.widget.ConstraintLayout>
SubActivity.kt
import androidx.appcompat.app.AppCompatActivity
import android.os.Bundle
class SubActivity : AppCompatActivity() {
    override fun onCreate(savedInstanceState: Bundle?) {
        super.onCreate(savedInstanceState)
        setContentView(R.layout.activity_sub)
    }
}
activity_sub.xml
<?xml version="1.0" encoding="utf-8"?>
<androidx.constraintlayout.widget.ConstraintLayout xmlns:android="http://schemas.android.com/apk/res/android"
    xmlns:app="http://schemas.android.com/apk/res-auto"
    xmlns:tools="http://schemas.android.com/tools"
    android:layout_width="match_parent"
    android:layout_height="match_parent"
    tools:context=".SubActivity">
    <TextView
        android:id="@+id/textView"
        android:layout_width="wrap_content"
        android:layout_height="wrap_content"
        android:text="Sub Activity"
        app:layout_constraintBottom_toBottomOf="parent"
        app:layout_constraintEnd_toEndOf="parent"
        app:layout_constraintStart_toStartOf="parent"
        app:layout_constraintTop_toTopOf="parent" />
</androidx.constraintlayout.widget.ConstraintLayout>
🖥️ 프래그먼트
- 한 화면의 UI를 분할하는 데 사용
- 액티비티 안에 종속 필수
- 액티비티의 생명주기에 영향을 받지만, 프래그먼트 고유의 생명 주기 존재
- 액티비티가 실행 중일 때 프래그먼트를 추가하거나 제거 가능
- 모든 프래그먼트는 각각의 레이아웃 파일이 필요
프래그먼트의 생명주기
프래그먼트의 생명주기
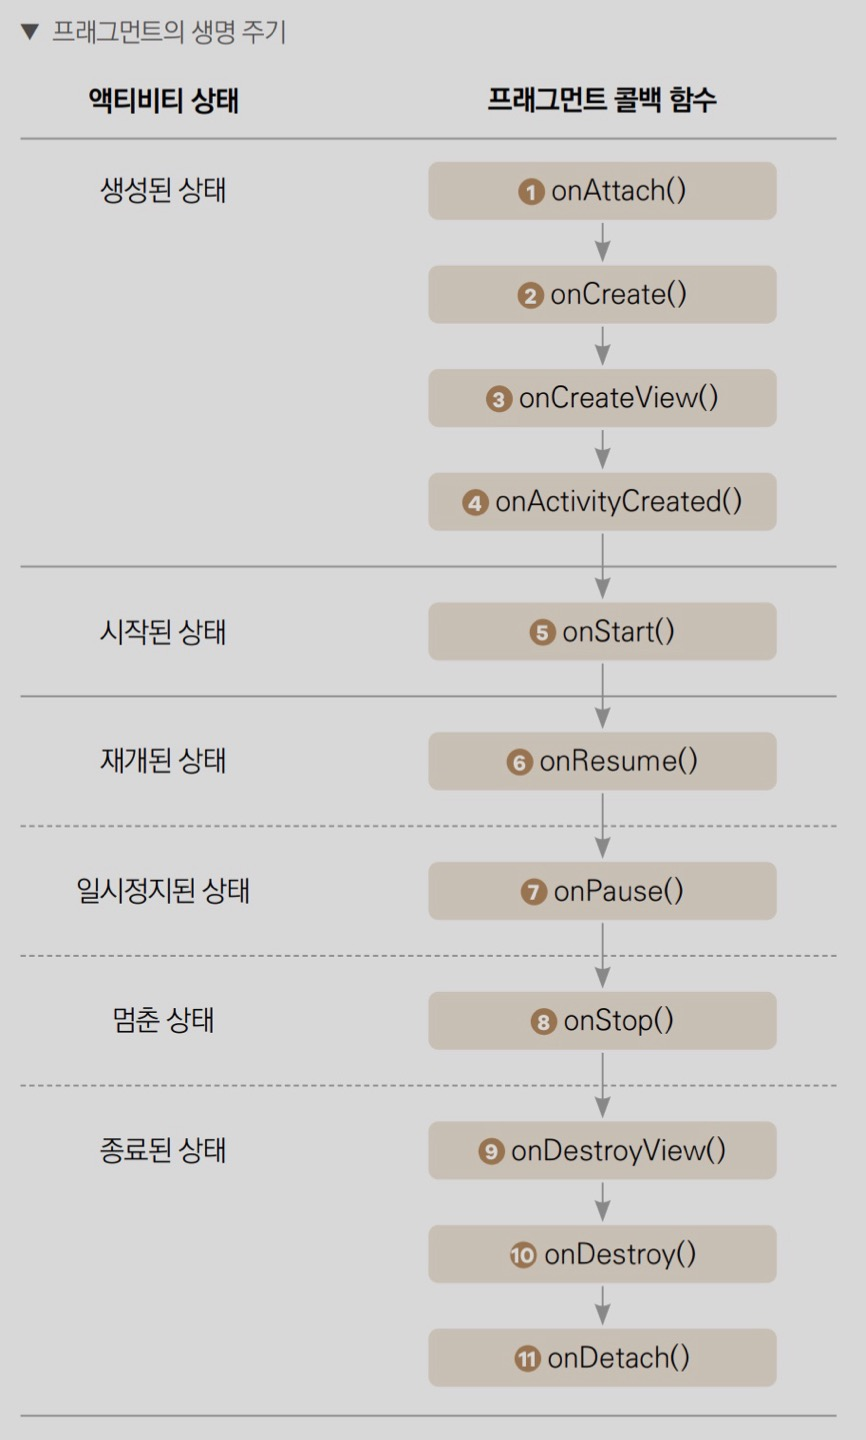
onAttach()
- 프래그먼트가 액티비티에 더해지고 나서 호출되는 함수
onCreate()
- 프래그먼트 최초 생성 시점에 호출
- 프래그먼트 초기화 코드 작성
onCreateView()
- 프래그먼트에 그릴 뷰를 생성할 때 호출
- 그릴 뷰를 반환
onActivityCreated()
- 액티비티의 onCreate() 함수가 완료되고 나서 실행되는 함수
- 액티비티 생성 후에 프래그먼트에서 해주어야 할 작업 로직 작성
onStart()
- 사용자에게 프래그먼트가 보이기 시작할 때 실행
onResume()
- 사용자와 상호작용 가능
- 사용자가 프래그먼트를 떠나지 않는 이상 계속 재개된 상태
onPause()
- 사용자가 프래그먼트를 떠날 때 처음 불러지는 함수
- 불필요한 리소스들 해제
onStop()
- 프래그먼트가 사용자에게 더 이상 보이지 않을 떄 호출
onDestroyView()
- onCreateView()와 상응하는 함수로서 뷰 리소스들 해제
onDestroy()
- 프래그먼트가 마지막으로 완전히 삭제되기 전에 호출
onDetch()
- onAttach()와 상응하는 함수로서 액티비티와의 연결을 끊기 전에 호출
프래그먼트 간의 화면전환
프래그먼트 파일 레이아웃 지정 방법
class RedFragment : Fragment() {
    override fun onCreateView( // 프래그먼트 레이아웃을 연결할 때 사용하는 콜백 함수
        // 뷰 생성 객체
        inflater: LayoutInflater,
        // 생성할 뷰(자식 뷰)가 들어갈 부모 뷰
        container: ViewGroup?,
        // 이전 프래그먼트 객체에서 전달된 데이터(번들)
        savedInstanceState: Bundle?
    ): View? {
        // 인수로 받는 inflater를 통해 프래그먼트의 레이아웃 지정
        // inflate(리소스 참조값, 부모 뷰, attachToRoot)
        //attachToRoot: 지금 즉시 부모 뷰에 뷰를 추가할 것인지 나중에 추가할 것인지
        return inflater.inflate(R.layout.fragment_red, container, false);
    }
}
프래그먼트 파일 전환 방법
TwoColorActivity.kt
    fun settingButtons() {
        val redButton = findViewById<Button>(R.id.button_red_fragment)
        val blueButton = findViewById<Button>(R.id.button_blue_fragment)

        redButton.setOnClickListener {
            // supportFragmentManager.beginTransaction()을 호출해 프래그먼트 트랜잭션 클래스의 객체 생성
            // 프래그먼트 트랜잭션: 프래그먼트 추가, 삭제, 기존 프래그먼트와 교체 후 백스택에 추가 등을 수행
            val fragmentTransaction = supportFragmentManager.beginTransaction()
            // 트랜잭션에서 수행할 활동 정의
            // replace()로 기존의 프래그먼트를 새로운 프래그먼트로 교체
            //replace(프래그먼트를 넣는 프레임 레아이웃 id, 새로운 프래그먼트 객체)
            fragmentTransaction.replace(R.id.framelayout,RedFragment())
            // 트랜잭션 이후 반드시 commit() 함수 호출
            fragmentTransaction.commit()
        }
    }
전체 코드
MainActivity.kt
import android.content.Intent
import android.os.Bundle
import android.widget.Button
import androidx.activity.ComponentActivity
class MainActivity : ComponentActivity() {
    override fun onCreate(savedInstanceState: Bundle?) {
        super.onCreate(savedInstanceState)
        setContentView(R.layout.activity_main)
        settingButton()
    }
    fun settingButton () {
        //xml 파일에서 추가한 버튼 객체를 변수로 만듦
        //findViewById()함수는 뷰의 id값을 인수로 받음
        val sub_button = findViewById<Button>(R.id.sub_button)
        val two_button = findViewById<Button>(R.id.two_button)
        //버튼일 클릭되었을 때 행동을 SetOnClickListener()에 지정
        sub_button.setOnClickListener {
            //intent 변수 생성 후 인턴드 객체 생성
            //Intent(현재 객체, 이동할 목적지)
            val intent = Intent(this, SubActivity::class.java)
            // startActivity() 함수는 방금 만든 인텐트 객체를 인수로 받아 새로운 액티비티 시작
            startActivity(intent)
        }
        two_button.setOnClickListener {
            val intent = Intent(this, TwoColorActivity::class.java)
            startActivity(intent)
        }
    }
}
activity_main.xml
<?xml version="1.0" encoding="utf-8"?>
<androidx.constraintlayout.widget.ConstraintLayout
    xmlns:android="http://schemas.android.com/apk/res/android"
    xmlns:app="http://schemas.android.com/apk/res-auto"
    xmlns:tools="http://schemas.android.com/tools"
    android:layout_width="match_parent"
    android:layout_height="match_parent">
    <TextView
        android:id="@+id/test1"
        android:text="Hi"
        android:textSize="35dp"
        android:layout_width="wrap_content"
        android:layout_height="wrap_content"
        app:layout_constraintLeft_toLeftOf="parent"
        app:layout_constraintRight_toRightOf="parent"
        app:layout_constraintBottom_toBottomOf="parent"
        app:layout_constraintTop_toTopOf="parent"/>
    <Button
        android:id="@+id/sub_button"
        android:layout_width="wrap_content"
        android:layout_height="wrap_content"
        android:text="Go to SubActivity"
        app:layout_constraintBottom_toBottomOf="parent"
        app:layout_constraintEnd_toEndOf="parent"
        app:layout_constraintStart_toStartOf="parent"
        app:layout_constraintTop_toBottomOf="@+id/test1" />
    <Button
        android:id="@+id/two_button"
        android:layout_width="wrap_content"
        android:layout_height="wrap_content"
        android:text="Go to two fragment"
        app:layout_constraintBottom_toBottomOf="parent"
        app:layout_constraintEnd_toEndOf="parent"
        app:layout_constraintStart_toStartOf="parent"
        app:layout_constraintTop_toBottomOf="@+id/sub_button" />
</androidx.constraintlayout.widget.ConstraintLayout>
TwoColorActivity.kt
import androidx.appcompat.app.AppCompatActivity
import android.os.Bundle
import android.widget.Button
class TwoColorActivity : AppCompatActivity() {
    override fun onCreate(savedInstanceState: Bundle?) {
        super.onCreate(savedInstanceState)
        setContentView(R.layout.activity_two_color)
        settingButtons()
    }
    fun settingButtons() {
        val redButton = findViewById<Button>(R.id.button_red_fragment)
        val blueButton = findViewById<Button>(R.id.button_blue_fragment)
        redButton.setOnClickListener {
            // supportFragmentManager.beginTransaction()을 호출해 프래그먼트 트랜잭션 클래스의 객체 생성
            // 프래그먼트 트랜잭션: 프래그먼트 추가, 삭제, 기존 프래그먼트와 교체 후 백스택에 추가 등을 수행
            val fragmentTransaction = supportFragmentManager.beginTransaction()
            // 트랜잭션에서 수행할 활동 정의
            // replace()로 기존의 프래그먼트를 새로운 프래그먼트로 교체
            //replace(프래그먼트를 넣는 프레임 레아이웃 id, 새로운 프래그먼트 객체)
            fragmentTransaction.replace(R.id.framelayout,RedFragment())
            // 트랜잭션 이후 반드시 commit() 함수 호출
            fragmentTransaction.commit()
        }
        blueButton.setOnClickListener {
            val fragmentTransaction = supportFragmentManager.beginTransaction()
            fragmentTransaction.replace(R.id.framelayout, BlueFragment())
            fragmentTransaction.commit()
        }
    }
}
activity_two_color.xml
<?xml version="1.0" encoding="utf-8"?>
<androidx.constraintlayout.widget.ConstraintLayout xmlns:android="http://schemas.android.com/apk/res/android"
    xmlns:app="http://schemas.android.com/apk/res-auto"
    xmlns:tools="http://schemas.android.com/tools"
    android:layout_width="match_parent"
    android:layout_height="match_parent"
    tools:context=".TwoColorActivity">
    <FrameLayout
        android:id="@+id/framelayout"
        android:layout_width="match_parent"
        android:layout_height="300dp"
        android:background="#FFEB3B"
        app:layout_constraintTop_toTopOf="parent"/>
    <Button
        android:id="@+id/button_red_fragment"
        android:layout_width="match_parent"
        android:layout_height="wrap_content"
        app:layout_constraintBottom_toBottomOf="parent"
        android:layout_margin="10dp"
        android:text="Red Fragment"/>
    <Button
        android:id="@+id/button_blue_fragment"
        android:layout_width="match_parent"
        android:layout_height="wrap_content"
        app:layout_constraintBottom_toTopOf="@+id/button_red_fragment"
        android:layout_margin="10dp"
        android:text="Blue Fragment"/>
</androidx.constraintlayout.widget.ConstraintLayout>
BlueFragment.kt
import android.os.Bundle
import android.view.LayoutInflater
import android.view.View
import android.view.ViewGroup
import androidx.fragment.app.Fragment
class BlueFragment : Fragment() {
    override fun onCreateView(
        inflater: LayoutInflater,
        container: ViewGroup?,
        savedInstanceState: Bundle?
    ): View? {
        return inflater.inflate(R.layout.fragment_blue, container, false);
    }
}
fragment_blue.xml
<?xml version="1.0" encoding="utf-8"?>
<androidx.constraintlayout.widget.ConstraintLayout xmlns:android="http://schemas.android.com/apk/res/android"
    xmlns:app="http://schemas.android.com/apk/res-auto"
    android:layout_width="match_parent"
    android:layout_height="match_parent">
    <FrameLayout
        android:id="@+id/framelayout"
        android:layout_width="match_parent"
        android:layout_height="300dp"
        android:background="#03A9F4"
        app:layout_constraintTop_toTopOf="parent" />
</androidx.constraintlayout.widget.ConstraintLayout>
fragment_red.xml
<?xml version="1.0" encoding="utf-8"?>
<androidx.constraintlayout.widget.ConstraintLayout xmlns:android="http://schemas.android.com/apk/res/android"
    xmlns:app="http://schemas.android.com/apk/res-auto"
    android:layout_width="match_parent"
    android:layout_height="match_parent">
    <FrameLayout
        android:id="@+id/framelayout"
        android:layout_width="match_parent"
        android:layout_height="300dp"
        android:background="#F44336"
        app:layout_constraintTop_toTopOf="parent" />
</androidx.constraintlayout.widget.ConstraintLayout>
작동 영상
Android 짱이 되고싶은 개발 기록 (+ ios도 조금씩,,👩🏻💻)