react-beautiful-dnd를 이용해 드래그 태그 만들기
react-beautiful-dnd라는 라이브러리를 이용해 드래그가 가능한 태그를 만들어보았습니다.
1. 패키지 설치
npm install react-beautiful-dnd2. DragDropContext으로 감싸준다.
    <StyledSelectInput>
      <DragDropContext>
        <ul className="tags">
          {datas.map(({ id, name }, index) => {
            return <li key={id}>{name}</li>;
          })}
        </ul>
      </DragDropContext>
      <p className="input-box">
        <input autoFocus />
      </p>
    </StyledSelectInput>
drag and drop을 사용하려면drag and drop을 사용할 수있는 React 트리의 일부를<DragDropContext />에 래핑해야합니다.
전체 애플리케이션을<DragDropContext />로 래핑하는 것이 좋습니다.
중첩 된<DragDropContext />는 지원되지 않습니다.
<Droppable />및<Draggable />의 소품을 사용하여 원하는조건부 drag and drop을 수행 할 수 있습니다.
<DragDropContext />는react-redux Provider컴포넌트와 비슷한 목적을 가지고 있다고 생각할 수 있습니다. content-security-protection nonce 속성이 제공된 경우 삽입 된 스타일 태그에 추가됩니다.
3. Droppable 영역을 만든다
<Droppable droppableId="tags">
  {provided => (
  <ul className="tags" {...provided.droppableProps} ref={provided.innerRef}>
    {datas.map(({ id, name }, index) => {
    return <li key={id}>{name}</li>;
    })}
  </ul>
  )}
</Droppable>
아래는 공식문서에서 필요한 내용을 가져온것입니다
<Droppable>컴포넌트에droppableId를 설정합니다. 이를 통해 라이브러리는 상호 작용간에이특정 인스턴스를추적할 수 있습니다.
의React children은ReactElement를 반환하는 함수 여야합니다.
provided.innerRef:droppable이 올바르게 작동하려면,provided.innerRef를ReactElement에서 가능한가장 상위 DOM 노드에바인딩해야합니다. DOM 노드를 조회하기 위해 ReactDOM을 사용할 필요가 없도록하기 위해 이렇게합니다.
provided.placeholder: 드래그하는 동안 필요에 따라<Droppable />에 공간을 만드는 데 사용됩니다. 이 공간은 사용자가 홈 목록이 아닌 목록 위로 끌 때 필요합니다. 참조를 제공 한 구성 요소 내부에 자리 표시자를 넣어야합니다. 자체의 크기를 늘려야합니다.
given.droppableProps (DroppableProps):Droppable 요소에적용해야하는 속성이 포함 된 개체입니다.provided.innerRef를 적용한 동일한 요소에 적용해야합니다. 현재스타일링 및 조회에 사용하는 데이터 속성이 포함되어 있습니다.
provided.innerRef는 라이브러리가 목록 요소의 HTML 요소에 액세스하기위한 참조를 생성합니다. provided.droppableProps는 라이브러리가 이동 및 위치를 추적 할 수 있도록 하는 요소에 props를 적용 합니다.
4. 드래그할 항목에 Draggable 태그 추가
드래그할 부분을 Draggable 태그로 감싸준 후 draggableId, index props를 추가한 후 드래그할 항목(li)에도 ref={provided.innerRef}, {...provided.draggableProps}, {...provided.dragHandleProps}를 추가합니다.
<Draggable key={id} draggableId={id} index={index}>
  {provided => (
    <li
      ref={provided.innerRef}
      {...provided.draggableProps}
      {...provided.dragHandleProps}
    >
      {name}
    </li>
  )}
</Draggable>
<Draggable />구성 요소를<Droppable />에 끌어다 놓을 수 있습니다.<Draggable />은 항상<Droppable />내에 포함되어야합니다. 홈<Droppable />내에서<Draggable />을 재정렬하거나 다른<Droppable />로 이동할 수 있습니다.<Droppable />이 무엇을 떨어 뜨릴 수 있는지 제어 할 수 있기 때문에 가능합니다.
이렇게 하면 드래그가 될줄 알았는데... 에러가 발생한다..
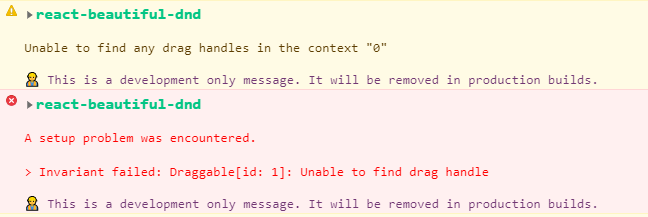
에러를 구글에 쳐보니 저와 같은 에러를 만난 사람의 글이 바로 나왔습니다.
ssr을 사용하는 경우에는 아래와 같은 코드가 필요하다고 합니다
import { resetServerContext } from "react-beautiful-dnd"

resetServerContext();
에러를 해결하고 드래그를 해보니 아래와 같은 에러가 발생했습니다.

이 에러는 {provided.placeholder}를 Droppable 안에 있는 요소의 맨 아래에 넣어주시면 해결됩니다.
<Droppable droppableId="tags" direction="horizontal">
  {provided => (
    <ul className="tags" {...provided.droppableProps} ref={provided.innerRef}>
      {tags.map(({ id, name }, index) => {
        return (
          <Draggable key={id} draggableId={`${id}`} index={index}>
            {provided => (
              <li
                ref={provided.innerRef}
                {...provided.draggableProps}
                {...provided.dragHandleProps}
              >
                {name}
              </li>
            )}
          </Draggable>
        );
      })}
      {provided.placeholder} // 추가한 부분
    </ul>
  )}
</Droppable>
여기까지하면 드래그는 되지만 아무리 드래그를 해도 바뀐순서를 저장해둔 곳이 없기때문에 드래그전 상태로 돌아갈것입니다.
5. 드래그한 항목의 순서 저장하기
DragDropContext 컴포넌트는 onDragEnd라는 props를 받습니다. onDragEnd props에 담기는 함수는 드래그가 끝날때 실행됩니다. 그리고 onDragEnd 함수의 첫번째 인자에는 드래그 항목에 대한 정보가 담깁니다. 이 정보를 이용해 드래그가 끝난 뒤에도 상태를 유지하도록 작업해보겠습니다.
먼저 앞서 말씀드린 handleOnDragEnd 함수의 첫번째 인자에 어떤값이 담기는지 확인해보았습니다.
function handleOnDragEnd(result) {
  console.log('result ? ', result);
}

<DragDropContext onDragEnd={handleOnDragEnd}>
위와같이 코드를 작성한 후 index가 3인 요소를 index가 2인 자리에 드래그해보았습니다.

source에는 현재 드래그중인 아이템의 정보가 담깁니다.source: {index: 3, droppableId: "tags"}
destination에는 드래그가 끝난 후 드래그중이였던 아이템의 정보가 담깁니다.destination: {droppableId: "tags", index: 2}
result에 담기는 index를 이용해 드래그한 항목의 순서를 useState를 이용해 저장하였습니다.
function handleOnDragEnd(result) {
    /**
     * 필요한 요소
     *  드래그할 대상의 index
     *  드래그가 끝났을때의 index
     *
     * 할 일
     * 1. 드래그할 대상의 index를 지운다
     * 2. 드래그가 끝난 당시의 index에 현재 드래그 중인 요소를 넣는다
     */

    const currentTags = [...tags];
    const draggingItemIndex = result.source.index;
    const afterDragItemIndex = result.destination.index;

    const removeTag = currentTags.splice(beforeDragItemIndex, 1);

    currentTags.splice(afterDragItemIndex, 0, removeTag[0]);

    setTags(currentTags);
  }
이제 드래그를 하면 드래그한 상태가 유지됩니다.
여기서 한가지 더 해줘야할 작업이 있습니다.
만약 <Droppable droppableId="tags" direction="horizontal"> 이렇게 direction이 horizontal일때 수직으로 이동을 하게되면 정의된 드래그 컨테이너 영역을 벗어나게 되어 destination에 아무값도 담기지 않아 에러가 발생합니다.
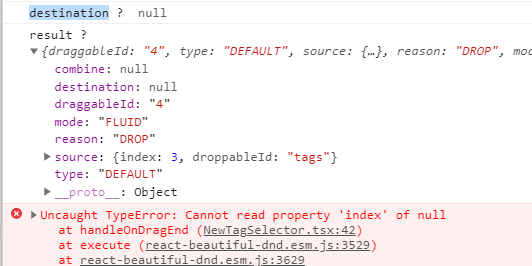
이런경우에는 handleOnDragEnd 함수안에 if (!result.destination) return; 이 코드 한줄을 넣어주면 에러가 해결됩니다.
  function handleOnDragEnd(result) {
    if (!result.destination) return;

    const currentTags = [...tags];
    const draggingItemIndex = result.source.index;
    const afterDragItemIndex = result.destination.index;
    const removeTag = currentTags.splice(draggingItemIndex, 1);

    currentTags.splice(afterDragItemIndex, 0, removeTag[0]);

    setTags(currentTags);
  }
드래그 태그가 완성되었습니다!
결론
React Beautiful DnD 라이브러리가 있어서 태그 드래그 기능을 큰어려움없이 만들 수 있었습니다. 라이브러리 만들어주신 분들께 정말 감사드립니다.
참고 블로그