[nodemailer] 이메일 인증을 통한 비밀번호 초기화 기능 구현
이메일 인증을 통한 비밀번호 초기화 기능 구현을 해야하는데 어떻게 해야할지 감이 안잡혀서 구글링해보았더니 설명이 정말 잘되어있는 글이 있었다..!
http://localhost:2030/resetaccount/2b888f6568ab0b0797461f13f69dccf0b16c8c43

router.post('/findEmail', async (req, res, next) => {
const { email } = req.body;
try {
const user = await db.User.findOne({ // 1. 유저가 존재하면 유저 정보를 가져옴
where: { email: email },
});
if (user) { // 2. 유저가 있다면?
const token = crypto.randomBytes(20).toString('hex'); // 3. token 생성(인증코드)
const data = {
// 4. 인증코드 테이블에 넣을 데이터 정리
token,
userid: user.id,
ttl: 300, // ttl 값 설정 (5분)
};
db.EmailAuth.create(data); // 5. 인증 코드 테이블에 데이터 입력
const transporter = nodemailer.createTransport({
service: 'gmail',
port: 465,
secure: true, // true for 465, false for other ports
auth: {
// 이메일을 보낼 계정 데이터 입력
user: '본인 Gmail ID',
pass: '본인 Gmail PW',
// .env에 따로 관리해야함
},
});
const mailOptions = {
from: 'yhehe228@gmail.com', // 발송 메일 주소 (위에서 작성한 gmail 계정 아이디)
to: email, // 수신 메일 주소
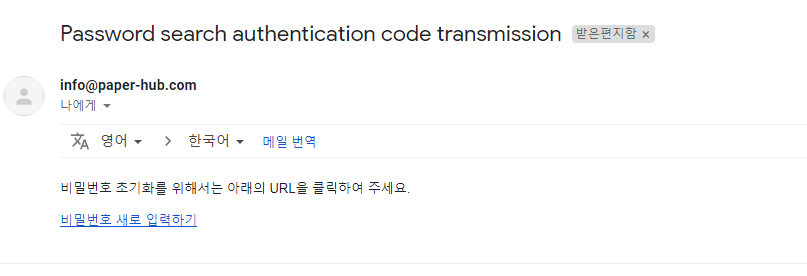
subject: 'Password search authentication code transmission', // 제목
text: 'This is the authentication code to find the password!', // 내용
html:
`<p>비밀번호 초기화를 위해서는 아래의 URL을 클릭하여 주세요.<p>` +
`<a href='http://localhost:2030/resetaccount/${token}'>비밀번호 새로 입력하기</a>`,
};
transporter.sendMail(mailOptions, (error, info) => {
if (error) {
console.log(error);
} else {
console.log('Email sent: ' + info.response);
}
});
return res.json(result);
} else {
return res.status(403).send('This account does not exist');
}
} catch (e) {
// try에서 result 결과값이 null일때 catch에서 에러로 잡지 않음 이유는?..
res.send(e);
}
});내 이메일로 입력했을때는 위의 코드로 아무런 문제없이 메일 전송이 잘 된다.
그런데... 내 개인 이메일이 아닌 G Suite 계정을 입력하니 에러가 뜬다..
검색해보니 nodemailer에서 G Suite 계정을 사용하려면 몇가지 설정해줘야 하는 것이 있다고 한다.
첫번째. API와 통신하는 데 사용될 새 서비스 계정을 설정한다
- https://console.cloud.google.com/projectselector2/iam-admin/serviceaccounts?supportedpurview=project 페이지로 이동
프로젝트 만들기버튼 클릭

- 서비스 키를 작성

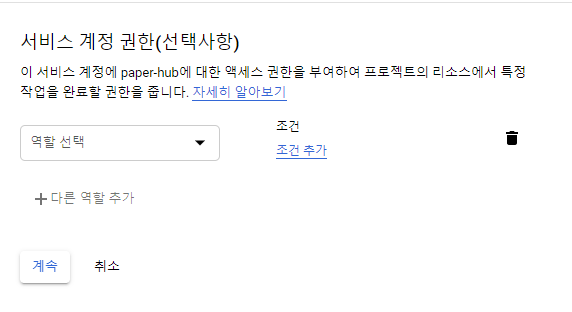
- 서비스 계정 권한은 그냥 패스한다
사용자에게 이 서비스 계정에 대한 액세스 권한 부여단계에서키 만들기버튼 클릭
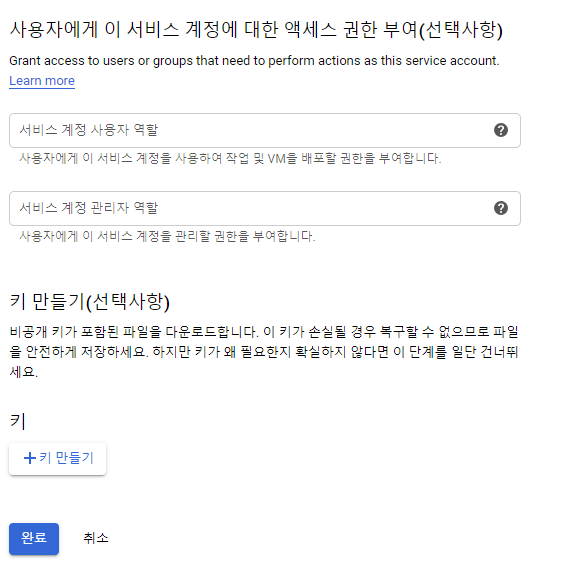
JSON으로 만들기!

- api key가 컴퓨터에 저장된다.

두번째. API 클라이언트 등록
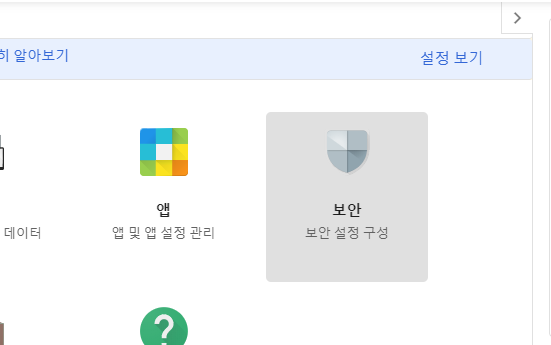
- Google Admin 페이지로 이동
- 보안메뉴 클릭
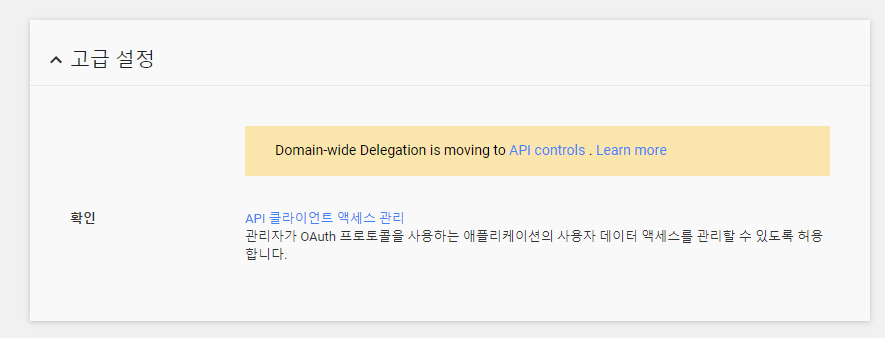
고급설정>API클라이언트 엑세스 관리버튼 클릭
- 위에서 발급받은
API KEY에서client_id를 가져와 페이지의클라이언트 이름인풋에 넣어준다.
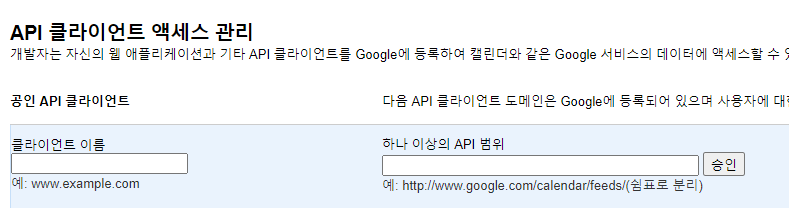
API 범위는 아래의 링크를 참고하여 필요한 기능을 가진 API를 넣어주고승인버튼을 클릭하면 새 API 클라이언트가 등록된다!
API 참고 👉 OAuth 2.0 Scopes for Google APIs
나는 mail 보내기 기능이 필요하여https://mail.google.com/을 선택해주었다.

- 이제 nodemailer 사용하는 코드에 아래와 같이 입력해준다.
nodemailer
비밀 key값들은 .env 파일로 따로 관리해주는게 좋을거 같다..!
const transporter = nodemailer.createTransport({
host: 'smtp.gmail.com',
port: 465,
secure: true, // true for 465, false for other ports
auth: {
// 이메일을 보낼 계정 데이터 입력
type: 'OAuth2',
user: process.env.GMAIL_ID,
serviceClient: process.env.GMAIL_CLIENT_ID,
privateKey: process.env.GMAIL_PRIVATE_KEY,
},
});
const mailOptions = {
from: process.env.GMAIL_ID, // 발송 메일 주소 (위에서 작성한 gmail 계정 아이디)
to: email, // 수신 메일 주소
subject: 'Password search authentication code transmission', // 제목
text: 'This is the authentication code to find the password!', // 내용
html:
`<p>비밀번호 초기화를 위해서는 아래의 URL을 클릭하여 주세요.</p>` +
`<a href='http://localhost:2030/resetaccount/${token}'>비밀번호 새로 입력하기</a>`,
};
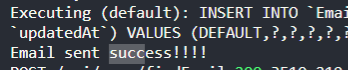
try {
await transporter.verify();
await transporter.sendMail(mailOptions);
console.log('Email sent success!!!!');
} catch (err) {
console.error(err);
}메일 보내기 성공!!!!
nodemailer 참고블로그
기타 참고

👩🏻💻 🚀