React와 같은 라이브러리, Angular와 같은 프레임워크로 개발하면서 지금 개발하고 있는 페이지가 SPA라는 것을 모르는 개발자는 없을 겁니다. 하지만 바닐라 자바스크립트로 SPA를 구현하라고 하면 좀 막연한 기분이 드는데요. 이번에는 바닐라 자바스크립트로 간단한 SPA를 구현해보려고 합니다.
서버 만들기
express로 간단한 서버를 먼저 만들어보겠습니다.
npm install express로 express를 설치한 후, 루트 위치에 server.js를 만들고 다음과 같이 작성합니다.
// server.js
const express = require('express');
const path = require('path');

const app = express();

// path.resolve는 정적 파일의 경로를 작성해줍니다.
// frontend 폴더 내에 작성한 파일들을 로드하기 위해 두번째 인자에 frontend, 세번째 인자에 static을 작성해줍니다.
// frontend와 static은 폴더 이름으로, 변경해도 무방합니다.
app.use(
  '/static',
  express.static(path.resolve(__dirname, 'frontend', 'static'))
);

// 어떤 주소가 입력되더라도 frontend 폴더 내부의 index.html 파일을 로드합니다.
app.get('/*', (req, res) => {
  res.sendFile(path.resolve('frontend', 'index.html'));
});

// port 번호를 지정하고 서버가 돌아가고 있음을 확인할 수 있도록 콘솔을 찍어줍니다.
// 콘솔은 생략해도 괜찮습니다.

app.listen(process.env.PORT || 4000, () => console.log('서버 슈웅'));
여기까지 작성한 후 npm start를 했을 때 콘솔이 찍히면 서버가 제대로 만들어진 것입니다.
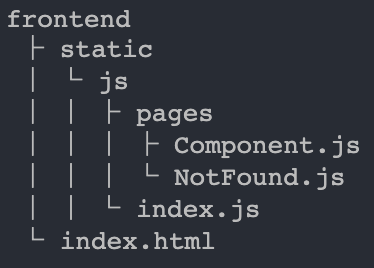
frontend 폴더 구성하기
server.js와 같은 위치에 frontend 폴더를 생성합니다. frontend 폴더의 구성은 다음과 같이 구성될 것입니다.
index.html
이제 frontend 폴더 내에 index.html을 작성해줍니다.
간단한 SPA를 만들기 위해 내비게이션은 html에 작성하도록 하겠습니다.
동적으로 렌더링될 페이지는 app 이라는 id를 가진 div 아래에 위치하게 됩니다.
작성한 html 외에 렌더링될 페이지는 js로 작성해줄 것이기 때문에 script도 추가해줍니다.
<!-- frontend/index.html -->
<body>
    <nav class="nav">
      <li><a href="/" class="nav_item">Home</a></li>
      <li><a href="/posts" class="nav_item">Post</a></li>
      <li><a href="/settings" class="nav_item">Setting</a></li>
    </nav>
    <div id="app"></div>
    <script type="module" src="./static/js/index.js"></script>
  </body>
동적으로 렌더링될 페이지 만들기
index.js에 렌더링할 페이지에 대한 코드를 작성하기 전에 frontend/static/js/pages 폴더에 각 페이지에 대한 코드를 작성해줍니다.
저는 렌더링될 페이지를 Component라는 파일 하나에 모두 작성했지만 분리해서 작성해도 됩니다. 만약 바닐라 자바스크립트로 진짜 프로젝트를 만든다면 분리해야겠죠. 분리한다면 다음과 같이 작성합니다.
// frontend/static/js/pages/Home.js
export default class {
  constructor() {
    document.title = 'Home';
  }
  async getHtml() {
    return `<h1>${document.title} 슈웅</h1>`;
  }
}
하지만 저는 Home, Post, Setting을 다음과 같이 한꺼번에 작성했습니다.
// frontend/static/js/pages/Component.js
export default class {
  constructor() {
    this.path = location.pathname;

    switch (this.path) {
      case '/':
        this.title = 'Home';
        break;
      case '/posts':
        this.title = 'Post';
        break;
      case '/settings':
        this.title = 'Setting';
    }
  }

  async getComponent() {
    return `<h1>${this.title} 슈웅</h1>`;
  }
}
만약 잘못된 주소 예를 들어 /user 를 입력했을 때 오류 페이지에 대한 코드도 작성해줍니다.
// frontend/static/js/pages/NotFound.js
export default class {
  constructor() {
    document.title = 'Not Found';
  }
  async getComponent() {
    return `<h1>404 ${document.title}</h1>`;
  }
}
index.js
이제 작성한 페이지를 로드할 index.js를 작성합니다.
index.js에 필요한 것은 사용자의 액션이 있을 때 페이지를 라우팅하는 render()와 히스토리 관리입니다.
먼저 render 함수는 다음과 같이 작성합니다.
// frontend/static/js/index.js

// 로드할 페이지 import
import NotFound from './pages/NotFound.js';
import Component from './pages/Component.js';

// 변경된 html을 삽입하거나 이벤트를 제어하기 위한 DOM 요소
const $app = document.querySelector('#app');
const $nav = document.querySelector('.nav');

const render = async () => {
  const routes = [
    { path: '/', component: Component },
    { path: '/posts', component: Component },
    { path: '/settings', component: Component },
  ];

  // 페이지의 pathname과 route의 path가 같은지 확인합니다.
  let isMatch = routes.find(route => route.path === location.pathname);

  // isMatch 여부에 따라 동적으로 렌더링 되는 component
  // 잘못된 주소를 입력할 경우 isMatch는 undefined 입니다.
  const $component = isMatch ? isMatch.component : NotFound;

  const $page = new $component();

  // 해당되는 페이지를 동적으로 삽입합니다.
  $app.innerHTML = await $page.getComponent();
};
이 render 함수를 적절하게 호출하려면 페이지에서 발생하는 이벤트를 제어해야 합니다. 먼저 내비게이션을 클릭했을 때 발생할 이벤트를 작성합니다.
$nav.addEventListener('click', e => {
  if (!e.target.matches('.nav > li > a')) return;

  // 페이지가 이동하지 않게 하기 위한 코드
  e.preventDefault();

  const path = e.target.getAttribute('href');

  if (window.location.pathname === path) return;

  // 클릭이벤트가 발생했을 때 주소를 변경하기 위한 코드
  window.history.pushState(null, null, path);

  render();
});pushState는 클릭이벤트가 발생했을 때 사용자가 클릭한 위치의 주소로 변경해주는 history의 내장 메소드입니다. 페이지를 이동하지 않으면서 주소를 변경하기 때문에 history 관리가 용이합니다. window.location과 비슷한 방식이지만 해시만 수정해야 같은 페이지에 머무를 수 있는 window.location보다 좀 더 나은 방식입니다.
window.history.pushState로 history를 관리하게 되었다면, 뒤로 가기를 구현하려면 내장 이벤트 중 popstate를 사용해야 합니다. window.history.pushState가 popstate 이벤트를 내장하고 있지 않기 때문에 추가로 작성해줍니다.
window.addEventListener('popstate', () => render());이제 초기에 페이지가 렌더링 됐을 때 동작할 이벤트를 적용해야 합니다. DOMContentLoaded이벤트는 최초로 html이 로드되었을 때 동작하는 이벤트입니다.
document.addEventListener('DOMContentLoaded', () => render());위의 코드를 작성하면 다음과 같이 동작하는 간단한 SPA가 만들어지게 됩니다.
마무리
바닐라 자바스크립트로 SPA를 작성하려고 했을 때 당황했던 기억 때문에 간단한 SPA를 만드는 코드를 작성해봤습니다. 아주 기본적인 라우팅을 구현해보면서 SPA에 대한 기초적인 동작원리를 이해하게 되었습니다.
pushState
popstate event
DOMContentLoaded event
Single Page Application & Routing
Vanilla JavaScript로 SPA구현하기
바닐라 자바스크립트로 SPA 구현해보기