오늘은 어제에 이어서 C#을 공부하고, C#을 이용한 TextRPG를 구상해 볼 예정이다.
메서드와 구조체
메서드란?
- 일련의 코드를 뭉쳐놓은 하나의 블록
- 재사용성
- 동일한 작업을 반복해서 구현하지 않아도 된다.
- 필요할 때 호출하여 작업 수행
- 모듈화
- 코드를 작은 단위로 분리하고 관리할 수 있다.
- 각 메서드는 특정한 기능을 수행하므로 코드의 구조가 명확해진다.
- 가독성과 유지보수성
- 코드가 간결해지고 가독성이 좋아진다.
- 수정이 필요할 경우 해당 메서드만 수정하면 되므로 유지보수가 용이해진다.
- 코드의 추상화
- 작업 단위를 추상화할 수 있다.
- 메서드 이름을 통해 해당 작업이 어떤 역할을 하는지 파악할 수 있다.
메서드의 구조, 선언과 호출
- 메서드의 구조와 문법
[접근 제한자] [리턴 타입] [메서드 이름]([매개변수)]
{
	//메서드 실행 코드
}- 예시
public int AddNumbers(int a, int b)
{
    int sum = a + b;
    return sum;
}

AddNumbers(10,20) // 호출- 문법
- 접근 제한자: 메서드에 접근할 수 있는 범위 (
public,private,protected등) - 리턴 타입: 메서드가 반환하는 값의 데이터 타입 (없을 경우
void사용) - 메서드 이름: 메서드를 호출하기 위해 사용하는 이름
- 매개변수: 메서드에 전달되는 입력 값
- 메서드 실행 코드: 중괄호
{}안에 메서드가 수행하는 작업을 구현하는 코드 작성
- 접근 제한자: 메서드에 접근할 수 있는 범위 (
메서드 오버로딩
- 오버로딩의 개념
- 동일한 이름의 메서드를 다양한 매개변수 목록으로 다중 정의
- 매개변수의 개수, 타입, 순서가 다른 여러 메서드를 동일한 이름으로 정의
- 입력값에 따라 다르게 동작해야 할 때 사용
void PrintMessage(string message)
{
    Console.WriteLine("Message: " + message);
}

void PrintMessage(int number)
{
    Console.WriteLine("Number: " + number);
}

// 메서드 호출
PrintMessage("Hello, World!");  // 문자열 매개변수를 가진 메서드 호출
PrintMessage(10);  // 정수 매개변수를 가진 메서드 호출
재귀 호출
- 재귀호출의 개념과 원리
- 메서드가 자기 자신을 호출하는 것
- 문제를 작은 부분으로 분할하여 해결하는 방법
void CountDown(int n)
{
    if (n <= 0)
    {
        Console.WriteLine("Done");
    }
    else
    {
        Console.WriteLine(n);
        CountDown(n - 1);  // 자기 자신을 호출
    }
}

// 메서드 호출
CountDown(5);- 종료조건을 명확히 정의해야 한다
- 무한히 재귀 호출이 반복되어 스택 오버플로우 등의 오류가 발생할 수 있음.
- 메모리 사용량이 더 크고 실행 속도가 느릴 수 있다.
구조체
- 사용자 정의 자료형
struct키워드를 사용하여 선언. 접근할 때.연산자를 사용한다.- 멤버는 변수와 메서드로 구성된다.
struct Person
{
    public string Name;
    public int Age;

    public void PrintInfo()
    {
        Console.WriteLine($"Name: {Name}, Age: {Age}");
    }
}

Person person1;
person1.Name = "John";
person1.Age = 25;
person1.PrintInfo();
TRPG 구성
배운 C#문법을 토대로 C#을 이용한 TRPG를 구성해보겠다. 과제의 필수 기능부터 어떻게 구현하면 좋을지 구상해보겠다.
게임 시작 화면
- 게임 시작 시 간단한 소개 말과 마을에서 할 수 있는 행동을 알려준다.
- 원하는 행동의 숫자를 입력 시 실행하고, 해당하지 않는 숫자나 문자 입력 시 "잘못된 입력입니다" 라는 텍스트를 출력한다.
- 간단한 소개말은
Console.WriteLine()을 이용해 출력한다. input변수를 선언하고 플레이어가 입력하는 문자를 숫자로 변환 후inputNumber에 저장한다.while문 안에 숫자를 입력받고 실행하는 스크립트를 작성한다.if문을 사용하여 해당하지 않는 숫자나 문자 입력 시 "잘못된 입력입니다"라는 텍스트를 출력한다.
- 간단한 소개말은
- 소개 말 출력 후,
Console.WriteLine("스파르타 마을에 오신 여러분 환영합니다.");
Console.WriteLine("이곳에서 던전으로 들어가기 전 활동을 할 수 있습니다.\n");

Console.WriteLine("1. 상태 보기");
Console.WriteLine("2. 인벤토리");
Console.WriteLine("3. 상점");

Console.WriteLine("\n원하시는 행동을 입력해주세요");

string input = Console.ReadLine();
int inputNumber;

if (int.TryParse(input, out inputNumber))
{
    Console.WriteLine("입력하신 번호는: " + inputNumber);
}- 올바르지 않은 입력값 입력 시 텍스트를 출력하고, 올바른 입력값을 입력할 때까지 반복하는 시스템을 위해
if문과while문을 사용한다. 이 스크립트를 추가하였다.
    if (int.TryParse(input, out inputNumber))
    {
        if (inputNumber >= 1 && inputNumber <= 3)
        {
        Console.WriteLine($"입력하신 숫자는 {inputNumber]입니다.")
        }
        else
        {
            Console.WriteLine("1~3 사이의 숫자를 입력해주세요.");
        }
    }
    else
    {
        Console.WriteLine("잘못된 입력입니다. 숫자를 입력해주세요.");
    }
플레이어 설정하기
- 각 화면으로 넘어가는 처리를 하기 전, 플레이어의 상태를 저장하는 파일을 하나 생성하겠다.
- 플레이어의 정보, 인벤토리, 소지금 등을 저장하는 Player 클래스를
Player.cs라는 하나의 파일에서 관리할 예정이다.
//Player.cs
public class Player
{
    public string Name = "Chad";
    public string Job = "전사";
    public int Level = 1;
    public int Hp = 100;
    public int Atk = 10;
    public int Def = 5;
    public int Gold = 1500;
}
각 화면으로 넘어가기
- 입력값에 따라
상태,인벤토리등의 화면으로 넘어가기 위해switch문이 적절할 것이라 생각한다. inputNumber에 따라 다른 화면으로 넘어가고, 각 화면은 서로 다른 항목에서 클래스로 관리하는 방식이 편할 것이라 생각했다.- 먼저,
MainScene에서 각 항목으로 넘어가기 위한switch문을 작성하겠다.
//MainScene.cs
            if (int.TryParse(input, out inputNumber))
            {
                switch (inputNumber)
                {
                    case 1:
                        Status.Show(); // 상태 보기 화면
                        break;
                    case 2:
                        Inventory.Show(); // 인벤토리 화면
                        break;
                    case 3:
                        Shop.Show(); // 상점 화면
                        break;
                    default:
                        Console.WriteLine("1~3 사이의 숫자를 입력해주세요.");
                        break;
                }
            }
            else
            {
                Console.WriteLine("잘못된 입력입니다. 숫자를 입력해주세요.");
} - 이후 각 파일에서
Show()함수를 생성하여 각 화면으로 넘어갈 수 있도록 만들겠다.Status.cs를 예시로 작성해보겠다.
//Status.cs
public class Status
{
    private Player player;

    public void Show()
    {
        while (true)
        {
            Console.Clear();
            Console.WriteLine("상태 보기");
            Console.WriteLine("캐릭터의 정보가 표시됩니다.\n");

            Console.WriteLine($"Lv. {player.Level.ToString("D2")}");
            Console.WriteLine($"{player.Name} ( {player.Job} )");
            Console.WriteLine($"공격력 : {player.Atk}");
            Console.WriteLine($"방어력 : {player.Def}");
            Console.WriteLine($"체 력 : {player.Hp}");
            Console.WriteLine($"Gold : {player.Gold} G\n");

            Console.WriteLine("0. 나가기");
            Console.WriteLine("\n원하시는 행동을 입력해주세요.");
            Console.Write(">> ");

            string input = Console.ReadLine();
            if (input == "0")
                break;
            else
                Console.WriteLine("\n잘못된 입력입니다. 다시 시도해주세요.");
        }

        Console.Clear();
    }
}- 이후 MainScene에서 각 화면을 불러오기 위해 MainScene안에서 각 클래스들의 필드를 구성하고, 각 클래스들을 불러와서 그 필드 안에 저장하는 스크립트를 추가하였다. 또한 각 화면을 구성하는 클래스들에 player 정보를 저장하는 스크립트를 추가하였다.
//MainScene
{
    private Player player;
    private Status status;
    private Inventory inventory;
    private Shop shop;
    public MainScene(Player player)
    {
        this.player = player;
        this.status = new Status(player);
        this.inventory = new Inventory(player);
        this.shop = new Shop(player);
    }
//Status.cs 예시
public class Status
{
private Player player;
public Status(Player player)
{
this.player = player;
}- 하지만 프로그램이 실행되지 않았다. 오류 메시지를 확인해보았다.
프로그램에는 진입점에 적합한 정적 'Main' 메서드가 포함되어 있지 않습니다. - 프로그램의 실행이 시작되는 곳이 있어야 한다는 뜻으로 해석된다.
- 이 오류를 해결하기 위해 구글링을 하던 중 마침 같은 조원이 과제물을 설명하는 과정에서
static키워드를 사용하는 예를 보며static키워드의 개념에 대해 좀 더 자세히 배워보기로 했다.
static 키워드의 개념과 활용
- 앞서 언급한 바,
static키워드는 객체를 불러오지 않아도 뒤에 수식하는 메서드를 활용할 수 있게 해주는 키워드이다. - 지금까지 코드를 작성하며 모든 객체를 MainScene에
new키워드를 통해 생성하고 불러왔는데,static키워드를 사용하면 그러지 않고도 쉽게 공유 및 접근이 가능해진다.
static이란?
static키워드는 클래스의 인스턴스(객체)를 생성하지 않아도 클래스 자체에서 접근할 수 있도록 만들어주는 키워드다. 쉽게 말해,new없이 클래스 이름만으로 변수나 메서드에 접근할 수 있게 된다.
public static class Game
{
    public static void PrintLine()
    {
        Console.WriteLine("============");
    }
}

// 호출
Game.PrintLine(); // new 없이 바로 호출 가능static은 클래스, 메서드, 변수, 속성 등 다양한 곳에 사용할 수 있으며, 프로그램 전역에서 공유되어야 하는 값이나 기능에 자주 사용된다.
static의 대표적인 사용 사례
- 프로그램의 시작점
static void Main(string[] args)
{
    // 프로그램 실행 시작
}
내가 static에 대해 자세히 배우게 된 계기이다. Main() 메서드는 C# 프로그램의 진입점이다. 이 메서드는 static으로 선언되어야만 컴파일러가 프로그램을 시작할 수 있다. 이 구조 덕분에 객체를 생성하지 않아도 프로그램이 실행될 수 있다.
- 유틸리티 메서드
public static class MathUtil
{
    public static int Add(int a, int b)
    {
        return a + b;
    }
}
int sum = MathUtil.Add(10, 20); // 객체 없이 직접 호출- 전역 변수처럼 사용할 때
public class GameManager
{
    public static int TotalGold = 0;
}static의 장점
- 공통 기능을 어디서든 호출할 수 있음
- 객체를 생성하지 않으므로 메모리 관리에 유리
- 게임 전체에서 하나만 있어야 하는 값(예: 설정, 환경 변수 등)에 적합
사실 나는 Unity 프로젝트를 진행하면서도 무심코 static을 써왔지만, 이번 텍스트 RPG 프로젝트를 하며 static의 개념을 명확히 이해하게 되었다. "언제 어떻게 static키워드를 써야 하는가?"를 알고 설계하는 것이 중요하다고 생각한다.
이후 나는 지금까지 제작한 프로젝트를 static 키워드를 사용한 형태로 갈아엎기로 결정했다.
TRPG 다시 제작하기
Program.cs
- 먼저 프로그램의 시작점이 되는
Main()메서드를 실행하는 스크립트를 작성한다.
using System;

public class Program
{
    static void Main(string[] args)
    {
        // 게임 시작
        MainScene.Start();
    }
}
MainScene.cs
- 다음으로 게임의 첫 화면인 MainScene을 관리하는 스크립트를 수정했다.
public static class MainScene
{
    public static void Start()
    {
        int inputNumber = 0;

        while (true)
        {
            Console.WriteLine("스파르타 마을에 오신 여러분 환영합니다.");
            Console.WriteLine("이곳에서 던전으로 들어가기 전 활동을 할 수 있습니다.\n");

            Console.WriteLine("1. 상태 보기");
            Console.WriteLine("2. 인벤토리");
            Console.WriteLine("3. 상점");
            Console.WriteLine("\n원하시는 행동을 입력해주세요");
            Console.Write(">> ");

            string input = Console.ReadLine();

            if (int.TryParse(input, out inputNumber))
            {
                switch (inputNumber)
                {
                    case 1:
                        Status.Show();
                        break;
                    case 2:
                        Inventory.Show();
                        break;
                    case 3:
                        Shop.Show();
                        break;
                    default:
                        Console.WriteLine("1~3 사이의 숫자를 입력해주세요.");
                        break;
                }
            }
            else
            {
                Console.WriteLine("잘못된 입력입니다. 숫자를 입력해주세요.");
            }

            Console.WriteLine();
        }
    }
}
Player.cs
- 다음은 Player의 정보를 저장하는
Player.cs를 수정했다.
public static class Player
{
    public static string Name = "Chad";
    public static string Job = "전사";
    public static int Level = 1;
    public static int Hp = 100;
    public static int MaxHp = 100;
    public static int Atk = 10;
    public static int Def = 5;
    public static int Gold = 1500;
}
기타 화면 스크립트들 (Status.cs 등)
- 다음은 상태, 인벤토리, 상점 등을 관리하는 스크립트들을 수정했다.
public static class Status
{
    public static void Show()
    {
        while (true)
        {
            Console.Clear();
            Console.WriteLine("상태 보기");
            Console.WriteLine("캐릭터의 정보가 표시됩니다.\n");

            Console.WriteLine($"Lv. {Player.Level.ToString("D2")}");
            Console.WriteLine($"{Player.Name} ( {Player.Job} )");
            Console.WriteLine($"공격력 : {Player.Atk}");
            Console.WriteLine($"방어력 : {Player.Def}");
            Console.WriteLine($"체 력 : {Player.Hp} / {Player.MaxHp}");
            Console.WriteLine($"Gold : {Player.Gold} G\n");

            Console.WriteLine("0. 나가기");
            Console.WriteLine("\n원하시는 행동을 입력해주세요.");
            Console.Write(">> ");

            string input = Console.ReadLine();
            if (input == "0")
                break;
            else
                Console.WriteLine("\n잘못된 입력입니다. 다시 시도해주세요.");
        }

        Console.Clear();
    }
}
public static class Inventory
{
public static void Show()
{
while (true)
{
Console.Clear();
Console.WriteLine("인벤토리");
Console.WriteLine("보유 중인 아이템을 관리할 수 있습니다.\n");
Console.WriteLine("0. 나가기");
Console.WriteLine("\n원하시는 행동을 입력해주세요.");
Console.Write(">> ");
string input = Console.ReadLine();
if (input == "0")
break;
else
Console.WriteLine("\n잘못된 입력입니다. 다시 시도해주세요.");
}
Console.Clear();
}
}public static class Shop
{
public static void Show()
{
while (true)
{
Console.Clear();
Console.WriteLine("상점");
Console.WriteLine("필요한 아이템을 얻을 수 있는 상점입니다.\n");
Console.WriteLine("0. 나가기");
Console.WriteLine("\n원하시는 행동을 입력해주세요.");
Console.Write(">> ");
string input = Console.ReadLine();
if (input == "0")
break;
else
Console.WriteLine("\n잘못된 입력입니다. 다시 시도해주세요.");
}
Console.Clear();
}
}수정 이후 실행했더니 의도한대로 화면이 실행됨을 확인했다.
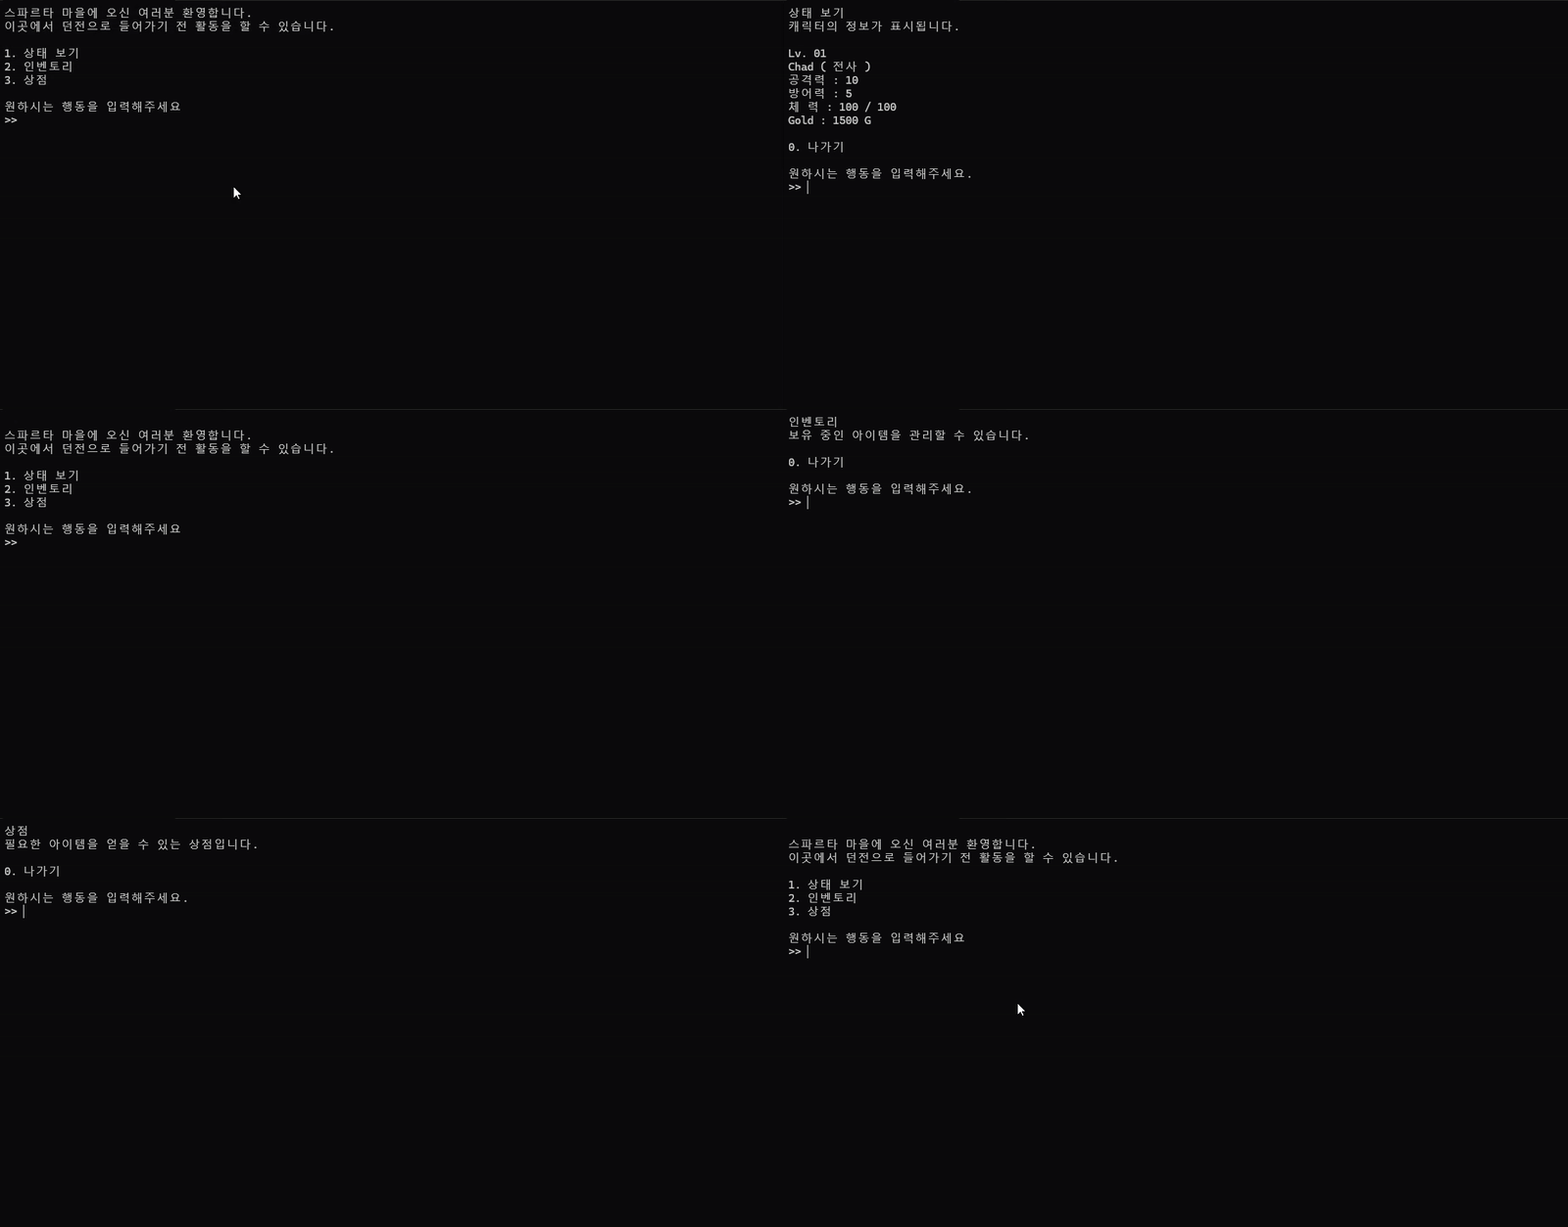
PlayerSetup.cs
이후 나는 처음 플레이를 할 때 플레이어의 이름을 직접 입력받는 기능을 구현하고 오늘의 실습을 마치기로 했다.
PlayerSetup.cs를 생성하고, 입력받은 이름을Player.Name에 저장하는 스크립트를 작성했다.
using System;

public static class PlayerSetup
{
    public static void Start()
    {
        Console.Clear();
        Console.WriteLine("원하시는 이름을 입력해주세요:");
        Console.Write(">> ");

        string input = Console.ReadLine();
        Player.Name = input;

        Console.WriteLine($"\n환영합니다, {Player.Name}님!");
        Console.WriteLine("아무 키나 눌러 스파르타 마을로 이동합니다...");
        Console.ReadKey();
        Console.Clear();
    }
}
이후 Program.cs에서 PlayerSetup.Start()가 먼저 실행되도록 수정했다.
실행 후, 의도한 대로 작동되고 있음을 확인했다.
이후 이 스크립트를 통해서 초기 값(ex: 직업, 능력치 분배 등)을 조정할 수 있을 것이다.
회고 및 느낀 점
- 오늘은 단순히 기능을 구현하는 데서 그치지 않고, C#의 핵심 문법과 개념에 대해 깊이 있게 이해하고, 그것을 직접 텍스트 RPG 구조에 적용해보는 의미 있는 시간이 되었다.
- 메서드는 지금까지 많이 사용해왔지만, 구조체를 이용해 데이터 묶음을 활용할 수 있다면, 이를 Unity에서 여러 시스템으로 활용할 수 있겠다는 생각이 들었다.
static키워드를 제대로 배우고 나니 지금까지 썼던 스크립트들에 대한 막연한 이해가 조금 더 명확해졌다.- 이걸 기반으로 전체 프로젝트 구조를 다른 스크립트에서 객체를 생성하는 것에서 스크립트에 접근하여 가져오는 방향으로 재설계했고, 그 덕분에 프로그램 흐름이 훨씬 명확해지고 불필요한 객체 생성도 줄어들었다.
- 솔직히 말하면 지금까지 개인적으로 프로젝트 모작을 할 때 검색을 통해 복사한 코드들을 '적용해보며 배우면 되지'라는 생각으로 붙여넣어 사용해왔었다.
- 하지만 이런 과정이 실제 이해하는 것과는 괴리가 있었음을 인정하게 되었다. 이제는 코드를 가져오더라도 왜 그 코드가 필요한지, 그 코드가 어떻게 동작하는지 등을 먼저 생각하고 배우는 과정이 필요하다.
- 결국 내가 직접 이해하고 사용하는 과정이 중요하다는 것을 다시금 깨닫는다.
- 앞으로도 기능 구현과 함께 기본기 학습과 개념 정리에 꾸준히 투자하는 개발 습관을 유지하겠다.
내일 계획
- 내일은 C# 3주차 강의를 마저 수강하고 정리한 후, TRPG 필수 기능 구현을 마치고 추가 기능까지 구현해볼 예정이다.