Enhanced Input 은 언리얼 엔진에서 구 Input 을 대체하기 위해 나온 새로운 인풋 시스템이다
5.1 버전부터는 Enhanced Input이 기본 설정으로 되어 있는만큼, 이것이 어떤것인지 정리하고, 코드로 구현해보고자 한다
Enhanced Input 이란?
Enhanced Input(향상된 입력)은 UE5에서 런타임 리매핑, 복잡한 입력 처리(동시 입력) 등 향상된 입력 기능을 제공하는 플러그인이다
Enhanced Input은 크게 4가지 특징을 가지고, 이는 각각
- Input Action
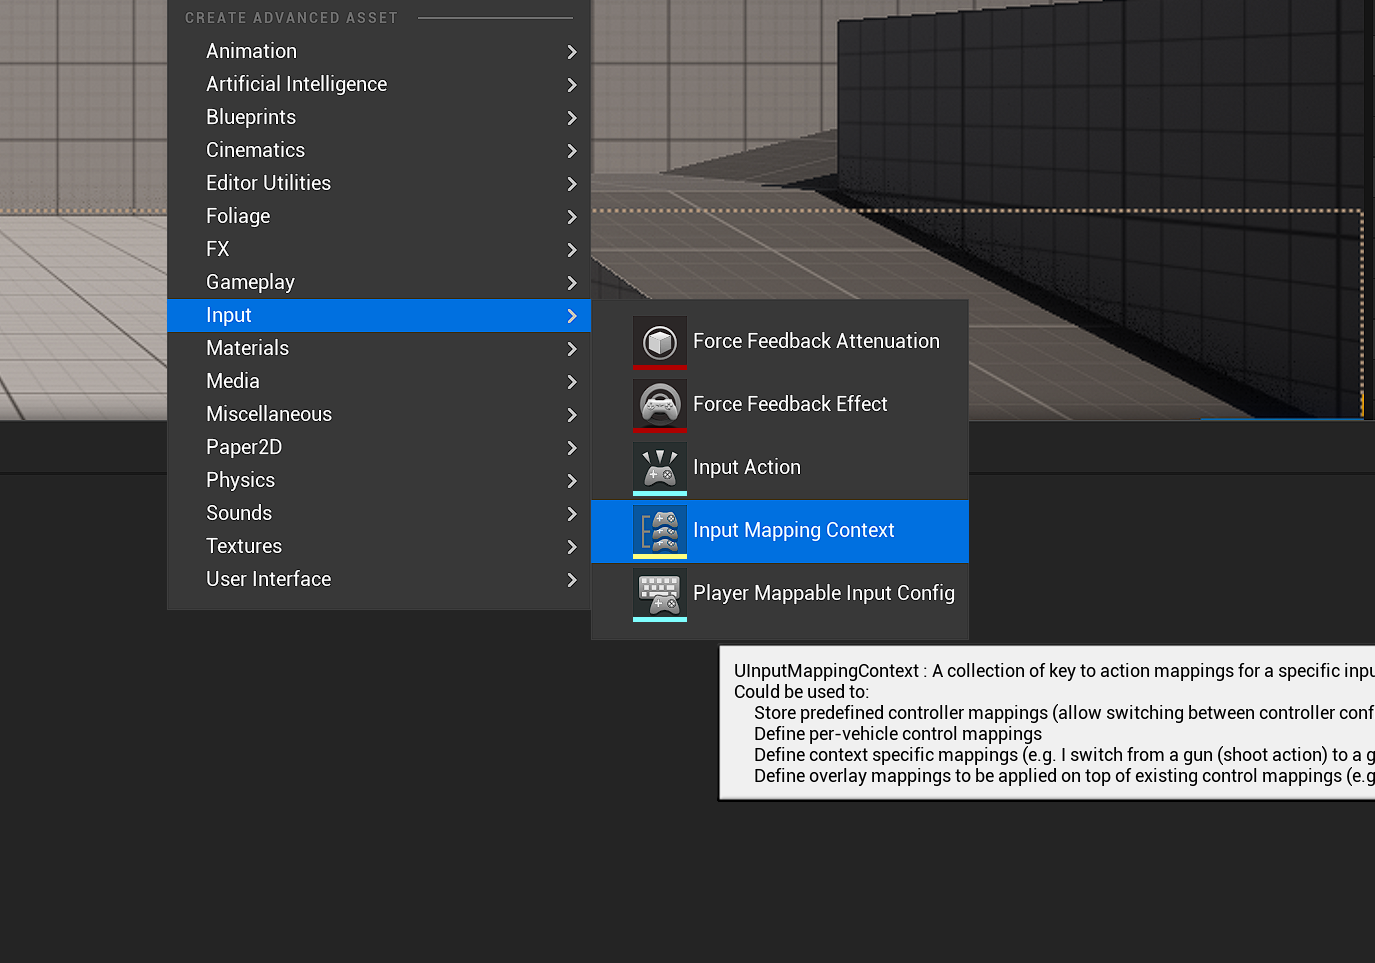
- Input Mapping Context
- Modifier
- Trigger
이렇게 4가지 이다
각각이 어떤것을 의미하는지 알아보고, 이들이 어떻게 유기적으로 연결되어 Enhanced Input을 구성하는지 알아보겠다
Enhanced Input 설정하는 법
먼저 언리얼 엔진 5.1 버전이라면 기본적으로 Enhanced Input이 설정되어 있지만, 그렇지 않다면 플러그인을 설치해주어야 한다
Edit -> Plugin 에서 Enhanced Input 을 검색해 설치할 수 있다

설치가 되었다면, 엔진이 재시작하게 되는데, 재시작 후 Project Setting -> Input 에서 Default Classes 를 Enhanced 로 설정한다

Input Action
InputAction(입력 액션)은 액션이 할당되는 부분이다
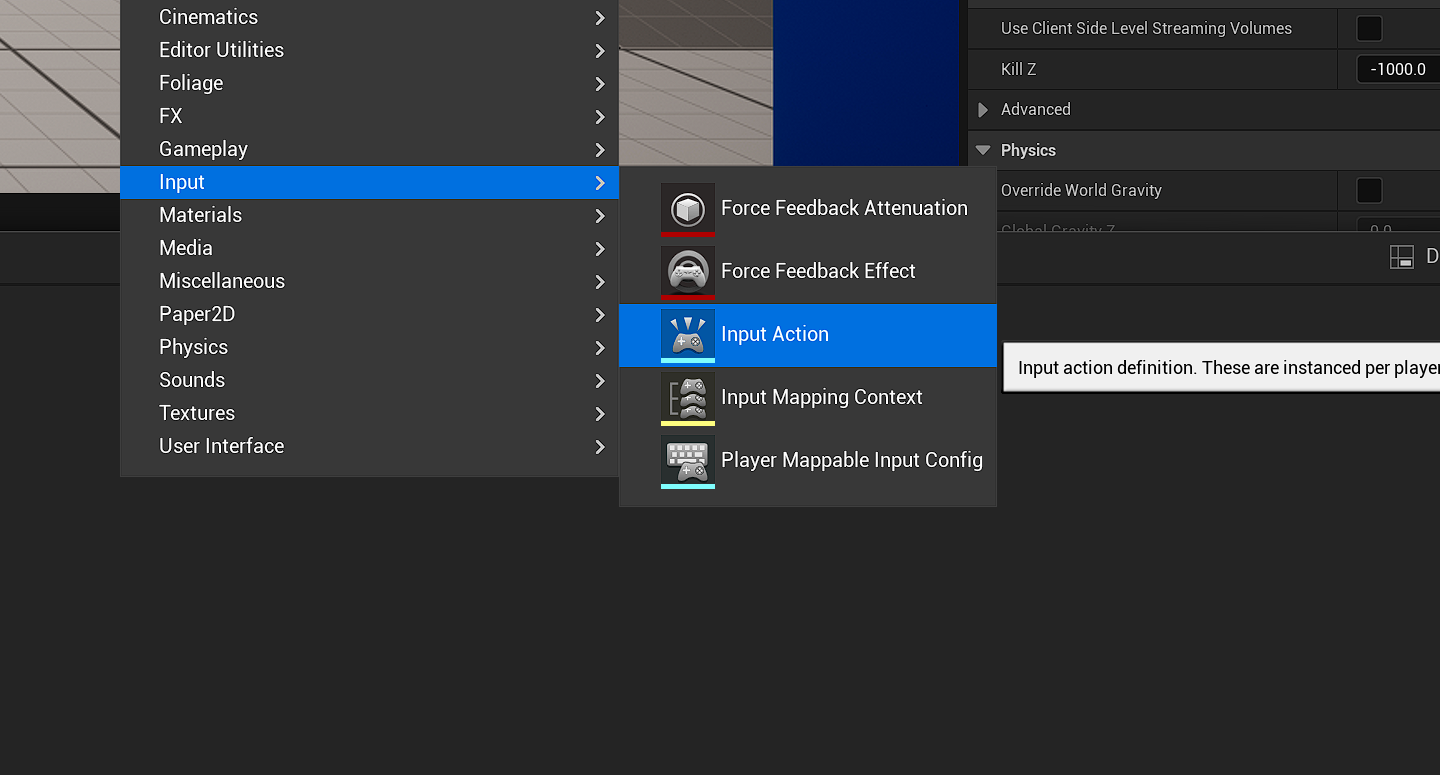
Input Action에서는 특정 키가 연결되지 않고, 역할에 대한 정보만을 구성하게 된다
입력받는 정보는 bool, float, Vector 2D, Vector 3D 를 받을 수 있게 되며, 내가 어떤 입력값을 받을지에 따라 이를 정할 수 있다
가령 '문을 연다', '장비를 착용한다' 와 같은 동작은 bool 값으로 지정하면 되고, 이동같은 동작은 Vector 2D로 설정해주면 된다
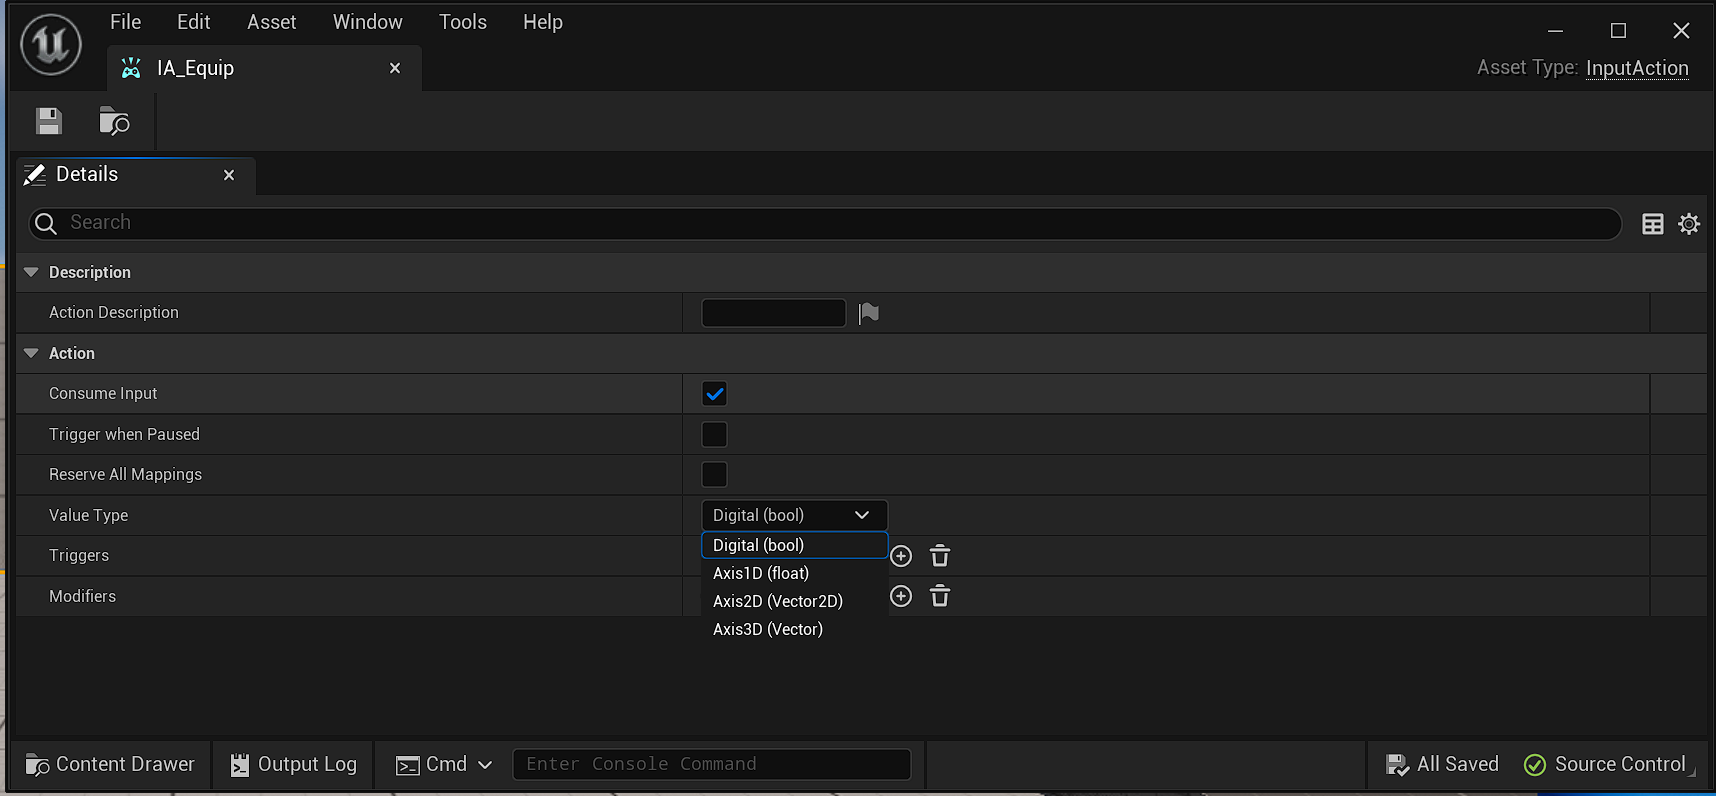
(Value Type 을 통해 지정 가능)
Input Mapping Context
Input Mapping Context(입력 매핑 컨텍스트)는 사용자의 입력값을 만들어둔 인풋 액션과 바인딩하게 된다
이때 사용자는 여러개의 Input Mapping Context를 가질 수 있으며, 이들은 각각 우선순위가 있어 같은 키를 입력해도
어떤 액션이 나갈지를 지정할 수 있게 된다
ex) 플레이어는 걷기와 인벤토리를 탐색할 때 각각의
Input Mapping Context를 가질 수 있다
이때 같은 WASD를 누르더라도, 인벤토리를 열었다면 인벤토리를 탐색하도록 우선순위를 정할 수 있다
예전같다면, 인벤토리를 열었는지 아닌지를 bool 값을 통해 체크해야 했으나,Input Mapping Context를 연결하는 것으로 해결이 가능해졌다
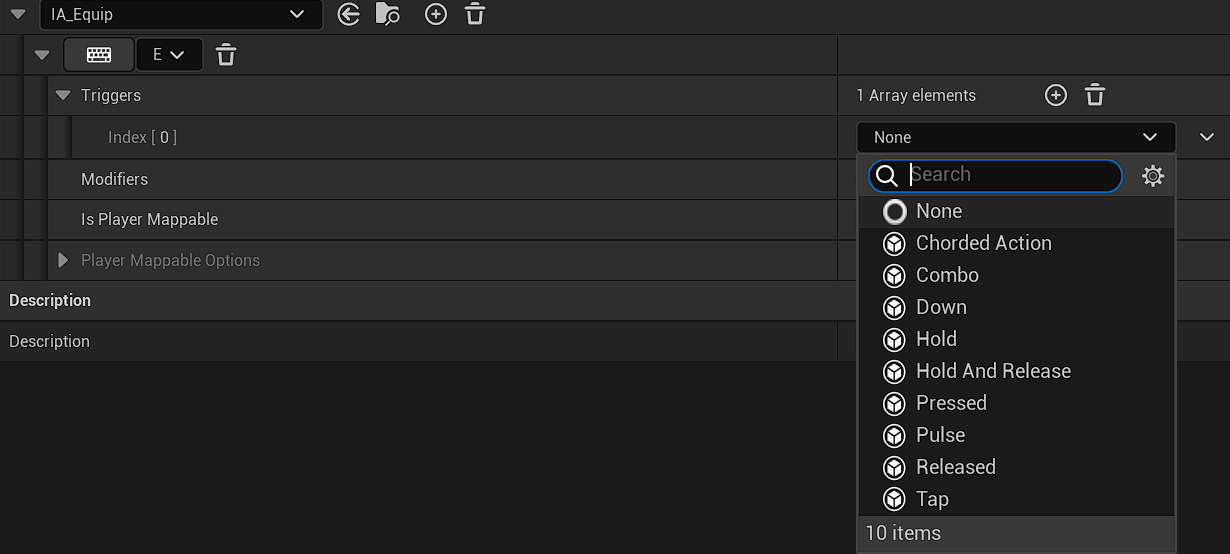
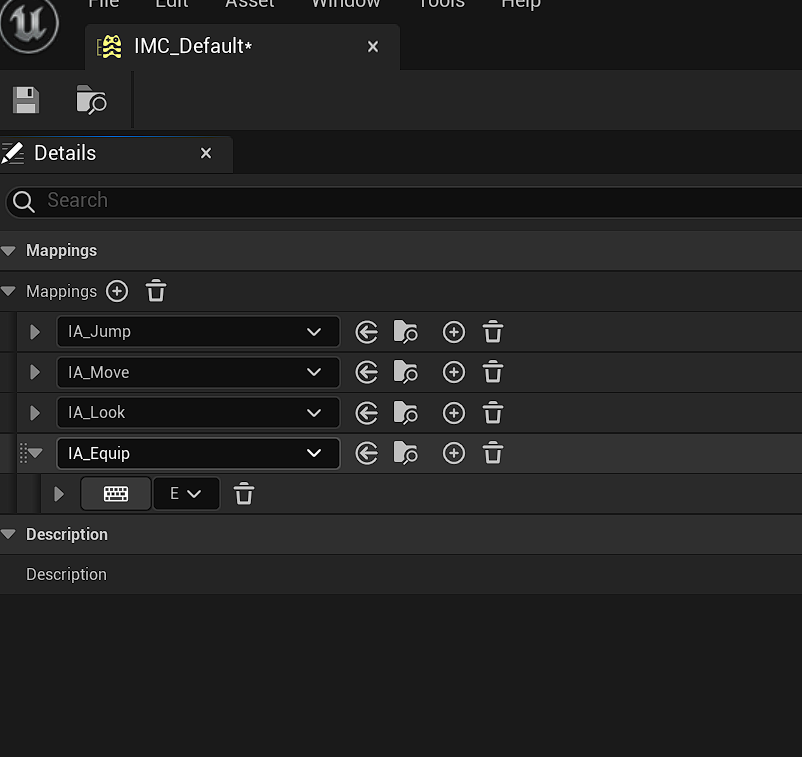
언리얼에서 기본적으로 제공하는 Input Mapping Context 를 살펴보면,
매핑을 통해 Jump, Move, Look 이라는 Input Action을 매핑했다 (Equip 의 경우 필자가 추가한 것이다)
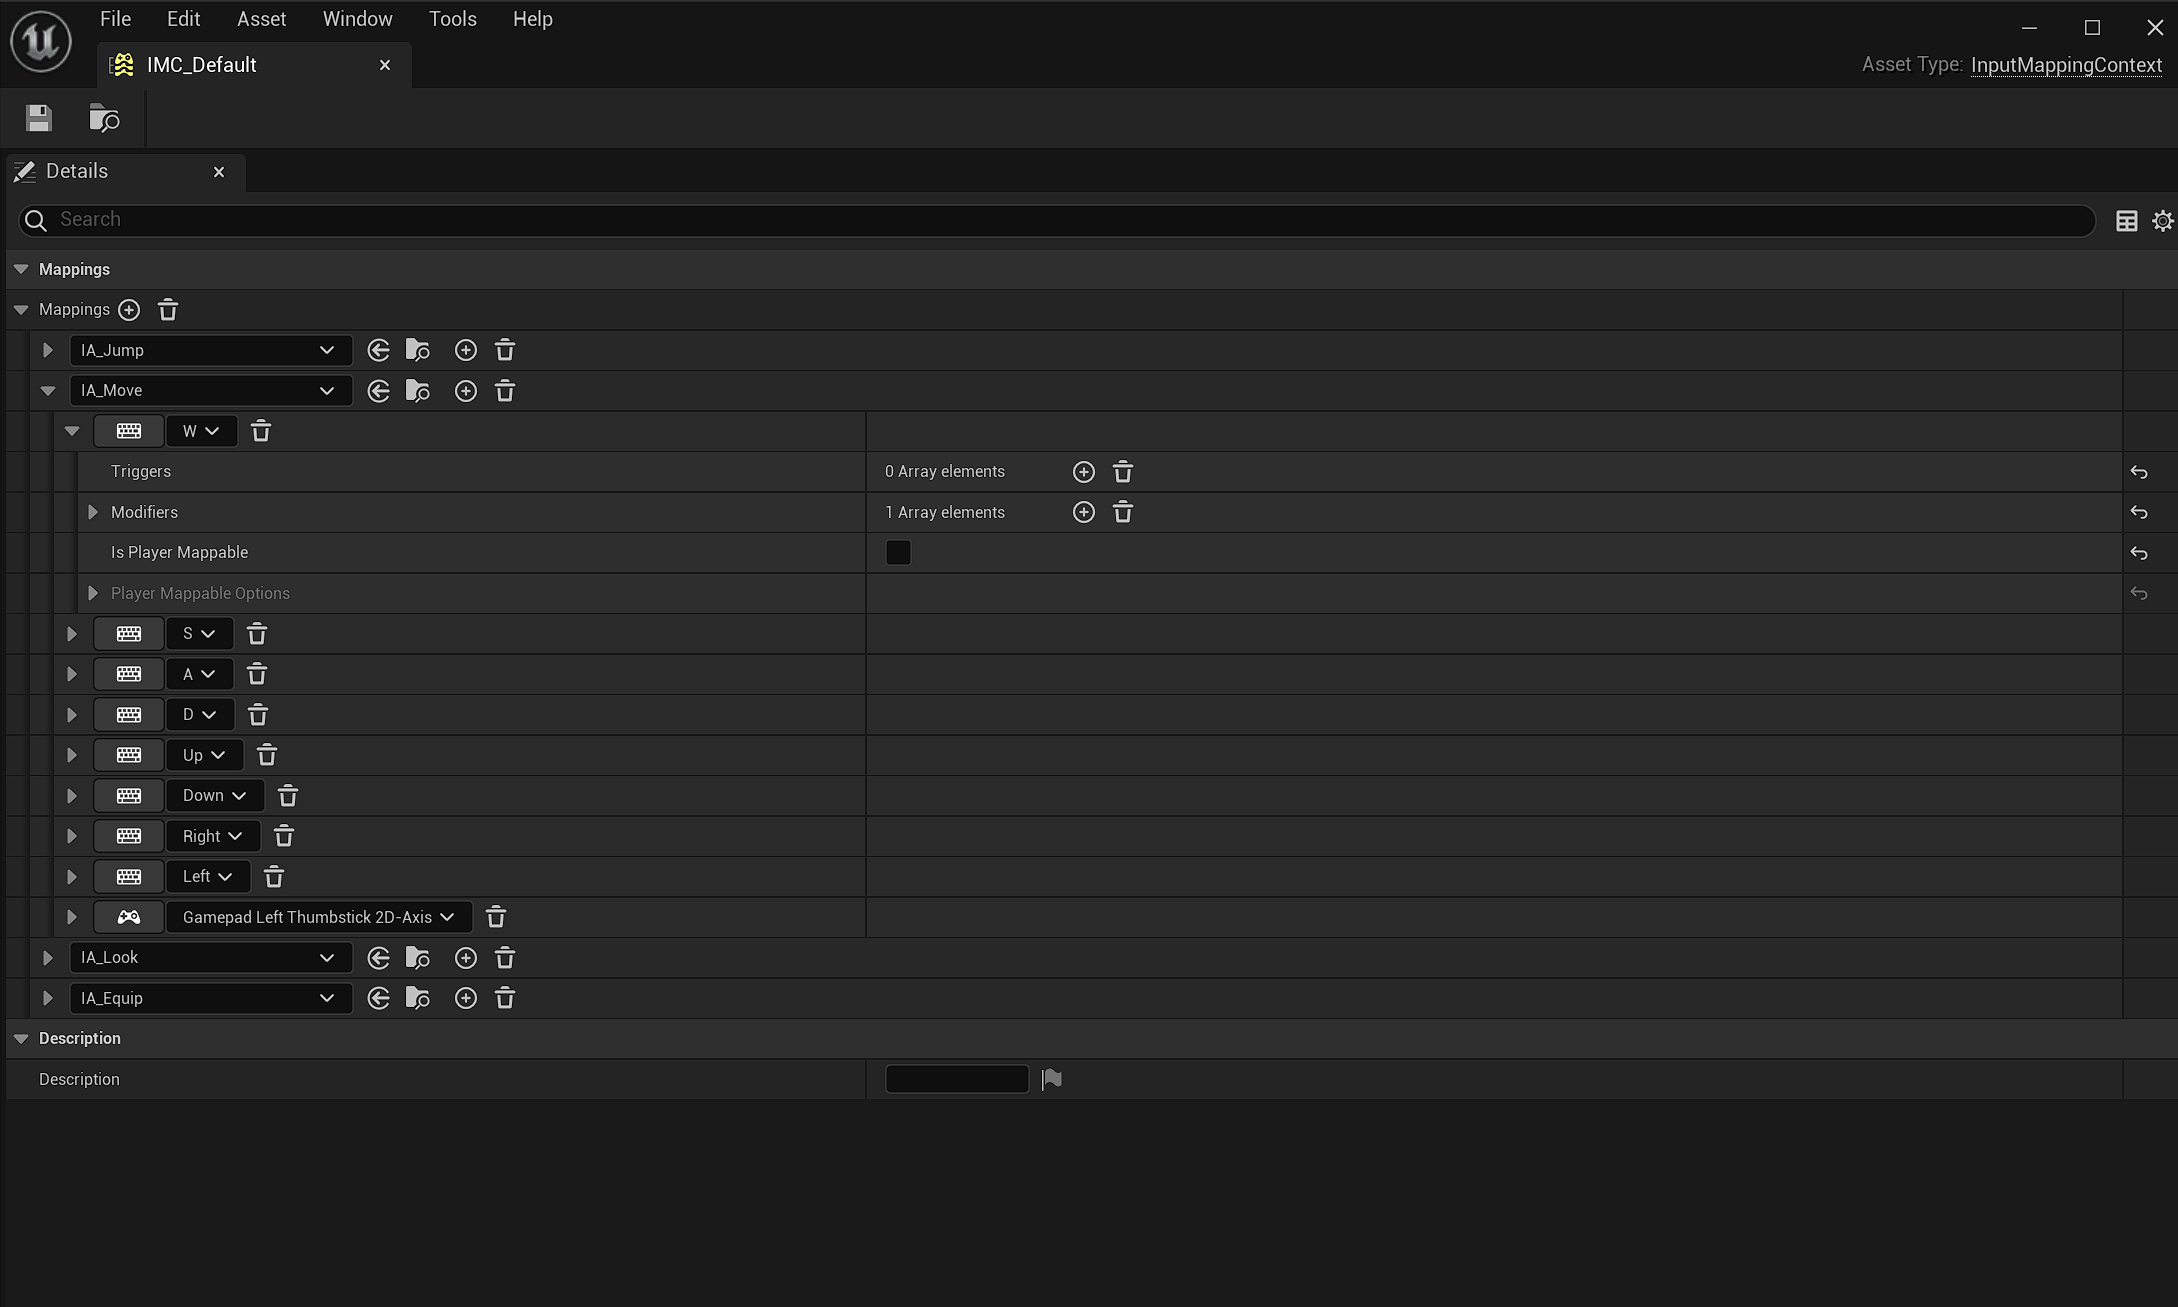
Move 액션에 경우 WASD가 모두 하나의 액션에 할당 되어 있는데, 어떻게 이런 구조가 가능했는지 Modifier와 Trigger를 보며 알아보자
Modifier
Modifier는 입력 받은 값을 변환해주는 장치이다
예시를 통해 빠르게 이해하자
W를 보면 Modifier에서 Swizzle Input Axis Values 가 설정되어 있고, 순서를 YXZ로 두었다
이는 원래는 입력을 받으면 XYZ 의 순서로 받게 되는데(이 경우 Modifier 가 없다면 w를 누르면 X가 1이 된다)
이를 YXZ 의 순서로 받게 하여 W를 입력 시 Y가 1이 되도록 설정하는 것이다

S를 보면 이번에는 Swizzle Input Axis Values 가 W 와 동일하게 설정되어 있고, 추가로 Negate 라는 항목이 추가가 되었다
Negate는 말에서 알 수 있듯이 입력받은 값을 반대로 해주는 역할이고, 이를 세부적으로 X, Y, Z 각각 정해줄 수 있다
(이 경우에는 Y에만 추가해도 되지만, 가시성을 위해 3가지 축 모두 설정이 되어있다)
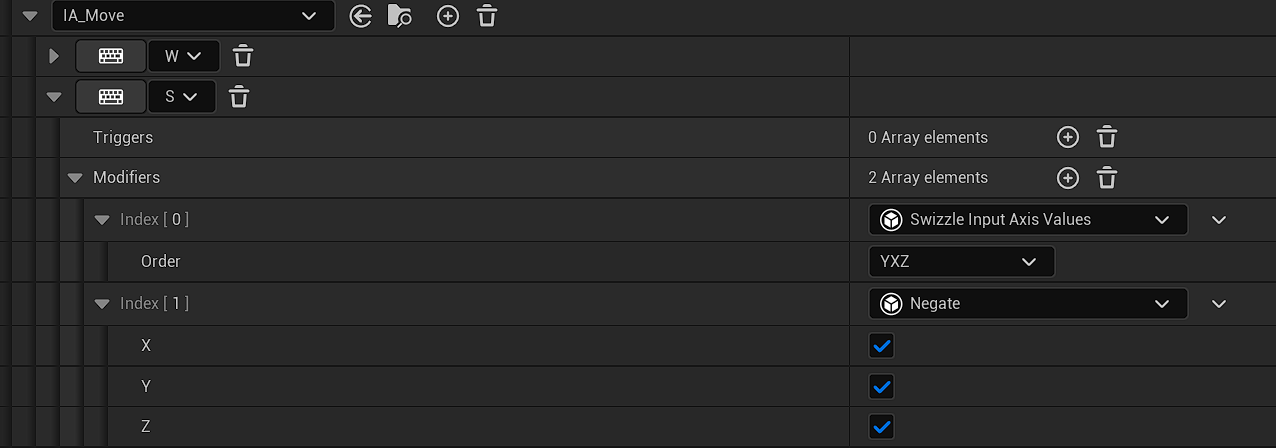
이처럼 Modifier를 적절하게 사용하면 하나의 입력액션으로 다양한 역할을 할 수 있다
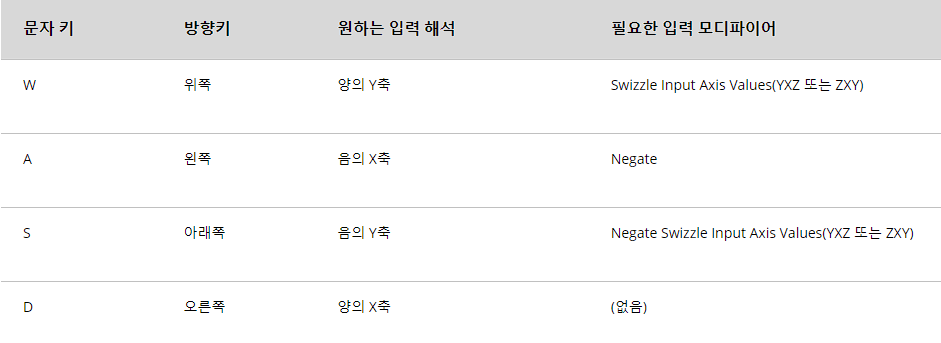
밑은 공식 도큐먼트에서 알려주는 방식이다
Trigger
Trigger 는 Modifier를 통해 입력 받은 값을 어떻게 활용할지 정하게 된다
가령 총을 쏘기 전에 먼저 에임을 해야한다거나, 짧게 누르면 약공격, 길게 누르면 차지어택이 나간다면, 이를 모두 트리거에서 제어가 가능하다
블루프린트로 Enhanced Input 설정하기
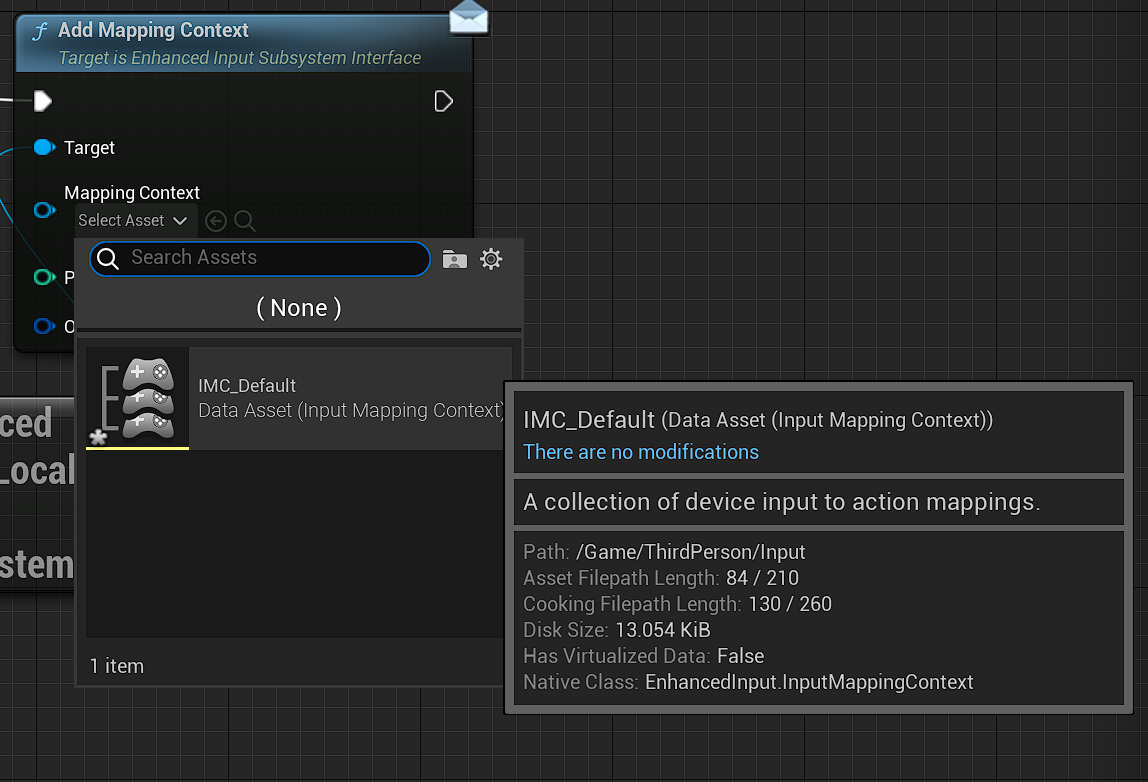
블루프린트를 통해 Enhanced Input을 설정해주기 위해 플레이어 컨트롤러 블루프린트를 열어보았다
Begin Play 함수에서 플레이어 컨트롤러를 캐스팅해주고, 이를 Enhanced Input Local Player Subsystem 으로 연결해
Mapping Context를 연결해준다
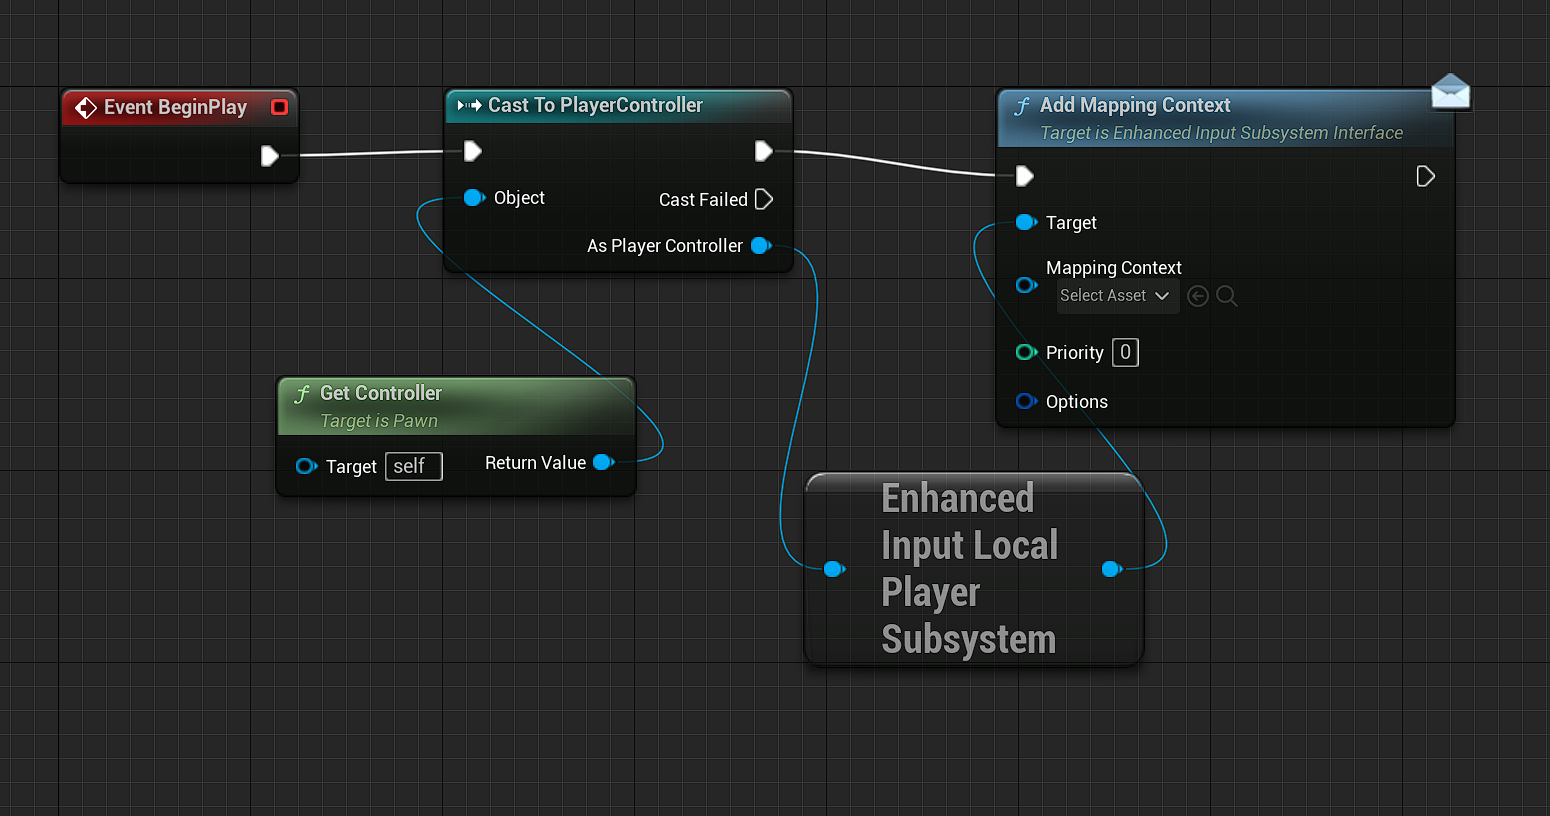
Mapping Context 에서 만들어둔 Input Mapping Context를 연결해줄 수 있고, Priority에서 우선순위를 정할 수 있다
Priority가 낮을수록 우선순위 또한 낮다
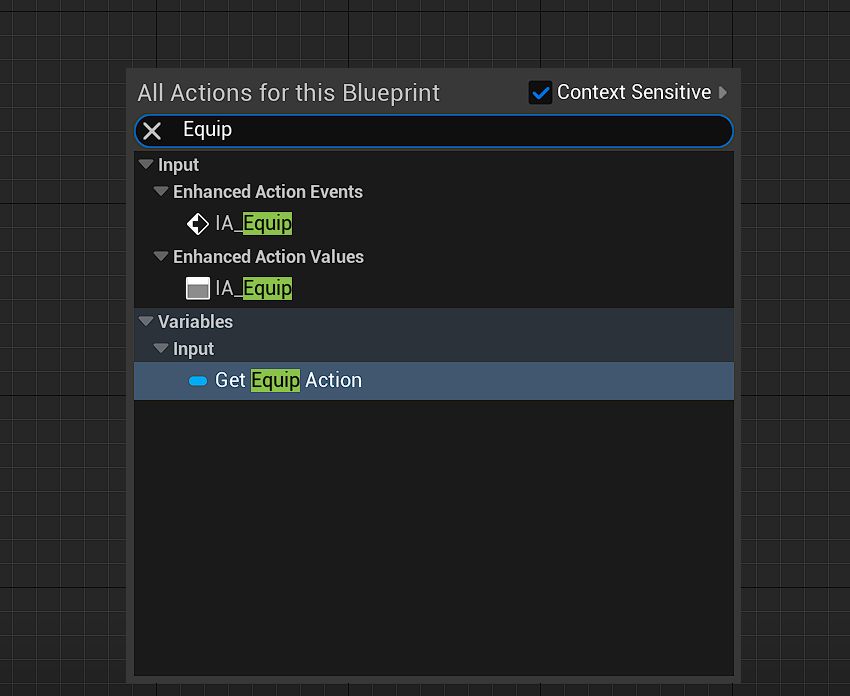
InputAction은 블루프린트에서 우클릭 후 검색해 어떤 액션을 할지 만들 수 있다
C++ 코드로 Enhanced Input 설정하기
블루프린트로 구현된 Enhanced Input을 보면서 같은 구성을 코드에서는 어떻게 적용하는지 보도록 하겠다
먼저, 5.1 버전 이전이라 플러그인을 직접 추가했다면, Enhanced Input 모듈을 추가해주어야 한다
빌드.cs 파일에서 Enhanced Input을 추가해주자
Practice.Build.cs
// Copyright Epic Games, Inc. All Rights Reserved.

using UnrealBuildTool;

public class Practice : ModuleRules
{
	public Practice(ReadOnlyTargetRules Target) : base(Target)
	{
		PCHUsage = PCHUsageMode.UseExplicitOrSharedPCHs;

		PublicDependencyModuleNames.AddRange(new string[] { "Core", "CoreUObject", "Engine",
        "InputCore", "HeadMountedDisplay", "EnhancedInput" });
	}
}
Input Mapping Context IMC_Default에 우리가 만든 액션 IA_Equip 를 추가해주었다
공부를 위해 새로운 플레이어 컨트롤러 클래스 PCharacter 를 선언해주었다
헤더또한 CoreMinimal.h 를 사용해 필요한 헤더를 파악하며 공부하겠다
PCharacter.h
// Fill out your copyright notice in the Description page of Project Settings.

#pragma once

#include "CoreMinimal.h"
#include "GameFramework/Character.h"
#include "InputActionValue.h"
#include "PCharacter.generated.h"

UCLASS()
class PRACTICE_API APCharacter : public ACharacter
{
	GENERATED_BODY()

public:
	// Sets default values for this character's properties
	APCharacter();

protected:
	// Called when the game starts or when spawned
	virtual void BeginPlay() override;

public:
	// Called every frame
	virtual void Tick(float DeltaTime) override;

	// Called to bind functionality to input
	virtual void SetupPlayerInputComponent(class UInputComponent* PlayerInputComponent) override;


private:
	UPROPERTY(VisibleAnywhere, Category = Input)
	class UInputMappingContext* DefaultContext;

	UPROPERTY(VisibleAnywhere, Category = Input)
	class UInputAction* EquipAction;

protected:
	void Equip(const FInputActionValue& Value);
};
PCharacter 클래스에서는 Input Mapping Context 와 거기에 추가할 Input Action Equip를 선언하고 연결해주도록 하겠다
이때, 헤더 파일에 #include 를 하게 되면, 컴파일 시간이 증가하게 되므로, Forward Declaration(전방 선언)을 해주었다
Forward Declaration? C++에서는 하나의 헤더파일이 변경되면 이를 include 하는 모든 파일이 다시 컴파일된다
이를 방지하기 위해 class 라고 명시해주는 것이Forward Declaration(전방 선언)이다
다만Forward Declaration은 리턴타입으로 쓸때, 혹은 포인터 변수로 사용될때만 사용가능하다
FInputActionValue는 구조체이며, 포인터 변수로 받지 않기 때문에 #include "InputActionValue" 를 통해 추가해주었다
PCharacter.cpp
// Fill out your copyright notice in the Description page of Project Settings.


#include "PCharacter.h"
#include "EnhancedInputComponent.h"
#include "EnhancedInputSubsystems.h"
#include "InputMappingContext.h"

// Sets default values
APCharacter::APCharacter()
{
 	// Set this character to call Tick() every frame.  You can turn this off to improve performance if you don't need it.
	PrimaryActorTick.bCanEverTick = true;

	static ConstructorHelpers::FObjectFinder<UInputMappingContext>DEFAULT_CONTEXT
	(TEXT("/Game/ThirdPerson/Input/IMC_Default.IMC_Default"));
	if (DEFAULT_CONTEXT.Succeeded())
		DefaultContext = DEFAULT_CONTEXT.Object;

	static ConstructorHelpers::FObjectFinder<UInputAction>IA_EQUIP
	(TEXT("/Game/ThirdPerson/Input/Actions/IA_Equip.IA_Equip"));
	if (IA_EQUIP.Succeeded())
		EquipAction = IA_EQUIP.Object;
}

// Called when the game starts or when spawned
void APCharacter::BeginPlay()
{
	Super::BeginPlay();

	if (APlayerController* PlayerController = Cast<APlayerController>(GetController()))
	{
		if (UEnhancedInputLocalPlayerSubsystem* SubSystem =
			ULocalPlayer::GetSubsystem<UEnhancedInputLocalPlayerSubsystem>(PlayerController->GetLocalPlayer()))
			SubSystem->AddMappingContext(DefaultContext, 0);
	}
}

// Called every frame
void APCharacter::Tick(float DeltaTime)
{
	Super::Tick(DeltaTime);

}

// Called to bind functionality to input
void APCharacter::SetupPlayerInputComponent(UInputComponent* PlayerInputComponent)
{
	Super::SetupPlayerInputComponent(PlayerInputComponent);

	if (UEnhancedInputComponent* EnhancedInputComponent = Cast<UEnhancedInputComponent>(PlayerInputComponent))
	{
		EnhancedInputComponent->BindAction(EquipAction, ETriggerEvent::Triggered, this, &APCharacter::Equip);
	}
}

void APCharacter::Equip(const FInputActionValue& Value)
{
	if (Value.Get<bool>())
		UE_LOG(LogTemp, Warning, TEXT("Input Action Triggered"));
}
생성자
생성자에서는 먼저 선언한 포인터변수 DefaultContext와 EquipAction 을 설정해주었다
이들은 모두 ConstructorHelpers::FObjectFinder 를 통해 불러올 수 있으며
각각 "InputMappingContext.h" 와 "EnhancedInputComponent.h" 가 필요하다
BeginPlay
Begin Play에서는 플레이어 컨트롤러를 캐스팅해주고, SubSystem과 Input Mapping Context 를 연결해주어야 한다
블루프린트의 경우를 생각하며 연결해준다
이때 UEnhancedInputLocalPlayerSubSystem 클래스를 사용하기 위해 "EnhancedInputSubsystems.h"를 추가한다
SetupPlayerInputComponent
SetupPlayerInputComponent 에서는 원래라면 PlayerInputComponent 에서 바로 BindAction 등을 통해 매핑이 가능했다
Enhanced Input 을 사용하는 경우에는 Enhanced Input Component를 캐스팅 해주고, 이를 바인딩해주게 되면 된다
이때 BindAction의 매개변수로는 (인풋 액션, 트리거 이넘, 오브젝트(캐릭터 본인), 함수의 주소) 가 된다
Equip 함수
바인딩해줄 액션 함수의 매개변수는 FInputActionValue& 를 사용했다
이 Value 값은 bool, float, Vector2D, Vector3D가 모두 가능하며 이를 통해 가시성을 확보하게 된다
나의 경우에는 Equip 함수의 Value 타입을 bool로 지정했기에, Value.Get<bool>() 을 통해 불 값을 받아왔다
마지막으로 내 캐릭터를 기본 캐릭터로 받도록 게임모드 클래스를 변경해주고 플레이 해보았다
PracticeGameMode.cpp
// Copyright Epic Games, Inc. All Rights Reserved.
#include "PracticeGameMode.h"
#include "PracticeCharacter.h"
#include "UObject/ConstructorHelpers.h"
#include "PCharacter.h"
APracticeGameMode::APracticeGameMode()
{
DefaultPawnClass = APCharacter::StaticClass();
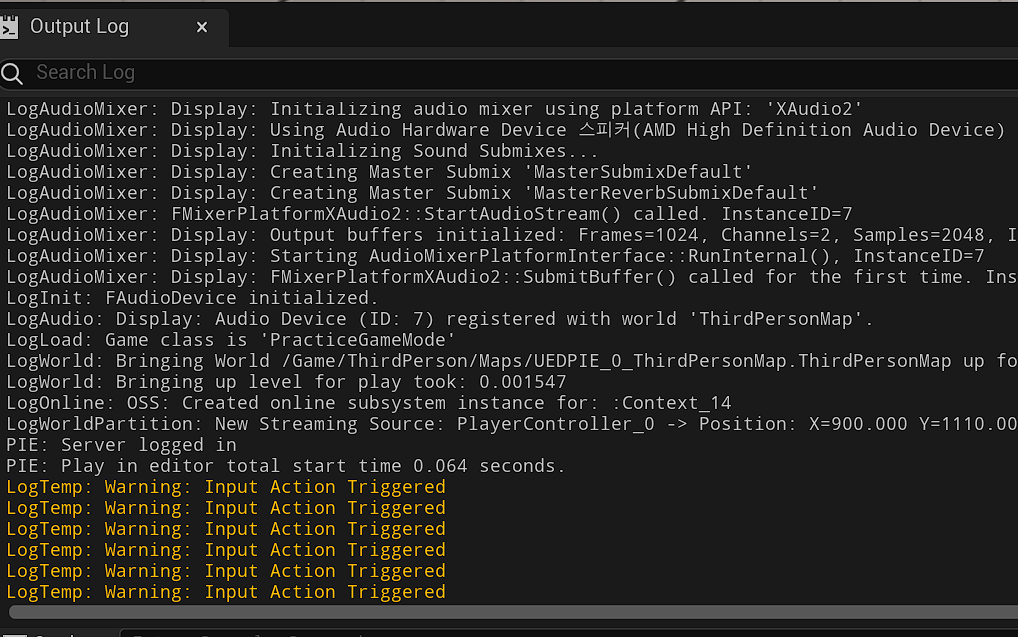
}E를 누르면 로그가 찍히게 된다

많이 배우고 갑니다!