Spring: The IoC Containers
Basic Concepts
- Bean
- Spring IoC 컨테이너가 생성 및 관리하는 오브젝트이다.
- IoC(Inversion of Control) Container
- 모든 bean에 대한 정보가 있는 configuration metadata를 바탕으로 오브젝트들을 생성한다.
- Configuration 방법에는 annotation-based, java-based, xml-based 세 가지가 있다. xml은 요즘 잘 쓰지 않는 것 같다.
- IoC 컨테이너 안에
BeanDefinition라는 메타데이터가 있다:- Class, Name, Scope, Constructor arguments, Properties, Autowiring mode, Lazy initialization mode, Initialization method, Destruction method
BeanFactory인터페이스: IoC 컨테이너의 한 종류로서 오브젝트를 관리해주는 기능을 제공해준다.ApplicationContext인터페이스:BeanFactory에서 기능이 더 추가된 것이다.
- 모든 bean에 대한 정보가 있는 configuration metadata를 바탕으로 오브젝트들을 생성한다.
- Dependency Injection (DI)
- 어떤 오브젝트가 자신의 dependency, 즉 서로 상호작용하는 다른 오브젝트를 constructor arguments, factory method에 대한 arguments, 혹은 property 로만 정의하는 것이다.
- IoC 컨테이너가 bean을 만들 때, 혹은 먼저 만든 이후에 각 오브젝트들에 대해 필요한 dependency를 설정해준다.
- 이렇게 오브젝트가 만들어질 때 dependency가 준비되어 있어야하는 게 아니라, 먼저 bean이 만들어지거나 만들 때 dependency를 연결해주기 때문에 inversion이라고 부르는 것이다.
Spring 컨테이너가 생성될 때 각 bean의 configuration에 대한 validation을 한다. 그러나 bean properties는 실제로 bean이 생성되기 전까지는 설정되지 않는다. singleton-scoped이고 pre-instantiated인 bean은 컨테이너가 생성될 때 생성된다.
Dependency Injection
Dependency Injection은 오브젝트와 dependency를 decouple 하기 때문에 코드가 더 간결해진다. 두 가지의 DI 방식이 있다.
- Setter-based DI
B b = new B();
A a = new A();
a.setB(b);- Constructor-based DI
B b = new B();
A a = new A(b);
Dependency resolution 과정은 다음과 같다.
ApplicationContext가 모든 bean에 대한 정보가 있는 configuration metadata 를 바탕으로 초기화된다. Configuration metadata는 XML, Java 코드, 혹은 annotation을 통해 정의할 수 있다.- 각 bean마다의 dependency는 properties, constructor arguments, 혹은 static-factory 메소드의 arguments를 통해 알 수 있다. bean이 생성될 때 이런 dependency가 bean에게 전달된다.
- 각 property나 constructor argument는 특정 값이나 컨테이너 안의 다른 bean에 대한 reference이다.
Circular dependencies
- constructor injection을 사용할 때 circular dependency 상황이 발생할 수 있다.
- 클래스 A가 constructor injection을 통해 클래스 B를 요구하고, 반대로 클래스 B도 constructor injection을 통해 클래스 A를 요구할 수 있다. 이렇게 클래스 A와 B에 대해서 서로 inject 되도록 bean을 정의하면 Spring IoC 컨테이너가 런타임에 이런 순환참조를 발견하고
BeanCurrentlyInCreationException을 발생시킨다. - setter based DI로 구현이 가능은 하지만 circular dependency 자체가 권장되지는 않는다.
@Lazy를 통해서도 가능한가..?
Autowiring Collaborators
Spring이 ApplicationContext의 데이터를 바탕으로 bean에 대한 collaborator를 정해주도록 할 수 있다.
- 직접 정의해줘야하는 번거로움을 줄여준다.
- 오브젝트가 바뀔 때 configuration을 업데이트해줄 수 있다.
autowiring mode는 네 가지가 있다.
- no (default)
- autuwiring을 하지 않고 bean reference는 직접
ref값 설정을 통해 해야한다. - collaborator를 직접 명시하는 것이 control 과 clarity 측면에서 좋기 때문에 이 설정 그대로 사용하는 게 권장된다.
- autuwiring을 하지 않고 bean reference는 직접
- byName
- property 이름과 동일한 bean을 찾아서 autowire한다.
- byType
- 컨테이너 안에서 해당 property type과 동일한 bean이 하나만 존재할 때 autowire한다.
- 동일한 type의 bean이 여러 개라면 exception이 발생한다.
@Primary혹은@Qualifier를 통해 해결할 수 있다. - 하나도 없다면 property가 설정되지 않는다.
- constructor
- byType과 유사하지만 constructor agrument에 적용된다.
autowiring의 한계점도 있다.
property와constructor-arg의 명시적인 dependency 설정이 autowiring을 override한다.Strings나Classes와 같은 primitive는 autowire할 수 없다.- explicit wiring 을 사용하는 게 더 명확하다.
@Autowired
기본적으로는 byType으로 autowiring 한다. 근데 해당 type의 오브젝트가 여러 개일 때는 byName과 같이 @Qualifier를 사용할 수 있다.
@Autowired
@Qualifier("item1")
public void setItem(Item item) {
    ...
}
Item 클래스의 bean이 여러 개일 때 bean id가 item1인 오브젝트를 찾아서 주입한다.
@Autowired를 필드에 붙일 수도 있다. 그러면 default constructor 호출할 때 binding을 한다. default constructor 호출이 안 되는 상황이라면 사용할 수 없다.
public class CandyStore implements Store {

    @Autowired
    @Qualifier("item1")
    private Item item;

    public CandyStore() {
        System.out.println("constructor");
    }
    ...
}@Autowired를 Constructor에 쓸 때는 Qualifier를 parameter에 붙여야한다.
public class CandyStore implements Store {

    private Item item;

    @Autowired
    public CandyStore(@Qualifier("item1") Item item) {
        System.out.println("constructor");
    }
    ...
}
@Autowired(required=false) 로 설정하면 해당 bean이 없어도 null로 들어가고 exception이 발생하지 않는다.
Bean Scopes
Bean definition은 실제 인스턴스를 생성하는 recipe라고 이해하면 된다. 하나의 recipe로 여러 오브젝트 인스턴스를 만들 수도 있다.
6개의 bean scope가 지원된다. 다음 중 request, session, application, websocket은 web-aware Spring인 ApplicationContext에서만 사용 가능하다.
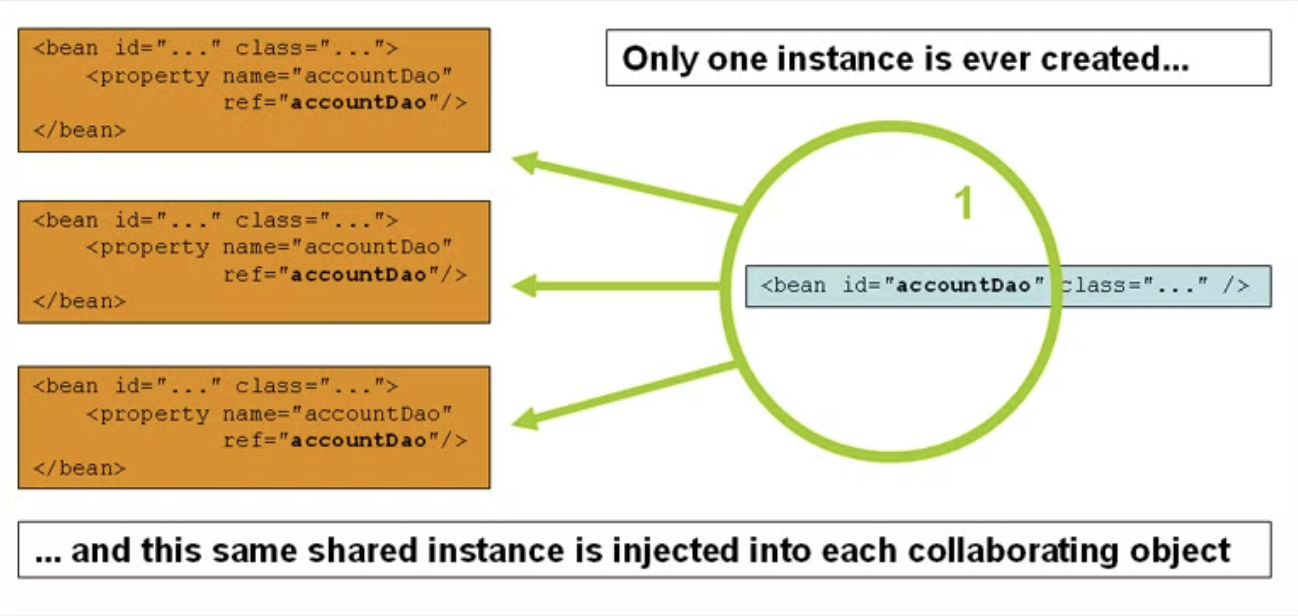
- singleton(default)
- Spring IoC container이 singleton 으로 scope된 bean definition에 대해 하나의 인스턴스만 생성한다.
- 이 하나의 인스턴스는 cache에 저장되어서 해당 이름의 bean 요청이 오면 그 캐싱된 오브젝트를 반환한다.
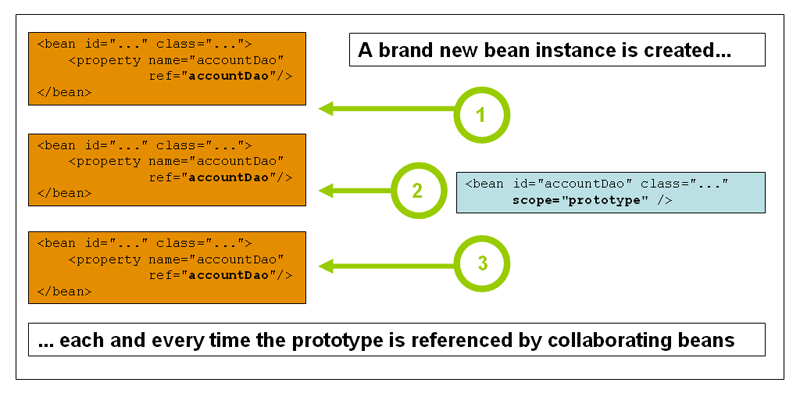
- prototype
- 특정 bean에 대한 요청이 있을 때마다 새로운 bean 인스턴스를 생성한다.
- 컨테이너에
getBean()메소드를 호출함으로써 bean을 얻을 수 있다. - stateful bean은 prototype scope를 사용하고 stateless bean은 singleton scope을 사용해야한다.
- request (
@RequestScope)- 하나의 HTTP 요청마다 하나의 bean definition을 적용한다.
- session (
@SessionScope)- 하나의 HTTP
Session마다 하나의 bean definition을 적용한다.
- 하나의 HTTP
- application (
@ApplicationScope)Servletcontext마다 하나의 bean definition을 적용한다.
- websocket
- 하나의
WebSocket마다 하나의 bean definition을 적용한다.
- 하나의
Annotation-based Container Configuration
- 클래스에 annotation-based configuration metadata를 사용한다.
@Component,@Service,@Repository,@Controller등을 사용한다.- Service, Repository, Controller는 기본적으로는 Component의 종류인데 해당 클래스의 목적을 더 명확히 해준다.
- component scanning 을 통해서 bean이 등록된다.
- dependency는
@Autowired혹은 constructor injection을 통해 이루어진다.
Component에 대해 디폴트 값을 넣어주려면 @Value를 사용한다.
@Component
public class CandyStore implements Store {
    @Value("10")
    private int stock;
}
혹은 @Value("${[property.name](http://property.name/):defaultValue}") 와 같은 방법으로 정의할 수도 있다.
@Autowired, @Inject, @Value, @Resource annotation 들의 동작은 Spring의 BeanPostProcessor 에 의해 처리된다. 따라서 BeanPostProcessor나 BeanFactoryPostProcessor 타입에는 이런 annotation을 사용할 수 없다. 대신 XML이나 @Bean 메소드를 통해서 직접 wire up 해야한다.
Java-based Container Configuration
Basic Concepts
@Configuration,@Bean,@Import,@DependsOnannotation 을 사용한다.- bean definition이 있는 클래스에
@Configurationannotation을 추가한다. 그 다음에 각 bean을 생성할 method에@Beanannotation을 추가한다. - 직접 Configuration이라 명시하기 때문에 bean discovery가 더 explicit하다.
- 더 유연하고 복잡한 bean logic에 유용하다.
- dependency는
@Bean메소드에서 처리한다. @Bean- 해당 메소드가 Spring IoC 컨테이너에 의해 관리될 새로운 오브젝트를 instantiate, configure, initialize 할 때 사용한다.
- 이 메소드에서 반환하는 오브젝트는 bean으로 등록된다. 따라서 이 메소드가 여러 군데에서 호출되어도 반환된 오브젝트는 동일한 주소를 바라보고 있다.
@Component나@Configuration로 annotate된 클래스에서 사용한다.- default로 bean 이름은 method 이름과 동일하다.
@Configuration- 해당 클래스가 bean definition을 정의할 때 사용된다.
@Bean로 annotate 된 메소드를 통해 bean을 선언한다.
Injecting Inter-bean Dependencies
@Configuration
public class AppConfig {

	@Bean
	public BeanOne beanOne() {
		return new BeanOne(beanTwo());
	}

	@Bean
	public BeanTwo beanTwo() {
		return new BeanTwo();
	}
}beanOne이 constructor injection을 통해서 beanTwo에 대한 reference를 받게 된다.
이런 inter-bean dependencies는 @Component 클래스에서는 Constructor based DI를 통해 사용할 수 없다. setter based DI로는 되는 것 같다.
XML configuration to Java configuration
XML configuration
<beans xmlns=...>
    <context:component-scan base-package="my.example.entity" />
    <bean id="item" class="my.example.entity.Item" />
</beans>
Java configuration
@ComponentScan("my.example.entity")
@Configuration
public class AppConfig {

    // @Bean 메소드의 이름은 bean id가 되기 때문에 getItem 이 아니라 명사형인 item 으로 한다.
    @Bean
    public Item item() {
        return new Item();
    }
}
보완: bean lifecycle - PostConstruct, PreDestroy annotation에 대한 정리도 하자.
References