이제 막 프론트엔드+백엔드+모델 서빙하는 것을 끝냈는데 쉴 새 없이 또 새로운 개념을 익혀야 한다... 정말 휘몰아치는구나... 하루에 18시간씩 공부해도 진도를 따라갈 수가 없다 ㅠㅠ
학습시간 09:00~03:00(당일18H/누적2114H)
◆ 학습내용
1. 모델 서빙 프레임워크
(1) 모델 서빙 시 고려사항
A. 서빙 환경
- 모델 종류: 다루려는 모델이 LLM인지, 컴퓨터 비전(CV) 모델인지, 일반적인 머신러닝(ML) 모델인지에 따라 접근법이 달라짐
- 가용 자원: 모델을 실행할 하드웨어 환경(GPU, CPU, TPU 등)을 파악하고 최적화해야 함
B. 서빙 퍼포먼스
- 처리량 (Throughput): 1초 동안 얼마나 많은 요청을 처리할 수 있는지 나타내는 지표 (단위: rps, token/sec 등)
- 지연 시간 (Latency): 하나의 요청을 처리하는 데 걸리는 시간, 낮을수록 응답이 빠름
- 결국 모델 서빙은 ‘어떤 모델’을 ‘어떤 환경’에서 ‘얼마나 빠르고 많이’ 처리할 것인가에 대한 고민
2. KV cache & PagedAttention
(1) LLM의 추론 방식과 KV 캐시
A. 자기회귀(Autoregressive) 모델의 특징
- LLM은 다음에 올 단어를 예측할 때, 이전에 생성했던 모든 단어들을 다시 입력으로 사용함
- 예시: "부대찌개는" 다음에 "햄이"를 생성하고, 그 다음엔 "부대찌개는 햄이"를 입력으로 넣어 "중요하다"를 생성
- 문제점: 매번 똑같은 앞부분("부대찌개는")을 중복해서 연산해야 하므로 매우 비효율적
B. KV 캐시 (Key-Value Cache)
- 중복 연산을 피하기 위해, 어텐션 메커니즘에서 계산된 중간 값(Key, Value)을 저장해두는 메모리 공간
- 한 번 계산한 토큰의 KV 값은 캐시에 저장해두고 다음 토큰 생성 시 재사용하여 추론 속도를 크게 향상
C. KV 캐시의 한계
- 메모리 점유율이 매우 큼 (예: A100 GPU 메모리의 30% 이상 차지)
- 메모리 단편화 문제: 요청마다 생성되는 텍스트 길이가 달라서, 할당된 캐시 공간에 빈틈(낭비)이 많이 생김
- 이러한 비효율적인 메모리 관리가 결국 전체 서빙 성능을 저하시키는 원인이 됨
(2) vLLM과 PagedAttention
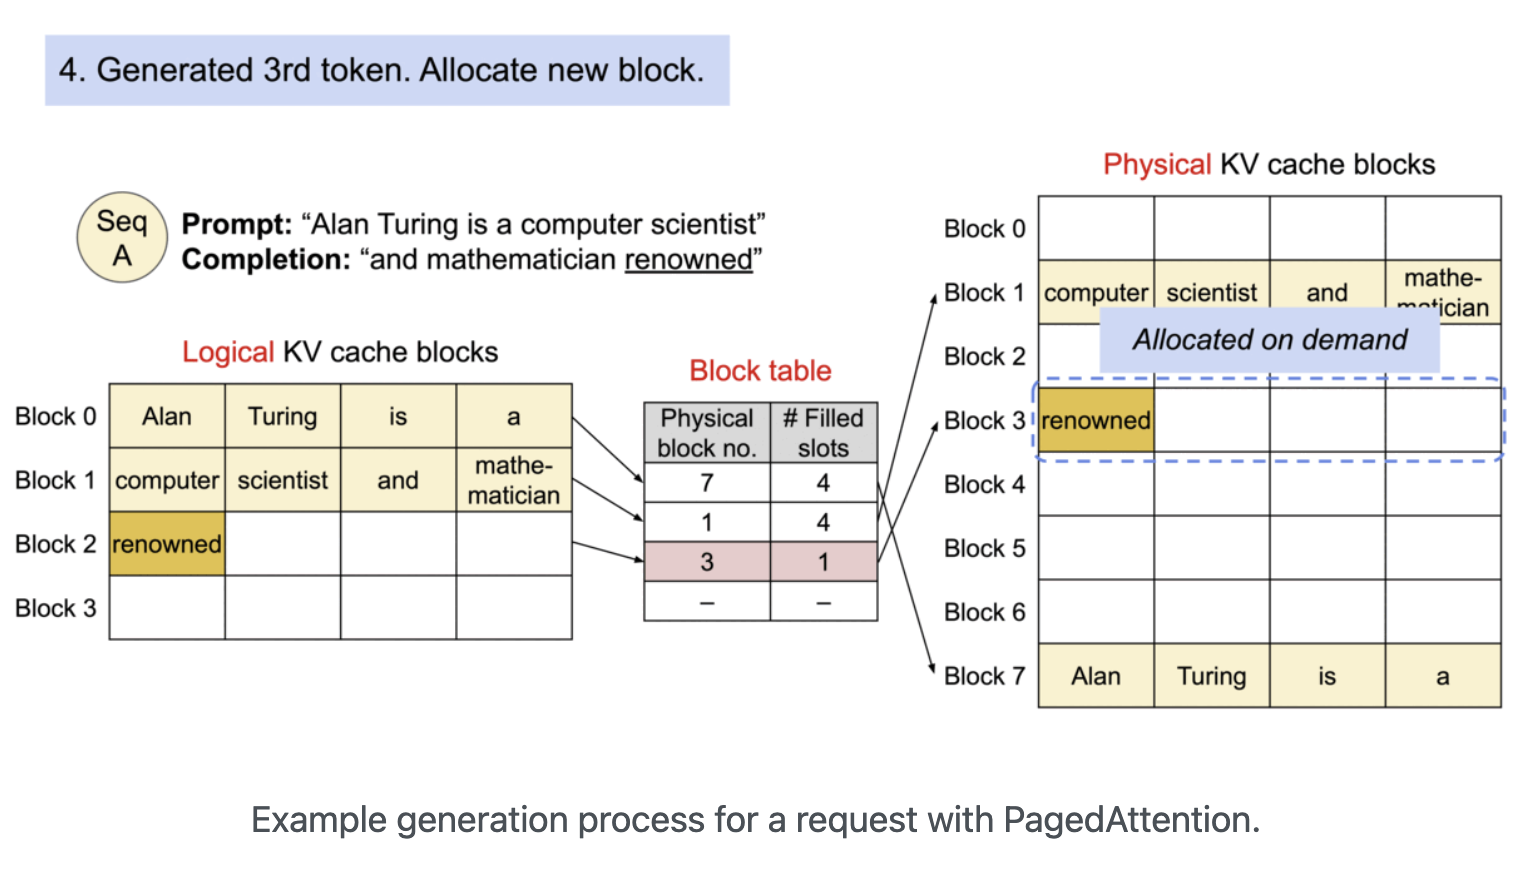
A. PagedAttention의 등장
- KV 캐시의 메모리 비효율 문제를 해결하기 위해 등장한 알고리즘
- 운영체제(OS)의 '가상 메모리'와 '페이징' 기법에서 아이디어를 얻음
B. 작동 원리
- KV 캐시를 정해진 크기의 '블록(Block)' 단위로 잘게 나눔
- 연속되지 않은 물리 메모리 공간에 이 블록들을 할당하고, '블록 테이블'을 이용해 논리적으로 연결하여 관리
- 결과적으로 메모리 단편화를 최소화하고, GPU 메모리를 훨씬 유연하고 효율적으로 사용 가능
- PagedAttention 기술 덕분에 vLLM은 기존 서빙 시스템들보다 훨씬 높은 처리량(Throughput)을 달성할 수 있게 됨
3. 주요 모델 서빙 프레임워크
(1) vLLM
- PagedAttention 논문을 실제 구현한, LLM 추론 및 서빙에 특화된 파이썬 라이브러리
- 빠른 서빙 속도: PagedAttention을 통해 초당 처리 요청 수와 동시 요청 수용 능력이 뛰어남
- 배치 처리: 여러 요청을 한 번에 묶어 처리하여 GPU 활용도를 극대화
- 다양한 기능 지원: 양자화(모델 경량화), 분산 추론(여러 GPU 사용) 등을 지원
- 뛰어난 호환성: 허깅페이스에 있는 대부분의 모델을 바로 가져와 사용할 수 있음
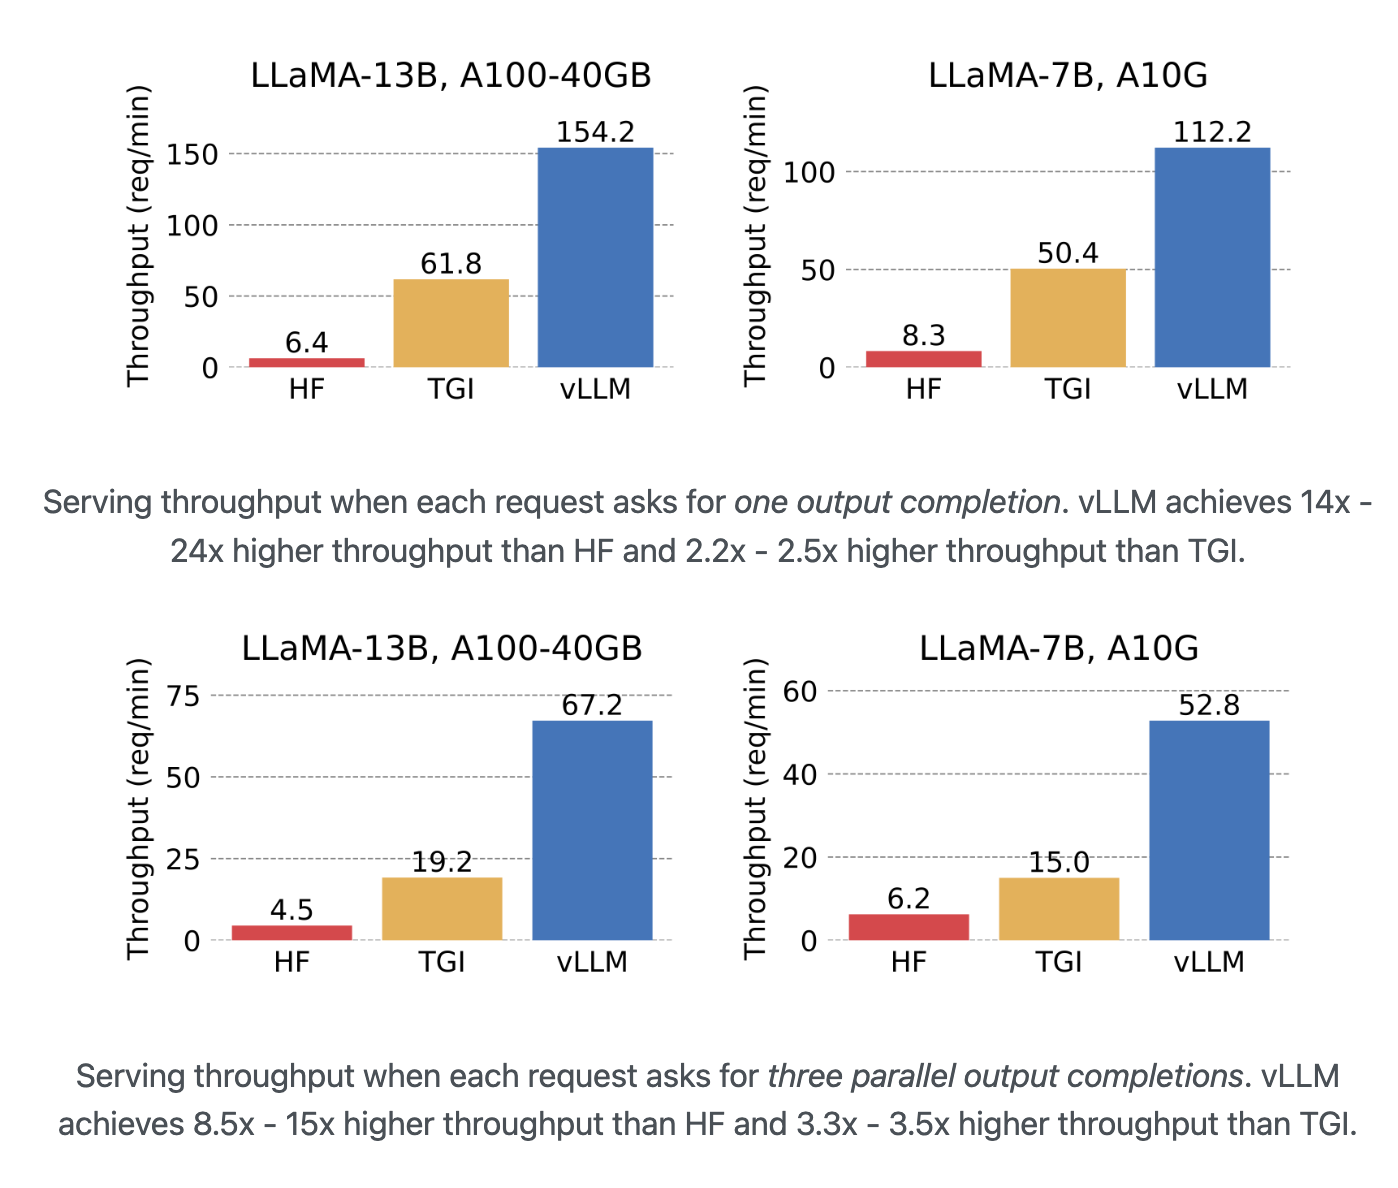
- LLaMA 모델 서빙 시, 일반적인 허깅페이스(HF)나 TGI 방식에 비해 월등히 높은 처리량(req/min)을 보여줌
# vLLM을 사용한 간단한 텍스트 생성 예시
from vllm import LLM, SamplingParams

# 모델 로드
llm = LLM(model="facebook/opt-125m")

# 생성할 프롬프트
prompts = [
    "Hello, my name is",
    "The president of the United States is",
    "The capital of France is",
]

# 샘플링 파라미터 설정
sampling_params = SamplingParams(temperature=0.8, top_p=0.95, max_tokens=50)

# 텍스트 생성 실행
responses = llm.generate(prompts, sampling_params)

# 결과 출력
for response in responses:
    prompt = response.prompt
    generated_text = response.outputs[0].text
print(f"Prompt: {prompt!r}, Generated text: {generated_text!r}")| 비교 대상 | 특징 | vLLM의 장점 |
|---|---|---|
| HF Transformers | 가장 기본적인 모델 로딩 및 추론 라이브러리 | PagedAttention 부재로 메모리 효율 낮고 처리량 저조 |
| TGI | HF에서 만든 서빙 전용 프레임워크 | vLLM 대비 여전히 낮은 처리량과 메모리 효율 |
| vLLM | PagedAttention 기반 LLM 서빙 최적화 | 압도적인 처리량과 메모리 효율성 |
(2) KServe
- 쿠버네티스(Kubernetes) 환경에서 머신러닝 모델을 서버리스(Serverless) 형태로 배포하기 위한 오픈소스 프로젝트
- 원래는 Kubeflow의 기능 중 하나였다가 독립적으로 분리됨
- 서버리스 추론: 요청이 있을 때만 자원을 할당하고, 없을 때는 자원을 0으로 줄여(Scale-to-zero) 비용 효율적
- 표준화된 프로토콜: 예측, 전/후처리, 설명 가능성(Explainability) 등을 위한 표준 API 구조를 제공
- 다양한 프레임워크 지원: PyTorch, TensorFlow, Scikit-learn 등 거의 모든 머신러닝 프레임워크를 지원
- 장점: 쿠버네티스 기반으로 확장성이 매우 뛰어나고, 대규모 트래픽 처리에 유리
- 단점: 쿠버네티스 자체에 대한 학습 장벽이 높고, 구조가 복잡해 소규모 서빙에는 부적합
| 기능 | 설명 |
|---|---|
| InferenceService | KServe의 핵심 구성 요소로, 모델 배포의 모든 설정을 정의 |
| Predictor | 실제 모델 추론을 담당하는 부분 |
| Transformer | 모델 입출력 데이터의 전/후처리를 담당하는 선택적 요소 |
| Knative | 서버리스 기능을 제공하며, 트래픽에 따라 Pod 수를 자동으로 조절 (Auto-scaling) |
(3) Triton Inference Server
- NVIDIA에서 개발한 고성능 추론 서버
- NVIDIA GPU 환경에 최적화되어 있으며, 다양한 종류의 모델과 프레임워크를 지원
- 동시 모델 실행 (Concurrent Model Execution): 하나의 GPU에서 여러 모델 또는 여러 모델 인스턴스를 동시에 실행하여 GPU 활용도를 극대화
- 동적 배치 (Dynamic Batching): 개별적으로 들어오는 요청들을 서버 단에서 자동으로 묶어 배치(Batch)로 만들어 처리함으로써 처리량을 향상
- 다양한 백엔드 지원: PyTorch, TensorFlow, ONNX 뿐만 아니라 vLLM도 백엔드로 지정하여 Triton의 강력한 기능과 함께 사용 가능
- 모델 관리 및 분석: 모델 버전 관리, 성능 모니터링, 최적화 도구(Model Analyzer) 등 운영에 필요한 다양한 기능을 제공
- 성능: C++ 기반으로 작성되어 Python보다 빠르며37, NVIDIA 하드웨어에서 최고의 성능을 냄
- 안정성 및 기능성: 모델 로드/언로드 API, 상태 확인 등 대규모 프로덕션 환경에 필요한 기능들을 잘 갖추고 있음
(4) 그 외 프레임워크
- MLflow: 머신러닝 모델의 전체 생명주기(개발, 실험, 배포)를 관리하는 데 중점을 둔 플랫폼
- Ollama: 로컬 환경이나 소규모 서비스에서 LLM을 쉽고 간편하게 실행하는 데 특화됨
- TensorRT-LLM: NVIDIA 환경에서 LLM 추론을 위한 최고 수준의 성능을 제공하는 라이브러리
- PeriFlow: 한국인들이 설립한 FriendliAI의 제품으로, LLM 서빙에 특화된 솔루션
4. vLLM 실습
(1) vLLM 초기화 및 기본 설정
A. LLM 엔진 로딩
vllm라이브러리에서LLM클래스를 가져와서 사용할 모델과 여러 옵션을 지정하여 객체를 생성model: 허깅페이스에 등록된 모델 이름을 그대로 사용max_model_len: 모델이 처리할 수 있는 최대 토큰 길이 (입력+출력)gpu_memory_utilization: 전체 GPU 메모리 중 vLLM이 KV 캐시 등으로 사용할 비율을 지정 (0.0 ~ 1.0)
from vllm import LLM

# vLLM 엔진을 초기화하면서 사용할 모델과 옵션을 설정
llm = LLM(
    model="facebook/opt-125m",
    max_model_len=512,
    gpu_memory_utilization=0.5 # GPU 메모리의 50%를 사용하도록 설정
)
(2) 텍스트 생성 실행
A. 샘플링 파라미터 설정
SamplingParams클래스를 이용해 텍스트를 어떻게 생성할지 상세하게 조절temperature: 값이 높을수록 모델이 더 창의적이고 무작위적인 텍스트를 생성 (보통 0.7 ~ 1.0)top_p: 확률이 높은 순서대로 토큰을 정렬했을 때, 누적 확률이 p가 될 때까지의 후보군에서만 샘플링max_tokens: 생성할 텍스트의 최대 길이를 지정
B. 텍스트 생성 및 결과 확인
- 초기화된
llm객체의generate()메서드를 호출하여 텍스트 생성을 실행 generate()의 첫 번째 인자로는 프롬프트(prompt) 리스트를, 두 번째 인자로는SamplingParams객체를 전달- 반환된
outputs리스트를 순회하면서 각 프롬프트에 대한 생성 결과(텍스트, 토큰 ID 등)를 확인 가능
from vllm import LLM, SamplingParams

# 텍스트 생성 방법을 정의하는 샘플링 파라미터
sampling_params = SamplingParams(
    temperature=0.8,
    top_p=0.95,
    max_tokens=100
)

# 생성할 텍스트의 시작점(프롬프트)
prompt = "The future of AI is "

# 프롬프트와 샘플링 파라미터를 이용해 텍스트 생성
outputs = llm.generate([prompt], sampling_params)

# 결과 확인
for output in outputs:
    print(f"Prompt: {output.prompt}")
    print(f"Generated text: {output.outputs[0].text}")
    print(f"Tokens generated: {len(output.outputs[0].token_ids)}")
(3) 배치 처리(Batch Processing)
A. 개별 처리 vs 배치 처리
- 개별 처리: 여러 개의 프롬프트를
for문을 돌면서 하나씩generate()로 처리하는 방식 - 배치 처리: 여러 개의 프롬프트를 리스트에 담아
generate()에 한 번에 넘겨 처리하는 방식
B. 성능 비교
- vLLM은 내부적으로 여러 요청을 모아 한 번에 GPU 연산을 수행하는 'Continuous Batching' 기술을 사용
- 따라서 여러 프롬프트를 리스트로 묶어 한 번에 처리(배치 처리)하는 것이 훨씬 빠르고 효율적
- 실제로 동일한 요청들을 처리할 때, 개별 처리보다 배치 처리의 속도가 3배 이상 빠른 것을 확인 가능
import time
from vllm import LLM, SamplingParams

llm = LLM(model="facebook/opt-125m")
sampling_params = SamplingParams(max_tokens=50)

prompts = [f"Test prompt {i}" for i in range(8)] # 테스트용 프롬프트 8개

# 1. 개별 처리 시간 측정
start_time = time.time()
for prompt in prompts:
    llm.generate([prompt], sampling_params)
individual_time = time.time() - start_time

# 2. 배치 처리 시간 측정
start_time = time.time()
llm.generate(prompts, sampling_params)
batch_time = time.time() - start_time

print(f"개별 처리 소요 시간: {individual_time}")
print(f"배치 처리 소요 시간: {batch_time}")

# 처리량(Throughput) 측정
batch_sizes = [1, 2, 4, 8]
throughputs = []

for batch in batch_sizes:
    batch_prompts = [f"Test prompt {i}" for i in range(batch)]
    start_time = time.time()
    _ = llm.generate(batch_prompts, sampling_params)
    elapsed_time = time.time() - start_time
    throughput = batch / elapsed_time # (처리한 요청 수) / (걸린 시간)
    throughputs.append(throughput)
    print(f"Batch size {batch}: {elapsed_time:.4f} sec, Throughput: {throughput:.2f} req/sec")
(4) GPU 자원 관리
A. vLLM 프로세스 확인
- vLLM을 실행하면
nvidia-smi명령어를 통해 실제 GPU를 사용하는 프로세스를 확인할 수 있음 VLLM::EngineCore라는 이름의 프로세스가 GPU 메모리를 점유하고 있는 것을 볼 수 있음
B. 프로세스 강제 종료
- Jupyter Notebook 등에서 vLLM 사용 후, 커널을 종료해도 GPU 메모리가 해제되지 않는 경우가 종종 발생
- 이럴 때는 터미널 명령어를 사용해 직접 vLLM 프로세스를 찾아 강제 종료(
kill -9) 해줘야 함
# 1. nvidia-smi로 VLLM 엔진의 PID(프로세스 ID) 확인
!nvidia-smi

# 2. grep과 awk를 조합해 PID를 자동으로 찾아 종료 (더 편리한 방법)
!kill -9 $(nvidia-smi | grep VLLM::EngineCore | awk '{print $5}')

# 3. 확인된 PID를 직접 입력하여 종료
# !kill -9 3213060
(5) OpenAI 형식 API 서버 실행
A. 실행 방법
- vLLM은 Python 라이브러리로 사용하는 것 외에도, OpenAI의 API와 동일한 형식으로 요청을 주고받을 수 있는 API 서버를 쉽게 실행할 수 있는 기능을 제공
- 터미널에서
python -m vllm.entrypoints.openai.api_server명령어로 서버를 실행
B. 주요 실행 옵션(Arguments)
-model: 사용할 모델 이름-port: API 서버를 실행할 포트 번호-max-model-len: 모델이 처리할 최대 토큰 길이-gpu-memory-utilization: 사용할 GPU 메모리 비율
# facebook/opt-125m 모델을 8000번 포트에서 API 서버로 실행
!python -m vllm.entrypoints.openai.api_server \
    --model facebook/opt-125m \
    --port 8000 \
    --max-model-len 256 \
    --gpu-memory-utilization 0.5
(6) 비동기 API & 벤치마킹
A. 비동기(Asynchronous) 요청
- API 서버의 실제 성능을 측정하려면, 여러 사용자가 동시에 요청하는 상황을 가정해야 함
- Python의
asyncio와aiohttp라이브러리를 사용하면, 여러 개의 API 요청을 동시에 보내고 응답을 기다리는 비동기 코드를 쉽게 작성할 수 있음
B. Latency 및 Health Check
aiohttp.ClientSession을 사용해 서버에POST요청을 보내고, 각 요청이 완료되기까지 걸리는 시간(Latency)을 측정- 이를 통해 개별 요청에 대한 응답 속도와 서버의 상태를 주기적으로 확인할 수 있음
import asyncio
import aiohttp
import time

# 동시에 보낼 요청의 수
NUM_REQUESTS = 10
URL = "http://localhost:8000/v1/completions"

# 비동기로 API 요청을 보내는 함수
async def make_request(session, request_id):
    payload = {
        "model": "facebook/opt-125m",
        "prompt": f"Test request {request_id}: The weather is ",
        "max_tokens": 30,
        "temperature": 0.7
    }

    start_time = time.time()
    async with session.post(URL, json=payload) as response:
        result = await response.json()
        latency = time.time() - start_time
        print(f"Request {request_id} - Latency: {latency:.4f} sec, Status: {response.status}")
        return {
            "request_id": request_id,
            "latency": latency,
            "status": response.status
        }

# 메인 비동기 실행 함수
async def benchmark_api(num_requests=NUM_REQUESTS):
    async with aiohttp.ClientSession() as session:
        # 정해진 수만큼 요청 작업을 생성
        tasks = [make_request(session, i) for i in range(num_requests)]
        # 모든 작업을 동시에 실행하고 결과를 기다림
        results = await asyncio.gather(*tasks)
    return results

# 비동기 함수 실행
# await benchmark_api()
(7) 동시 요청(Load) 테스트
A. 배치 사이즈별 성능 테스트
- 실제 서비스 환경에서는 요청이 꾸준히 들어오므로, 다양한 수의 동시 요청(Load)에 대해 서버가 어떻게 반응하는지 테스트하는 것이 중요
batch_sizes리스트를 만들어 동시 요청 수를 늘려가며 전체 작업 완료 시간(batch_time)을 측정- 이를 통해 우리 서버가 어느 정도의 트래픽을 감당할 수 있는지 가늠해볼 수 있음
import asyncio
import aiohttp
import time

URL = "http://localhost:8000/v1/completions"

async def batch_efficiency_test():
    # 테스트할 동시 요청 수 목록
    batch_sizes = [1, 2, 4, 8, 16]
    results = []

    async with aiohttp.ClientSession() as session:
        for batch_size in batch_sizes:
            print(f"Testing with batch size: {batch_size}")

            tasks = []
            for i in range(batch_size):
                payload = {
                    "model": "facebook/opt-125m",
                    "prompt": f"Test request {i}: The weather is ",
                    "max_tokens": 30,
                    "temperature": 0.7
                }
                # aiohttp.post는 코루틴이 아니므로 await을 붙이지 않음
                # session.post 자체를 태스크로 만들어야 함
                task = asyncio.create_task(session.post(URL, json=payload))
                tasks.append(task)

            start_time = time.time()
            # 모든 요청이 끝날 때까지 기다림
            responses = await asyncio.gather(*tasks)
            batch_time = time.time() - start_time

            # 응답 상태 확인 (옵션)
            success_count = sum(1 for r in responses if r.status == 200)

            print(f"-> Total time for {batch_size} requests: {batch_time:.4f} sec")
            print(f"-> Successful responses: {success_count}/{batch_size}\n")
            results.append({"batch_size": batch_size, "time": batch_time})

    return results

# 비동기 함수 실행
# await batch_efficiency_test()
AI Engineer