Part 3: Basic Redux Data Flow
What you'll learn
- How to add slices of reducer logic to the Redux store with
createSlice- Reading Redux data in components with the
useSelectorhook- Dispatching actions in components with the
useDispatchhook
Introduction
Project Setup
redux-essentials-example-app에서 다운 받아서 npm install 후 npm start 하면
아래와 같은 창이 나온다.
Creating a New Redux + React Project
- Use Redux templates for Create-React-App as the fastest way to create a new Redux + React project.
Adding Redux to a React Project (SE)
- Add the
@reduxjs/toolkitandreact-reduxpackages - Create a Redux store using RTK's
configureStoreAPI, and pass in at least one reducer function. - Import the Redux store into your application's entry point (ex.
src/index.js) - Wrap your root React component with the
<Provider>component from React-Redux
ReactDOM.render(
  <Provider store={store}>
    <App />
  </Provider>,
  document.getElementById('root')
)
Exploring the Initial Project
/public: HTML host page template and other static files like icons/src/index.js
- The entry point file for the application. It renders the React-Redux<Provider>component and the main<App>component/src/App.js
- The main application component. Renders the top navbar and handles client-side routing for the other content/src/index.css: Styles for the complete application/src/api/client.js: small AJAX request client that allows us to make GET and POST request/src/api/server.js
- Provides a fake REST API for our data- Our app will fetch data from these fake endpoints later
/src/app/Navbar.js: Renders the top header and nav content/src/app/store.js: creates the Redux store instance
Main Posts Feed
- Main feature of our social media feed app will be a list of feeds.
- We'll add several more pieces to this feature as we go alogng, but to start off, our first goal is to only show the list of post entries on screen.
Creating the Posts Slice
- The first step is to create a new Redux slice that will contain the data for our posts.
- Once we have that data in the Redux store, we can create the React components to show that data on the page
/src/features/posts/postsSlice.jsx (SE)
-
Redux Toolkit
createSlicefunction to make a reducer function that knows how to handle our posts data -
Reducer functions need to have some initial data included so that the Redux store has those values loaded when the app starts up.
-
Array with some fake post objects inside, so that we can begin adding the UI.
import { createSlice } from '@reduxjs/toolkit'

// Define initial posts array
const initialState = [
    { id: '1', title: 'First Post!', content: 'Hello!' },
    { id: '2', title: 'Second Post!', content: 'More Text' },
]

const postsSlice = createSlice({ // createSlice generates posts reducer
    name: 'posts',
    initialState, // Pass initialState to createSlice
    reducers: {}
})

// Export the posts reducer function
export default postsSlice.reducer- Every time we create a new slice, we need to add its reducer function to our Redux store.
- We already have a Redux store being created, but right now it doesn't have any data inside.
/src/app/store.jsx
import { configureStore } from '@reduxjs/toolkit'

// import `postReducer` function
import postsReducer from '../features/posts/postsSlice'

// Update the call to `configureStore`
// `postReducer` is being passed as a reducer field named `posts`
export default configureStore({
    reducer: {
        posts: postsReducer
    }
})- This tells Redux that we want our top-level-state object ot have a field named
postsinside - All the data for
state.postswill be updated bypostsReducerfunction when actions are dispatched
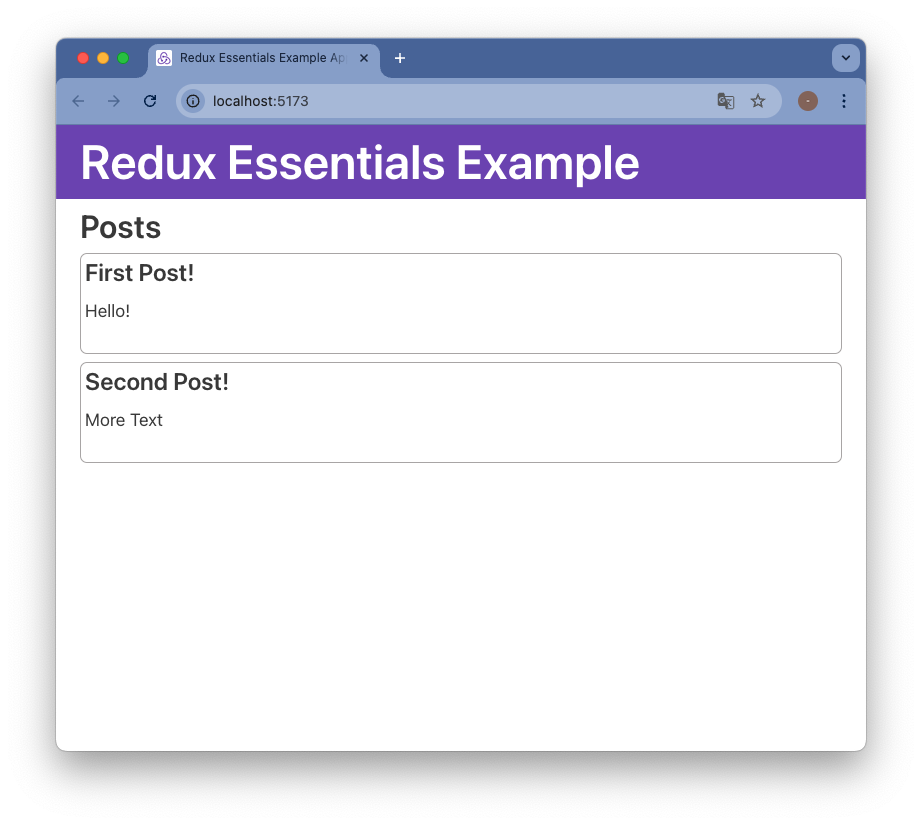
Showing the Posts List
-
Now we have some posts data in our store
-
We can create a React component that shows the list of posts
-
All of the code related to our feed posts feature should go in the
postsfolder -
React components can read data from the Redux store using
useSelectorhook from the React-Redux library
/src/features/posts/PostsList.jsx
import React from 'react'
// React components read data from Redux store
import { useSelector } from 'react-redux'

export const PostsList = () => {
    // Read `state.posts` value from Redux store
    const posts = useSelector(state => state.posts)

    const renderedPosts = posts.map(post => (
        <article className="post-excerpt" key={post.id}>
            <h3>{post.title}</h3>
            <p className="post-content">{post.content.substring(0, 100)}</p>
        </article>
    ))

    return (
        <section className="posts-list">
            <h2>Posts</h2>
            {renderedPosts}
        </section>
    )
}- We then need to update the routing in
App.js - Import the
PostsListcomponent intoApp.jsand replace the welcome text with `
/src/app.jsx
import React from 'react'
import { BrowserRouter as Router, Routes, Route, Navigate } from 'react-router-dom'
import { Navbar } from './components/Navbar'
import { PostsList } from './features/posts/PostsList'

function App() {
  return (
    <Router>
      <Navbar />
      <div className="App">
        <Routes>
          {/* 기본 경로("/")에 대해 PostsList를 렌더링 */}
          <Route path="/" element={<PostsList />} />

          {/* 잘못된 경로로 접근할 경우 리디렉션 */}
          <Route path="*" element={<Navigate to="/" />} />
        </Routes>
      </div>
    </Router>
  )
}

export default App
- Switch -> Routes
- Redirect -> Navigate
Adding New Posts
- We'll create the empty form first and add it to the page.
- Then connect the form to our Redux store so that new posts are added when we click the "Save Post" button.
Adding the new Post Form
AddPostForm.jsxinpostsfolder- We'll add a text input for the post title, and a text area for the body of the post
src/features/posts/AddPostForm.jsx
import React, { useState } from 'react'

export const AddPostForm = () => {
  const [title, setTitle] = useState('')
  const [content, setContent] = useState('')

  const onTitleChanged = e => setTitle(e.target.value)
  const onContentChanged = e => setContent(e.target.value)

  return (
    <section>
      <h2>Add a New Post</h2>
      <form>
        <label htmlFor="postTitle">Post Title:</label>
        <input
          type="text"
          id="postTitle"
          name="postTitle"
          value={title}
          onChange={onTitleChanged}
        />
        <label htmlFor="postContent">Content:</label>
        <textarea
          id="postContent"
          name="postContent"
          value={content}
          onChange={onContentChanged}
        />
        <button type="button">Save Post</button>
      </form>
    </section>
  )
}
src/app.jsx
import React from 'react'
import { BrowserRouter as Router, Routes, Route, Navigate } from 'react-router-dom'
import { Navbar } from './components/Navbar'
import { AddPostForm } from './features/posts/AddPostForm'
import { PostsList } from './features/posts/PostsList'

function App() {
  return (
    <Router>
      <Navbar />
      <div className="App">
        <Routes>
          {/* 기본 경로("/")에 대해 PostsList를 렌더링 */}
          <Route path="/" element={
            <>
              <AddPostForm />
              <PostsList />
            </>
          } />

          {/* 잘못된 경로로 접근할 경우 리디렉션 */}
          <Route path="*" element={<Navigate to="/" />} />
        </Routes>
      </div>
    </Router>
  )
}

export default App
Saving Post Entries
- Update our posts slice to add new post entries to the Redux store
features/posts/postsSlice.jsx
const postsSlice = createSlice({
  name: 'posts',
  initialState,
  reducers: {
    postAdded: {
      reducer(state, action) {
        state.push(action.payload)
      },
      prepare(title, content) {
        return {
          payload: {
            id: nanoid(),
            title,
            content
          }
        }
      }
    }
    // other reducers here
  }
})
features/posts/AddPostForm.js
const onSavePostClicked = () => {
  if (title && content) {
    dispatch(postAdded(title, content))
    setTitle('')
    setContent('')
  }
}