[Kubernetes] Pod Health Check with Readiness, Liveness Probes (Feat. Pod Lifecycle)
Kubernetes
0. Overview
Probe에 대해 배워보기 전 알아야할 중요 개념이 있다. 바로 파드 라이프사이클(Pod Lifecycle)이다.
상황에 따라 생기고 어떠한 이유에서 제거되는 파드의 특성상 라이프사이클은 당연히 있을테고, 쿠버네티스에선 이 라이프사이클에 따라 파드가 운용된다.
1. Pod Lifecycle
기본적으로 파드는 아래와 같은 라이프사이클 단계(Phase)를 가진다.

각 단계를 자세히 살펴보면 아래와 같다.
Pending은 파드 생성이 쿠버네티스 클러스터에서 승인되었지만 하나 이상의 컨테이너가 설정되지 않아 실행할 준비가 안된 상태를 말한다.
쉽게 말해 파드 자체는 생성되었지만 컨테이너가 시작되지 않은 상태로, 이미지 다운로드나 리소스 할당 과정 등이 완료되지 않은 상태를 말한다.
Running은 모든 컨테이너가 성공적으로 시작되어 실행되는 생태로, 적어도 하나 이상의 컨테이너가 실행 중이면 Running 상태가 된다.
Succeeded는 파드에 있는 모든 컨테이너에서 Exit Code 0으로 종료된 상태이며, Failed도 마찬가지로 모든 컨테이너가 종료되었으나, 하나 이상의 컨테이너에서 Non Zero 상태로 Exit 되었을 상태를 말한다.
마지막으로 Unknown는 노드와의 통신 오류 등으로 파드의 상태를 가져올 수 없을 경우 발생한다.
한가지 예시로 kubectl run demo --image [IMAGE]을 통해 파드를 만들고, kubectl get pods [POD] -o yaml를 통해 확인해보자.
status:
  conditions:
  - lastProbeTime: null
    lastTransitionTime: "2025-09-28T00:41:03Z"
    status: "True"
    type: PodReadyToStartContainers
  - lastProbeTime: null
    lastTransitionTime: "2025-09-28T00:41:01Z"
    status: "True"
    type: Initialized
  - lastProbeTime: null
    lastTransitionTime: "2025-09-28T00:41:03Z"
    status: "True"
    type: Ready
  - lastProbeTime: null
    lastTransitionTime: "2025-09-28T00:41:03Z"
    status: "True"
    type: ContainersReady
  - lastProbeTime: null
    lastTransitionTime: "2025-09-28T00:41:01Z"
    status: "True"
    type: PodScheduled
  phase: Running
그럼 위와 같이 status 필드가 보일 것이다. 맨 밑에 phase가 현재 파드의 상태로, 정상적으로 만들어졌다면 Running으로 나타날 것이다.
그리고 conditions가 보여질텐데, 우리가 주요하게 볼 항목은 PodScheduled, Initialized, Ready, ContainersReady이다.
Phase와는 별개의 항목으로, 파드의 세부적인 상태를 말한다. PodScheduled은 파드가 노드에 할당, 즉 스케쥴링이 잘 되었는지를 나타내며, Initialized은 모든 초기화 컨테이너(initContainers로 지정 가능)가 완료 되었는지를 나타낸다.
그리고 중요한 것은 Ready와 ContainersReady인데, ContainersReady는 파드 내 모든 컨테이너가 잘 실행 중인지를 나타내고, Ready는 거기에 파드 자체가 요청을 처리할 수 있는지를 나타낸다.
Service 오브젝트는 파드의 Ready가 True여야 엔드포인트가 연결된다.
그런데 Phase가 Running이라고 Condition이 항상 Ready인건 아닌데, 예를 들어 추후 설명할 Readiness Probe에서 Health Check가 되지 않아 Ready가 False인 상태가 될 수 있고, 이럴 경우 서비스에 연결되지 않는다.
Container State
파드 Phase, Condition과는 별개로 각 컨테이너에도 상태를 가진다. 아까 kubectl get pods [POD] -o yaml 명령어를 통해 나온 결과에서 containerStatuses 항목을 보자.
  containerStatuses:
  - containerID: ...
    image: ...
    imageID: ...
    name: demo
    ready: true
    restartCount: 0
    started: true
    state:
      running:
        startedAt: "2025-09-28T00:41:02Z"
여기서 state엔 아래와 같은 상태를 확인할 수 있고, running 상태를 제외하면 reason을 통해 어떠한 이유로 해당 상태가 되었는지 확인할 수 있다.
- running
- waiting
- terminated
running은 컨테이너가 성공적으로 실행되고 있는 상태를 말하고, 별다른 Reason은 없다.
waiting은 컨테이너가 시작되기 전 대기 중이거나, 어떠한 이유로 인해 에러가 발생하여 컨테이너 재시작을 기다리는 중을 의미한다.
대표적인 Reason으론 ContainerCreating, CrashLoopBackOff, ImagePullBackOff 등이 있는데, 여기서 CrashLoopBackOff 에러가 발생하면 일정한 간격을 두고 컨테이너를 재시작한다. (이때 대기 시간은 10초, 20초, 40초, 80초 등 점진적으로 증가한다.)
마지막으로 terminated은 컨테이너가 종료된 상태로, 정상적으로 종료되었을 경우 Completed, Non Zero 에러 코드로 종료된 경우 Error, 메모리를 초과할 경우 OOMKilled 등의 Reason이 발생한다.
spec.restartPolicy
파드 내 컨테이너가 종료되었을 때, 재시작 여부를 결정하는 옵션이다. 기본값은
Always로, 컨테이너가 정상적으로 종료되던 Non Zero Exit Code를 통해 에러로 끝다던 항상 재시작을 한다는 옵션이다.그리고
Never은 반대로 항상 재시작하지 않고,OnFailure은 에러가 발생하였을 때만 재시작을 시도한다.
여기까지 파드의 라이프사이클에 대해 살짝만 다뤄보았는데, 하나의 파드에 여러개의 컨테이너를 가진 특성상 복잡할 수 밖에 없다. 이제 이번 블로그의 메인 주제인 Probe에 대해 다뤄보자.
2. What is Probe?
Probe는 쿠버네티스에서 kubelet에 의해 특정 주기를 가지고 파드를 진단하는 역할을 한다. 크게 Startup Probe, Readiness Probe, Liveness Probe가 있다.
Startup Probe는 애플리케이션이 실행되었을 경우 다른 Probe를 활성화하는데, 스타트업을 실패하면 컨테이너를 종료시키고, Restart Policy에 따라 재시작을 할지 결정한다. (블로그에선 따로 실습하지 않는다.)
Readiness Probe
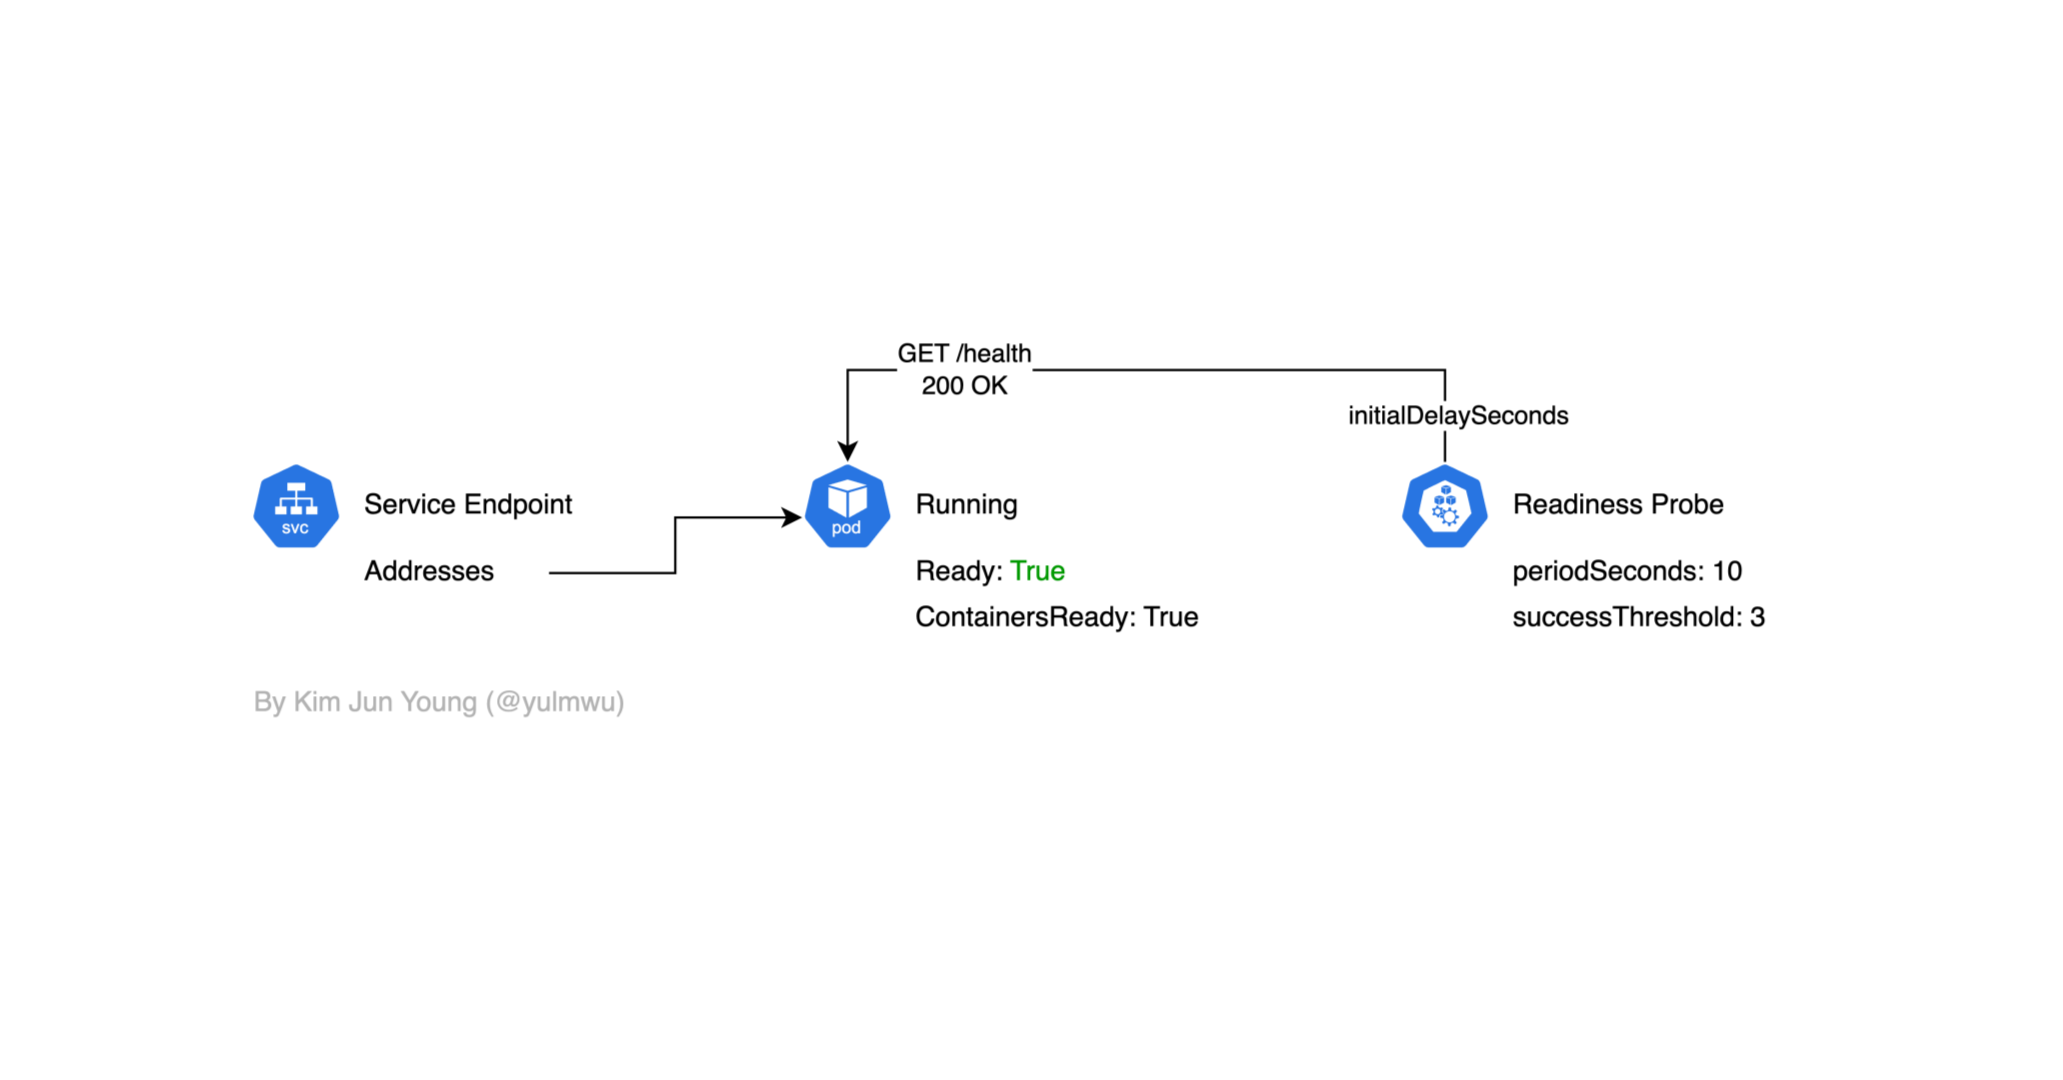
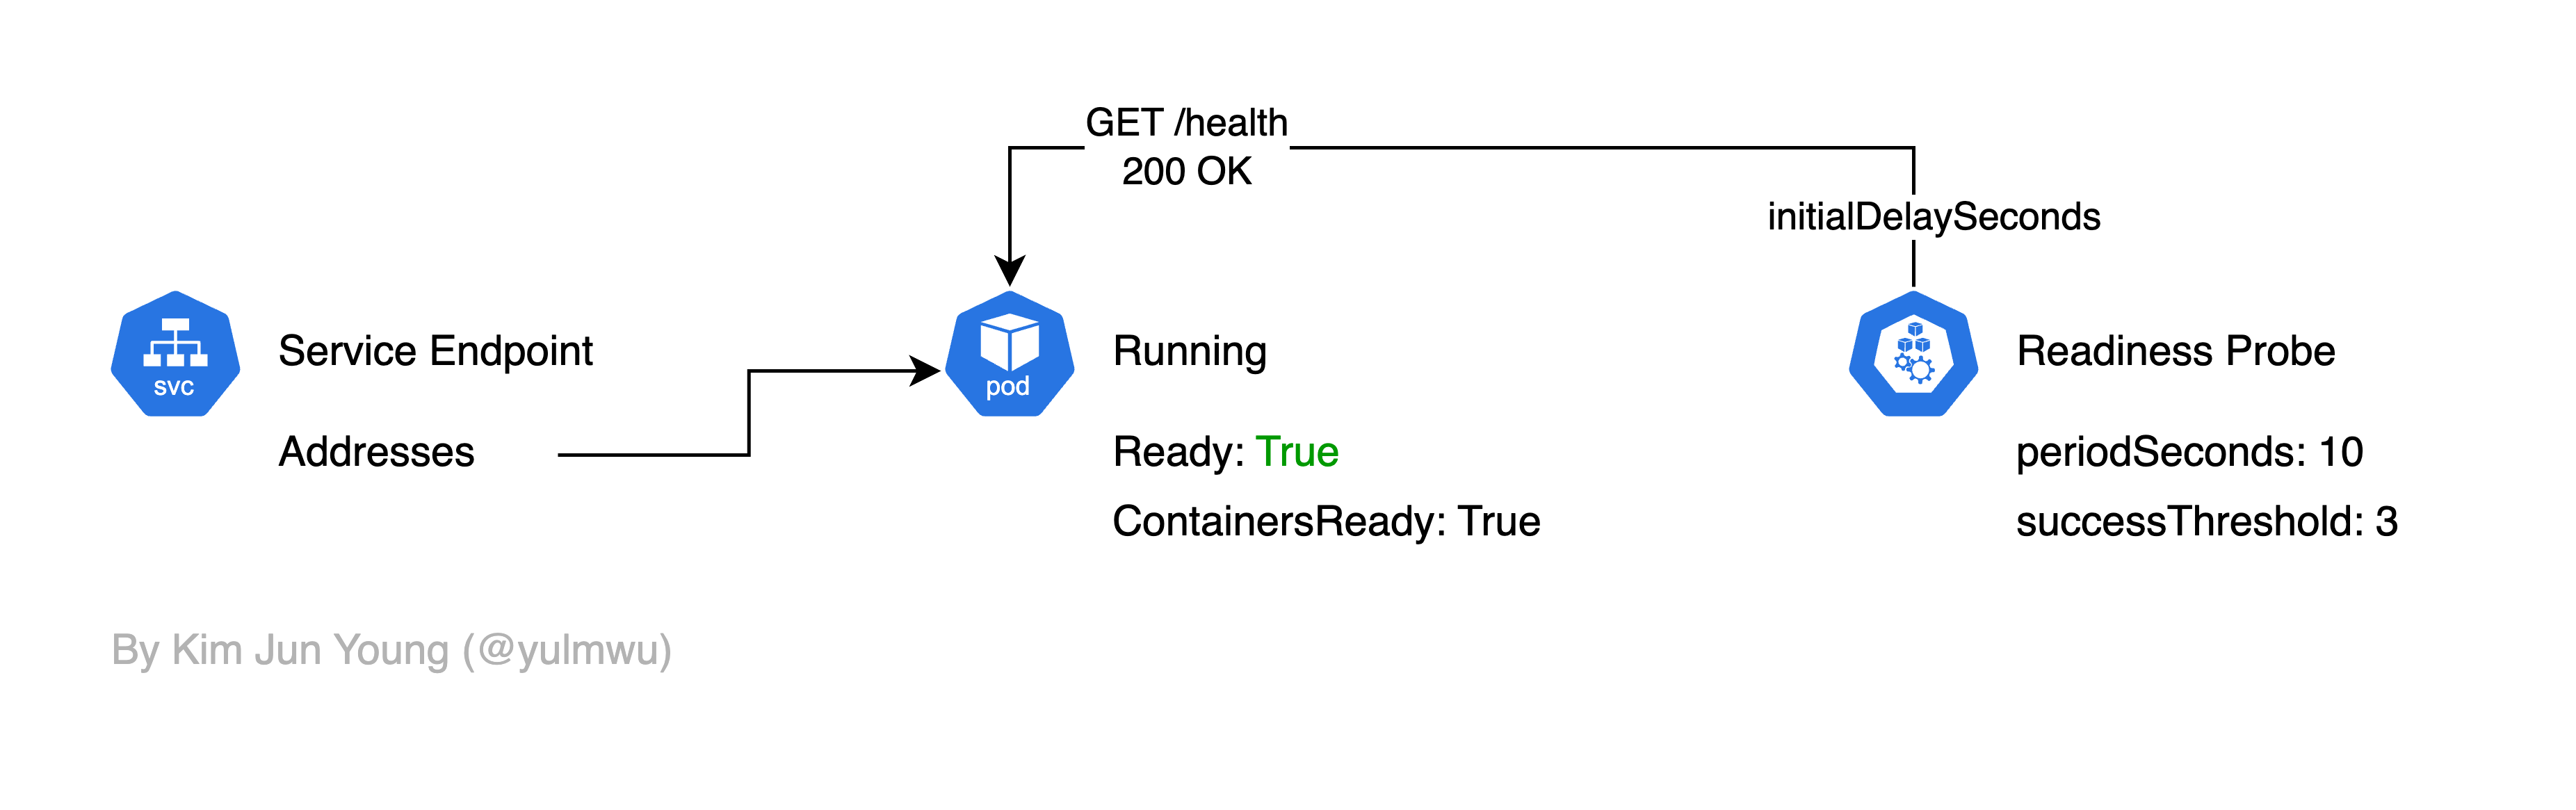
Readiness Probe는 컨테이너가 요청을 처리할 준비가 되어있는지 여부를 확인한다. 만약 Readiness Probe가 실패된다면 서비스 엔드포인트에서 파드 IP가 제거되어 트래픽을 받을 수 없게 된다.
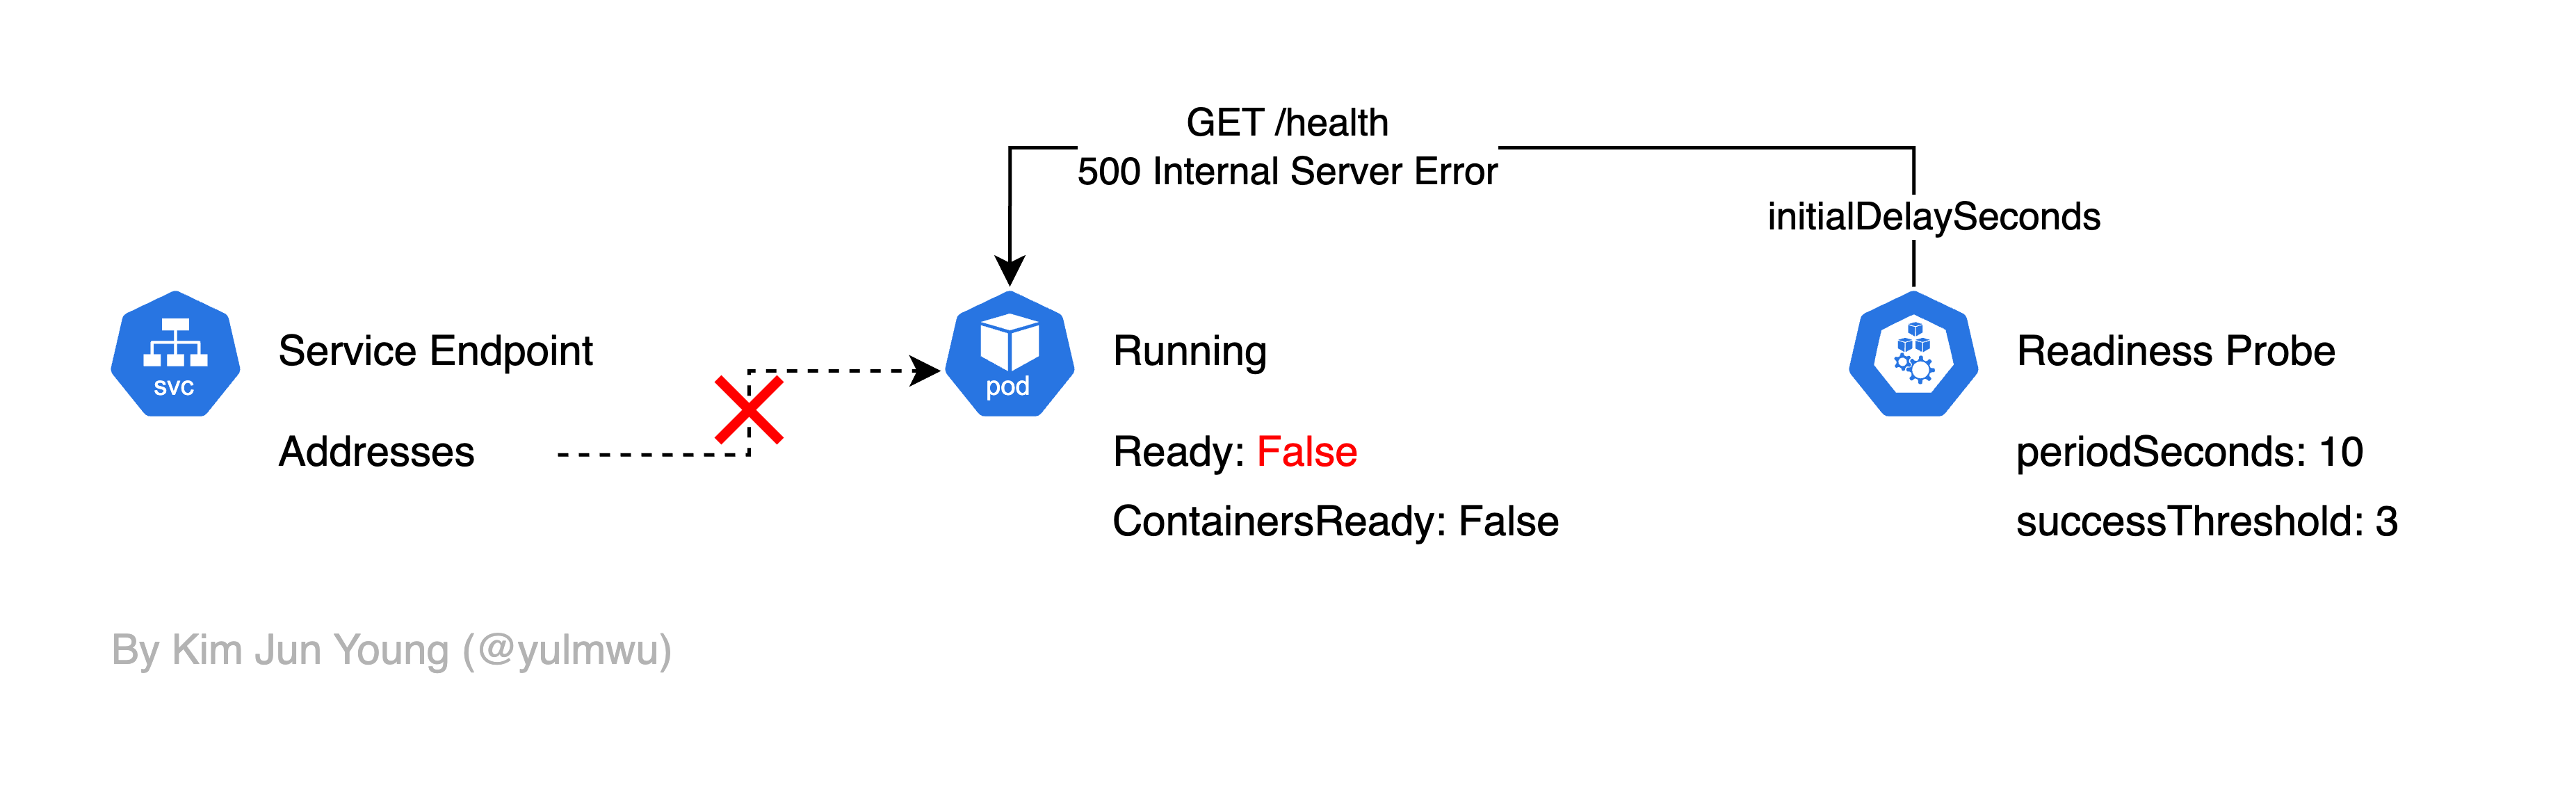
여기서 Readiness Probe에서 Health Check를 실패한다면 Ready Condition이 False가 되고, 그럼 서비스 엔드포인트에서 파드의 IP가 제거되어 트래픽을 받을 수 없게 된다.
initialDelaySeconds는 파드가 생성된 후 초기 대기 시간을, periodSeconds는 Health Check 간격을, successThreshold는 몇 번을 성공해야 Ready를 True로 만들지를 결정하는 옵션으로, 자세한 옵션은 다루지 않겠다.
만약 Readiness Probe에서 Health Check를 성공했을 경우 아래와 같이 엔드포인트가 연결되어 트래픽을 받을 수 있다.
Liveness Probe
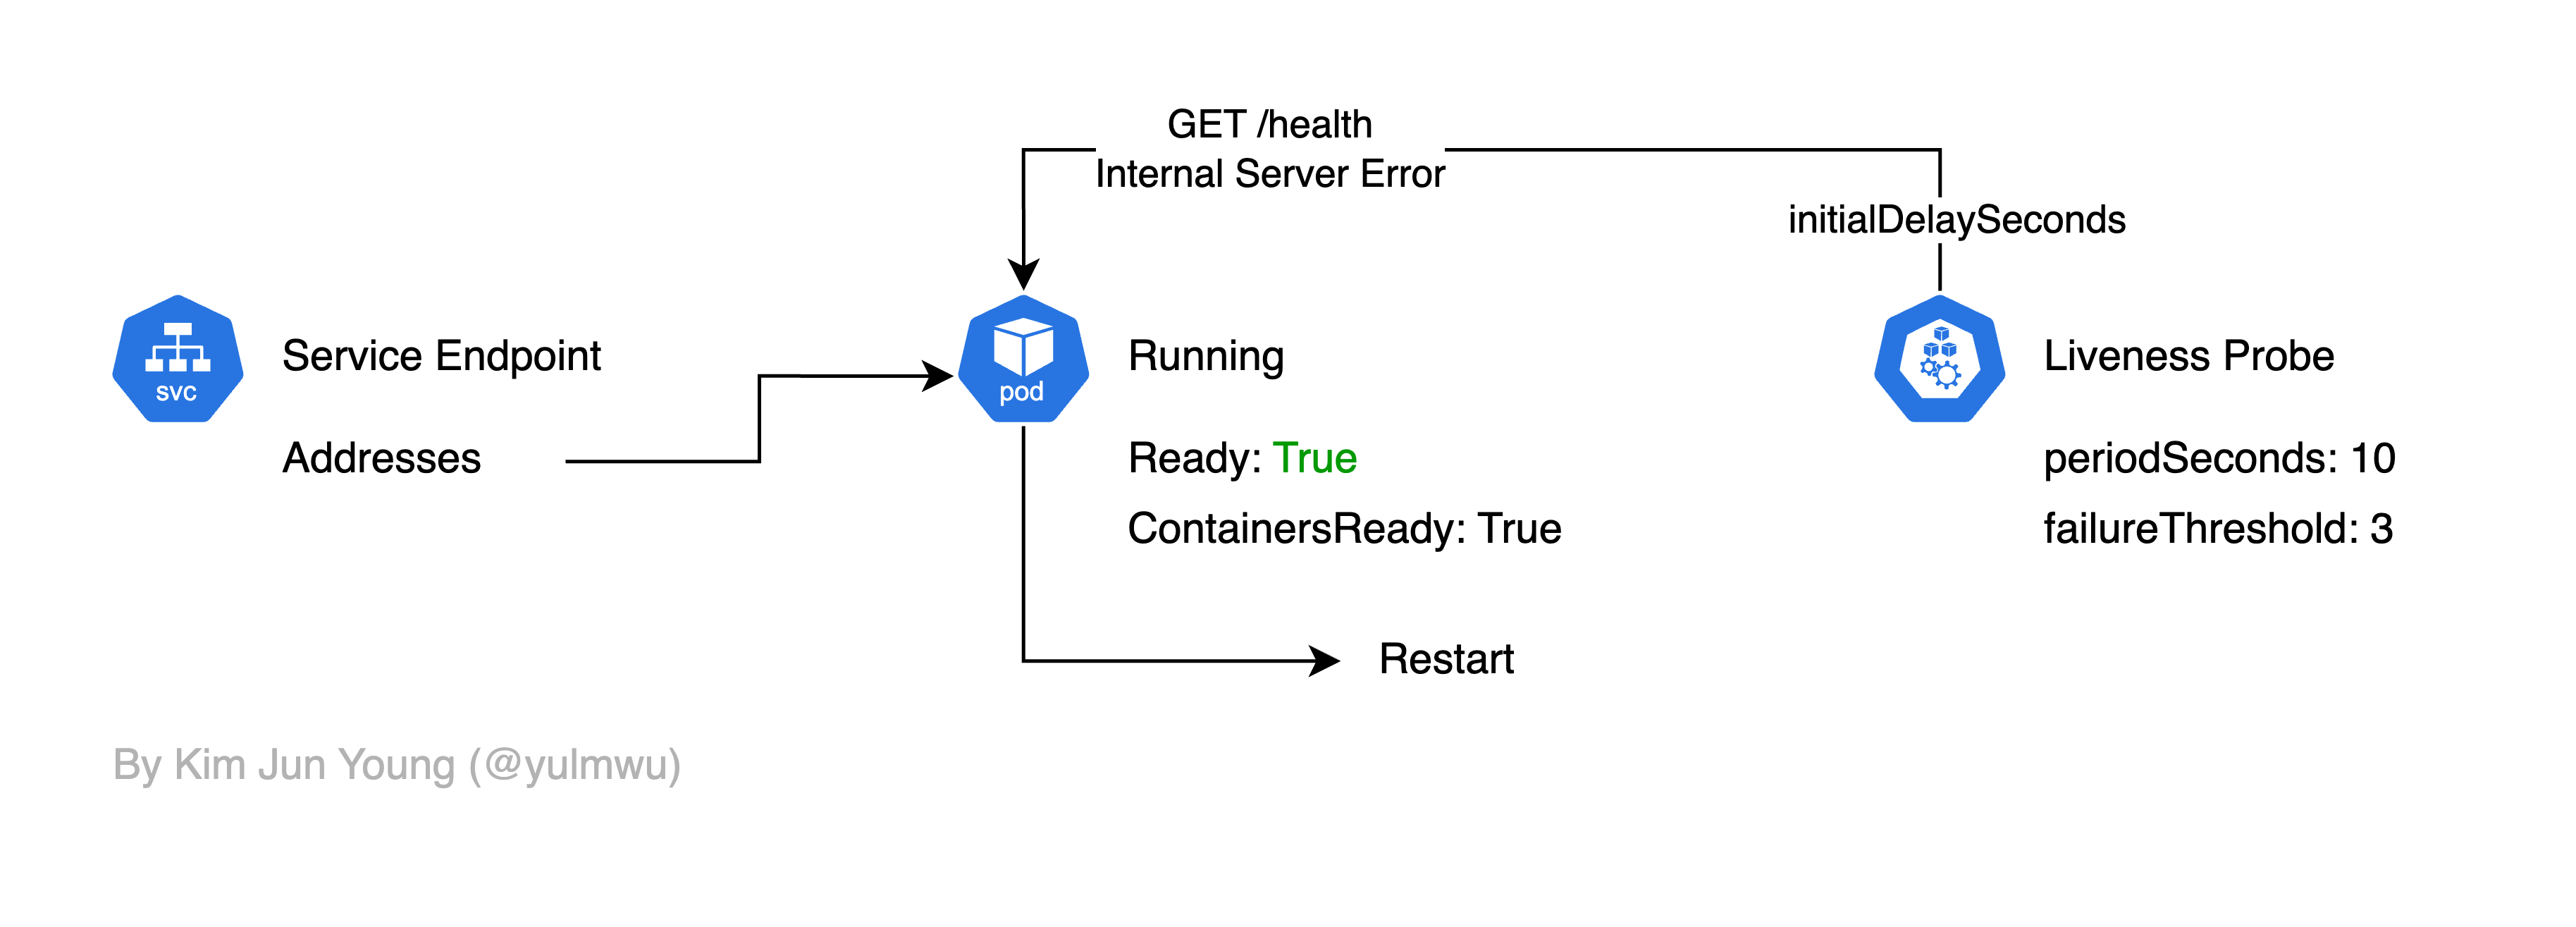
Liveness Probe는 컨테이너의 애플리케이션이 정상적으로 동작하는지를 Health Check 한다.
만약 Liveness Probe를 실패한다면 해당 컨테이너를 재시작하게 된다. (그래서 데드락 등이 발생하여 컨테이너/파드 자체는 동작하나, 애플리케이션이 문제가 생겨 정상적으로 동작하지 않을 때 재시작할 수 있다.)
Health Check Target
설명한 Probe 모두 Health Check를 위한 대상과 방법을 정할 수 있는데, 방법엔 httpGet, exec, tcpSocket이 있다.
httpGet은 이름 그대로 HTTP GET을 통해 /health 등의 엔드포인트에 접근하여 살아있는지 확인하는 방법이고, tcpSocket은 TCP 트래픽을 보내 확인하는 방법이다. 마지막으로 exec는 특정 명령어를 실행하여 Health Checking을 하는 방법이다.
3. Example Demo
순서는 각각 Readiness Probe, Liveness Probe로 실습해보겠고, Health Check Target은 exec로 설정해보겠다.
먼저 아래와 같은 서비스를 먼저 만들어보자.
apiVersion: v1
kind: Service
metadata:
  name: myapp-service
spec:
  selector:
    app: myapp
  ports:
    - name: http
      port: 80
      targetPort: 8080
  type: ClusterIP
그리고 아래와 같은 Deployment를 적용해보자.
apiVersion: apps/v1
kind: Deployment
metadata:
  name: myapp-deployment
spec:
  replicas: 1
  selector:
    matchLabels:
      app: myapp
  template:
    metadata:
      labels:
        app: myapp
    spec:
      terminationGracePeriodSeconds: 1
      containers:
        - name: myapp
          image: rlawnsdud/demo:arm
          ports:
            - containerPort: 8080
          env:
            - name: HOST
              value: "0.0.0.0"
            - name: PORT
              value: "8080"
            - name: POD
              valueFrom:
                fieldRef:
                  fieldPath: metadata.name
          volumeMounts:
            - name: data
              mountPath: /data
          readinessProbe:
            exec:
              command: ["sh", "-c", "[ -f /data/test.txt ]"]
            initialDelaySeconds: 3
            periodSeconds: 5
            failureThreshold: 1
            successThreshold: 1
            timeoutSeconds: 1
          livenessProbe:
            exec:
              command: ["sh", "-c", "[ -f /data/test.txt ]"]
            initialDelaySeconds: 10
            periodSeconds: 10
            failureThreshold: 2
            successThreshold: 1
            timeoutSeconds: 1
      volumes:
        - name: data
          emptyDir: {}
적용 후 kubectl get events -w | grep 'myapp-deployment-[...]' 명령어를 통해 이벤트 로그를 확인해보자.
> kubectl get events -w | grep 'myapp-deployment-7475dd7b6c-6nmsd'
80s         Normal    Scheduled           pod/myapp-deployment-7475dd7b6c-6nmsd    Successfully assigned default/myapp-deployment-7475dd7b6c-6nmsd to demo-m02
30s         Normal    Pulled              pod/myapp-deployment-7475dd7b6c-6nmsd    Container image "rlawnsdud/demo:arm" already present on machine
30s         Normal    Created             pod/myapp-deployment-7475dd7b6c-6nmsd    Created container: myapp
30s         Normal    Started             pod/myapp-deployment-7475dd7b6c-6nmsd    Started container myapp
1s          Warning   Unhealthy           pod/myapp-deployment-7475dd7b6c-6nmsd    Readiness probe failed:
1s          Warning   Unhealthy           pod/myapp-deployment-7475dd7b6c-6nmsd    Liveness probe failed:
1s          Normal    Killing             pod/myapp-deployment-7475dd7b6c-6nmsd    Container myapp failed liveness probe, will be restarted
81s         Normal    SuccessfulCreate    replicaset/myapp-deployment-7475dd7b6c   Created pod: myapp-deployment-7475dd7b6c-6nmsd
0s          Normal    Pulled              pod/myapp-deployment-7475dd7b6c-6nmsd    Container image "rlawnsdud/demo:arm" already present on machine
0s          Normal    Created             pod/myapp-deployment-7475dd7b6c-6nmsd    Created container: myapp
0s          Normal    Started             pod/myapp-deployment-7475dd7b6c-6nmsd    Started container myapp
0s          Warning   Unhealthy           pod/myapp-deployment-7475dd7b6c-6nmsd    Readiness probe failed:
0s          Warning   Unhealthy           pod/myapp-deployment-7475dd7b6c-6nmsd    Readiness probe failed:
0s          Warning   Unhealthy           pod/myapp-deployment-7475dd7b6c-6nmsd    Readiness probe failed:
0s          Normal    Killing             pod/myapp-deployment-7475dd7b6c-6nmsd    Container myapp failed liveness probe, will be restarted
0s          Normal    Pulled              pod/myapp-deployment-7475dd7b6c-6nmsd    Container image "rlawnsdud/demo:arm" already present on machine
0s          Normal    Created             pod/myapp-deployment-7475dd7b6c-6nmsd    Created container: myapp
0s          Normal    Started             pod/myapp-deployment-7475dd7b6c-6nmsd    Started container myapp
그럼 Readiness Probe와 Liveness Probe 둘 모두 실패하는 것을 볼 수 있다. kubectl describe pods 명령어를 통해 확인해봐도 Ready가 False인걸 볼 수 있다.
Conditions:
  Type                        Status
  PodReadyToStartContainers   True
  Initialized                 True
  Ready                       False
  ContainersReady             False
  PodScheduled                True
kubectl describe endpointslice myapp-service 명령어를 통해 엔드포인트(EndpointSlice)를 확인해봐도 Ready는 False로 나타난다.
Name:         myapp-service-7m9p6
Namespace:    default
Labels:       endpointslice.kubernetes.io/managed-by=endpointslice-controller.k8s.io
              kubernetes.io/service-name=myapp-service
Annotations:  endpoints.kubernetes.io/last-change-trigger-time: 2025-09-28T03:47:22Z
AddressType:  IPv4
Ports:
  Name  Port  Protocol
  ----  ----  --------
  http  8080  TCP
Endpoints:
  - Addresses:  10.244.1.5
    Conditions:
      Ready:    false
    Hostname:   <unset>
    TargetRef:  Pod/myapp-deployment-7475dd7b6c-6nmsd
    NodeName:   demo-m02
    Zone:       <unset>
Events:         <none>
이제 아래의 명령어를 통해 정상적으로 Health Check가 되도록 test.txt 파일을 생성해보자.
kubectl exec myapp-deployment-[...] -- sh -c 'touch /data/test.txt && ls -l /data'그리고 전에 실행해봤던 명령어를 실행해보자.
> kubectl describe endpointslice myapp-service
Name:         myapp-service-7m9p6
Namespace:    default
Labels:       endpointslice.kubernetes.io/managed-by=endpointslice-controller.k8s.io
              kubernetes.io/service-name=myapp-service
Annotations:  endpoints.kubernetes.io/last-change-trigger-time: 2025-09-28T03:54:27Z
AddressType:  IPv4
Ports:
  Name  Port  Protocol
  ----  ----  --------
  http  8080  TCP
Endpoints:
  - Addresses:  10.244.1.5
    Conditions:
      Ready:    true
    Hostname:   <unset>
    TargetRef:  Pod/myapp-deployment-7475dd7b6c-6nmsd
    NodeName:   demo-m02
    Zone:       <unset>
Events:         <none>
> kubectl describe pods
Conditions:
Type Status
PodReadyToStartContainers True
Initialized True
Ready True
ContainersReady True
PodScheduled True 그럼 Health Check가 정상적으로 되어 서비스 엔드포인트에 연결되는 것을 볼 수 있다.
> kubectl get pods
NAME                                READY   STATUS    RESTARTS        AGE
myapp-deployment-7475dd7b6c-6nmsd   1/1     Running   7 (7m28s ago)   11m
또한 Health Check가 되지 못하였을 때 Liveness Probe로 인해 컨테이너 재시작이 일어났었고, 때문에 Restarts 항목에 2이상으로 나타나는 것을 볼 수 있다.
이상으로 파드의 라이프사이클과 Readiness Probe 및 Liveness Probe를 간단하게 실습해보았다. Readiness Probe 및 Liveness Probe는 파드의 안정성을 위한 중요한 기능이므로 까먹지 않고 사용하는 것을 추천한다.