게시판 목록 조회
-
배열로 들고 있는 값들을 for문으로 뿌려줘야 한다
-
프록시 서버로 스프링과 연결해야한다
-
Axios 를 사용해야한다.
앞서서 공통파일인 mixins.js 을 추가했다면 우리는 axios를 이렇게 가져다 쓸 수 있다.
순서 지키기
-
views 에 1.vue 파일생성
-
router/index.js에 impot 추가하고(경로설정), path 추가로 넣기
-
App.vue 파일을 열어서 라우터 링크도 추가해주기
- views - board(폴더추가) - list.vue (파일생성)
<template>
    <h2>게시판 목록 보기</h2>
    <div>
<table>
   <thead>
     <tr>
       <th>번호</th>
       <th>제목</th>
       <th>내용</th>
       <th>생성일</th>
       <th>수정일</th>
       <th>조회수</th>
     </tr>
   </thead>
   <tbody>
     <!-- key: 변수의 키값, v-for:(<변수이름>,<인덱스>) in <배열 객체> -->
     <tr :key="i" v-for="(list,i) in boardList">
       <td>{{ list.idx }}</td>
       <td>{{ list.title }}</td>
       <td>{{ list.content }}</td>
       <td>{{ list.create_date }}</td>
       <td>{{ list.update_date }}</td>
       <td>{{ list.hit_cnt }}</td>
     </tr>
   </tbody>
 </table>
    </div>
</template>
<script>
export default {
    name: 'BoardList', // 컴포넌트 이름
    components: {}, // 다른 컴포넌트 사용 시 컴포넌트를 import 하고 배열로 저장
    data() {
      return {  // html과 자바스크립트 코드에서 사용할 데이터 변수 선언
             boardList: []
        };
    },
    setup() {},   // 컴포지션 API
    created() {    // 컴포넌트가 생성되면 실행
       this.getList();
    },
    mounted() { // 템플릿에 정의된 html 코드가 렌더링된 후 실행

    },
    unmounted() {},
    methods: {  // 컴포넌트 내에서 사용할 메소드 정의
      async getList() {
		this.boardList = await this.$api("/board/list");
      }
    }
}
</script>
<style scoped>
table {
 font-family: arial, sans-serif;
 border-collapse: collapse;
 width: 100%;
}

td, th {
 border: 1px solid #dddddd;
 text-align: left;
 padding: 8px;
}
</style>
여기서 봐야할거
async getList() {
		this.boardList = await this.$api("/board/list");
   }
mixins.js 파일에 이런게 있다.
import axios from 'axios';

export default {
  methods: {
    async $api(url, method, data) {
      return (await axios({
        method: method,
        url,
        data
      }).catch(e => {
        console.log(e);
      })).data;
    }
  }
}
async 와 await 개념
async 비동기는 요청을 보낸 후에 응답과 관계없이 다음 동작을 실행할 수 있는 방식
비동기적 처리 방식 사용 하지 않는다면 콜백 함수의 과정이 끝나기 전에 다음 프로세스로 진행될 수 있다. 즉 비디오 파일을 불러오는 과정이 진행중인데 바로 출력을 실행하라하면 에러가 떨어질 것이다.
https://www.youtube.com/watch?v=aoQSOZfz3vQ
=============
다음은 프록시 서버로 스프링과 연결해야한다
vue.config.js
module.exports = {
  outputDir: "../src/main/resources/static", // npm run build로 빌드 시 파일이 생성되는 위치
  indexPath: "../static/index.html", // index.html 파일이 생성될 위치를 지정
  devServer: { // Back-End , 즉 Spring Boot의 내장 was의 주소를 작성하게 되면 된다.
    proxy: "http://localhost:8083"
  },
  chainWebpack: config => {
    const svgRule = config.module.rule("svg");
    svgRule.uses.clear();
    svgRule.use("vue-svg-loader").loader("vue-svg-loader");
    config.plugins.delete('prefetch');  // prefetch 전체끄기
  }
};

// prefetch : 미래에 사용될 수 있는 리소스(비동기 컴포넌트)를 캐시에 저장함으로써,
// 사용자가 접속했을 때 굉장히 빠르게 리소스를 내려줄 수 있다. (랜더링 시간 감소)
이렇게 해주면
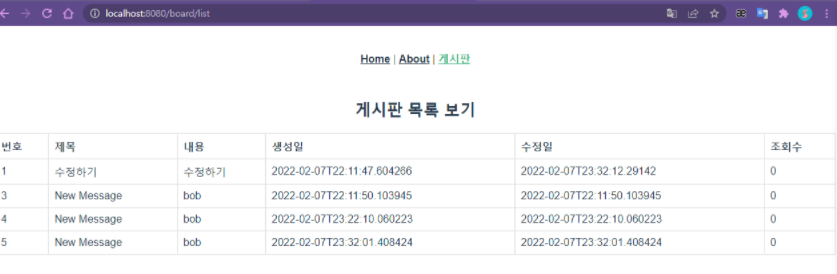
뜬다.
그리고
중간에 노드 서버를 업그레이드 한 전례가 있었다.
그로 인해 vue 에서도 문제가 생겼다...
그래서 다운그레이를 시도했다
<Node 다운그레이드 하기>
https://codepathfinder.com/entry/NVM-Nodejs-%EB%B2%84%EC%A0%84-%EB%B3%80%EA%B2%BD%ED%95%98%EA%B8%B0
https://github.com/coreybutler/nvm-windows/releases
NVM 을 적극 사용해서 했음
CMD는 관리자 모드로 꼭 실행하고 하기