** 해당 강의는 인프런 김영한 님의 스프링 부트 - 핵심 원리를 시청하고 작성한 게시글입니다.
지난 벨로그 포스팅 때에는 서블릿 컨테이너 초기화 과정에 대하여 알아보았다. 이제 애플리케이션 초기화 과정을 알아보자. 무슨 말인지 이해가 잘 안 되고, 과정이 복잡하더라도 난 꼭 알아야겠다. 이해해야겠다!
애플리케이션 초기화 과정을 알아보자.
1. 먼저 HttpServlet을 상속받는 HelloServlet 클래스를 만들어 준다.
- 그리고 service 메서드를 재정의 한다.
package hello.servlet;

import jakarta.servlet.ServletException;
import jakarta.servlet.http.HttpServlet;
import jakarta.servlet.http.HttpServletRequest;
import jakarta.servlet.http.HttpServletResponse;

import java.io.IOException;

public class HelloServlet extends HttpServlet {

    //서블릿 초기화

    @Override
    protected void service(HttpServletRequest req, HttpServletResponse resp) throws ServletException, IOException {
        System.out.println("helloServlet.service");
        resp.getWriter().println("hello servlet!");
    }
}
2. AppInit 인터페이스를 생성한다.
- void onStartup 메서드를 생성한다. onStartup 메서드 안에는 인자로 ServletContext가 들어가는데, 이 메서드가 하는 역할은 ServletContext 그 자체이다.
package hello.container;

import jakarta.servlet.ServletContext;

public interface AppInit {

    //appInit이 하는 역할?
    //애플리케이션 초기화를 진행하려면 먼저 인터페이스를 만들어야 한다.

    void onStartup(ServletContext servletContext);
    //ServletContext 그 자체. 필터 등록 등도 가능하다.
}
3. AppInit을 구현한 AppInitV1Servlet 클래스를 생성한다.
package hello.container;

import hello.servlet.HelloServlet;
import jakarta.servlet.ServletContext;
import jakarta.servlet.ServletRegistration;

public class AppInitV1Servlet implements AppInit{
    //인터페이스를 다시 구현해 준다.
    @Override
    public void onStartup(ServletContext servletContext) {
        System.out.println("AppInitV1Servlet.onStartup");

        //순수 서블릿 코드 등록
        ServletRegistration.Dynamic helloServlet =
                servletContext.addServlet("helloServlet", new HelloServlet());

        //이 부분에서 맵핑해 줄 수 있음
        helloServlet.addMapping("/hello-servlet");
    }
}
4. ServletContainerInitializer 를 구현한 MyContainerInitV2 클래스를 생성한다.
- 이 때 @HandlesTypes() 어노테이션에 AppInit.class 즉, 아까 우리가 생성한 인터페이스를 넣어준다. @HandlesTypes에 우리가 생성한 인터페이스를 넣어주면 그 구현체들이 재정의 된 onStartup() 함수의 Set<Class<?>> c 라는 인자에 딸려오게 된다.
package hello.container;

import jakarta.servlet.ServletContainerInitializer;
import jakarta.servlet.ServletContext;
import jakarta.servlet.ServletException;
import jakarta.servlet.annotation.HandlesTypes;

import java.util.Objects;
import java.util.Set;

@HandlesTypes(AppInit.class)
public class MyContainerInitV2 implements ServletContainerInitializer {

    @Override
    public void onStartup(Set<Class<?>> c, ServletContext ctx) throws ServletException {

        System.out.println("MyContainerInitV2.onStartup");
        System.out.println("MyContainerInitV2 c =" + c);
        System.out.println("MyContainerInitV2 ctx =" + ctx);
    }
}
5. 그럼 이제 서블릿을 등록 후 여기까지의 값을 출력해 보자!
-
해당 url을 호출했을 때,

-
콘솔에서 이런 값을 찍고 있다. c에는 값이 잘 넘어왔고, 즉, 초기화는 되었다는 말인데 AppInitV1Servlet을 찍고 있다. AppInitV1Servlet은 우리가 초반에 인터페이스 AppInit을 구현해 만든 클래스이다.

6. for문을 돌려, 저 안에 있는 것들을 끄집어내 보자! (AppInit을 구현한 클래스가 여러개일 수 있으므로)
package hello.container;

import jakarta.servlet.ServletContainerInitializer;
import jakarta.servlet.ServletContext;
import jakarta.servlet.ServletException;
import jakarta.servlet.annotation.HandlesTypes;

import java.util.Objects;
import java.util.Set;

@HandlesTypes(AppInit.class)
public class MyContainerInitV2 implements ServletContainerInitializer {

    @Override
    public void onStartup(Set<Class<?>> c, ServletContext ctx) throws ServletException {

        System.out.println("MyContainerInitV2.onStartup");
        System.out.println("MyContainerInitV2 c =" + c);
        System.out.println("MyContainerInitV2 ctx =" + ctx);

        //class hello.container.AppInitV1Servlet
        for (Class<?> appInitClass : c) {
            try {
                //new AppInitV1Servlet() 과 같은 코드
                AppInit appInit = (AppInit) appInitClass.getDeclaredConstructor().newInstance();
                appInit.onStartup(ctx);
            } catch (Exception e){
                throw new RuntimeException(e);
            }

        }
    }
}- 이제 다시 실행을 해 보자. 실행을 하면, 콘솔에 이렇게 뜬다. 어? 이거 어디서 봤던 문구인데? 바로 AppInitV1Servlet 클래스에 있었던 System.out.println("AppInitV1Servlet.onStartup"); 코드이다.

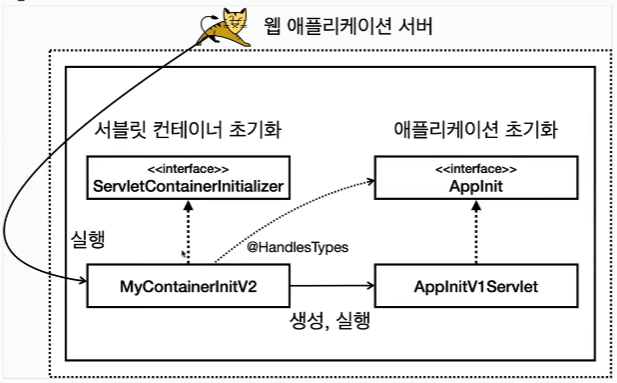
다시 애플리케이션 초기화 과정을 정리해 보자.
1. @HandlesTypes 어노테이션에 애플리케이션 초기화 인터페이스를 지정한다.
2. 서블릿 컨테이너 초기화 (ServletContainerInitializer)는 파라미터로 넘어오는 'Set<Class<?>> c'에 애플리케이션 초기화 인터페이스의 구현체들을 모두 찾아서 클래스 정보로 전달한다.
3. 'appInitClass.getDeclaredConstructor().newInstance()' 를 사용해 객체를 생성한다. 참고로 이 코드는 new AppInitV1Servlet()과 같다고 생각하면 된다.
4. 'appInit.onStartup(ctx)' 애플리케이션 초기화 코드를 직접 실행하면서 서블릿 컨테이너 정보가 담긴 ctx도 함께 전달한다.
그럼 또 하나의 의문점이 생긴다. 서블릿 컨테이너 초기화만 있어도 될 것 같은데, 왜 애플리케이션 초기화라는 개념까지 만들었을까?
- 편리함
- 서블릿 컨테이너를 초기화하려면 ServletContainerInitializer 인터페이스를 구현한 코드를 만들어야 한다. 여기에 추가로 'META-INF/services/jaka~~' 파일에 해당 코드를 직접 계속 지정해 주어야 한다. 하지만 애플리케이션 초기화는 특정 인터페이스를 구현해 주기만 하면 된다.
- 의존성
- 애플리케이션 초기화는 서블릿 컨테이너에 상관없이 원하는 모양으로 인터페이스를 만들 수 있다. 이를 통해 애플리케이션 초기화 코드가 서블릿 컨테이너에 대한 의존을 줄일 수 있다.
